Table of Contents
Advertisement
Quick Links
Installing the Extrusion Upgrade kit
The Extrusion Upgrade kit allows you to turn your
Ultimaker 2 or Ultimaker 2 Extended into an Ultimaker
2+ or Ultimaker 2 Extended+. This guide shows how
to install the upgrade kit step by step. In addition to
reading our detailed support text guide there are
an installation guide video and installation manual
available.
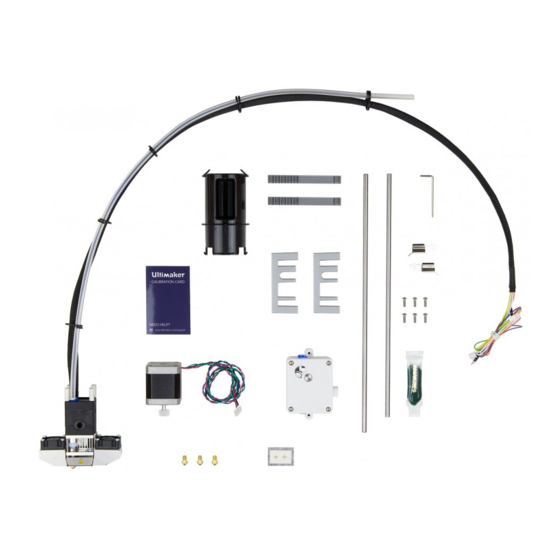
Your upgrade kit consists of several parts.
Check if all the parts are included before continuing.
Removing the cable cover
Remove the two screws (M3 x 8 mm) with
which the cable cover in the back left corner is
attached to the frame. One screw is attached to
the left side of the frame and the other one to
the back side.
Note: Ensure that the build plate is at the bottom
position.
•
Remove the cable cover.
•
Raise the build plate gently by holding it
with both hands as close as possible to the
back of the build plate.
•
Place the Ultimaker on its right side as seen
from the front.
A C A D E M Y
1. Pre-assembled print head
2. Nozzle kit
3. Short spool holder
4. Print head shafts (X and Y)
5. Hex wrench 2 mm
6. Pre-assembled feeder
7. Calibration card
8. Build plate clamps
9. Geared feeder mounting plate
10. M3 ring (2x)
11. M3 x 10 mm screw (6x)
12. "+" stickers
13. Print head alignment tool (2x)
14. Axles protect tools
15. Print head axis (dis)assemble tool (2x)
16. Grease
Advertisement
Table of Contents

Summary of Contents for Ultimaker Extrusion Upgrade Kit
- Page 1 Installing the Extrusion Upgrade kit A C A D E M Y The Extrusion Upgrade kit allows you to turn your Ultimaker 2 or Ultimaker 2 Extended into an Ultimaker 2+ or Ultimaker 2 Extended+. This guide shows how to install the upgrade kit step by step. In addition to...
-
Page 2: Disconnecting The Cables
Remove the wires from the green terminal HEATER 1 by pressing the top of the terminal with the flat screwdriver. Note: If you have an older model of the main board on your Ultimaker, you need to loosen the screws instead of pressing to remove the wires. • Disconnect the hot end fan from the middle of the board. - Page 3 • Place the feeder motor with the wires down on the inside of washers from the old feeder. your Ultimaker and place the geared feeder mounting plate • Place the feeder on the with the hole at the bottom over the four screw holes on the back with the small lever on outside.
- Page 4 Installing the Extrusion Upgrade kit A C A D E M Y Replacing the build plate clamps • Remove the glass plate. • Place the 2 mm hex wrench on the screw in the front left corner of the build plate. Hold the corresponding build plate screw at the bottom of the build plate with your hand.
-
Page 5: Removing The Print Head
Installing the Extrusion Upgrade kit A C A D E M Y Removing the print head • Slide a print head axis (dis)assemble tool on either side of the left sliding block until it clicks into the axle. • Pop up the print head shaft until it comes out of the sliding block at this side. - Page 6 Installing the Extrusion Upgrade kit A C A D E M Y Installing the new print head • Guide the two new print head axles through the new print head. The long axle is the X-axle and the short axle is the Y-axle.
- Page 7 Place the clamp clip around the tube coupling collet to secure the bowden tube. Guiding the cables • Place the Ultimaker on its right side. • Feed the braided sleeve through the hole at the back and the hole at the bottom.
-
Page 8: Connecting The Cables
Connect the wires of the heater cartridge to the green terminal HEATER 1. Press at the top of the terminal with the flat screwdriver and insert the wires. Gently pull at the heater wires to ensure they are stuck in place. Note: If you have an older model of the electronics on your Ultimaker, you need to tighten the screws instead of pressing to connect the wires. -
Page 9: Attaching The Cable Cover
(M3 x 12 mm) and locknuts you set aside when disassembling the electronics. Attaching the cable cover • Put the Ultimaker upright and move the build Note: Ensure that no cables are plate down. trapped when you place the cable cover. - Page 10 USB cable. • Connect the power supply and turn on the Ultimaker. • Start Cura and select the Ultimaker 2+ or Ultimaker 2 Extended+ in the “Machine” menu (depending on which Ultimaker you have). • Go to “Machine” > “Install default firmware” Cura will now automatically upload the correct firmware to your Ultimaker.
- Page 11 Installing the Extrusion Upgrade kit A C A D E M Y Aligning the axles Before you start, ensure that you have the print head align tools and 2mm hex wrench. • Loosen the 2 pulleys on the back X axle.
-
Page 12: Completing The Upgrade
Now the work is done, it’s time to seal your upgrade with the spool holder and two small + stickers. Attach the new (smaller) spool holder to the back of your Ultimaker and place the + stickers their place. Stick the biggest + sticker behind the name of your Ultimaker on the front panel and the smallest on the back plate cover. It is the subtle finishing...


