Table of Contents
Advertisement
Advertisement
Chapters
Table of Contents
Troubleshooting

Related Manuals for Yamaha CinemaStation AVX-S30


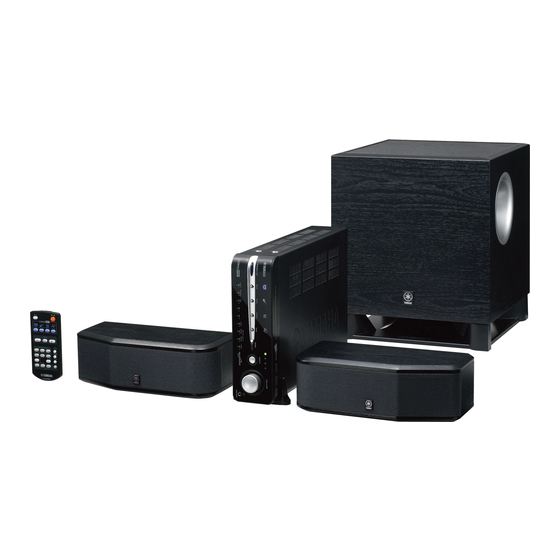
Summary of Contents for Yamaha CinemaStation AVX-S30
- Page 1 HOME THEATER SOUND SYSTEM AVX-S30 (AVC-S30 + NX-S30 + NX-SW30) OWNER’S MANUAL...
- Page 2 12 Only voltage specified on this unit must be used. Using this unit with a higher voltage than specified is dangerous and may cause fire, damage to this unit, and/or personal injury. YAMAHA will not be held responsible for any damage resulting from use of this unit with a voltage other than specified.
-
Page 3: Table Of Contents
■ About this manual • This manual provides information relevant only to the YAMAHA Home Theater Sound System “AVX-S30”. For information on the DVD player “DVD-S30”, refer to the “DVD-S30 OWNER’S MANUAL”. For information on other AV components, refer to the manual for that product. -
Page 4: Preparation
Speaker cable Subwoofer cable (for satellite, 5 m) x 2 (1-pin, 5 m) x 1 Non-skid pad (small) x 2 sets (8 pieces) Owner’s Manual (this manual) HOME THEATER SOUND SYSTEM AVX-S30 (AVC-S30 + NX-S30 + NX-SW30) OWNER’S MANUAL STANDBY/ON VOLUME... -
Page 5: Controls And Functions
Controls and Functions ■ Front panel STANDBY/ON MOVIE qDigital NIGHT STANDBY/ON Turn this unit on or set it to the standby mode. While the unit is in the standby mode, the unit consumes a small amount of power. CINEMA DSP buttons Select CINEMA DSP programs. -
Page 6: Remote Control
PREPARATION ■ Remote control You can control both the AV amplifier (AVC-S30) and DVD player (DVD-S30) with the supplied remote control. Read the following for the function of each button. (The buttons shaded in the illustration below are used to control the DVD- S30. - Page 7 SUBTITLE Selects the subtitle language of the DVD video while operating the DVD-S30. AUDIO Selects the audio language of the DVD video or the audio channel setting of the VCD and SVCD while operating the DVD-S30. SHIFT While holding down SHIFT, press a button below to enable the corresponding operation.
-
Page 8: Placing The Speakers
Main roles: Produces front channel (stereo) sounds. Also produces center channel sounds (dialogues or vocal sounds) and surround channel sounds effectively using the Yamaha Air Surround system. Subwoofer (NX-SW30) Place the subwoofer near a front speaker and turn it slightly toward the center of the room to reduce wall reflections. -
Page 9: Placing The Satellite Speakers
• When connecting the speakers, fix the speaker cables in place so that cables do not loosen. If your foot or hand accidentally gets caught on a loose speaker cable, the speaker may fall. • After attaching each speaker, check that the speaker is fixed securely. YAMAHA will bear no responsibility for any accidents caused by improper installations. -
Page 10: Connecting The Speakers
PREPARATION Connecting the Speakers Follow the procedure below to connect the satellite speakers (NX-S30) and subwoofer (NX-SW30) to the AV amplifier (AVC-S30). Notes • Do not connect the power cables of the AV amplifier and subwoofer until all cable connections are completed. •... -
Page 11: Connecting External Components
Connecting External Components The AV amplifier “AVC-S30” has four input jacks (optical digital x 2, coaxial digital x 1, analog x 1). Before connecting your external components to the AV amplifier, check the output jacks of the components and be sure to use correct connection cables. -
Page 12: Analog Connection
PREPARATION ■ Analog connection Note Do not connect the power cables of the AV amplifier and external components until all cable connections are completed. TV (monitor) VIDEO INPUT Video pin cable (commercially available) VCR etc. AUDIO OUTPUT VIDEO OUTPUT Video camera or TV game console etc. -
Page 13: Using The Remote Control
Using the Remote Control VOLUME INPUT STANDBY/ON MOVIE MUSIC SPORTS GAME MODE Pro Logic II qDigital NIGHT AUTO MOVIE MUSIC SILENT CINEMA 30˚ ■ Replacing the batteries If the batteries grow old, the effective operation distance of the remote control decreases considerably. If this happens, replace the batteries with two new ones as soon as possible. -
Page 14: Operation
OPERATION Basic Operation Once you have finished all cable connections (pages 8-10) and remote control preparation (page 11), follow the procedure below to start from basic playback operation. STANDBY/ON STANDBY/ON STANDBY/ON CENTER SURR REPEAT AUDIO TV INPUT DUAL MONO TV CH ON SCREEN ENTER MENU... -
Page 15: Enjoying Sounds With Specific Speaker Channels
Enjoying Sounds with Specific Speaker Channels The sound program features allow you to enjoy various kinds of audio such as movie or music. Please choose a program based on your listening preference, and not purely on the name of the program. This unit automatically memorizes the settings assigned to each input (1 to 4). -
Page 16: Enjoying Sounds In A Variety Of Ways
■ Listening with headphones (“SILENT CINEMA”) “SILENT CINEMA” allows you to enjoy multi-speaker simulation sounds with headphones. “SILENT CINEMA” is a registered trademark of YAMAHA CORPORATION. Connect the headphones to the CINEMA jack on the unit. Press the INPUT button for the desired input source, then start playback on the external component. -
Page 17: Adjusting The Speaker Balance
CONFIGURATIONS Adjusting the Speaker Balance The initial speaker settings are suitable for most conditions. However, depending on room conditions or listening position, you may need to adjust the speaker balance manually. In this case, adjust the speaker balance using test tones at first. -
Page 18: Adjusting The Speaker Balance During Playback
(page 15). Adjusting the Orientation of the Virtual Surround Speakers This unit employs the Yamaha Air Surround system that enables the surround sound field using six speaker units built in two satellite speakers. To create better acoustic field, please adjust the orientation of the virtual surround speakers suited for your listening environment. - Page 19 While the Status indicator is blinking, press L repeatedly to select an orientation of the virtual left surround speaker, or press R repeatedly to select an orientation of the virtual right surround speaker. Each time you press the button, the orientation changes as follows.
-
Page 20: Additional Information
ADDITIONAL INFORMATION ADDITIONAL INFORMATION Status Indicator You can check the volume level or audio input signal types on the Status indicator. ■ Volume level Volume level of each speaker channel (difference based on the system volume, unit: dB) Status indicator (green) Front (L, R) –6... -
Page 21: Troubleshooting
If there is any problem with this unit, check the following items. If you cannot solve your problem with the following remedies or if your problem is not listed below, turn off and unplug this unit, then consult the nearest authorized YAMAHA dealer or service center. Problem... -
Page 22: Recommended Virtual Surround Speaker Settings
ADDITIONAL INFORMATION Recommended Virtual Surround Speaker Settings If you cannot adjust the orientation of the virtual surround speakers well (page 16), use the following information for reference. Note To create better acoustic field, you may need to change the arrangement of the satellite speakers or furniture. Satellite speaker (L) Room size: Distance of satellite speakers... -
Page 23: Glossary
Glossary ■ Air Surround Front surround sound system which is developed by Yamaha enables the surround sound field using six speaker units built in two satellite speakers. In comparison with traditional front surround technologies, the Air Surround system enables a wide range of natural surround sound field. -
Page 24: Specifications
YAMAHA ELECTRONICS (UK) LTD. YAMAHA HOUSE, 200 RICKMANSWORTH ROAD WATFORD, HERTS WD18 7GQ, ENGLAND YAMAHA SCANDINAVIA A.B. J A WETTERGRENS GATA 1, BOX 30053, 400 43 VÄSTRA FRÖLUNDA, SWEDEN YAMAHA MUSIC AUSTRALIA PTY, LTD. 17-33 MARKET ST., SOUTH MELBOURNE, 3205 VIC., AUSTRALIA Subwoofer •... - Page 25 BAVL DVD PLAYER DVD-S30 OWNER’S MANUAL...
- Page 26 12 Only voltage specified on this unit must be used. Using this unit with a higher voltage than specified is dangerous and may cause fire, damage to this unit, and/or personal injury. YAMAHA will not be held responsible for any damage resulting from use of this unit with a voltage other than specified.
- Page 27 CAUTION Use of controls or adjustments or performance of procedures other than those specified herein may result in hazardous radiation exposure. CAUTION - VISIBLE AND / OR INVISIBLE LASER RADIATION WHEN OPEN. AVOID EXPOSURE TO BEAM. VARNING - SYNLIG OCH / ELLER OSYNLIG LASERSTRÅNING NÄR DENNA DEL ÄR Ö...
-
Page 28: Notes On Discs
About region codes The region code (an ID number assigned to each market region) is set for normal DVD players and DVD video discs. The DVD-S30 supports the discs with the region codes shown below. For details, read the information on the disc jacket. - Page 29 Specifications ...30 ■ About this manual • This manual provides information relevant only to the YAMAHA DVD player “DVD-S30”. • In this manual, operations that can be performed using either the front panel buttons or remote control are explained using the remote control.
-
Page 30: Preparation
PREPARATION Supplied Parts This product consists of the following parts. Before connecting an amplifier or a TV to this product, make sure you received all of the following parts. DVD player (DVD-S30) x 1 Accessories Remote control Battery x 2 (AA, R06, UM-3) STANDBY/ON STANDBY/ON... -
Page 31: Controls And Functions
Controls and Functions ■ Front panel STANDBY/ON 1 STANDBY/ON Turn this unit on or set it to the standby mode. When the unit is in the standby mode, the unit consumes a small amount of power. 2 Front panel display Displays playback information or settings. -
Page 32: Remote Control
Read the following for the function of each button. The buttons shaded in the illustration below are used to control the YAMAHA AV amplifier “AVC-S30” (included if you purchase DVX-S30). For details on AVC-S30 operations, refer to the “AVX-S30 OWNER’S MANUAL”. - Page 33 H AUDIO Selects the audio language of the DVD video or the audio channel setting of the video CD and super video CD. (page 15) I SHIFT While holding down SHIFT, press a button below to enable the corresponding operation. SW +/–: Adjusts the subwoofer channel volume on the AVC-S30.
-
Page 34: Connections
PREPARATION Connections This section explains how to connect the DVD-S30 to your TV or external AV amplifier (AVC-S30 etc.). For connections related to external AV amplifier, refer to the manual for it. Note Connect the power cord of the DVD player or external components after connection of all cables are complete. AV amplifier (AVC-S30 etc.) VOLUME... -
Page 35: Using The Remote Control
Using the Remote Control STANDBY/ON 30˚ ■ Replacing the batteries If the batteries grow old, the effective operation distance of the remote control decreases considerably. If this happens, replace the batteries with two new ones as soon as possible. Press Notes •... -
Page 36: Operation
OPERATION Getting Started Before starting playback operation, follow the procedure below to set up the DVD player settings. STANDBY/ON STANDBY/ON ANGLE CENTER SURR Number ZOOM buttons REPEAT AUDIO SUBTITLE SHIFT TV INPUT DUAL MONO TV CH ON SCREEN SETUP ENTER MENU RETURN VOLUME... -
Page 37: Step 3: Setting The Osd Language
Press to select “OK”, and then press ENTER. Repeat step 4 in the re-confirmation screen. CHANGING MULTI TO PAL: 1.ENSURE THAT YOUR TV SUPPORTS PAL STANDARD. 2.IF THERE IS A DISTORTED PICTURE DISPLAYED ON THE TV. WAIT 15 SECONDS FOR AUTO RECOVER. CANCEL CONFIRM AGAIN TO USE NEW TV TYPE SETTING. -
Page 38: Supported Disc Types
OPERATION Supported Disc Types You can enjoy movie or music discs with this unit. Since some disc operations are limited to specific disc types, the supported disc types are indicated using the icons shown below. Each icon means that the operation is limited to the corresponding disc type. -
Page 39: Basic Playback Operations
Basic Playback Operations Follow the procedures below to carry out basic disc playback operations. Notes • If the inhibit icon ( ) appears on the TV when a button is pressed, it means the function is not available on the current disc or the current status. -
Page 40: Repeating Playback (Repeat Play)
OPERATION Repeating Playback (Repeat Play) You can repeat single chapter (track), single title, or entire disc. Also, you can set two points to repeat the specified section of a title (track) with A-B Repeat. Notes • Repeat Play may not work depending on DVD disc types. •... -
Page 41: Specifying An Elapsed Time For Playback (Time Search)
Specifying an elapsed time for playback (Time Search) You can specify an elapsed time where you want playback to start. Notes • Using the Time Search feature for a VCD or SVCD automatically closes the Playback Control menu (page 16). •... -
Page 42: Time Search On Cd
OPERATION ■ Time Search on CD Press ON SCREEN repeatedly to select “DISC GO TO”, “TRACK GO TO” or “SELECT TRACK”. ↓ DISC GO TO: (Specify an elapsed time for the entire disc) ↓ TRACK GO TO: (Specify an elapsed time for the current track) ↓... -
Page 43: Selecting Audio And Subtitle Languages
To start playback with the Program Play feature, press “START”, and then press ENTER. • To cancel the Program Play feature, press select “Exit” in the program list, then press ENTER. • To remove a chapter or track from Program Play, press to select the program number, then press ENTER. -
Page 44: Selecting A Viewing Angle
OPERATION Selecting a Viewing Angle You can select the desired viewing angle during DVD playback. Note This selection is available only with multi-angle compatible discs. Also, viewing angles available for each disc may vary. For information on your disc, refer to the operating instructions in the disc’s menu or on its jacket. -
Page 45: Restricting Playback
Restricting Playback You can set playback restrictions for certain discs using Parental Control. Only users who know the password (page 18) can access the locked discs. ■ Setting the Parental Control level You can restrict playback according to a predetermined level (Parental Control level). -
Page 46: Changing The Password
OPERATION To disable a lock applied to a disc Select “UNLOCK” in step 3. • To return to the previous menu, press menu, press SETUP. • To unlock the Disc Lock temporarily for playback, use the Number buttons to enter the password in the password input area (displayed when the locked disc is loaded), and then press ENTER. -
Page 47: Viewing Jpeg (Kodak) Pictures In Thumbnailed Form
SHIFT, use the Number buttons to enter the three-digit remote control code (page 29). The default setting is “242 (Yamaha)”. Carry out one of the following operation to check if the remote control works on the TV. -
Page 48: Changing Playback Settings On The Tv (On-Screen Menu)
OPERATION Changing Playback Settings on the TV (On-Screen Menu) You can view and change the settings for the current DVD or VCD (SVCD) playback using the TV (On-Screen menu). Note Displaying the On-Screen menu for a VCD or SVCD automatically closes the Playback Control menu (page 16). Although the On-Screen menu is shown in English in the procedure below, you can display the menu in other language by setting the OSD language (page 9). -
Page 49: Configuring The Various Parameters (Setup Menu)
Configuring the Various Parameters (Setup Menu) In the Setup menu, you can configure the various parameters or operate useful functions. Follow the procedure below to operate the Setup menu. For details on each menu or available parameters, refer to “Setup menu items”... -
Page 50: Setup Menu Items
OPERATION ■ Setup menu items Page Menu Submenu GENERAL DISC LOCK SETUP PAGE DISPLAY DIM PROGRAM INPUT MENU OSD LANGUAGE SCREEN SAVER SLEEP AUDIO ANALOG OUTPUT SETUP PAGE DIGITAL DIGITAL AUDIO OUTPUT LPCM OUTPUT CD UPSAMPLING “CD UPSAMPLING” is available only when a music CD is loaded in this unit. See page 17 for details. - Page 51 DEFINITION” OUTPUT. IF THERE ARE QUESTIONS REGARDING YOUR VIDEO MONITOR COMPATIBILITY WITH THIS UNIT, PLEASE CONTACT OUR CUSTOMER SERVICE CENTER. This unit is compatible with the complete line of YAMAHA products, including the projectors DPX-1100, LPX-510 and the plasma monitor PDM-4210/4210E.
-
Page 52: Additional Information
If there is any problem with your system, check the following items. If you cannot solve your problem with the following remedies or if your problem is not listed below, turn off and unplug the unit, then consult the nearest authorized YAMAHA dealer or service center. ■ General... -
Page 53: Disc Playback
■ Disc playback Problem A disc cannot be inserted into this unit Some button operations do not work Playback does not start or stops immediately when pressing p An audio or subtitle language does not switch No subtitles appear A viewing angle does not switch DVD videos cannot be copied with the VCR... -
Page 54: Glossary
ADDITIONAL INFORMATION Glossary ■ Channel (ch) A channel is an audio type that has been divided based on range and other characteristics. Ex. 5.1 channel • Front speakers, Left (1ch), Right (1ch) • Center speaker (1 ch) • Surround speakers, Left (1ch), Right (1ch) •... -
Page 55: Copyright And Logo Marks
ADDITIONAL INFORMATION Copyright and Logo Marks This product incorporates copyright protection technology that is protected by method claims of certain U.S. patents and other intellectual property rights owned by Macrovision Corporation and other rights owners. Use of this copyright protection technology must be authorized by Macrovision Corporation, and is intended for home and other limited viewing uses only unless otherwise authorized by Macrovision Corporation. -
Page 56: Language Codes
ADDITIONAL INFORMATION Language Codes If your desired language for “AUDIO” “SUBTITLE” and “DISC MENU” is not listed in the Setup menu (page 9), select “OTHER”, then enter the 4-digit language code for your desired language. Abkhazian 6566 Afar 6565 Afrikaans 6570 Albanian 8381... -
Page 57: Remote Control Codes
297, 225 SYNPHONIC 217, 218, 219 TELEFUNKUN 269, 264, 265, 266 THOMSON 223, 266 TOSHIBA 292, 226, 267, 215 VIDECH 297, 242 WARDS 297, 239, 232, 216 YAMAHA 299, 292, 242, 285, 287, 253 ZENITH 216, 261, 271 ADDITIONAL INFORMATION... -
Page 58: Specifications
ADDITIONAL INFORMATION Specifications AUDIO SECTION • Audio Output Level (1 kHz, 0 dB)... 2 V • Signal to Noise Ratio ... 105 dB or more • Dynamic Range... 100 dB or more • Total Harmonic Distortion ...0.003% or less • Frequency Response DVD (fs 96 kHz) ... - Page 59 YAMAHA ELECTRONICS (UK) LTD. YAMAHA HOUSE, 200 RICKMANSWORTH ROAD WATFORD, HERTS WD18 7GQ, ENGLAND YAMAHA SCANDINAVIA A.B. J A WETTERGRENS GATA 1, BOX 30053, 400 43 VÄSTRA FRÖLUNDA, SWEDEN YAMAHA MUSIC AUSTRALIA PTY, LTD. 17-33 MARKET ST., SOUTH MELBOURNE, 3205 VIC., AUSTRALIA...