Yamaha USB-MIDI INTERFACE UX16 Owner's Manual
Usb-midi interface
Hide thumbs
Also See for USB-MIDI INTERFACE UX16:
- Manual del instrucción (33 pages) ,
- Mode d'emploi (30 pages) ,
- Owner's manual (26 pages)

Related Manuals for Yamaha USB-MIDI INTERFACE UX16


Summary of Contents for Yamaha USB-MIDI INTERFACE UX16
- Page 1 Owner's Manual This includes Limited Warranty for products distributed by YAMAHA CORPORATION OF AMERICA.
- Page 2 This product should be used only with the components supplied or; a cart, rack, or stand that is recommended by Yamaha. If a cart, etc., is used, please observe all safety markings and instructions that accompany the accessory product.
- Page 3 The instru- ment contains no user-serviceable parts. If it should appear to be malfunctioning, discontinue use immedi- ately and have it inspected by qualified Yamaha service personnel. CAUTION Always follow the basic precautions listed below to avoid the possibility of physical injury to you or others, or damage to the instrument or other property.
-
Page 4: Table Of Contents
Welcome to the UX16 Thank you for choosing the Yamaha UX16 USB-MIDI Interface Cable. The UX16 is a MIDI interface that features simultaneous playback of up to 16 chan- nels. Connect the UX16 to a computer that has a USB terminal and enjoy the advantages of digital music. -
Page 5: Ux16 Features
UX16 Features 16 channel simultaneous playback Supports your music production system with one MIDI OUT port (16 channels) and one MIDI IN port (16 channels). Easy Hot Swap Connection With a USB connection, you can connect and disconnect the USB cable while the power to the computer is on. -
Page 6: Package Contents
CD-ROM (Windows/Macintosh hybrid CD) About the included software The included CD-ROM contains the following software (driver). [Windows] USB-MIDI driver (YAMAHA USB-MIDI Driver) You need this driver to operate the UX16. See installing the driver. [Macintosh] This is a MIDI driver for Macintosh provided by Opcode Systems. -
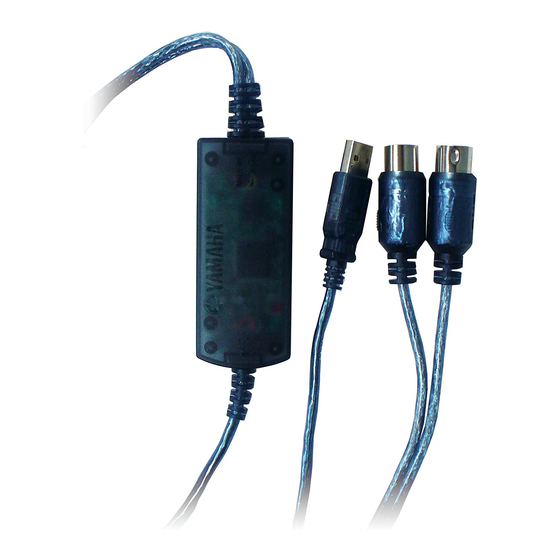
Page 7: Parts And Functions
Parts and Functions Power indicator This will light when the USB terminal is connected, supplying power to the UX16. MIDI IN/OUT indicators These indicators will light when MIDI messages pass through the corresponding cable. USB cable Connect this to the USB terminal of your computer or USB hub. -
Page 8: Connections
Connections This section explains how to use the UX16 to connect your MIDI devices (tone generator or keyboard, etc.) to your computer. Computer page 9 for information on installing the driver. 1. Connections to your computer Connect the USB cable to the USB terminal of your computer (or USB hub). It is not necessary to turn off the power of your computer before doing so. -
Page 9: Installing The Driver
Installing the Driver To operate the UX16, you need to install the driver on the computer correctly. The USB-MIDI driver is software that transmits MIDI signals back and forth between sequence software and the UX16 via a USB cable. If you are using a Macintosh computer, you also need to install the OMS driver (page 16) as well as the USB-MIDI driver. -
Page 10: Windows Users
Windows users: Installing the driver on a Windows98/Me system Before you continue, make a note of the drive name (D:, E:, Q:, etc.) for your CD-ROM NOTE drive. The drive name is displayed under the CD-ROM icon in “My Computer.” (The root directory of the CD-ROM drive will be (for example) D:\, E:\, or Q:\, etc.) 1. - Page 11 Specify the root folder of the CD-ROM drive (such as D:\) and continue the installation. 7. When the system detects the driver on the CD-ROM and is ready for installa- tion, it displays the following screen. Make sure that the “YAMAHA USB MIDI Driver” is listed, and click [Next]. The system starts the installation.
- Page 12 8. When the installation is complete, the following screen appears. Click [Finish]. Some computers may take about ten seconds to show this screen after the installation NOTE is complete. Windows 98 The driver has been installed. Windows Me...
- Page 13 Installing the driver on a Windows 2000 system 1. Start the computer and use the “Administrator” account to log into Windows 2000. 2. Select [My Computer | Control Panel | System | Hardware | Driver Signing | File Signature verification], and check the radio button on the left of “Ignore - Install all files, regardless of file signature”...
- Page 14 “0.” For Windows 98 users, select the driver while “Single instrument” is selected. NOTE If “YAMAHA USB OUT xx-1” is not displayed, the drive has not been installed NOTE correctly. Delete the driver 4. Click [OK].
- Page 15 Checking operation 1. Is the power indicator lit? If the driver is installed correctly, the power indicator will light. 2. Does the MIDI OUT indicator blink? Use your sequence software or the Windows Media Player to play back MIDI data. Alternatively, click [Send All Note On] in the MIDI Patch screen (page 21).
-
Page 16: Macintosh Users
Macintosh users: First install OMS before you install the USB-MIDI driver. Also, after installing the driver, you will need to set up OMS Installing OMS 1. Start the computer. 2. Insert the included CD-ROM into the CD-ROM drive. The system displays the CD-ROM icon on the desktop. - Page 17 You can locate the installed files in the following locations: System Folder | Control Panels | YAMAHA USB MIDI Patch System Folder | Extensions | USB YAMAHA MIDI Driver System Folder | OMS Folder | YAMAHA USB MIDI OMS Driver...
- Page 18 Setting up OMS 1. Start the computer. 2. Connect the USB cable to the USB terminal of the computer (or the USB hub). Make sure that the UX16 is powered on and the power indicator lights up. 3. Open the “OMS Applications” folder in the “Opcode” folder installed on the hard disk, and double-click the “OMS Setup”...
- Page 19 8. Make sure that “USB-MIDI 1” is displayed in the “OMS MIDI Device Setup” dia- log and put the check box on it. Click [OK]. 9. The system displays a dialog box that enables you to save the setup file. Enter the file name and click [Save].
- Page 20 Checking operation 1. Is the power indicator lit? If the USB cable is connected correctly, the power indicator will light. 2. Does the MIDI OUT indicator blink? Use your sequence software to play back MIDI data. Alternatively, click [Send All Note On] in the MIDI Patch screen light when MIDI messages pass through the cable.
-
Page 21: Changing The Driver Setting (Midi Patch Screen)
MIDI Patch screen on a Windows system. [Windows] 1. Double-click “Control Panel” in the “My Computer” folder. 2. Double-click “MIDI-USB Driver” to display the screen. [Macintosh] Select “Control Panels” from the Apple menu, then select “YAMAHA USB MIDI Patch” to display the screen. - Page 22 Changing the device number If you are using multiple UX16s, you can change the device number. Click “Device Name.” The System displays the drop-down list. Select the device for which you wish to change the setting. If you are using a Macintosh computer, the device number is assigned sequentially, NOTE such as “USB1,”...
- Page 23 THRU output of MIDI signals (MIDI IN MIDI OUT) You can route MIDI signals received at the input port of the UX16 directly to the output port of the UX16 (this is called THRU output). This routing is useful when you wish to route MIDI signals from a MIDI keyboard directly to a tone generator.
-
Page 24: System Requirements
Yamaha Corp. reserves the right to change or modify products or specifications at any time without prior notice. Since specifications, equipment or options may not be the same in every locale, please check with your Yamaha dealer. 36 (D) -
Page 25: Troubleshooting (Faq)
Troubleshooting (FAQ) The driver cannot be installed. Is the USB cable connected correctly? Check the USB cable connection. Disconnect the USB cable, then connect it again. [Windows] Is the USB function enabled on your computer? When you connect the UX16 to the computer for the first time, if the “Add New Hardware Wizard”... - Page 26 The UX16 does not operate correctly, or no sound is heard. Did you install the driver? Are the USB cable, MIDI cables, and audio cables connected correctly? (page Is the volume setting of the tone generator, playback device, and applica- tion program set to the appropriate level? Is the HOST SELECT switch on the tone generator set to “MIDI”? Have you selected an appropriate port in the sequence software?
- Page 27 1. When the UX16 is recognized correctly, double-click “System” in the Con- trol Panel to open the System window. 2. Double-click the “Device Manager” tab, select “YAMAHA USB MIDI Driver” and delete it. 3. Use MS-DOS prompt or Internet Explorer to delete the following three files.
- Page 28 *This applies only to products distributed by YAMAHA CORPORATION OF AMERICA Yamaha Corporation of America 6600 Orangethorpe Ave., Buena Park,...
-
Page 29: Limited Warranty
Yamaha. 3. This warranty is applicable only to units sold by retailers authorized by Yamaha to sell these products in the U.S.A., the Dis- trict of Columbia, and Puerto Rico. This warranty is not applicable in other possessions or territories of the U.S.A. or in any other country. - Page 30 For details of products, please contact your nearest Yamaha or the authorized distributor listed below. Pour plus de détails sur les produits, veuillez-vous adresser à Yamaha ou au distributeur le plus proche de vous figurant dans la liste suivante. NORTH AMERICA CANADA Yamaha Canada Music Ltd.
- Page 31 Yamaha Manual Library (English versions only) http://www2.yamaha.co.jp/manual/english/ Yamaha Corporation, Pro Audio & Digital Musical Instrument Division © 2001 Yamaha Corporation...