
Summary of Contents for Honda Loke-26 4T
- Page 1 Instruction manual: Loke-26 4T V.nr 11986 Balder-36 4T V.nr 11985 Blinken a.s - Østkilen 4 - 1621 Gressvik - Tlf.: 90 70 11 00 - Fax.: 69 36 09 20 - www.blinken.no...
- Page 2 EXPLODED VIEW Loke-26 4T _______________________________________...
- Page 3 EXPLODED VIEW Balder-36 4T _______________________________________...
-
Page 4: Table Of Contents
Page 10 SETTING THE OPERATING MODE (Loke-26 4T) Page 11 SETTING THE OPERATING MODE (Balder-36 4T) Page 11 REMOVING/INSERTING THE QUICK CHANGE CHUCK (Loke-26 4T) Page 11 CHANGING THE TOOL SDS-plus (Loke-26 4T) Page 11 CHANGING THE TOOL SDS-max (Balder-36 4T) -
Page 5: Introduction
N°1 Tool kit N°1 Operator’s manual N°1 Shoulder strap N°1 Quick change keyless chuck (only Loke-26 4T) APPROPRIATE USE Drill could be used to drill (for diameter see “Technical characteristics”) in concrete, bricks, rock, ice and snow. Excluding rotation drill could be used to chiseling, chasing or demolishing. Only use it in the outside, in open air or well-aerated rooms. - Page 6 Do not overreach. Keep proper footing and balance at all time. This enables best control of the drill in unexpected situations. The engine and the exhaust became very hot during operation. Keep the engine at least 1 metre (3 feet) away from building and other equipment during operation.
-
Page 7: Technical Characteristics
2. TECHNICAL CHARACTERISTICS ______________________________________________________________________________ Loke-26 4T Balder-36 4T Dimensions Cm 55,5x21,5x26,5h Cm 72,5x26,5x26h Dry weight 6,5 Kg 11 Kg Fuel Petrol 100% Petrol 100% Tank capacity Lt 0,55 Lt 0,63 Fuel consumption at maximum power 340 g/Kw*h 497 g/Kw*h 4-stroke engine (displacement) 25 cc –... -
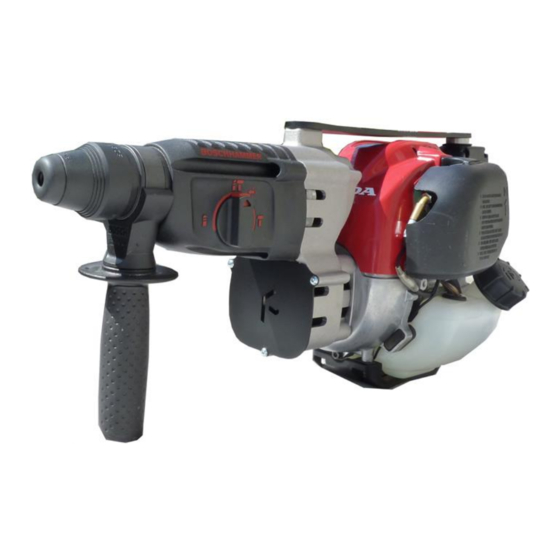
Page 8: Component And Control Location
3. COMPONENT AND CONTROL LOCATION ________________________________________________________________... - Page 9 Loke-26 4T Balder-36 4T OSITION FOR HAMMER DRILLING HEN THE DRILLING TOOL DOES OSITION FOR HAMMER DRILLING IN NOT IMMEDIATELY ROTATE UPON CONCRETE OR STONE SWITCHING ON ALLOW THE MACHINE TO RUN SLOWLY UNTIL THE DRILLING TOOL ROTATES OSITION FOR DRILLING WITHOUT...
-
Page 10: Before Operation Checks
4. BEFORE OPERATION CHECKS _____________________________________________________________________________ For your safety and to maximize the service life of your equipment, it is very important to take a few moments before you operate the drill to check its conditions. Be sure to take care of any problem you find, or have your servicing dealer correct it, before you operate the drill. -
Page 11: Setting The Operating Mode (Loke-26 4T)
NOTE: Change the operating mode only when the machine is switched off!! Otherwise the machine can be damaged. REMOVING/INSERTING THE QUICK CHANGE CHUCK 2-26 (LOKE-26 4T) (FIG. 3) Pull the lock ring for the quick change chuck 6 toward the rear, hold it in position and pull off the quick change chuck. -
Page 12: Dust/Chip Extraction
Insert the tool into the tool holder with a turning motion until it is automatically locked. The locking sleeve automatically snaps towards the front and the red ring is no longer visible. This indicates that the tool holder is locked. REMOVING SDS- DRILLING TOOL: Pull the locking sleeve 2 back until it engages. -
Page 13: Maintenance Schedule
MAINTENANCE SCHEDULE REGULAR SERVICE PERIOD: Perform Each First Every 3 Every 6 Every Every 2 at every indicated month or month months months year years operating hour interval, whichever or 10 or 25 or 50 or 100 or 300 comes first Engine oil Check level •... -
Page 14: Engine Oil
NOTICE: Fuel can damage paint and some types of plastic. Be careful not to spill fuel when filling your fuel tank. Damage caused by spilled fuel is not covered under the distributor’s warranty. Never use stale or contaminated petrol or oil/petrol mixture. Avoid getting dirt or water in the fuel tank. Check the fuel level by looking through the translucent fuel tank. -
Page 15: Oil Change
OIL CHANGE Drain the used oil when the engine is warm. Warm oil drains quickly and completely. Check that the fuel filler cap is tightened securely. Place a suitable container below the engine to catch the used oil. Remove the oil filler cap/dipstick and drain the oil into the container by tipping the engine toward the oil filler neck. -
Page 16: Spark Plug
CLEANING (FIG. 9) Clean the filter element in warm soapy water, rinse and allow to dry thoroughly. Or clean in nonflammable solvent and allow to dry. Dip the filter element in clean engine oil, then squeeze out all excess oil. The engine will smoke when started if too much oil is left in the element. -
Page 17: Cooling Fins
6.10 COOLING FINS (FIG. 12) NSPECTION Loosen the 5mm hex bolt, then remove the top cover. Disconnect the spark plug cap. Inspect the engine cooling fins and clean out debris if necessary. Reconnect the spark plug cap. Install the top cover and tighten the 5mm hex bolt securely. 6.11 FUEL FILTER AND FUEL TANK (FIG. -
Page 18: Taking Care Of Unexpected Problems
XHAUST FILTER CLEANING AND INSPECTION Pinch the exhaust filter and strike it lightly with a finger, to remove carbon deposits. Be careful not to strike it too hard. The exhaust filter must be free of breaks and holes. If it is damaged or fouled excessively, have it serviced by your service center PARK ARRESTER CLEANING AND INSPECTION Use a brush to remove carbon... -
Page 19: Main Parts Loke-26 4T
7. MAIN PARTS Loke-26 4T ______________________________________________________________________________ 8. MAIN PARTS Balder-36 4T _________________________________________________________________________________ 9. WARRANTY _______________________________________________________________________________________________________ This drill is covered by a 12-months warranty from the date of purchase (always keep the receipt or the invoice). Damaged materials and manufacturing defects are covered by warranty; in this case, no expenses will be demanded for repair or replacement at manufacturer’s premises (the purchaser should bear transport... - Page 20 Blinken a.s - Østkilen 4 - 1621 Gressvik - Tlf.: 90 70 11 00 - Fax.: 69 36 09 20 - www.blinken.no...