Advertisement
Quick Links
Advertisement

Related Manuals for HIKVISION DS-2TS03-25UF/W

Summary of Contents for HIKVISION DS-2TS03-25UF/W
- Page 1 Thermal Handheld Monocular User Manual COPYRIGHT © 2019 Hikvision. ALL RIGHTS RESERVED...
- Page 2 Any and all information, including, among others, wordings, pictures, graphs are the properties of Hangzhou Hikvision Digital Technology Co., Ltd. or its subsidiaries (hereinafter referred to be “Hikvision”). This user manual (hereinafter referred to be “the Manual”) cannot be reproduced, changed, translated, or distributed, partially or wholly, by any means, without the prior written permission of Hikvision.
- Page 3 encouraged to try to correct the interference by one or more of the following measures: —Reorient or relocate the receiving antenna. —Increase the separation between the equipment and receiver. —Connect the equipment into an outlet on a circuit different from that to which the receiver is connected.
- Page 4 des autres utilisateurs, il faut choisir le type d'antenne et son gain de sorte que la puissance isotrope rayonnée équivalente (p.i.r.e.) ne dépasse pas l'intensité nécessaire à l'établissement d'une communication satisfaisante. This equipment should be installed and operated with a minimum distance 20cm between the radiator and your body.
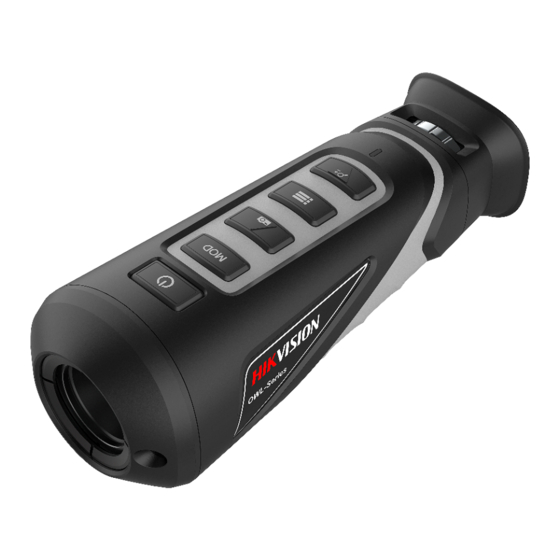
- Page 5 1 Introduction Box Content USB Cable Manual (×1) Non-dust (×1) Cloth (×1) Protective Handheld Thermal Neck Bag (×1) Monocular (×1) Belt(×1) Overview The handheld thermal monocular is a handheld thermal camera with functions of observation, highest temperature spot mark, distance measurement, hot spot, and so on. The high-sensitivity built-in IR detector provides you with clear view even in total darkness.
- Page 6 Network: The device can capture snapshots, record videos, and set parameters via APP after being connected to your phone. DPC (Defective Pixel Correction): The device can correct the defective pixels on the screen which are not performing as expected. Palettes: Device supports palettes mode switch.
- Page 7 Buttons Power Press: LED Light On/Off Hold: Power On/Off MODE Press: Switch Palette Hold: Flat Field Correction Capture Press: Capture Snapshot Hold: Start/Stop Record Video Menu Press: Sleep Mode Hold: Menu Operation Zoom ± Press: Digital Zoom Hold: Laser Light On/Off Warning: The laser radiation emitted from the device can cause eye injuries, burning of skin or inflammable substances.
- Page 8 Lens Cover Cover the lens when you are not using the monocular. Sight Adjust Slide the sight adjust knob to adjust the view according to Knob your degree of myopia. USB Interface Charge the battery and export videos/snapshots with the USB cable.
- Page 9 Power On and Off Power On Hold the POWER button for two seconds to turn on the device. Refer to the figure below for the main view of the monocular. Power Off When the monocular is turned on, hold the POWER button for two seconds to power off the device.
- Page 10 Steps: Hold the button to enter the menu and select the icon Press and the icon turns to the hot spot function is disabled. Connect the thermal monocular to your PC with USB cable, you can see a detected removable disk. Notes: ...
- Page 11 Press the button to move the cursor up, and press the button to move the cursor down. Press the button to confirm. Press to display or hide the OSD information. Press to enable/disable hot spot mark (marking the spot of highest temperature).
- Page 12 Black Hot: The hot part is black-colored in view. Fusion: The hot part is yellow-colore d and cold part is purple-col ored in view. Red Hot: The hot part is red-colored in view. Brightness Adjusting In white hot mode, you can adjust the brightness as >...
- Page 13 Set the bottom of the target. Move the monocular slightly to place the bottom mark below the target bottom. Press to confirm. The distance between you and the target will display on the upper left corner of the live view interface. 1.8m Note: Enter the distance measurement interface, press...
- Page 14 After recording the video, hold the button for three seconds again, and the monocular stops recording. Snapshot Capturing In the view mode, press the button, the live view freezes for one second, and the snapshot is captured. Digital Zoom Press the button in the view mode, the live view will switch between 1×...
- Page 15 expected. Before you start: Switch the palettes mode to white hot mode. Steps: Hold the button to show the menu of monocular. Press the key. Press the to select the offset. The offset refers to the moving length of cursor. Press to select the moving direction.
- Page 16 Open the Hik-connect and click Device. Click on the top right of the interface, select Online Device. Click the desired online device. If necessary, please active the device first. Active the Device: Click Activate. Edit the password, and click Confirm. You can view the device information and network information on the Details page.
- Page 17 6 FAQ The charge indicator flashes improperly. Examine whether the device is charged with standard power adapter and the charging temperature is 0 °C to 45 °C (32 °F to 113 °F). Device power indicator is off. Examine whether the device is off-battery.