Table of Contents
Advertisement
Quick Start Guide
The company names and product names appearing in this manual are
trademarks or registered trademarks of their respective holders.
For exemptions, refer to "Notes on Usage" available on the au homepage.
February 2020, 1st Edition
Sold by: KDDI CORPORATION,
OKINAWA CELLULAR TELEPHONE COMPANY
Manufactured by: SHARP CORPORATION
Advertisement
Table of Contents

Related Manuals for Sharp Au Speed Wi-Fi NEXT W07

Summary of Contents for Sharp Au Speed Wi-Fi NEXT W07
- Page 1 Quick Start Guide The company names and product names appearing in this manual are trademarks or registered trademarks of their respective holders. For exemptions, refer to “Notes on Usage” available on the au homepage. February 2020, 1st Edition Sold by: KDDI CORPORATION, OKINAWA CELLULAR TELEPHONE COMPANY Manufactured by: SHARP CORPORATION...
-
Page 2: Packaged Items
Preface Thank you for buying the “Speed Wi-Fi NEXT W07” (simply called “the product” from here on). Before using the product, read the “Quick Start Guide” (this manual), and “Notes on Usage”, carefully for proper use. Packaged Items Before using the product, make sure that you have all the following packaged items with the product. -
Page 3: About Descriptions
About Descriptions • Symbols representing keys in this manual are as below. Power key • The following operations are abbreviated in this manual. Description Meaning On the home screen → From the home screen, tap “ Settings”. Then, [Settings] → [Display]. tap “Display”. -
Page 4: What You Can Do With This Product
What You Can Do with This Product ® The product can be connected to multiple wireless LAN (Wi-Fi )-supported ® devices such as PCs, smartphones, tablets, etc. via wireless LAN (Wi-Fi ) and connect a PC etc. using a USB Type-C cable (commercially available). Also, data communication using Internet access using WiMAX 2+, LTE or UMTS systems is available on devices connected to the product. - Page 5 Connecting with USB Cable You can connect this product to a PC with a USB Type-C cable (commercially available) for data communication. Additionally, you can also use the USB ® connection at the same time as Wi-Fi connections. Wi-Fi Wireless base ®...
- Page 6 Connecting with the Specified Cradle (Sold Separately) by Using a LAN Cable (Commercially Available) You can perform data communication by connecting the cradle (sold separately) to a PC or other device using a LAN cable (commercially available). You can also use the wired LAN connection at the same time as ®...
- Page 7 ◎ Depending on radio wave reception, overloading of access points, or the volume of the content, normal communications may not be possible. Furthermore, depending on the connected devices, normal communications may not be possible. ◎ Connection to the network automatically determines and selects the most suitable network at that time.
-
Page 8: Setting Communication Mode
◎ Various discount services as well as data communication charges/ discount services available within Japan cannot be used overseas. ◎ Consumption tax is not added to usage fees for international services. Setting Communication Mode You can use the product to perform data communication with wireless base station via WiMAX 2+, LTE or UMTS systems. - Page 9 Useful Functionality of This Product Support for Mobile Charging You can charge your smartphone, tablet or other device by connecting it to this product using a USB Type-C cable (commercially available). For details, refer to “Mobile Charging” (zP. 24). QR Codes and WPS Connection You can easily connect your smartphone or other device to the product over ®...
-
Page 10: About The Manuals
About the Manuals ■ “Quick Start Guide” (this manual) The “Quick Start Guide” (this manual) available on the au homepage describe basic operations of major functions. ttps://www.au.com/english/support/manual/) ■ “Full Instruction Manual” (Japanese) You can check “取扱説明書 詳細版”(Full Instruction Manual) (Japanese) that describes detailed of various functions on the au homepage. -
Page 11: Part Names And Functions
Part Names and Functions Front Bottom A RESET button The product settings can be restored to the factory default settings by pressing this button with the SIM eject pin (sample) when the power to the product is on. B au IC Card tray C f Power key Turn the screen on/off. - Page 12 F Display (Touch panel) G External connection jack Use when connecting with the TypeC Common AC Adapter 01/02 (sold separately), the specified cradle (sold separately), a USB Type-C cable (commercially available), and USB cable (commercially available) for connection with peripheral devices. ◎...
- Page 13 Pulling out the IMEI plate A Turn the display side up, pull out the au IC Card tray, and remove the au IC Card. (For details on pulling out the au IC Card tray, refer to the step of “Inserting the au IC Card” (zP. 15).) B Turn the display side down, hook the tab on the rear of the au IC Card tray (side without text), and pull out the IMEI plate.
- Page 14 Main Unit Keys and Buttons Use keys and buttons on the main unit to carry out the following operations. ■ Power key Power on f (hold down for at least 2 seconds). f (hold down for at least 2 seconds) → [Power Power off off].
- Page 15 au IC Card (SIM Card) Your phone number etc. is recorded in the au IC Card. The product is compatible with au Nano IC Card 04 LE. au Nano IC Card 04 LE IC (metal) part Front Back ◎ Note the following points, otherwise handling the au IC Card may cause malfunction or damage.
- Page 16 Inserting/Removing the au IC Card Before inserting/removing the au IC Card, ensure you turn off the product. Insert/remove the card with the display side of the product turned up. Inserting the au IC Card Insert the tip of the SIM eject pin (sample) into the au IC Card tray hole.
- Page 17 Put the au IC Card into the au IC Card tray with the IC (metal) side facing down. Check the direction of the au IC Card, and place it securely in the au IC Card tray. Take care so that the au IC Card does not come out of the IC Card tray. Inserting the tray with the card not properly seated within may result in damage.
- Page 18 ◎ Do not misplace or damage the au IC Card tray once it is removed. ◎ When removing the au IC Card tray from the main unit, pull out the card tray slowly and horizontally with the display side facing up. •...
- Page 19 Charging Charging The internal battery is not fully charged at the time of purchase. Charge the battery before using the product. • If the performance of a battery does not recover even after charging (e.g. the usable time after each charge has become extremely short), the internal battery may be at the end of its service life.
- Page 20 Charging with the Specified AC Adapter This explains connecting the TypeC Common AC Adapter 02 (sold separately) and charging the product. For details on the specified AC adapter (sold separately), refer to the “取扱説明書 詳細版” (Full Instruction Manual) (Japanese). Insert the TypeC Common AC Adapter 02 (sold separately) power plug into an 100V AC outlet.
- Page 21 Remove the power plug of the TypeC Common AC Adapter 02 from the outlet. ◎ Charging while the product is turned on will still charge the product, however charging will take longer. Charging with the Specified Cradle (Sold Separately) When charging using the cradle (sold separately), ensure you consult the instruction manual included with the cradle (sold separately).
- Page 22 TypeC Common AC Adapter 02 (sold separately) Power lamp USB Type-C connection jack for power supply 100V AC outlet Cradle (sold separately) USB Type-C plug With the external connection jack on the product facing down, connect the product straight onto the USB Type-C plug for charging on the cradle (sold separately).
- Page 23 When charging is complete, remove the power plug of the TypeC Common AC Adapter 02 (sold separately) from the outlet. Remove the product straight from the USB Type-C plug for charging on the cradle (sold separately). Remove the USB Type-C plug of the TypeC Common AC Adapter 02 (sold separately) from the power supply USB Type-C connection jack on the cradle (sold separately).
- Page 24 Charging with a PC This explains how to charge the product by connecting this to a USB port on a PC that is capable of charging. Once the PC is fully started, connect the USB plug of the USB Type-C cable (commercially available) to the USB port on the PC.
- Page 25 Mobile Charging You can charge your smartphone, tablet or other device by connecting it to this product using a USB Type-C cable (commercially available). On the home screen → [Mobile Charge]. Scroll up. [50%]/[30%]. Charging will stop when the remaining battery capacity reaches the selected percentage.
-
Page 26: Turning The Power On/Off
Turning the Power On/Off Turning the Power On f (hold down for at least 2 seconds) when the power is turned off. Turning the Power Off f (hold down for at least 2 seconds). [Power off]. Rebooting the Product The product will turn off, and then restart. f (hold down for at least 2 seconds). -
Page 27: Configuring Initial Settings
Locking/Unlocking the Screen The product will turn off if you either press f, or do not operate the product for a set period of time. When the screen is turned on, the lock screen is displayed. ■ Unlocking the screen f while the screen is off. -
Page 28: Resetting To Factory Defaults
Resetting to Factory Defaults You can restore the product to its factory default settings. ■ Resetting the Product to Factory Defaults With the product powered on, insert the tip of the SIM eject pin (sample) into the RESET button hole. Hold down the RESET button for at least 2 seconds. -
Page 29: Using The Touch Panel
Using the Touch Panel The product uses a touch panel, operated with your finger. • In the following cases, the touch panel may not work even if you touch it. These may also cause a malfunction. ・ Operation with a gloved finger ・... -
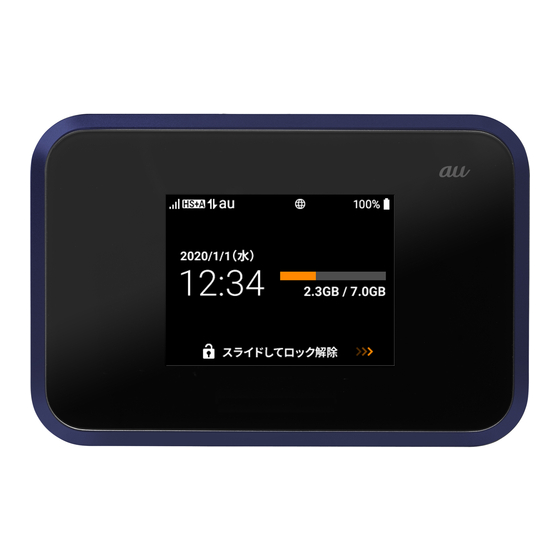
Page 30: Screen Display
Screen Display The following information is shown on the home screen. A Status icon display area B Data Usage Displays details of the amount of data used. Set the data usage display to show on the lock screen and home screen. For details on data usage to show on the lock screen and home screen, refer to the “取扱説明書... - Page 31 ◎ Data usage amounts are counted by the product main unit, and are to be used as a guide. Actual data usage may differ. Icons The status icon display area displays status icons to show product status, including signal status and remaining battery capacity. ■...
- Page 32 Message Display In this product, communication status and information regarding failures are notified using messages. Label Description The passcode doesn't match. In “Screen Lock”, the passwords entered in “Set a new passcode” and “Confirm passcode” do not match. Enter the correct passcode.
- Page 33 Label Description 5GHz cannot be used for 30 Displayed after turning the product on minutes because the power when radar is detected when using the was turned off while the radar DFS function. was detected. When using 5GHz, set again after 30 minutes.
-
Page 34: Basic Operation
Basic Operation ■ To Return to the Previous Screen at the top left of the screen. ■ To Return to the Home Screen at the top right of the screen. - Page 35 ■ To Select Items Tap the items to select. are displayed, tap to select.
- Page 36 are displayed, tap to turn this “OFF”, and tap to turn this “ON”. ■ Enter Numbers The number keyboard is displayed depending on the entry field. A Entry field Numbers can be entered at the position of the cursor. B Keyboard Keyboard for entering numbers.
- Page 37 ® Connecting via Wireless LAN (Wi-Fi ® Using Wireless LAN (Wi-Fi ® This product is compliant with IEEE802.11a/b/g/n/ac wireless LAN (Wi-Fi ® ® and supports wireless LAN (Wi-Fi ) connection with wireless LAN (Wi-Fi devices (PCs, smartphones, tablets, etc.) for data communications. Also, the product supports WPS (Wi-Fi Protected Setup), and if your wireless ®...
- Page 38 Using 5 GHz This product is legally required by the Radio Law to include DFS functionality ® in order to prevent radio interference in the wireless LAN (Wi-Fi ) 5-GHz band. ® The wireless LAN (Wi-Fi ) 5-GHz frequency band used by the product is also used by weather radars and other radio equipment, therefore depending where it is used, the product may interfere with these.
- Page 39 ■ Use on this product On the home screen → [Wi-Fi Guide] → [WPS]. [Start WPS].
- Page 40 ■ Use on wireless devices supporting wireless LAN (Wi-Fi ® Push the WPS button. • Operating methods will differ depending on the device supporting ® wireless LAN (Wi-Fi ). For details, refer to the instruction manual for your ® device supporting wireless LAN (Wi-Fi •...
- Page 41 [Manual Connection] → select SSID to connect. • The SSID, password, and security (encryption mode) of the product will be displayed. • If using “SSID B”, turn “Enabled” to “ON”. ■ Use on wireless devices supporting wireless LAN (Wi-Fi ® Open the connection settings screen and search for the access point.
- Page 42 Enter the password and save the settings. • Depending on the device supporting wireless LAN (Wi-Fi ® ), a security (encryption mode) selection screen may be displayed. Select the same encryption mode that was set for “Security (Encryption Mode)” on the product.
- Page 43 Connecting by Using QR Code ® You can automatically connect devices supporting wireless LAN (Wi-Fi ) to this product by reading the QR code displayed on this product with the camera on the connecting device. Supported operating systems are Android™ 10 or later, and iOS 11 or later. This example describes the procedure for Android 10.
- Page 44 ◎ As for the model of Android 9 Pie and earlier, the QR code reader installed on your Android™ smartphone may not be able to automatically ® perform Wi-Fi settings. Install the QR code reader from the link below. ttp://k-tai.sharp.co.jp/support/a/w07/peripherals/qrapl.html) (Japanese)
-
Page 45: Setting Tool
Setting Tool You can configure the various functions of the product using a web browser from a PC or mobile device connected to the product. ® This example describes the procedure for connecting a PC via Wi-Fi . The screens may differ depending on your operating system and web browser. •... -
Page 46: About Device
◎ You will be logged out automatically if no operations are performed for approximately 5 minutes. Be aware that any items that were entered will be deleted. About Device You can check information about the product, such as the phone number of the au IC Card inserted in the product and the IMEI information (international mobile equipment identity number). -
Page 47: Updating Software
Updating Software This product supports updates to its software. To start update, use one of the following methods. ■ Updating the Software Automatically The product will update its software automatically when it receives update information. On the home screen → [Settings] → [Software Update] → [Auto Update], set to “ON”... - Page 48 • When software update is required, you will be notified of this on the au website and through other means. For details, contact an au shop or Customer Center (call toll-free 157). Additionally, in order for optimal usage of the Speed Wi-Fi NEXT W07, au may send notifications to customers owning these informing them that updates are necessary.
-
Page 49: Troubleshooting
Troubleshooting If this happens Check this • Is the Wi-Fi ® ® Wi-Fi doesn't connect signal strong enough? • Has Wi-Fi ® been set up? • Check the product and the wireless LAN ® (Wi-Fi )-supported device to determine that their Wi-Fi functionality have been turned “ON”. - Page 50 If this happens Check this • Is the product often used in areas when “OUT” Battery life is short is displayed? • Has the internal battery reached the end of its service life? Check the battery status. • Is the battery fully charged? •...
-
Page 51: After Sales Service
After-Sales Service ■ To Request Repairs To request repairs, contact the Repair and Delivery Support Center. During the Repairs are covered in accordance with the stipulations warranty period for free repair detailed in the Warranty. Outside the If the product can be repaired, charged repairs will be warranty period carried out upon request. - Page 52 ■ Replacement Parts We guarantee availability of replacement parts for our Speed Wi-Fi NEXT W07 main unit and its peripheral devices for a period of 4 years after the end of production. Replacement parts are those required to maintain the functionality of the product.
- Page 53 ■ au IC Card The au IC Card is lent to you by au. In case of loss or damage, the card will be replaced at your expense. When malfunction is suspected, or in case of theft or loss, contact an au shop or Toyota store. Main specifications and peripheral devices For details of main specifications and the peripheral devices, please refer to...
-
Page 54: Regulatory Information
Regulatory information Hereby, SHARP CORPORATION declares that the radio equipment type SHD31 is in compliance with Directive 2014/53/EU. The full text of the EU declaration of conformity is available at the following internet address: (Japanese) ttps://jp.sharp/k-tai/) Manufacturer's Address: SHARP CORPORATION, 1 Takumi-cho, Sakai-ku, Sakai-shi, Osaka 590-8522, Japan •... - Page 55 • Maximum transmit power WCDMA FDD Ⅰ +24 dBm (Power Class3) WCDMA FDD Ⅷ +24 dBm (Power Class3) LTE Band 1 +23 dBm (Power Class3) LTE Band 3 +23 dBm (Power Class3) LTE Band 8 +23 dBm (Power Class3) LTE Band 28 +23 dBm (Power Class3) WLAN 2.4 GHz +18.5 dBm...
-
Page 56: Fcc Notice
For body-worn operation, this mobile device has been tested and meets the RF exposure guidelines when used with an accessory containing no metal and positioning the device a minimum of 5 mm from the body. Use of other accessories may not ensure compliance with RF exposure guidelines. As SAR is measured utilizing the devices highest transmitting power the actual SAR of this device while operating is typically below that indicated above. - Page 57 However, there is no guarantee that interference will not occur in a particular installation; if this equipment does cause harmful interference to radio or television reception, which can be determined by turning the equipment off and on, the user is encouraged to try to correct the interference by one or more of the following measures: 1.
- Page 58 ■ FCC RF Exposure Information Your device is a radio transmitter and receiver. It is designed and manufactured not to exceed the emission limits for exposure to radio frequency (RF) energy set by the Federal Communications Commission of the U.S. Government. The guidelines are based on standards that were developed by independent scientific organizations through periodic and thorough evaluation of scientific studies.
- Page 59 For inquiries, call: Customer Center For general information (7 days a week / toll free) Business hours: 9:00 to 20:00 From au mobile phones: From non-au mobile phones / general subscriber phones: 0077-7-111 area code not required In case above numbers are not available, call toll-free: 0120‑977‑033 0120‑977‑699 (except Okinawa) (Okinawa) In case of theft, loss, or malfunction (7 days a week / toll free) Business hours: 24 hours From au mobile phones: From non-au mobile phones / general subscriber phones: 0077-7-113 area code not required In case above numbers are not available, call toll-free: 0120‑925‑314 Corporate Customer Center (For corporate contractors) For general information (toll free) Business hours: 9:00 to 19:00 (Weekday), 9:00 to 18:00 (Saturday, Sunday, Holiday) *Except during the year change period From au mobile phones: From non-au mobile phones / general subscriber phones: 0077-7041 0120-925-041 Repair and Delivery Support Center For theft, loss, or malfunction (toll free) Business hours: 9:00 to 20:00 (7 days a week) From au mobile phones / non-au mobile phones / general subscriber phones: 0120-925-919 Cell phone and PHS operators collect and recycle unused ...