Table of Contents
Advertisement
Advertisement
Table of Contents

Related Manuals for Cobra SC200


Summary of Contents for Cobra SC200
-
Page 2: Table Of Contents
CONTENTS CONTENTS ..............................2 INTRODUCTION ..............................3 SC 200 DASH CAM FEATURES .........................3 PRODUCT SERVICE AND SUPPORT .........................4 WHAT’S IN THE BOX ............................4 HARDWARE INTERFACE ..........................5 INSTALLATION ..............................6 BASIC OPERATION ............................8 INITIAL SETUP ..............................9 DRIVE SMARTER® APP CONNECTION ......................... 9 iRADAR® APP CONNECTION ............................. 10 VIDEO SCREEN .............................11 VIDEO SETTINGS ............................13 VIDEO AND PHOTO PLAYBACK MODE ......................13... -
Page 3: Introduction
INTRODUCTION Congratulations! You made the smart choice by purchasing an SC Series Dash Cam from Cobra. SC Series cameras provide peace of mind by continuously recording the road in beautiful HD video. With cutting edge features, phenomenal video quality, and an industry-leading focus on user experience, SC Dash Cams are the best solution to record your ride. -
Page 4: Product Service And Support
For any questions about operating or installing this new Cobra product, PLEASE CONTACT COBRA FIRST…do not return this product to the retail store. The contact information for Cobra will vary depending on the country in which you purchased and utilize the product. For the latest contact information, please go to www.cobra.com/support. -
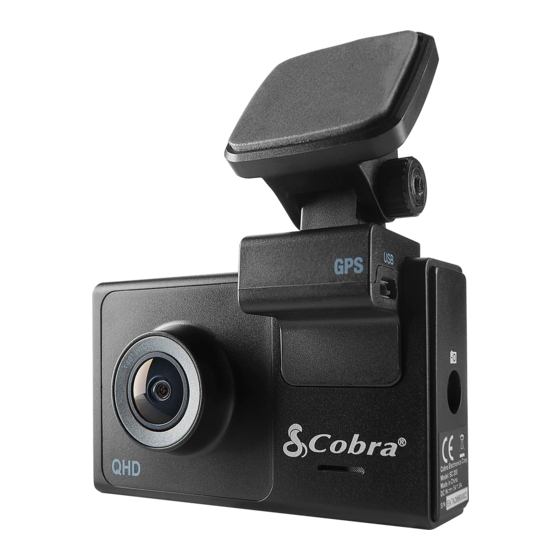
Page 5: Hardware Interface
HARDWARE INTERFACE P a g e... -
Page 6: Installation
INSTALLATION MOUNT To install the Adhesive Windshield Mount, slide the dash cam onto the mount. Remove protective film from camera lens and display. Find the spot on your windshield where you would like to mount the camera and confirm the placement. Reminder, this is an adhesive mount, so it is important to mount correctly the first time. - Page 7 Note: A Hardwire Kit is available at www.cobra.com for a more permanent installation that allows for discrete routing of the power cable and recording while your vehicle is off. DRIVE! Your dashcam is designed for easy operation. After powering the camera will instantly begin loop recording.
-
Page 8: Basic Operation
BASIC OPERATION POWERING ON THE DEVICE The device will power on automatically when plugged in and can also be powered by PRESSING AND HOLDING the On/Off button until the display activates (when connected to power). LOOP RECORDINGS: Once the SD card is full, the camera will continuously overwrite the oldest footage recorded with recent recordings. -
Page 9: Initial Setup
Live-View: Viewing a live-stream into the camera when within proximity of the camera’s WiFi network. MayDay: Cobra’s MayDay feature allows you create an emergency contact and auto-upload your location and MayDay notice when the camera’s G-Sensor detects a severe impact/collision. -
Page 10: Iradar® App Connection
• Make sure your iPhone’s Bluetooth is ON. The dash cam will NOT APPEAR in the iPhone’s Bluetooth Settings Menu. • Start the Cobra iRadar App. Press the Menu button in the upper left of the app and select Devices. Follow the onscreen instructions to complete the pairing and connection. -
Page 11: Video Screen
VIDEO SCREEN The Video Screen is the home screen for the device. With the SC200, based on settings, you can have one view or two views (picture-in-picture). VIDEO SCREEN BASICS: When first powered on, the display will show you what the camera sees. - Page 12 STATUS BAR ICONS: A - Indicates when camera is loop recording Hazard icon appears in status bar if an Emergency Recording is in progress. The videos is being locked. B - Indicates the recording time of the current clip C - Indicates resolution of current recording D - Indicates loop clip time (1 minute, 2 minutes, 3 minutes) E - Indicates whether the microphone is active or muted F - Indicates if Motion Detection is enabled...
-
Page 13: Video Settings
VIDEO SETTINGS Video Resolution: This setting allows you to set the following resolutions on your SC 200. Higher resolutions will give you a clearer image but take up more space on the memory card. The available resolutions are: 1600P QHD 2560 x 1440 30 Frames per Second (Front View Only) 1080P Full HD 1920x1080 30 Frames per Second... -
Page 14: Voice Announcements
VOICE ANNOUNCEMENTS Your camera can warn you when you are approaching red-light and speed-cameras, user-reported police, radars detected in the area, accidents, and more from our community of users. When connected to the iRadar Mobile App, your camera can tell you what kind of threat you are approaching (For example: “Police Spotted Ahead”... -
Page 15: Memory Card Storage
MEMORY CARD STORAGE LOOP RECORDINGS: Once the SD card is full, the camera will continuously overwrite the oldest footage recorded with recent recordings. To protect a clip so that it will not be overwritten, press the Emergency Record/Favorites Button so that the clip is moved into the locked content partition. EMERGENCY RECORDINGS: An Emergency Recording is triggered when the Emergency Record/Favorites Button is pressed... -
Page 16: Safety Features
Socket must remain on with the ignition off, or the dash cam must be hardwired to a constant power source (please check www.cobra.com for available accessories). • If you park where there is lots of activity which keeps triggering the motion sensor, then the unit might never time out and enter the sleep state. - Page 17 Lane Departure Warning The Lane Departure Warning System (LDWS) provides audible and visual warnings as you approach a lane boundary. It will indicate whether you are departing the lane to the left or to the right. Note that this feature relies solely on analyzing video of the road ahead and, therefore, works best on clearly marked roads with good visibility.
-
Page 18: General Settings
GENERAL SETTINGS Video Resolution: Allows you to select the desired video resolution for loop recordings and emergency videos. Lower resolution settings result in smaller file sizes, which results in more space on the SD card. Loop Clip Time: Loop recordings and emergency videos can be saved in 1 min, 2 min, or 3 min clips depending on your preference. - Page 19 Watermark (Date/Time, Speed, GPS, Driver ID Video Stamp The watermark settings allow you to toggle having the date/time, speed, GPS coordinates, the Cobra logo and a custom Driver ID be stamped into the bottom of all recorded video. Driver ID Watermark: This setting allows you to associate a Driver ID with the camera (for example: John, Employee 12, etc).
- Page 20 Allows you to set a duration after which the device’s display turn off with the camera still recording. This setting is useful to avoid distracted driving and having a bright LED screen when driving at night. Interior Night Vision: The interior camera’s infrared LEDs allow for clear recording at night. You can set this to be always on, off, or select Auto to allow the camera to detect low-light conditions and automatically enable Interior Night Vision recording.
- Page 21 Volume: Allows you to raise and lower the volume of notifications and button beeps from your camera. WDR: Enabling Wide Dynamic Range allows your camera to accurately capture footage in very bright conditions. Enabling this feature is recommended for most recording conditions. GPS Format: Choose between Decimals and Degrees as the GPS format that is stamped in the watermark.
-
Page 22: Firmware Updates
• To check that the Firmware update was successful, you can check the ‘About’ screen in your camera’s settings menu Using a Mac or PC For optimal performance, check www.cobra.com periodically for software updates. • View the current firmware version under the About menu item on the Dash Cam o Stop loop recording... - Page 23 • Plug the Micro USB cord into a reliable power source such as your home’s outlet or your vehicle’s CLA adapter. The Dash Cam will turn on and automatically boot into the Firmware Update Menu. • Follow the directions on the camera display to update firmware if the unit has one. Units without displays will update automatically.
-
Page 24: Camera Specifications
CAMERA SPECIFICATIONS 20 | P a g e... -
Page 25: Troubleshooting
Parking Mode and Motion Detection can be turned on in the camera’s settings. These two features will monitor your vehicle automatically when the unit is connected directly to the car’s vehicle via hardwire kit (check for availability at www.cobra.com). Note: When the car is parked your unit will go into a low-power “standby”/sleeping state where it monitors for activity. -
Page 26: Trademarks Acknowledgement, Warnings, And Regulatory Information
Cobra Electronics Corporation™ is a trademark of Cobra Electronics Corporation, USA. The Bluetooth® word mark is a registered trademark owned by Bluetooth SIG, Inc. and any use of such marks by Cobra Electronics Corporation is under license. Other trademarks and trade names are those of their respective owners.