Advertisement
Quick Links
Advertisement

Related Manuals for Underground Magnetics Mag 3 System


Summary of Contents for Underground Magnetics Mag 3 System
- Page 1 Operator’s Manual www.undergroundmagnetics.com...
- Page 3 Introduction………………………………………...…….1 Caution………………………….…………………...……2 3: System Highlights…………………………………...….3 Receiver……………………………….………………….4 4.1: Specifications……………………………..…...4 4.2: Receiver Operation………………………..….…4 4.3: Icons………………………………………………5 4.3.1: Main Page Icons……………..…………5 4.3.2: Secondary Page Icons…………………6 4.3.3: Calibrations and Depth Forecast Page Icons……………7 4.3.4: Setup Page Icons……………………….7 4.4: Calibration……………………………………...…8 4.4.1: Depth Calibration…………………...…..8 4.4.2: Roll Calibration…………………….……9 4.5: Operation…………………………………..……10 4.5.1: Depth...
- Page 4 5.3.1: Main Page Icons………………………23 5.3.2: Secondary Page Icons……..…………24 5.3.3: Display Telemetry Selection……….…25 5.3.4: Radio Registration……………….… …26 5.3.5: Pitch Unit Selection……………………27 5.4: Display Maintenance…………………… …..…28 Transmitter…………………………….……………..…29 6.1: Introduction………………………………...……29 6.2: Specifications……………………………...……29 6.3: Digital Information………………………..… ….30 6.4: Transmitter Maintenance………………………30 7: Locating Methods…………………………………...…31 7.1 Locate Points and Locate Line……………..….31 7.2 Finding the Front Locate Point…………..
- Page 5 “pairs”. This manual is intended to provide information and instructions on how to use this locating system properly. Underground Magnetics reserves the right to improve the locating system and the user manual at any time without notice.
- Page 6 Underground Magnetics is not responsible for any damage or loss caused by using the Mag 3 system. Users should operate the Mag 3 system according to the manual. If there are any questions, please contact Underground Magnetics.
- Page 7 High precision and high anti-interference Faraday shield 3D antenna structure Industrial rated, gold-plated electronic modules High-performance DSP Dual locating system, functioning as two locators independently tracking to provide better accuracy and reliability Up to 160ft depth range and up to 200 hours continuous usage Page 3...
- Page 8 Mag 3 System 4kHz, 19kHz, 30kHz frequency Water proof IP65 Temperature -4° to 140°F range Telemetry 4 radio channels with range up to 3000 feet Rechargeable 12.5V lithium battery Battery life Up to 50 hours Dimensions 27” by 5” by 12” Weight 6.5 pounds Power key:...
- Page 9 Transmitter model and frequency Transmitter signal strength Signal to noise ratio bar Transmitter battery status Transmitter temperature (Flashing indicates transmitter is over-heating) Receiver and display connection status Distance between transmitter and receiver Transmitter pitch Page 5...
- Page 10 To enter the secondary page, press and hold Transmitter model and frequency Receiver battery status Telemetry channel Page 6...
- Page 11 A1: 10ft calibration A3: Depth prediction Transmitter activation Transmitter settings Receiver settings Telemetry selection Receiver and display pairing Roll calibration Pitch unit selection Time setting System lock/unlock B10: Visibility control B11: System info B13: Depth unit selection Page 7...
- Page 12 Warning: Even if the transmitter’s roll, pitch, battery status and temperature are displayed correctly, calibration may not be reliable due to a distorted magnetic field. 1. Make sure that the transmitter is working properly. Place it in the housing. 2. Place housing containing the transmitter in a location away from interference.
- Page 13 1. Place transmitter housing in a 12 o`clock position. 2. Press and hold 3. Tap three times to enter setup page and enter and start roll to select B6 calibration and wait for icon. calibration to complete. 5. Tap to return to 4.
- Page 14 1. Tap to enter 2. Tap to enter calibration page and depth forecast page. to select A3 Maximum, projected, icon. and minimum depth forecast values are listed on the right while transmitter model and frequency are listed at the top. to reset forecast 3.
- Page 15 (Process must be started within 10 minutes after batteries have been placed in the transmitter.) 1. Press and hold 2. 1111-1111 is the enter setup page. transmitter identification to enter number and 3333-3333 is transmitter activation the prompt code in the page.
- Page 16 (Process must be started within 10 minutes after batteries have been placed in the transmitter.) 1. Press and hold 2. Tap to enter transmitter enter setup page and settings page. The receiver to select B2 icon. and Echo transmitter will automatically pair.
- Page 17 2. Tap to enter 1. Press and hold receiver settings enter setup page. page. Tap to select B3 to select icon. Transmitter model and frequency. 3. Tap to return to main page. Page 13...
- Page 18 1. Press and hold 2. Tap to enter radio enter setup page. channel page. Use to select B4 to select radio icon. channel. 3. Tap to return to main page. Page 14...
- Page 19 1. Press and hold 2. Tap to enter radio enter setup page. registration page. to select B5 to start radio icon. registration. (It is required that these last two steps are performed on the display at the same time.) 4. Tap to return to 3.
- Page 20 1. Press and hold 2. Tap to switch to enter setup page pitch mode. and tap to select B7 icon. Tap enter pitch unit selection page. 3. Tap to return to main page. Page 16...
- Page 21 3. Tap to enter 2. Press and hold Depth Unit Selection. enter setup page. to select B13 select unit and icon. format. 4. Tap to return to main page. Page 17...
- Page 22 2. Tap to enter Time 1. Press and hold Settings. Tap enter setup page. select year, month, to select B8 day, hour, or minute. icon. to set time. 3. Tap to return to main page. Page 18...
- Page 23 1. Press and hold enter setup page and to input password. to select B9 get the password, please contact your dealer) icon. Tap to enter system unlock page. 4. Tap to return to main page. Page 19...
- Page 24 1. Press and hold 2. Tap enter setup page and adjust. to select the B10 icon. Tap enter Visibility Control. 3. Tap to return to main page. Page 20...
- Page 25 The receiver uses rechargeable lithium batteries. The receiver will automatically shut off if no key is pressed for over a period of 20 minutes or if there is no information received from the transmitter. It is strongly recommended that the batteries are taken out of the receiver if it is not being used for a long period of time to avoid potential corrosion.
- Page 26 Mag D Radio frequency 915MHz Water proof IP65 Temperature -4° to 140°F range Telemetry 4 radio channels with range up to 3000 feet Power Rechargeable lithium batteries Battery life Up to 50 hours Screen Industrial rated LCD graphic display Dimensions 7.5”...
- Page 27 Transmitter model and frequency Transmitter signal strength Signal to noise ratio bar Transmitter battery status Transmitter temperature (Flashing indicates transmitter is over-heating) Receiver and display connection status Distance between transmitter and receiver Transmitter pitch Page 23...
- Page 28 To enter the secondary page, press and hold Transmitter model and frequency Receiver battery status Telemetry channel Page 24...
- Page 29 1. Press and hold 2. Use to select enter setup page. radio channel. to enter radio channel page. 3. Tap to return to main page. Page 25...
- Page 30 to start radio 1. Press and hold registration. enter setup page and (It is required that the to select B5 following procedure is icon. Tap to enter performed on the Radio Registration. receiver at the same time) 3. Radio registration 4.
- Page 31 2. Tap to switch 1. Press and hold pitch mode. enter setup page and to select B7 icon. Tap to enter Pitch Unit Selection. 3. Tap to return to main page. Page 27...
- Page 32 The display uses rechargeable lithium batteries. The display will automatically shut off if no key is pressed for over a period of 20 minutes or if there is no information received from the receiver. It is strongly recommended that the batteries are taken out of the display if it is not being used for a long period of time to avoid potential corrosion.
- Page 33 The transmitter provides drill head temperature, clock position, pitch, battery status and locating signal. The transmitter transmits signals at 4kHz, 19kHz or 30kHz. The transmitter will enter a “sleep” mode after 15 minutes without rotation. It takes 10 seconds to “wake up” when the transmitter is rotated.
- Page 34 Pitch: From -100% to +100% with 0.1% resolution within the range of -45% to +45% and 1.0% resolution outside of that range. Roll: 24 transmitter roll positions Battery: Battery full, 2/3 full, 1/3 full and flash warning ...
- Page 35 One major advantage of the Mag 3 system is its simplicity. Once the receiver and transmitter are paired, the operator is not required to push any buttons to pinpoint the location, direction or depth of the transmitter. The Mag 3 receiver locates the transmitter by pinpointing three specific locations along the transmitter’s magnetic...
- Page 36 The Locate Line does not equal the location of the transmitter. The Locate Line extends left and right of the transmitter. Think of the transmitter as an airplane. The FLP is the nose and the RLP is the tail. You can locate the LL left and right of the body, but that is not the center of the...
- Page 37 Scenario: Bore Path Drill Rig Receiver view Actual position of receiver to transmitter The locating procedure described here assumes you are (a) facing away from the drill rig, toward the bore path, (b) the transmitter is below ground and between you and the drill rig and (c) the FLP is behind you.
- Page 38 Steps to locate FLP 1. Move the receiver (3) back toward the drill until the arrows (1) flip as shown in the receiver view below. The flip indicates that you have just crossed the front locate point. Receiver view Actual position of receiver to transmitter 2.
- Page 39 3. To fine tune the FLP, simply move the receiver to the right and center the right-left bar (2) as shown in the figures below. You are now at the FLP. Mark the location on the ground. Receiver view Actual position of receiver to transmitter Notice that the highlighted arrow indicates the direction of the nearest locate point, while the highlighted section of the left-right...
- Page 40 Steps to locate RLP 1. Move the receiver (3) back toward the drill until the arrows (1) flip as shown in the receiver view below. The flip indicates that you have just crossed the LL. Receiver view Actual position of receiver to transmitter Page 36...
- Page 41 2. Continue to move back toward the drill until the arrows flip as shown in the receiver view below. The flip indicates that you have just crossed the RLP. 3. Fine tune the left-right bar and mark the location on the ground.
- Page 42 Now that the FLP and RLP have been marked, you’re ready to locate the transmitter. Steps to Locate LL 1. From the RLP walk toward the FLP. The LL will start to center as shown on the receiver view below. Receiver view Actual position of receiver to transmitter...
- Page 43 2. Once the LL is centered as shown below, you are directly over the head and you may mark the location and note depth. (Note: the left-right bar should not be used over the head) Receiver view Actual position of receiver to transmitter Page 39...
- Page 44 Tracking on the fly may be used once the bore path is established and level. This tracking method will increase locating speed and in turn the speed at which the bore can be completed. As long as the FLP remains on target, there is no need to find the RLP on every rod.
- Page 45 10’ Wait for FLP to come to you Page 41...
- Page 46 When charging the battery, the red light will shine. When charging is complete, a green light will shine. Underground Magnetics offers standard warranty on parts and labor of the Mag 3 series locating system under normal usage. The warranty period is one year for the receiver and display and one year for the transmitter.
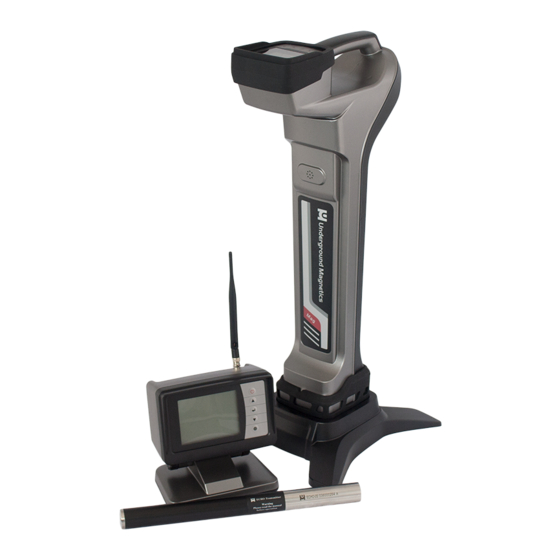
- Page 47 Description Quantity Receiver Display Transmitter Lithium rechargeable batteries Battery charger Long range antenna Tape measure Carrying Case C-Cell battery Page 43...
- Page 48 515-329-4243 www.undergroundmagnetics.com support@undergroundmagnetics.com...