
Related Manuals for Bosch DIVAR IP all?in?one 5000 Series


Summary of Contents for Bosch DIVAR IP all?in?one 5000 Series
- Page 1 DIVAR IP all‑in‑one 5000 DIP‑5240IG‑00N | DIP‑5244IG‑4HD | DIP‑5248IG‑4HD | DIP‑524CIG‑4HD | DIP‑5240GP‑00N | DIP‑5244GP‑4HD | DIP‑5248GP‑4HD | DIP‑524CGP‑4HD Installation manual...
-
Page 3: Table Of Contents
Protecting the system from unauthorized access Setting up port forwarding Choosing an appropriate client 5.3.1 Remote connection with Operator Client 5.3.2 Remote connection with Video Security App Maintenance Monitoring the system Recovering the unit Bosch Security Systems B.V. 2019.08 | V1 | DOC... - Page 4 | Table of contents DIVAR IP all-in-one 5000 Service and repair Additional documentation and client software 2019.08 | V1 | DOC Bosch Security Systems B.V.
-
Page 5: Safety Precautions
(ON/OFF) is in the ON position. When the mains plug is pulled out of the socket, the supply of power to the device is completely interrupted. Bosch Security Systems B.V. 2019.08 | V1 | DOC... - Page 6 Warning! Handling of lead solder materials used in this product may expose you to lead, a chemical known to the State of California to cause birth defects and other reproductive harm. 2019.08 | V1 | DOC Bosch Security Systems B.V.
-
Page 7: Electrical Safety Precautions
We recommend that you regularly install the latest security patches using the Windows Update function. Disposal Your Bosch product has been developed and manufactured using high-quality materials and components that can be reused. This symbol means that electronic and electrical devices that have reached the end of their working life must be disposed of separately from household waste. - Page 8 (Positive Temperature Coefficient) fuses on the mainboard must be replaced by trained service technicians only. The new fuse must be the same or equivalent as the one replaced. Contact technical support for details and support. 2019.08 | V1 | DOC Bosch Security Systems B.V.
-
Page 9: Esd Precautions
– When handling chips or modules, avoid touching their pins. – Put the mainboard and peripherals back into their antistatic bags when not in use. Bosch Security Systems B.V. 2019.08 | V1 | DOC... -
Page 10: Operating Precautions
– Windows online update functionality or the corresponding monthly roll-up patches for offline installation can be used to install OS security updates. 2019.08 | V1 | DOC Bosch Security Systems B.V. -
Page 11: System Overview
System overview | en – Limiting local network access to trusted devices is strongly suggested. Details are described in the Technical note Network Authentication 802.1X and in the Bosch IP Video and Data Security Guidebook, available in the online product catalog. –... -
Page 12: Device Views
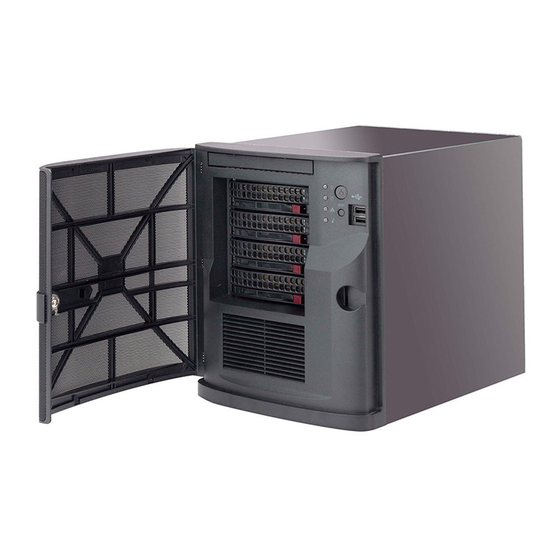
1 Front cover 2 Lock for front cover 3 4 x hot-swap hard drive 4 Air intake filter ports (for 3.5" hard drives) 5 Power LED 6 HDD LED (not used) 2019.08 | V1 | DOC Bosch Security Systems B.V. - Page 13 3 HDMI 2.0 4 2 x USB 3.1 (Type A) 5 2 x USB 3.1 (Type C) 6 2 x LAN ports (RJ45), teamed Note: Do not change the teaming mode! Bosch Security Systems B.V. 2019.08 | V1 | DOC...
-
Page 14: Control Panel Elements
Note: Turning off system power with this button Power removes the main power, but keeps standby power supplied to the system. To remove all power, unplug the system before performing maintenance tasks. 2019.08 | V1 | DOC Bosch Security Systems B.V. - Page 15 An overheat condition has occurred. (This may be caused by cable congestion.) Blinking red (1 Hz) Fan failure: check for an inoperative fan. Blinking red (0.25 Hz) Power failure: check for an inoperative power supply. Bosch Security Systems B.V. 2019.08 | V1 | DOC...
-
Page 16: Installing A Hard Drive
To remove a hard drive carrier from a hard drive bay: Unlock the front cover and swing it open. Press the release button to the right of the hard drive carrier. This extends the hard drive carrier handle. 2019.08 | V1 | DOC Bosch Security Systems B.V. -
Page 17: Installing A Hard Drive Into A Hard Drive Carrier
Installing a hard drive into a hard drive carrier To install a hard drive into a hard drive carrier: Remove the screws which secure the dummy drive to the hard drive carrier. Bosch Security Systems B.V. 2019.08 | V1 | DOC... - Page 18 Align the mounting holes in both, the hard drive carrier and the hard drive. Secure the hard drive to the hard drive carrier with the six screws. 2019.08 | V1 | DOC Bosch Security Systems B.V.
-
Page 19: Installing A Hard Drive Carrier Into A Hard Drive Bay
Bosch recommends using the respective Bosch hard disk drives. The hard disk drives as one of the critical component are carefully selected by Bosch based on available failure rates. Hard disk drives not delivered from Bosch are not supported. For more information about supported hard disk drives, see the datasheet in the Bosch Online Product Catalog at: www.boschsecurity.com... -
Page 20: System Setup
IP Address: automatically assigned by DHCP (fallback IP address: 192.168.0.200). – Subnet mask: automatically assigned by DHCP (fallback subnet mask: 255.255.255.0). Default user settings for administrator account – User: BVRAdmin – Password: WSS4Bosch Prerequisites Observe the following: 2019.08 | V1 | DOC Bosch Security Systems B.V. -
Page 21: Operating Modes
Systems that come pre-equipped with hard drives from factory are ready to record out-of-the-box. Hard drives that have been added to an empty system need to be prepared (formatted) before using them for video recording. Bosch Security Systems B.V. 2019.08 | V1 | DOC... -
Page 22: Starting The Application
Connect the unit and the cameras to the network. Turn on the unit. The Windows Storage Server 2016 setup process starts. Select the appropriate language for the installation, then click Next. 2019.08 | V1 | DOC Bosch Security Systems B.V. - Page 23 The configuration must be done from scratch or must be imported. Notice! We strongly recommend not changing any operating system settings. Changing operating system settings can result in malfunctioning of the system. Bosch Security Systems B.V. 2019.08 | V1 | DOC...
-
Page 24: Operating As Full Video Recording And Management System
Operating as iSCSI storage expansion To operate the DIVAR IP system as an iSCSI storage expansion, you have to logon to the administrator account (BVRAdmin) in order to perform the necessary configuration steps. 2019.08 | V1 | DOC Bosch Security Systems B.V. -
Page 25: Using Bvms Config Wizard
– configuring systems with no or multiple Video Recording Manager – configuring external storage devices – adding Video Streaming Gateway – all advanced configurations beyond a basic setup (maps or alarms, for example) Bosch Security Systems B.V. 2019.08 | V1 | DOC... -
Page 26: Adding Additional Licenses
On a computer with Internet access, enter the following URL into your browser: https://activation.boschsecurity.com If you do not have an account to access the Bosch License Activation Center, either create a new account (recommended) or click the link to activate a new license without logging on. -
Page 27: Using Bvms Operator Client
Cameras in the Logical Tree with a red dot in the camera’s icon are recording. To verify playback functionality in the Operator Client The time line moves if the camera is viewed in playback mode. Bosch Security Systems B.V. 2019.08 | V1 | DOC... -
Page 28: Remote Connection To The System
DIVAR IP system through the internet. There are 2 ways to make a remote connection: – Remote connection with Operator Client, page 29. – Remote connection with Video Security App, page 29. 2019.08 | V1 | DOC Bosch Security Systems B.V. -
Page 29: Remote Connection With Operator Client
5.3.2 Remote connection with Video Security App To make a remote connection with Video Security App: In Apple’s App Store search for Bosch Video Security. Install the Video Security app on your iOS device. Start the Video Security app. Select Add. Enter the public IP address or dynDNS name. -
Page 30: Recovering The Unit
Initial factory setup: restores to factory default image and deletes all data on the HDDs. – System Recovery (back to Factory Defaults): restores to factory default image; data on the HDDs will not be deleted. 2019.08 | V1 | DOC Bosch Security Systems B.V. - Page 31 The storage equipment is shipped with an original manufacturer Service and Support agreement. The Bosch Technical Support is the Single Point of Contact in case of failure but the Service and Support obligations are fulfilled by the manufacturer or a partner.
- Page 32 | Additional documentation and client software DIVAR IP all-in-one 5000 Additional documentation and client software For more information, software downloads, and documentation, visit www.boschsecurity.com and go to the respective product page. 2019.08 | V1 | DOC Bosch Security Systems B.V.
- Page 33 DIVAR IP all-in-one 5000 Additional documentation and client software | Bosch Security Systems B.V. 2019.08 | V1 | DOC...
- Page 34 | Additional documentation and client software DIVAR IP all-in-one 5000 2019.08 | V1 | DOC Bosch Security Systems B.V.
- Page 36 Bosch Security Systems B.V. Torenallee 49 5617 BA Eindhoven Netherlands www.boschsecurity.com © Bosch Security Systems B.V., 2019...