Table of Contents
Advertisement
Quick Links
Installing a Network Module
•
•
•
•
•
•
Network Module Overview
Network Module
C3850-NM-4-1G
OL-26779-05
Network Module Overview, page 1
Installing a Network Module in the Switch, page 7
Removing a Network Module, page 13
Installing SFP and SFP+ Modules, page 14
Removing SFP and SFP+ Modules, page 16
Finding the Network Module Serial Number, page 16
1
Description
This module has four 1 G SFP module slots. Any combination of standard SFP
modules are supported. SFP+ modules are not supported.
If you insert an SFP+ module in the 1 G network module, the SFP+ module does
not operate, and the switch logs an error message.
Note
This is supported on the following switch
models:
• WS-C3850-24T/P/U
• WS-C3850-48T/F/P/U
• WS-C3850-12X48U
• WS-C3850-24XU
• WS-C3850-12S
• WS-C3850-24S
Catalyst 3850 Switch Hardware Installation Guide
1
Advertisement
Table of Contents

Related Manuals for Cisco C3850-NM-4-1G


Summary of Contents for Cisco C3850-NM-4-1G
- Page 1 Network Module Overview Network Module Description C3850-NM-4-1G This module has four 1 G SFP module slots. Any combination of standard SFP modules are supported. SFP+ modules are not supported. If you insert an SFP+ module in the 1 G network module, the SFP+ module does not operate, and the switch logs an error message.
- Page 2 Installing a Network Module Network Module Overview Network Module Description C3850-NM-2-10G This module has four slots: Two slots (left side) support only 1 G SFP modules and two slots (right side) support either 1 G SFP or 10 G SFP modules. This is supported on the following switch Note models:...
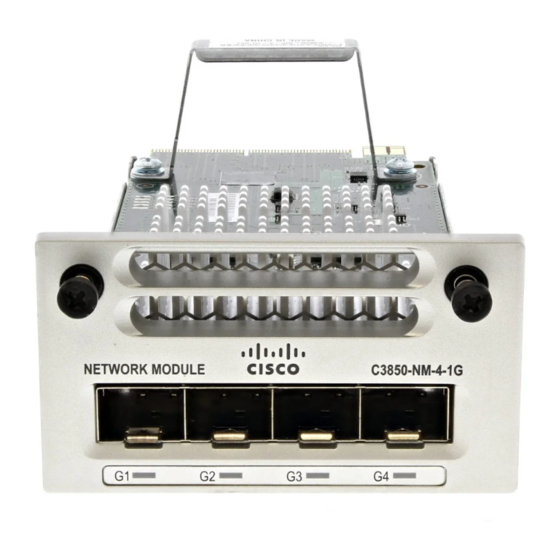
- Page 3 C3850-NM-BLANK Insert this blank module when the switch has no uplink ports (this is required for sufficient air flow). 1 All network modules are hot-swappable. Figure 1: C3850-NM-4-1G Network Module Captive screws LEDs 1 G Ethernet SFP slots Figure 2: C3850-NM-2-10G Network Module...
- Page 4 Installing a Network Module Network Module Overview Figure 3: C3850-NM-4-10G Network Module Captive screws LEDs 10 G slots or 1 G Ethernet SFP slots Figure 4: C3850-NM-8-10G Network Module Captive screw LEDs This network module has only one Note screw. You must fasten the screw completely to secure the module, and loosen the screw first so that the module may be removed.
- Page 5 Installing a Network Module Network Module Overview Figure 5: C3850-NM-2-40G Network Module Captive screws LEDs 40 G QSFP+ slots Figure 6: Blank Network Module Blank module Captive screws Catalyst 3850 Switch Hardware Installation Guide OL-26779-05...
-
Page 6: Network Module Leds
Link is off due to a fault or because it has exceeded a limit set in the switch software. Caution Link faults occur when noncompliant cabling is connected to an SFP/SFP+ port. Use only standard-compliant cabling to connect to Cisco SFP/SFP+ ports. You must remove from the network any cable or device that causes a link fault. Amber Link for the SFP/SFP+ has been disabled. -
Page 7: Installing A Network Module In The Switch
Installing a Network Module in the Switch Safety Warnings This section includes the installation cautions and warnings. Translations of the safety warnings appear in the Regulatory Compliance and Safety Information for the Catalyst 3850 Switches on Cisco.com: http:// www.cisco.com/go/cat3850_hw Read this section before you install a network module. -
Page 8: Installing Network Modules
Installing a Network Module Installing Network Modules Installing Network Modules Note The switch can operate without a network module, but a blank module (with no ports or SFP slots) is available and should be installed when uplink ports are not required. The switch generates logs when you insert or remove a network module with SFP slots. - Page 9 Network Module Port Configurations C3850-NM-4-1G Module All ports in the C3850-NM-4-1G module are natively GigabitEthernet and are configured GigabitEthernet1/1/1 though GigabitEthernet1/1/4. There are only four interfaces that are valid, and the other four should not be used even though they still show up in the CLI.
- Page 10 Installing a Network Module Network Module Port Configurations Table 1: C3850-NM-4-1G Module Interface Action GigabitEthernet1/1/1 Configure this interface GigabitEthernet1/1/2 Configure this interface GigabitEthernet1/1/3 Configure this interface GigabitEthernet1/1/4 Configure this interface TenGigabitEthernet1/1/1 Disregard TenGigabitEthernet1/1/2 Disregard TenGigabitEthernet1/1/3 Disregard TenGigabitEthernet1/1/4 Disregard C3850-NM-4-10G Module All ports in the C3850-NM-4-10G module default to 10 G and should be configured as TenGigabitEthernet1/1/1 through TenGigabitEthernet1/1/4, even when you are operating them as 1 G using SFPs.
- Page 11 Installing a Network Module Network Module Port Configurations C3850-NM-2-10G Module In the C3850-NM-2-10G module, the first two parts are natively 1-G ports and the last two ports are natively 10-G ports. So, you configure the 1-G posts as GigabitEthernet1/1/1 through GigabitEthernet1/1/2, and configure the last two ports as TenGigabitEthernet1/1/3 through TenGigabitEthernet1/1/4, even when you are operating the last two ports as 1-G.
- Page 12 Installing a Network Module Network Module Port Configurations Interface Action TenGigabitEthernet1/1/7 Configure this interface TenGigabitEthernet1/1/8 Configure this interface C3850-NM-2-40G Module The default port connections for the C3850-NM-2-40G module depends on whether you use a 40 G QSFP module or a 4x10G breakout cable. If you use a 40 G QSFP module, the ports default to 40 G interfaces.
-
Page 13: Removing A Network Module
Installing a Network Module Removing a Network Module Interface Action TenGigabitEthernet1/1/1 Configure this interface TenGigabitEthernet1/1/2 Configure this interface TenGigabitEthernet1/1/3 Configure this interface TenGigabitEthernet1/1/4 Configure this interface TenGigabitEthernet1/1/5 Configure this interface TenGigabitEthernet1/1/6 Configure this interface TenGigabitEthernet1/1/7 Configure this interface TenGigabitEthernet1/1/8 Configure this interface Removing a Network Module The switch complies with EMC, safety, and thermal specifications when a network module is present. -
Page 14: Installing Sfp And Sfp+ Modules
WS-C3850-24XS switch models support standard SFP+ modules. See the switch release notes on Cisco.com for the list of supported SFP and SFP+ modules. Use only supported SFP modules on the switch. For the latest information about supported SFP and SFP+ modules, refer to the Cisco Transceiver Modules Compatibility Information at http://www.cisco.com/en/US/products/hw/modules/... - Page 15 Installing a Network Module Installing SFP and SFP+ Modules Procedure Step 1 Attach an ESD-preventive wrist strap to your wrist and to an earth ground surface. Step 2 Find the send (TX) and receive (RX) markings that identify the top of the SFP module. On some SFP modules, the send and receive (TX and RX) markings might be shown by arrows that show the direction of the connection.
-
Page 16: Finding The Network Module Serial Number
Place the SFP/SFP+ module in an antistatic bag or other protective environment. Finding the Network Module Serial Number If you contact Cisco Technical Assistance regarding a network module, you need to know its serial number. Figure 11: Network Module Serial Number Location...