Table of Contents
Advertisement
Quick Links
S20-1
This wood appliance needs periodic inspection and repair. It is against United States federal regulations to operate this wood
appliance in a manner inconsistent with the operating instructions in this manual.
INSTALLER:
Leave this manual with the appliance.
CONSUMER:
Retain this manual for future reference.
SAFETY INFORMATION
WARNING
!
If the information in these instructions are not followed exactly, a fi re
or explosion may result causing property damage, personal injury or
death. Please read the entire manual before you install and use your
appliance. This heater has not been tested with an unvented gas log
set. To reduce risk of fi re or injury, do not install an unvented gas log
set into the heater.
- This heater can be very hot when burning.
- Combustible materials such as fi rewood, wet clothing, etc. placed
too close can catch fi re.
- Children and pets must be kept from touching the heater when it is
hot.
- The chimney must be sound and free of cracks. Before installing this
appliance, contact the local building or fi re authority and follow their
guidelines.
- Always operate this appliance with the door(s) or screen (where
applicable) tightly closed.
- Burn wood behind the log retainer directly on the fi rebricks.
- Do not use an elevated grate or otherwise raise the fi re.
- This appliance is designed to burn natural wood only. Higher
effi ciencies and lower emissions generally result when burning air
dried seasoned hardwoods, as compared to softwoods or to green
or freshly cut hardwoods.
- Do not start a fi re with chemicals or fl uids such as gasoline, engine
oil, etc.
- Do not burn trash or garbage, lawn clippings/waste, rubber,
waste petroleum products, paints or paint thinners/solvents, plastic,
materials containing asbestos, construction debris, railroad ties or
treated wood, manure or animal remains, salt water driftwood or
salted materials, unseasoned wood, coal, charcoal, coloured paper,
cardboard, plywood or particleboard. Burning these materials may
result in release of toxic fumes or render the appliance ineffective and
cause smoke.
- Do not let the appliance become hot enough for any part to glow
red.
Wood Stoves ONLY
- At least 14 squares inches (90.3 square centimeters) of outside air
must be admitted to the room or directly to the appliance through a
4" (101.6mm) diameter pipe.
- KEEP THE STOVE TOP TEMPERATURE BELOW 700°F (371°C).
Attempts to achieve heat output rates that exceed design
specifications can result in steel distortion and damage.
Wolf Steel Ltd., 24 Napoleon Rd., Barrie, ON, L4M 0G8 Canada / 103 Miller Drive, Crittenden, Kentucky, USA, 41030
$10.00
ADD MANUAL TITLE
OPERATION MANUAL
CSA / OMNI
/ INTERTEK
LOGO
Phone 1 (866) 820-8686 • www.napoleon.com • hearth@napoleon.com
INSTALLATION AND
(MUST use title from Price Book)
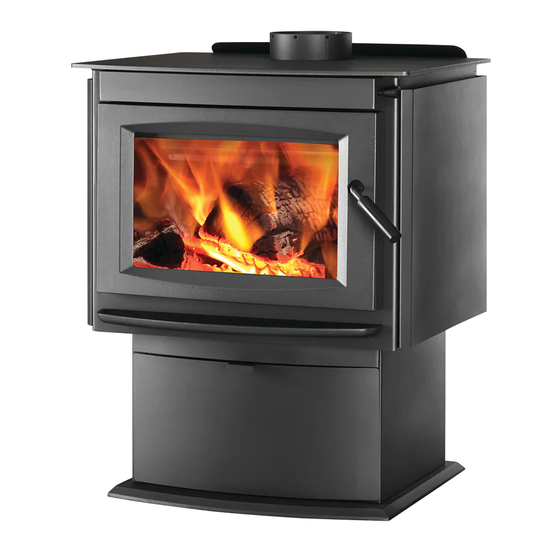
ADD PRODUCT IMAGE
U.S. ENVIRONMENTAL PROTECTION AGENCY (E.P.A.) CERTIFIED TO COMPLY WITH 2020
ADD SAFETY STANDARD INFORMATION
PARTICULATE EMISSION STANDARDS USING CORD WOOD. THIS APPLIANCE HAS BEEN
& EPA QUALIFICATION (IF APPLICABLE)
TESTED BY POLYTESTS AND LISTED BY CSA GROUP TO STANDARDS: ULC S627 AND
ALT-125 AS REFERENCED INTO 40 CFR PART 60 SUBPART AAA.
IF INSTALLATION + OPERATION, ADD SERIAL
IF SEPARATE MANUALS, ADD "PLACE
BARCODE LABEL ON THE OWNER'S MANUAL"
ENGLISH
FRENCH PG. 43
Product Name / Code
ADD ____ ILLUSTRATED
FOR INDOOR USE ONLY
UL1482. ASTM E3053-17; ASTM E2515-11 METHODS
REFERENCE #: 161746
NUMBER LABEL HERE
W415-2796 / B / 12.19.19
S20-1
Advertisement
Table of Contents

Related Manuals for Napoleon S20-1


Summary of Contents for Napoleon S20-1
-
Page 1: Overview Part
/ INTERTEK BARCODE LABEL ON THE OWNER’S MANUAL” LOGO Wolf Steel Ltd., 24 Napoleon Rd., Barrie, ON, L4M 0G8 Canada / 103 Miller Drive, Crittenden, Kentucky, USA, 41030 Phone 1 (866) 820-8686 • www.napoleon.com • hearth@napoleon.com $10.00 W415-2796 / B / 12.19.19... -
Page 2: Overview Part
safety information WARNING • This appliance is hot when operated and can cause WARNING severe burns if contacted. • Any changes or alterations to this appliance or its controls can be dangerous and is prohibited. HOT GLASS WILL • Do not operate appliance before reading and CAUSE BURNS. - Page 3 safety information WARNING • Your appliance requires periodic maintenance and cleaning. Failure to maintain your appliance may lead to smoke spillage in your home. • Ashes must be disposed in a metal container with a tight lid and placed on a non-combustible surface well away from the home or structure until completely cool.
-
Page 4: Table Of Contents
table of contents general information maintenance dimensions ash removal procedures specifi cations 7.1.1 ash removal with ash disposal kit general instructions creosote formation and removal general information runaway or chimney fi re rating plate information chimney cleaning door glass replacement installation planning care of glass appliance placement... -
Page 5: General Information
dimensions 1.0 general information dimensions W415-2796 / B / 12.19.19... -
Page 6: Specifi Cations
general information specifi cations * As tested using test method Specifi cations ALT-125. Emissions 2.25 grams / hour ** Figures will vary considerably Effi ciency with individual conditions. 14 5/8" x 20 7/8" x 11 5/8" Chamber (D.W.H) (372mm x 530mm x 295mm) *** Wolf Steel Ltd. -
Page 7: General Information
general information general information WARNING • Do not operate this appliance without the pedestal installed. This appliance was specifi cally designed over many months AIR INLET PATH of research to meet the 2020 U.S.A. EPA particulate emission standards and has been extensively tested in Canadian EXHAUST PATH laboratories. -
Page 8: Rating Plate Information
Certifié conforme à la norme WOLF STEEL LTD. d’émanation de particles de 2020 en utilisant bois de corde. 40 CFR Part 60, 24 NAPOLEON ROAD, BARRIE, ON Subpart AAA 2.25 Grams Per Hour / 2020 Cordwood / 2,25 Grammes par heure L4M 0G8 CANADA / Bois de Corde 2020. -
Page 9: Installation Planning
2.0 installation planning appliance placement We recommend having your Napoleon wood burning appliance installed by a qualifi ed technician. However, should you choose to install the appliance yourself, it is extremely important that you follow all installation instructions for the appliance, the chimney and connector if applicable, as well as local building codes. At the very least, draw a detailed plan of your installation, including clearance dimensions to combustibles, and have your authorized dealer review them to confi... -
Page 10: Minimum Clearance To Combustibles
installation planning minimum clearance to combustibles WARNING • Do not install into any area having less than 7 feet (2.1m) (ceiling to appliance bottom, excluding hearth height). BACK WALL BACK WALL DOUBLE WALL PARALLEL & SINGLE WALL DOUBLE WALL CONNECTOR + CORNER CONNECTOR CONNECTOR... -
Page 11: Fl Oor Protection
installation planning fl oor protection If the appliance is to be installed on top of a combustible fl oor, it must be placed on an approved non-combustible hearth pad, that extends 8" (203mm) beyond the appliance sides and back, and 18" (45.7cm) in Canada / 16” (40.6cm) in the USA to the front. -
Page 12: Installation
3.0 installation WARNING • Wear gloves, protective footwear and safety glasses for protection. • Carefully follow the instructions for assembly of the pipe and other parts needed to install the appliance. Failure to do so may result in a fi re, especially if combustibles are too close to the appliance or chimney and air spacers are blocked, preventing the free movement of cooling air. -
Page 13: Chimney
installation chimney WARNING • Never install a single wall slip section or smoke pipe in a chase structure. The higher temperature of this single wall pipe may radiate suffi cient heat to combustible chase materials to cause a fi re. •... -
Page 14: Chimney Connection
installation 3.1.1 chimney connection Your chimney connector and chimney must have the same diameter as the appliance’s exhaust fl ue outlet. The appliance pipe must be made of aluminized or cold roll steel with a minimum 24 gauge (0.6mm) thickness. It is strictly forbidden to use galvanized steel. -
Page 15: Adding Sections
installation 3.1.2 adding sections Add chimney sections, according to the manufacturer’s installation instructions. If the chimney system passes through an attic space, a rafter radiation shield or attic insulation shield is required. The chimney must extend at least 3ft (0.9m) above its point of contact with the roof and at least 2ft (0.6m) higher than any wall, roof or building within 10ft (3.1m). -
Page 16: Typical Through The Ceiling
installation 3.1.3 typical through the ceiling Move the stove into position with the flue centered, midpoint between two joists to prevent having to cut them. Use a plumb bob to line up the center. Cut and frame an opening in the ceiling to provide a 2” (50.8mm) clearance between the outside of the chimney and any combustible material. -
Page 17: Typical Through The Wall
installation 3.1.4 typical through the wall If possible, design the installation so that the connector does not pass through a combustible wall. If during your installation you must pass through a combustible wall, check with your building inspector before you begin. -
Page 18: Typical Existing Masonry
installation 3.1.5 typical existing masonry You can also install your appliance using your existing masonry chimney. To do so, use the RAFTER following guidelines. Use a factory-built thimble, or construct your own brick thimble. If you are using a masonry chimney, it is important that it be built in EAVE compliance with the specifications of the Building CLEARANCE WITH FIRESTOP... -
Page 19: Finishing
4.0 fi nishing door removal WARNING • Burning your appliance in with the doors open or ajar creates a fi re hazard that may result in a house and/or chimney fi re. • Do not strike or slam door. • Never remove the door when the appliance is hot. -
Page 20: Door Adjustment
fi nishing door adjustment note: This hinge pin is an offset cam, which means it can move the door away from or closer to the fi rebox face, either creating a gap between it and the door gasket or making the door fi t too tight. Adjust accordingly. After removing and reinstalling the door (see Some parts “door removal”... -
Page 21: Brick And Baffl E Installation
fi nishing brick and baffl e installation WARNING • Operation of the appliance without the bricks and baffl es can result in excessive temperatures that could damage the appliance, chimney and the surrounding enclosure. With the appliance and chimney installation completed, move the bricks into place as illustrated below (Fig. 4-3). Install nine (A) bricks and one (B) brick along the bottom of the fi... -
Page 22: Secondary Air Tubes
fi nishing secondary air tubes note: The back 3 secondary air tubes are factory-installed; therefore only the front secondary air tube (supplied inside the fi rebox) will need to be installed. Before beginning installation, note the correct orientation of the secondary air tube. The side with the notch should face to the right, while the side with 2 holes on the end should face to the left. -
Page 23: Ash Lip Removal / Installation
fi nishing ash lip removal / installation WARNING • To avoid injury or damage, do not lift or carry the appliance using the ash lip. note: The ash lip comes factory-installed. Remove the 2 screws securing the ash lip to the appliance. Set screws and ash lip aside. -
Page 24: Optional Installation
5.0 optional installation blower kit installation WARNING • Risk of fire and electrical shock! • Turn off the gas and electrical power before servicing this appliance. • Use only Wolf Steel approved optional accessories and replacement parts with this appliance. Using non-listed accessories (blowers, doors, louvres, trims, gas components, venting components, etc.) could result in a safety hazard and will void the warranty and certification. -
Page 25: Ash Disposal Kit (Ads20)
optional installation ash disposal kit (ADS20) WARNING • Failure to achieve a good seal between the ash opening and ash plug will result in an over-fi re condition that could cause damage to the appliance. Provisions have been made on the appliance to install an optional ash disposal kit. The kit allows for convenient removal of excess ash. -
Page 26: Operation
United States to alter this setting or otherwise operate this wood appliance in a manner inconsistent with operating instructions in this manual. Your Napoleon EPA listed product is a Hi-tech appliance, designed with the most advanced technology. The appliance is extremely airtight. -
Page 27: Optimum Burn Method
operation optimum burn method For optimal emissions performance and effi ciency follow these simple guidelines when using your appliance: Maintain a 2" (51mm) deep, hot, glowing red coal bed. Burn dry seasoned wood with less than 20% moisture content and burn so that the glass door remains clean. -
Page 28: Air Control
operation air control WARNING • This wood appliance has a manufacturer-set minimum low burn rate that must not be altered. It is against federal regulations in the United States to alter the setting or otherwise operate this wood appliance in a manner inconsistent with operating instructions in this manual. -
Page 29: Fuel
operation fuel WARNING • Do not store fuel within the clearance to combustibles, or in the space required for re-fueling and ash removal. • Burning wet, unseasoned wood can cause excessive creasote accumulation. When ignited, it can cause a chimney fi re that may result in a serious house fi re. When loading the appliance, ensure that the two upper fi... -
Page 30: Extended Fi Re
operation 6.6.2 extended fi re Load your larger pieces of wood so they are tightly packed, close enough to prevent the fl ames from penetrating it completely. After approximately 30 minutes, depending on the size of the load, close the draft control completely making sure that the fi... -
Page 31: Maintenance
7.0 maintenance WARNING • Turn off the power before servicing the appliance. • Appliance may be hot, do not service until appliance has cooled. • Do not use abrasive cleaners. Check your chimney and chimney connector for creosote and soot buildup weekly until a safe frequency for cleaning is established. -
Page 32: Creosote Formation And Removal
maintenance creosote formation and removal When wood is burned slowly, it produces tar and other organic vapors, which combine with expelled moisture to form creosote. The creosote vapors condense in the relatively cooler chimney fl ue or a slow-burning fi re. As a result, creosote residue accumulates on the fl... -
Page 33: Door Glass Replacement
maintenance door glass replacement WARNING • Do not use substitute materials. • Glass may be hot. Do not touch glass until cooled. • Care must be taken when removing and disposing of any broken door glass or damaged components. Be sure to vacuum up any broken glass from inside appliance before operation. -
Page 34: Care Of Glass
maintenance care of glass WARNING • Do not clean glass when hot! Do not use abrasive cleaners to clean glass. WARNING If the glass is not kept clean, permanent discolouration and/or blemishes may result. Normally a hot fi re will clean the glass. The most common reasons for dirty glass include: HOT GLASS WILL CAUSE •... -
Page 35: Wood
maintenance wood WARNING • This appliance is designed to burn natural wood only. Do not burn treated wood, coal, charcoal, coloured paper, cardboard, solvents or garbage. This appliance has not been tested with an unvented gas log set. To reduce risk of fi re or injury, do not install an unvented gas log set into the appliance. •... -
Page 36: Replacement Parts
8.0 replacement parts WARNING • Failure to position the parts in accordance with this manual or failure to use only parts specifi cally approved with this appliance may result in property damage or personal injury. Contact your dealer for questions concerning prices and policies on replacement parts. Normally, all parts can be ordered through your Authorized dealer / distributor. - Page 37 replacement parts W415-2796 / B / 12.19.19...
- Page 38 replacement parts W415-2796 / B / 12.19.19...
-
Page 39: Accessories
9.0 accessories W415-2796 / B / 12.19.19... -
Page 40: Troubleshooting
10.0 troubleshooting WARNING • Turn off the appliance completely and let cool before servicing. Only a qualifi ed service person should service and repair this electric appliance. • Appliance may be hot, do not service until appliance has cooled. • Do not use abrasive cleaners. -
Page 41: Warranty
During the fi rst 10 years Napoleon will replace or repair the defective parts covered by the lifetime warranty at our discretion free of charge. From 10 years to life, Napoleon will provide replacement parts at 50% of the current retail price. - Page 42 NAPOLEON CELEBRATING OVER 40 YEARS OF HOME COMFORT PRODUCTS 7200, Route Transcanadienne, Montréal, Québec H4T 1A3 24 Napoleon Road, Barrie, Ontario, Canada L4M 0G8 214 Bayview Drive, Barrie, Ontario, Canada L4N 4Y8 103 Miller Drive, Crittenden, Kentucky, USA 41030 Phone: 1-866-820-8686...