Table of Contents
Advertisement
Quick Links
Advertisement
Table of Contents

Related Manuals for Yamaha GT-5000


Summary of Contents for Yamaha GT-5000
- Page 1 Turntable O wn er ’s Manu al...
-
Page 3: Features
Congratulations on your purchase of this Yamaha product! Features This is a turntable for playing analog records. ‹ Massive yet elegant heavy wooden chassis effectively serve to dampen vibration ‹ Large, heavy double-structured platter for enhanced stability and performance ‹ Custom belt-drive mechanism driven by 24-pole, 2-phase AC synchronous motor ‹... -
Page 4: Before You Start
Before you start About this manual This manual explains how to set up and operate this unit. When reading this manual, please note the following: • To use the product properly and safely, we suggest that you read this manual and the included Safety Brochure thoroughly. -
Page 5: Table Of Contents
Table of contents Features Playing a record Starting the record Pausing the record Before you start Stopping the record About this manual When necessary Checking the supplied accessories Part names Checking the speed Care Getting ready Replacing the belt Troubleshooting Location Assembly Assembling the unit... -
Page 6: Checking The Supplied Accessories
Checking the supplied accessories Make sure that all items are present. Note • Store the packaging materials, such as the packing box. If you relocate, you will need these materials to safely transport this product. Refer to the “Supplement” in the package for information on how to re-pack the product. • Platter ×1 • Sub platter ×1 • Turntable mat ×2 • Belt ×1 • Counter weight ×2 • Head shell ×1 Large Small • 45 rpm adaptor ×1 • Dial cover ×1 • Handle ×2 • Stroboscopic disc ×1 • Strobe light ×1... -
Page 7: Head
• Hexagonal wrench (2 5 mm) ×1 • Cable clamp ×1 • Washer ×1 * To adjust the tonearm height * Use this clamp if you connect * For the head shell a phono cable directly to the tonearm • Owner’s Manual (this book) • Safety Brochure • Supplement CAUTION... -
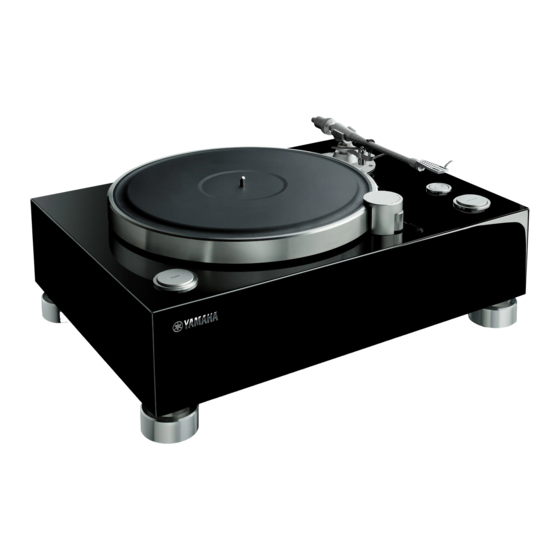
Page 8: Part Names
Part names Top panel POWER button ( ð page 19) Foot Platter ( ð page 13) START/STOP button ( ð page 20) Turntable mat ( ð page 13) Speed button ( ð page 20) Speed indicator ( ð page 20) Center spindle ( ð... -
Page 9: Counter
Tonearm section µ ¸ ¹ Counter weight ( ð page 13) Tonearm ( ð page 13) VTF* dial ( ð page 17) Lock nut ( ð page 14) * Vertical Tracking Force Head shell ( ð page 14) VTA* adjustment screw ( ð page 18) * Vertical Tracking Angle Lift lever ( ð... -
Page 10: Strobe
Rear panel BALANCED OUT PHONO OUT BALANCED OUT STROBE AC IN BALANCED OUT jacks ( ð page 15) PHONO OUT jacks ( ð page 16) GND (Ground) terminal ( ð page 16) STROBE jack ( ð page 22) AC IN inlet ( ð pages 15, 16) -
Page 11: Getting Ready
Getting ready Location Since a turntable and the sound of a record are easily affected by vibration, you should place the unit on a level surface that is extremely stable. Place the turntable sufficiently far from your speaker system so that it will not be affected by sound pressure or vibration. CAUTION If you need to lift or relocate the unit, make sure that two or more people will do so. NOTICE Do not attempt to rotate the feet. Otherwise, they might be damaged. -
Page 12: Assembly
Assembly „ Assembling the unit Pulley... - Page 13 Install the sub platter onto the center Attach the counter weight to the spindle tonearm With the markings on the counter weight facing NOTICE you, slide it onto the back end of the tonearm. Do not apply force to the center spindle when Note you install the sub platter onto the center Depending on the weight of the cartridge, install spindle.
-
Page 14: Installing A Cartridge
„ Installing a cartridge Attach the head shell to the tonearm Insert the head shell into the front end of the A cartridge is not included with this product. Follow the tonearm, and turn the lock nut to secure it. steps below to install a commercially-available cartridge into the head shell. Note Refer to the instruction manual for the cartridge. Connect the lead wires to the cartridge Lead wire Connector R+ (red) -
Page 15: Making Connections
Making connections CAUTION Finish making all other connections before you connect the power cord to an AC outlet. Note • Do not use both balanced and unbalanced connections at the same time. • For additional information, please refer to the owner’s manuals for the device that you are connecting. Balanced connection Use an XLR balanced cable to connect your amplifier to the BALANCED OUT jacks. This unit BALANCED OUT PHONO OUT BALANCED OUT STROBE AC IN XLR balanced cable Power cord (commercially available) Connect to AC outlet Pre-main amp or... - Page 16 Note • Connect the turntable to the XLR balanced input jacks • When connecting, be sure to match the pins and insert on your amplifier. The pin assignments for these jacks the connector of the “female” XLR balanced cable. are shown below. When disconnecting, pull out the “female” XLR balanced cable while pressing down the latch lock on the plug. 1: ground 2: hot (earth) Latch lock 3: cold...
-
Page 17: Making Adjustments
Making adjustments „ Adjusting the stylus pressure Return the tonearm to the arm rest Adjust the tonearm so that the appropriate stylus pressure Turn the VTF dial so that the “0” will be applied to the record. marking will be aligned with the center line on the back end of the tonearm Remove the tonearm from the arm rest and move it slightly towards the record... -
Page 18: Adjusting The Tonearm Height
„ Adjusting the tonearm height If the tonearm and the record are not in parallel when you lower the stylus onto the record, you will need to adjust the tonearm height. Follow the steps below: Return the tonearm to the arm rest and set it securely in position Use the hexagonal wrench to loosen the VTA adjustment screw VTA adjustment screw NOTICE The tonearm is secured by the VTA... -
Page 19: Turning The Power On
Turning the power on Press the POWER button on the top panel of the unit to turn on the power to the unit. -
Page 20: Playing A Record
Playing a record Starting the record Raise the lift lever CAUTION If you start to play a record without first sufficiently lowering the volume of your amplifier, a loud sound might occur when the tip of the stylus contacts the record. This could in some cases cause hearing loss and might damage your amplifier and speakers, so be sure to lower the volume of your amplifier first. Place the record on the platter If you are playing a 45 rpm record, use the 45 rpm adaptor. -
Page 21: Pausing The Record
„ Pausing the record If you raise the lift lever, the tonearm rise and playback pauses. When you lower the lift lever, playback resumes. „ Stopping the record Raise the lift lever Return the tonearm to the arm rest Lower the lift lever Press the START/STOP button The platter stops rotating. Note The tonearm does not automatically rise when the record finishes playing. -
Page 22: When Necessary
When necessary Checking the speed Care To check and adjust the speed, follow the steps below. Caring for this unit Wipe the unit with a soft dry cloth. If the finish of your Connect the strobe light to the STROBE unit is piano black, we recommend using a cleaning cloth jack on the rear panel of the unit made for pianos. Do not use chemicals such as benzine or thinner, since they might damage the surface. Place the stroboscopic disc on the Caring for the record stylus platter... -
Page 23: Replacing The Belt
Replacing the belt In certain circumstances, the belt can wear out or break. If this occurs, replace the belt. For a replacement belt, contact your nearest authorized Yamaha dealer or service center. Note Before you replace the belt, turn off the power to the unit and connected devices, and disconnect the power cord of the unit from the AC outlet. -
Page 24: Troubleshooting
Troubleshooting If the unit stops operating correctly, check the following points. If taking the appropriate action does not solve the problem, or if you encounter a problem that is not listed below, press the POWER button located on the unit’s top panel to turn off the power. Then disconnect the power cord and contact your nearest authorized Yamaha dealer or service center. Problem Cause Action page The power plug has been Pressing the POWER Firmly plug the power plug into this unplugged from this unit’s AC unit’s AC IN jack and into an AC button does not turn on IN jack or from the AC outlet, outlet. the power or it is not firmly plugged in. The belt is not correctly Attach the belt correctly to the sub positioned on the sub platter and The platter does not platter and the pulley. - Page 25 Problem Cause Action page The unit is not connected to the Connect the unit to the amplifier 15, 16 amplifier properly. properly. The head shell is not firmly Use the lock nut to firmly secure the Hum is audible secured to the tonearm. head shell to the tonearm. The cartridge is not correctly Secure the cartridge to the head shell secured to the head shell.
-
Page 26: Appendix
• The contents of this manual apply to the latest specifications as of the publishing date. To obtain Head shell weight ..... . . 14 g the latest manual, access the Yamaha website then (including wires) download the manual file. - Page 28 Yamaha Global Site https://www.yamaha.com/ Yamaha Downloads https://download.yamaha.com/ Manual Development Group © 2019 Yamaha Corporation Published 07/2019 IPOD-A0 AV18-0011 10-1 Nakazawa-cho, Naka-ku, Hamamatsu, 430-8650 Japan...