Advertisement
Quick Links
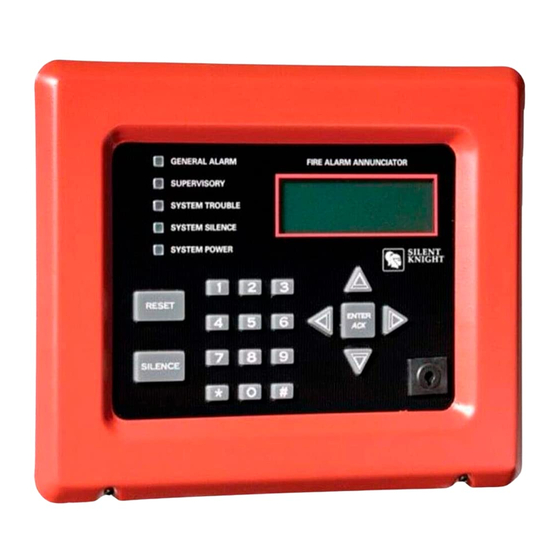
5860 Remote Fire Annunciator
Installation Quick Reference
The optional Model 5860 Remote Annunciator, as shown
in Figure 1, can be surface or flush mounted.
Figure 1: Model 5860 Remote Annunciator
5860 installation involves the following steps:
1.
Make sure power is off at the panel.
2.
Annunciator is assembled at the factory. Disassemble
as needed.
3.
Mount annunciator.
4.
Wire annunciator to the panel. See
5.
Use the DIP switches on the back of the 5860 to set
the annunciator ID. See Figure 4.
Figure 2: 5860 Parts
Wiring Connections
Wire the 5860 to the FACP as Shown in Figure 3.
Figure 3: SBUS Connections
Max. 5860s
Product
5820XL/5820XL-EVS
5808
5700
Figure 4: DIP Switch settings
For more
Information see
Allowed
Manual PN
12
LS10061-001SK-E
12
151274-L8
8
151295
P/N 151042 Rev C
ECN 14-0358
Advertisement

Related Manuals for Honeywell Silent Knight 5860


Summary of Contents for Honeywell Silent Knight 5860
-
Page 1: Wiring Connections
5860 Remote Fire Annunciator Wiring Connections Installation Quick Reference Wire the 5860 to the FACP as Shown in Figure 3. The optional Model 5860 Remote Annunciator, as shown in Figure 1, can be surface or flush mounted. Figure 3: SBUS Connections For more Max. -
Page 2: Mounting The 5860
Model 5860 Installation Instructions Mounting the 5860 Flush Mounting This section of the manual describes flush mounting. This section describes mounting the remote annunciator. Follow these steps to flush mount the 5860: The annunciator can be flush- or surface-mounted. Figure 5: Annunciator Dimensions Surface Mounting The Model 5860TG (gray) and 5860TR (red) trim ring kits Mounting Holes...