Table of Contents
Advertisement
Dear Customer,
Thank you for purchasing this Smeg 50's Style drip coffee machine.
By choosing one of our products, you have selected an appliance which combines
iconic style with innovative technical design and attention to detail.
A Smeg appliance coordinates perfectly with other Smeg products, or works equally
great as a standalone statement piece in your kitchen.
We hope you enjoy using your new appliance!
For further information on the product, please visit: www.smeg50style.com or
www.smeg.com.
Drip coffee machine
Advertisement
Table of Contents

Related Manuals for Smeg 50's Style Series


Summary of Contents for Smeg 50's Style Series
- Page 1 By choosing one of our products, you have selected an appliance which combines iconic style with innovative technical design and attention to detail. A Smeg appliance coordinates perfectly with other Smeg products, or works equally great as a standalone statement piece in your kitchen.
-
Page 2: Table Of Contents
4.4 Descaling 4.5 What to do if... TRANSLATION OF THE ORIGINAL INSTRUCTIONS We advise you to read this manual carefully, as it contains all the instructions for maintaining the appliance’s aesthetic and functional qualities. For further information on the product: www.smeg.com... -
Page 3: Instructions
Instructions 1 Instructions 1.2 This user manual This user manual is an integral part of the 1.1 Introduction appliance and must therefore be kept in its entirety and in an accessible place for the Key information for the user: whole working life of the appliance. Instructions 1.3 Intended use General information on this user... - Page 4 Instructions • Never submerge the appliance in water. • Children must never play with the appliance. • Plug into an earthed 3-pin socket. • The appliance may be used by people • Do not remove the earth pin. with reduced physical, sensory or mental •...
- Page 5 Instructions • Use cold, preferably filtered, water. Do • Do not make any modifications to the not use other liquids. appliance. • Make sure that the lid is firmly closed. • Never try to put out a fire or flames with water: turn off the appliance and remove •...
-
Page 6: Manufacturer Liability
Instructions 1.5 Manufacturer liability • Old appliances do not belong in household waste! To comply with The manufacturer shall not be liable for current legislation, old appliances, on injuries or property damage caused by: reaching the end of their useful lives, •... -
Page 7: Description
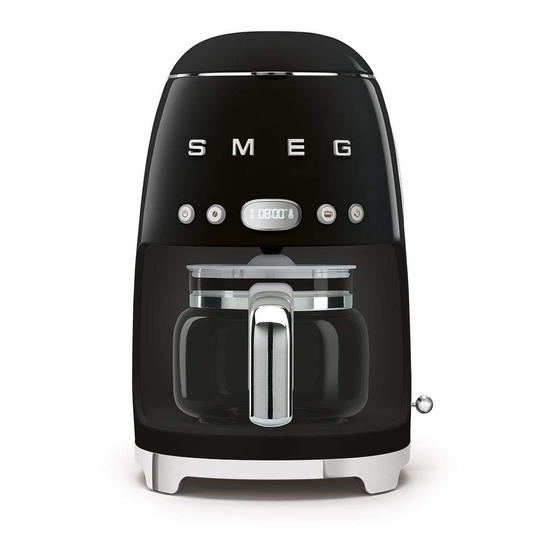
Description 2 Description 2.1 Product description Drip coffee machine 1 Lid 10 Boiler outlet 2 Water tank (1.4 litres) 11 Jug lid 3 Filter holder with anti-drip system 12 Jug (10 cups) 4 Permanent filter 13 Jug handle 5 ON/OFF button 14 Time / timer setting lever 6 AROMA setting button 15 Base and non-slip feet... -
Page 8: Use
3 Use 4. Fill the tank (3) with fresh clean water, taking care not to exceed the maximum 3.1 Before first use level shown on the level indicator (4) (1.4 litres). 1. Remove any labels and stickers from the drip coffee machine. 2. -
Page 9: First Use
3.2 First use 7. After confirming the minutes setting, the appliance emits a beep and activates 1. Plug the appliance into an electrical the CLOCK mode. outlet. 2. The symbols on the display flash. When the appliance is switched on for the first time, the default time will be shown in the 12h format indicating AM/PM. - Page 10 Time format settings menu Water hardness settings menu The time format can be modified after the The water hardness can be set by selecting appliance has been switched on for the first one of the 3 settings: HARD, MEDIUM and time: SOFT.
-
Page 11: How To Prepare The Coffee
To re-enable the sounds: 3.4 How to prepare the coffee 1. Access the settings menu and select SE03. 1. Fill the water tank as indicated in section ”3.1 Before first use”. 2. Move the lever up or down until ON appears on the display. - Page 12 6. Press the ON/OFF button to enable • One level scoop of ground the BREW The LED on the ON/ mode: coffee is approximately button lights up and flashes equivalent to one cup. However, the amount of ground coffee to quickly for the entire time the coffee is be used may vary according to being brewed.
- Page 13 In the KEEP WARM mode, the LED of the • Pressing any of the buttons, apart ON/OFF button flashes slowly and from the ON / OFF button, the KEEP WARM icon lights up on the does not affect the coffee brewing function in any way.
- Page 14 Setting the AROMA Using the 4 CUPS function This setting allows you to choose between This function allows you to brew a small two aroma intensity levels for your coffee: amount of coffee, corresponding to DELICATE or INTENSE. approximately 4 cups. The appliance is set by default to To select the 4 CUPS function: DELICATE: the LED of the aroma button...
- Page 15 Setting the time for the AUTO START mode AUTO START mode This setting allows the appliance to be 1. Press the AUTO START button to programmed to switch on automatically to start the AUTO START mode: the LED of brew the drip coffee at a time selected by the AUTO START button will light up the user.
-
Page 16: Cleaning And Maintenance
Cleaning and care 4 Cleaning and maintenance 4.2 Cleaning the drip coffee machine To keep the outer surface of the coffee 4.1 Instructions machine in good condition, it should be cleaned regularly after use. Let the Improper use appliance cool down first. Clean with a Danger of electrocution soft, damp cloth. -
Page 17: Descaling
Cleaning the jug 4.4 Descaling Depending on the water hardness setting, 1. Empty the jug after each use to prevent the appliance automatically indicates when staining caused by residues of coffee. descaling has to be carried out. 2. Wash the jug in hot, soapy water using a soft brush. -
Page 18: Cleaning And Care
• Use descaling products recommended by Smeg to avoid damaging the drip coffee machine. -
Page 19: What To Do If
Cleaning and care 4.5 What to do if... Problem Possible causes Solution No water in tank. Fill the tank. Coffee does not come out Scale build-up. Perform a descaling cycle. Coffee takes a long time Scale build-up. Perform a descaling cycle. to be dispensed The coffee has an acidic Possible stagnation of coffee in... - Page 20 Cleaning and care Problem Possible causes Solution Only water comes out of Put the required amount of No ground coffee in the filter. the drip coffee machine ground coffee into the filter. If the problem has not been resolved or in the case of other types of fault, contact your local technical support centre.