Makita 2704N Instruction Manual
Hide thumbs
Also See for 2704N:
- Instruction manual (109 pages) ,
- Instruction manual (85 pages) ,
- Instruction manual (109 pages)
Table of Contents
Advertisement
Advertisement
Table of Contents

Related Manuals for Makita 2704N


Summary of Contents for Makita 2704N
-
Page 1: Table Saw
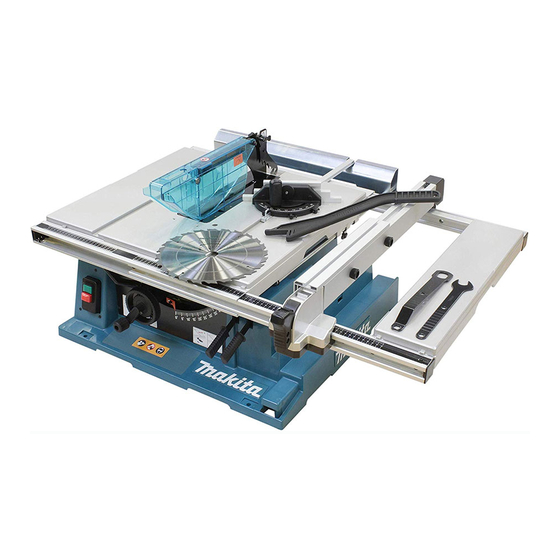
INSTRUCTION MANUAL Table Saw 2704N DOUBLE INSULATION Read before use. -
Page 2: Specifications
SPECIFICATIONS Model: 2704N Arbor hole 30 mm / 25.4 mm (Country specific) Blade diameter 260 mm Max. cutting capacities bevel 0° 93 mm bevel 45° 64 mm No load speed 5,200 min Table size (L x W) with sub tables (R) and (back) -
Page 3: Save All Warnings And Instruc- Tions For Future Reference
Save all warnings and instruc- Prevent unintentional starting. Ensure the switch is in the off-position before connecting tions for future reference. to power source and/or battery pack, picking The term "power tool" in the warnings refers to your up or carrying the tool. Carrying power tools with mains-operated (corded) power tool or battery-operated your finger on the switch or energising power tools (cordless) power tool. -
Page 4: Safety Instructions For Table Saws
Store idle power tools out of the reach of chil- Cutting procedures warnings dren and do not allow persons unfamiliar with DANGER: Never place your fingers or the power tool or these instructions to operate hands in the vicinity or in line with the saw the power tool. - Page 5 Kickback causes and related warnings Locate the table saw in a well-lit and level area Kickback is a sudden reaction of the workpiece due to a where you can maintain good footing and pinched, jammed saw blade or misaligned line of cut in balance.
-
Page 6: Installation
12. Some dust created from operation contains chemicals known to cause cancer, birth defects or other reproductive harm Some examples of these chemicals are: — lead from lead-based-painted material and, — arsenic and chromium from chemical- ly-treated lumber. Your risk from these exposures varies, depending on how often you do this type of work. -
Page 7: Functional Description
Do not use solvents or any petroleum-based cleaners because this may cause damage to the parts. If see-through parts become discolored through age or UV light exposure, contact a Makita service center for a new parts. DO NOT DEFEAT OR REMOVE BLADE GUARD AND SUB GUARD. -
Page 8: Switch Action
Adjusting positive stops Switch action ► 1. 90°Adjusting screw 2. 45°Adjusting screw ► 1. Switch CAUTION: Before operation, make sure that the tool is turned on and off. To start the tool, press the ON ( I ) button. To stop it, press the OFF ( O ) button. Sub fence (rip fence) The tool is equipped with positive stops at 90°... - Page 9 When the rip fence is attached to the left side of the saw blade, switch the sub fence position. Remove the clamping screws, sub fence, and rail from the rip fence. Loosely attach the rail on the right side of the rip fence using the removed clamping screws.
-
Page 10: Anti-Kickback Pawls
Always be sure that the tool is switched off and unplugged before installing or removing the saw blade. CAUTION: Use only the Makita wrench pro- vided to install or remove the saw blade. Failure to do so may result in overtightening or insufficient tightening of the hex bolt. -
Page 11: Adjusting The Riving Knife
Adjusting the riving knife CAUTION: Be sure that the saw blade is installed so that the teeth are aligned in the cut- ting (turning) direction. CAUTION: If the saw blade and riving knife are not aligned properly, a dangerous pinching CAUTION: Check the arbor hole diameter of condition may result during operation. - Page 12 There must be a clearance of about 4 - 5 mm between To remove the rip fence, pull the lever on the knob the riving knife and the blade teeth. Loosen the hex and pivot the knob fully forward while pulling the lever. bolts (A), adjust the riving knife accordingly and tighten To check if the rip fence is parallel with the saw blade, the hex bolts (A) securely.
- Page 13 ► 1. Guideline 2. Screws Connecting to vacuum cleaner Cleaner operations can be performed by connecting the tool to Makita vacuum cleaner or dust collector. ► 1. Rip fence 2. Released position 3. Moving position 4. Lock position ► 1. Rip fence 2. Moving position 3. Screw (B) 4.
-
Page 14: Operation
Work helpers OPERATION Push sticks, push blocks or auxiliary fence are types of "work CAUTION: helpers". Use them to make safe, sure cuts without the need Always use "work helpers" such for the operator to contact the saw blade with any part of the as push sticks and push blocks when there is a body. - Page 15 When the width of rip is 65 mm - 150 mm wide, use the Ripping push stick to feed the workpiece. CAUTION: When ripping, remove the miter gauge from the table. CAUTION: When cutting long or large work- pieces, always provide adequate support behind the table.
-
Page 16: Miter Gauge
Raise the small plate on the miter gauge for free setting. Cross cutting Turn the miter gauge to the desired miter angle. Return the small plate on the miter gauge to the original posi- CAUTION: tion and tighten the knob clockwise securely. When making a crosscut, remove the rip fence from the table. -
Page 17: Maintenance
Store the sub table (R). Remove the rip fence if it CAUTION: Always secure all moving portions is stored. before carrying the tool. Loosen the lock lever and turn the handwheel CAUTION: Before the carrying the tool, make sure until the saw head is tilted to 45° bevel angle. After that, that the blade guard and the sub guard are down and the tighten the lock lever. -
Page 18: Optional Accessories
Store the rip fence if removed. To maintain product SAFETY and RELIABILITY, repairs, any other maintenance or adjustment should be performed by Makita Authorized or Factory Service Centers, always using Makita replacement parts. OPTIONAL... - Page 20 Makita Europe N.V. Jan-Baptist Vinkstraat 2, 3070 Kortenberg, Belgium Makita Corporation 3-11-8, Sumiyoshi-cho, Anjo, Aichi 446-8502 Japan 885620-225 www.makita.com 20180117...