Table of Contents
Advertisement
Quick Links
Advertisement
Table of Contents

Related Manuals for Sony PEG-N770C/E


Summary of Contents for Sony PEG-N770C/E
- Page 1 CLIÉ Operating Instructions P E G - N 7 7 0 C / E...
-
Page 2: Read This First
Copyright laws prohibit reproducing the software or the software manual in whole or in part, or renting the software without the permission of the copyright holder. In no event will SONY be liable for any financial damage or loss of profits, including claims made by third parties, arising out of the use of the software supplied with this player. -
Page 3: Safety Information
Owner's record The model number and serial number are located on the back of the CLIÉ handheld. Record the serial number in the space provided below. Refer to these numbers whenever you call your Sony dealer regarding this product. Model number: PEG-N770C/E... - Page 4 Read this first Warnings General To prevent fire or shock hazard, do not expose the unit to rain or moisture. To avoid electrical shocks, do not open the cabinet. Refer servicing to qualified personnel only. The socket-outlet will be installed near the equipment and will be easily accessible. Audio Use your CLIÉ...
-
Page 5: Regulatory Information
Read this first Regulatory information This product conforms to the following European Directives: 73/23/EEC (Low Voltage Directive) 89/336/EEC, 92/31/EEC (EMC Directives) 93/68/EEC (CE Marking Directive) This product complies with EN 55022 Class B and EN 55024. This product has been tested and found compliant with the limits set out in the EMC Directive for using connection cables not longer than 3 metres (9.8 feet). - Page 6 Welcome Welcome Congratulations on your latest Sony purchase! The Personal Entertainment Organiser (hereafter referred to as 'CLIÉ handheld') functions as a personal digital organiser where you can record addresses, events, memos, expense reports and much more. As well as these functions, the CLIÉ handheld also works as an information terminal with an excellent extended ability to connect to other devices such as personal computers.
-
Page 7: Getting Started
Getting Started Getting Started This section is designed to complement the printed Read This First document. Please refer to the getting started explanations there for more details. Turning your CLIÉ handheld on and off To turn on your CLIÉ handheld, proceed as follows: Press the power button (1) as shown in the illustration. -
Page 8: Using The Stylus
Getting Started Using the stylus With your CLIÉ handheld, you can use the supplied stylus to enter characters or to specify an application you want to run. The stylus is stored in the holder at the back of your CLIÉ handheld. As shown below, simply pull it out when needed. - Page 9 Getting Started Dragging Just as you can drag the mouse to move objects or text on your computer, you can use the stylus to drag an item on the screen of your CLIÉ handheld. To drag, press the stylus lightly on the item and move it along the screen surface to its new position. You can use the dragging action in the following scenarios: To display data above or below the current viewing area on the screen, use the stylus to drag the slider of any scroll bar.
-
Page 10: Using The Jog Dial
Getting Started Using the Jog Dial™ Your CLIÉ handheld is equipped with a Jog Dial™, which allows you to perform all major operations without the stylus. You can operate your CLIÉ handheld using the Jog Dial™ with just one hand. The icon of any application that supports Jog Dial™... - Page 11 Getting Started Adjusting the frontlight You can turn the frontlight on the screen on or off, or adjust the brightness according to the lighting conditions or temperature of the environment in which you are using your CLIÉ handheld. To turn the frontlight on and off, press and hold down the power button for more than two seconds. Even with the frontlight on, you may need to further adjust the brightness on the screen.
-
Page 12: Performing A Soft Reset
Use the reset tip to gently press the reset button inside the hole on the back panel of your CLIÉ handheld. The system shuts down and then restarts. After restarting, the system displays Palm Powered, CLIÉ, and Sony, followed by the Preferences screen for setting the time and date. -
Page 13: Performing A Hard Reset
Resetting your CLIÉ handheld Performing a hard reset Please be fully aware that following the procedure below will make you lose all the data you have saved on your CLIÉ handheld! If there is a problem that a soft reset cannot resolve, you need to perform a hard reset to restart your CLIÉ handheld. -
Page 14: Entering Data
Entering data Entering data There are three ways to enter data on your CLIÉ handheld: ® Using Graffiti Using the onscreen keyboard Using your computer keyboard. ® Graffiti writing Your CLIÉ handheld includes Graffiti ® With Graffiti writing, you write simple strokes with the stylus and they are instantly recognised as letters or numbers. -
Page 15: Using The Onscreen Keyboard
Entering data The heavy dot on each shape shows where to begin the stroke. Certain characters have similar shapes, but different beginning and end points. Always begin the stroke at the heavy dot (you should not create the heavy dot; it is only there to show you where to begin the stroke). -
Page 16: Alphabetic Keyboard
Entering data Alphabetic keyboard On any keyboard screen, tap abc to go to the alphabetic keyboard (1). The main buttons are as follows: Backspace (2) Carriage return (3) Caps shift (4) Caps lock (5) Tab (6) -
Page 17: International Keyboard
Entering data International keyboard On any keyboard screen, tap Int’l (1) to go to the international keyboard. Numeric keyboard From any keyboard screen, tap 123 (1) to go to the numeric keyboard, as shown below. -
Page 18: Using Your Computer Keyboard
Entering data Using your computer keyboard If you have a lot of data to enter, or simply prefer to use the computer keyboard, you can use Palm™ ® Desktop for CLIÉ software or any other supported personal information manager (PIM), such as Microsoft ®... -
Page 19: Managing Applications
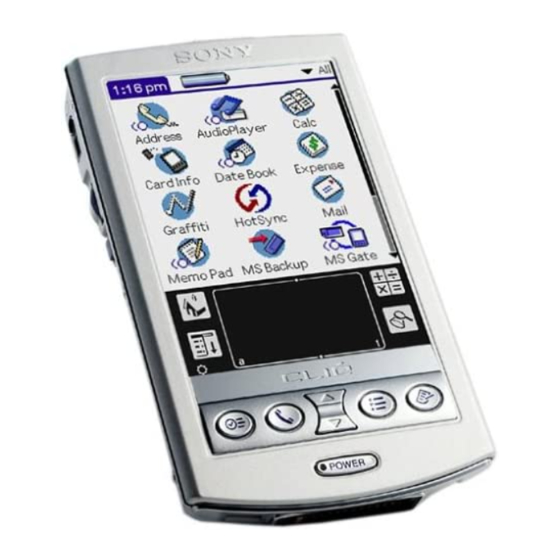
Managing applications Managing applications This chapter explains how to switch between applications on the CLIÉ handheld, how to personalize application settings, and how to categorize applications into related groups. The Application Launcher The Application Launcher displays all the default applications available on the CLIÉ handheld. You can also display selected applications by arranging them into categories. -
Page 20: Opening Applications
Managing applications Opening applications To open an application, proceed as follows: Tap the icon of the application you want to open. If you have many applications installed on the CLIÉ handheld, tap the scrollbar to see all the available applications. Tap the Home icon. - Page 21 Managing applications Opening applications on the Memory Stick™ To open an application on the Memory Stick™, proceed as follows: From the Application Launcher screen, tap the arrow select Card (or a category with the Card Tap the icon of the application you want to open. The Card Stick™...
-
Page 22: Categorizing Applications
Managing applications Categorizing applications The category feature enables you to manage the number of application icons that appear on screen in the Application Launcher. You can assign an application to a category and then display a single category or all your applications. To categorize an application, proceed as follows: Tap the Home icon Tap the Menu icon... -
Page 23: Searching For Records
Managing applications Tap OK again. Tap Done. Sorting applications To display applications by category, proceed as follows: Tap the Home icon Do one of the following: Tap the Home icon repeatedly to go through all the categories. in the top right-hand corner of the screen and then tap the category you want from the drop- down categories list. -
Page 24: Using The Find Option
Tap Find More to restart Find. The Find option is not case sensitive; searching for 'sony' also finds 'Sony'. Select text in an application before tapping the Find icon to automatically place the text in the Find dialog box. - Page 25 Managing applications Tap the Menu The menu of the application appears. Tap Options, then Phone Lookup. The Phone Number Lookup screen appears. Tap a phone number you want to add. Tap Add. The Phone Lookup screen closes and the name and phone number are added to the record. To find a phone number quickly, enter the first few letters of the name you want to find in the Look Up field in the lower screen.
-
Page 26: Switching Between Applications
Managing applications Tap OK. The setting is made. Only applications started from the Application Launcher screen will be remembered as the last-used application. Switching between applications To switch between applications, you can either: Tap the icon of the application you want. Press the appropriate application button on the front panel of the CLIÉ... - Page 27 Managing applications Undo: Reverses the action of the last edit command. For example, if you used Cut to remove text, Undo restores the text you removed. Undo also reverses deletions done by using backspace. Cut: Removes the selected text and stores it temporarily in the memory of your organiser. You can paste the text you cut into another area of the current application or into a different application.
- Page 28 Managing applications See the Software Guide to find out what you can do with these applications. The Software Guide will also provide explanations on the following pre-installed Sony applications: MS Gate MS Backup MS Autorun MS AudioPlayer.
-
Page 29: Scheduling Events
Your CLIÉ handheld is pre-installed with the following Palm™ OS basic applications: Date Book, Address Book, To Do List, Memo Pad, Expense and Calculator. This section explains how to use them. For the basic Sony applications and other software available for use on the CLIÉ handheld, please see the Software Guide. - Page 30 Using your CLIÉ handheld If the event is one hour long, skip to Step 6. If the event is longer or shorter than one hour, tap the time of the event to open the Set Time dialog box. To set the duration of the event, either: Tap the time columns on the right side of the Set Time dialog box to set the start time.
- Page 31 Using your CLIÉ handheld To schedule an untimed event, proceed as follows: In step 2, tap New and then tap No Time. Then follow the steps in Scheduling an event for today (page 28). You can create a new untimed event by making sure no event is selected and then writing letters in the Graffiti the untimed event appears at the top of the screen.
- Page 32 Using your CLIÉ handheld To schedule a continuous event, proceed as follows: Tap Day. In the Every line, enter a number stating how often the event takes place. To specify an end date for the repeated or continuous event, tap the down arrow next to End on to display the drop-down list and then tap Choose Date.
- Page 33 Using your CLIÉ handheld Displaying event views As well as displaying the time for a specific day, you can display the current time, a whole week, a month, or an agenda. To display the Date Book views, proceed as follows: Tap the blank area on your screen, so that no event is selected.
- Page 34 Using your CLIÉ handheld Week view Week view displays a calendar of your events for an entire week. This view lets you quickly review your appointments and available time slots. In addition, the graphical display helps you spot overlaps and conflicts in your schedule.
- Page 35 Using your CLIÉ handheld Month view The Month view shows which days have events scheduled. Dots and lines in the Month view indicate events, recurring events, and untimed events. To go to Month view, proceed as follows: Press the Date Book button on the front panel. The Date Book starts up Press the Jog Dial™...
- Page 36 Using your CLIÉ handheld Agenda view The Agenda view lets you view appointments, untimed events, and To Do List items in a single screen. Although it is primarily a viewing option, you can also use the Agenda view to check off To Do List items. To go to Agenda view, proceed as follows: Press the Date Book button on the front panel.
-
Page 37: Editing Events
Using your CLIÉ handheld Editing events Changing the date and time of an event To change the date or time of an event, proceed as follows: In the Date Book screen, tap the event you want to edit. Tap Details. The Event Details dialog box appears. -
Page 38: Deleting An Event
Using your CLIÉ handheld Deleting an event You can delete events in the Date Book. To delete an event, proceed as follows: Press the Date Book button on the front panel. The Date Book starts up. Select the description of the event you want to delete. The Start Time and the description are in a grey box. -
Page 39: Setting The Alarm
Using your CLIÉ handheld Setting the alarm The Alarm setting enables you to set an audible alarm to remind you about events in your Date Book. You can set an alarm to sound minutes, hours, or days before an event. The default Alarm setting is 5 minutes before the time of the event. -
Page 40: Date Book Menus
Using your CLIÉ handheld Date Book menus This section explains the menu commands specific to Date Book. The Record and Options menus differ depending on the screen displayed. Record menus New Event: Creates a new event. Delete Event: Deletes the currently selected event. Attach Note: Attaches notes to the current event. -
Page 41: Address Book
Using your CLIÉ handheld Play Every: Defines how often the alarm sounds. Display Options: Allows you to change the Date Book appearance. Show Time Bars: Activates the time bars that appear in the Day View. The time bars show the duration of an event and illustrate event conflicts. -
Page 42: Creating Address Book Entries
Using your CLIÉ handheld To open the Address Book, proceed as follows: Press the Address Book button on the front panel. Address Book opens and displays the list of all your records. Press the Address Book button repeatedly to cycle through the categories in which you have records. Prepare an address record either by entering it directly into your CLIÉ... - Page 43 Using your CLIÉ handheld Displaying entries To display a specific entry, proceed as follows: Rotate the Jog Dial™ to select the address record you want to view. If the address record you want is not displayed, rotate the Jog Dial™ again to scroll up or down the entire list.
-
Page 44: Editing Entries
Using your CLIÉ handheld Tap Options, then Preferences. The Address Book Preferences dialog box appears. In the List by field, tap Company, Last Name to sort alphabetically by the company name, and then an individual’s last name. Tap OK. The items of address records appear in the order determined by the Address Book. Searching for entries You can quickly search through your Address Book. - Page 45 Using your CLIÉ handheld Adding an image You can paste an image to the address information. Paste a photograph of a person or restaurant, for example, to remind you of an address record. To paste an image, you need to install the PictureGear Pocket software onto your CLIÉ handheld. For installation, see Installing PictureGear Pocket in the Software Guide manual.
-
Page 46: Deleting Entries
Using your CLIÉ handheld Duplicating entries If you want to use part of an existing record in a new one, you can copy address entries. To copy an existing entry, proceed as follows: In the Address Book list screen, tap the entry you want to copy. The Address View screen of the selected record appears. -
Page 47: Address Book Menus
Using your CLIÉ handheld Tap OK. The record you selected is deleted. If you select Save archive copy on PC, the deleted data from your CLIÉ handheld is saved to Palm™ Desktop for CLIÉ software during the next ® HotSync Categorizing entries You can categorize the records you entered. - Page 48 Using your CLIÉ handheld Beam Category: Sends all the Address Book entries in the currently selected category to another CLIÉ handheld via the infrared communications port. Beam Business Card: Sends the current business card to another CLIÉ handheld via the infrared communications port.
-
Page 49: Creating To Do List Items
Using your CLIÉ handheld To Do List The To Do List is a convenient place to create reminders and prioritize the things that you have to do. A To Do List item is a reminder of a task you have to complete. Use the To Do List to: Make a quick and convenient list of things to do. - Page 50 Using your CLIÉ handheld Tap anywhere onscreen to deselect the To Do List item. The item is deselected and the new item is recorded in the To Do List. If no To Do List item is currently selected, writing in the Graffiti Displaying items To check the items you recorded in To Do List, proceed as follows: Rotate the Jog Dial™...
- Page 51 Using your CLIÉ handheld Show Only Due Items: Shows only the items that are currently due, overdue, or have no due date specified. When this setting is active, items that are not yet due do not appear in the list until their due date.
-
Page 52: To Do List Menus
Using your CLIÉ handheld Tap Details. Tap the down arrow next to Due Date and then make a selection from the drop-down list. Tap OK. If you turn on the Show Due Dates option in the To Do List Options dialog box, you can tap directly on the due date in To Do List to select a due date. Checking off items You can use the check box next to an item to check off a To Do List item, reminding you that you have completed it. - Page 53 Using your CLIÉ handheld Option menus Font: You can select the fonts of the To Do List. Phone Lookup: If there is an Address Book entry, you can look up the phone number of the selected item. Security: Hides the current item unless the password is entered. About To Do List: Shows the version information of the To Do List.
-
Page 54: Creating Memos
Using your CLIÉ handheld Creating memos To create memos, proceed as follows: Tap New. A new memo is created. Enter the memo text. To start a new line, either use the <Enter> key on the keyboard or use Graffiti Tap Done or use the BACK button when you have finished. The Memo List displays the first line of a memo. - Page 55 Using your CLIÉ handheld Editing memos and lists Assigning a category To categorize your memos, proceed as follows: In the Memo Pad screen, tap the memo you want to delete. The content of the memo you tapped appears. Tap Details. The Memo Details dialog box appears.
-
Page 56: Deleting Memos
Using your CLIÉ handheld Sorting memos To change the order in which Memo Pad shows your memos, proceed as follows: Tap the Menu icon. A menu of commands appears. Tap Options, and then Preferences. The Memo Preferences dialog box appears. Select the preferred order of memos in the Sort by field, choosing from manual or automatic. -
Page 57: Memo Pad Menus
Using your CLIÉ handheld Memo Pad menus This section explains the menu commands specific to Memo Pad. The Record and Options menus differ depending on the screen displayed. Record menus Beam Category: Sends all the memos in the currently selected category to another CLIÉ handheld via the infrared communications port. -
Page 58: Recording Expenses
Using your CLIÉ handheld Expense You can use Expense for many disbursement purposes such as recording expenditures for business trips and personal expenses as a cash book. You can sort Expense items into categories or add other information to an item. Expense allows you to: Record dates, types of expenses, amount spent, payment method, and other details associated with any money that you spend. - Page 59 Using your CLIÉ handheld Tap Expense Type and make a selection from the drop-down list box. The item you entered is now saved. If you do not select an Expense type, the entered data will not be saved. You can also create a new Expense item in the Expense screen by writing on the number side of the Graffiti write begins your new Expense item.
- Page 60 Using your CLIÉ handheld Attendees: Expense opens the Attendees screen, which looks like a memo screen of Memo Pad. In this screen, you can enter the names of attendees and purposes of expenditures. To display the address information in Address Book, tap Address Lookup. Tap OK.
- Page 61 Using your CLIÉ handheld Customizing the currency list You can change the currencies and currency symbols to be used in Expense. To change the currency list, proceed as follows: In the Expense screen, tap the Expense item for which you want to change the currency type. Tap Details.
- Page 62 Using your CLIÉ handheld To create a new currency symbol, proceed as follows: In the Expense screen, tap the Menu icon. The menu is displayed. Tap Options and then Custom Currencies. The Custom Currencies dialog box appears. Select one of the four country boxes. The Currency Properties dialog box appears.
-
Page 63: Using Expense Report Templates
Click the Templates menu, and then select an Expense template. Then, click OK. The templates have the extension .xlt and are stored in the Template folder in the C:\Program Files\Sony Handheld directory on your computer. To see what a template looks like before you use it, open the template in Microsoft Excel. -
Page 64: Calculator Buttons
Using your CLIÉ handheld Calculator The Calculator lets you perform general mathematical functions, such as addition, subtraction, multiplication, and division. To start the Calculator, proceed as follows: Either: Tap the Calculator button, or Rotate the Jog Dial™ to select Calc and then press the Jog Dial™, or Tap the Calc icon on the Application Launcher screen. -
Page 65: Calculator Menus
Using your CLIÉ handheld Calculator menus Copy, Paste: Copies a number from Calculator and pastes it into another application. Similarly, you can also paste numeric values you copied from another application such as Expense into Calculator. Recent Calculations: Displays the last series of calculations. About Calculator: Shows the version information for Calculator. -
Page 66: Assigning A Password
Using your CLIÉ handheld Assigning a password You can assign a password to protect your private records and to lock your CLIÉ handheld. To enter a password, proceed as follows: Rotate the Jog Dial™ to select Security and then press the Jog Dial™. Alternatively, tap the Security icon in the Application Launcher screen. -
Page 67: If You Forget Your Password
Using your CLIÉ handheld If you forget your password If you forget your password, you have no option but to delete it. Note, however, that deleting a forgotten password also deletes all entries and records marked as Private. Avoid this by synchronizing with your computer before deleting a forgotten password. - Page 68 Using your CLIÉ handheld To display private records, proceed as follows: In step 2 above, select Show Records. If you have a password, the Show Records screen appears. Enter the password and then tap OK. Locking your CLIÉ handheld You can lock your CLIÉ handheld with a password to protect information. To lock your CLIÉ...
- Page 69 Using your CLIÉ handheld Setting your CLIÉ handheld to lock automatically You can set your CLIÉ handheld to lock whenever you turn it off. To lock your handheld automatically, proceed as follows: Back up your data and assign a password as described in Assigning a password Tap Never.
-
Page 70: Entering Owner Information
Using your CLIÉ handheld Entering owner information You can enter a name, company name, or phone number of the CLIÉ handheld owner. If you have used the Security application to turn off and lock your CLIÉ handheld with a password, the information that you enter in Preferences appears the next time you turn on your CLIÉ... - Page 71 Using your CLIÉ handheld Tap Unlock. The Unlock Message dialog box appears. Enter your current password (the one you entered in the Security application). Tap OK.
-
Page 72: Using The Palm™ Desktop For Clié Software
To start the Palm™ Desktop for CLIÉ software, double-click the Palm Desktop for CLIÉ software icon on ® the Windows desktop or click Start, select Programs, Sony Handheld, and then click Palm Desktop for Sony. The Palm™ Desktop for CLIÉ software starts. To quit the Palm™ Desktop for CLIÉ software, click the close button in the top right of the screen or click File, and then Exit. - Page 73 Using your CLIÉ handheld Main features of the Palm™ Desktop for CLIÉ software The basic operations for each application are the same as those of the corresponding CLIÉ application. For details, see the Palm™ Desktop online help (click Help and then Palm Desktop Help.) Here is an overview of the Palm™...
- Page 74 Using your CLIÉ handheld Install Tool icon User name display Record pane Displays the Install Tool dialog box to select the application you want to install on your CLIÉ handheld the next time you perform a HotSync operation. Displays the user name of the owner of the information being displayed. Displays full details of the record that is selected in the List pane.
- Page 75 Using your CLIÉ handheld Using HotSync What is a HotSync ® HotSync is a technology which automatically synchronizes CLIÉ handheld application data with the Palm™ Desktop for CLIÉ software data on the computer. You can reduce the time required for completing a HotSync Performing a local HotSync This section describes how to perform a HotSync you have done all the necessary preparations and installations for your CLIÉ...
- Page 76 Make sure that the HotSync Local is not selected from the shortcut menu. If the HotSync Start, point to Programs, Sony Handheld, and then click HotSync button on the cradle to start the HotSync If a message is displayed stating that the selected COM port is not available, uninstall the Palm™ Desktop for CLIÉ...
-
Page 77: Setting The Hotsync ® Setup Options
Using your CLIÉ handheld Enter a new user name and then click OK. Your CLIÉ handheld user name is changed at the next HotSync Advanced HotSync Setting the HotSync You can change the settings for a local HotSync To change the HotSync Click the HotSync Setup from the shortcut menu. -
Page 78: Customizing Hotsync ® Application Settings (Conduit)
Using your CLIÉ handheld Customizing HotSync What is a Conduit? For each application, you can define a set of options that determines how records are handled during synchronization. Each set of these options is called a conduit. By default, a HotSync all files between your CLIÉ... - Page 79 Using your CLIÉ handheld Creating a user profile to control multiple CLIÉ handhelds If your company distributes multiple CLIÉ handhelds to its employees, for example, you can create a user profile (such as a company phone list) to load the data into several CLIÉ handhelds without associating that data with a user name.
- Page 80 Using your CLIÉ handheld Transferring a created profile To transfer a created profile, proceed as follows: Place a CLIÉ handheld without a user name in the cradle. Press the HotSync The Users dialog box appears. Click Profiles. The Profiles dialog box appears. Select the profile you want to transfer to your CLIÉ...
- Page 81 Using your CLIÉ handheld Which port number is allocated to the infrared port. Check the infrared port number in the Infrared Monitor in the Control Panel. For information on the Infrared Monitor, see the manual of the computer you are using or the Windows Preparing your computer To perform an IR HotSync To allocate a virtual port to an IR HotSync...
- Page 82 Using your CLIÉ handheld To perform a HotSync Rotate the Jog Dial™ to select HotSync the Application Launcher screen. The HotSync dialog box appears. Tap Local. Tap the arrow list. Point the IR port of your CLIÉ handheld directly at the IR port of the receiving computer. For best results, your computer and your CLIÉ...
-
Page 83: Conducting A Hotsync ® Operation Via A Network
Using your CLIÉ handheld Conducting a HotSync When you use the Network HotSync available in many office environments. The Network HotSync ® HotSync operation by dialing in to a network or by using a cradle that is connected to any computer on your LAN or WAN (provided that the computer connected to the cradle also has the Network HotSync application installed, your computer is on, and the HotSync Connecting to your company's dial-in server... - Page 84 Using your CLIÉ handheld Place your CLIÉ handheld in the cradle and perform a HotSync ® The HotSync this information, your CLIÉ handheld can locate your computer when you perform a HotSync via the network. To check if your computer‘s network information (Primary PC name and Primary PC address) is entered on your CLIÉ...
- Page 85 Using your CLIÉ handheld Tap Network. Tap OK. The HotSync screen appears again. Tap Modem and then select Service. The Preferences screen is displayed. Tap the arrow Tap Done. Tap the Menu Tap Options, and then tap Conduit Setup. When connecting to a network computer with a cable To connect to the network computer via a cable, proceed as follows: Rotate the Jog Dial™...
- Page 86 Using your CLIÉ handheld Importing data from a Windows If you have data stored in Windows transfer that data to your CLIÉ handheld. Importable file formats Save data in one of the file formats listed below, import it into the Palm™ Desktop for CLIÉ software, and then perform a HotSync The Palm™...
-
Page 87: Synchronizing With External Data (File Link)
Using your CLIÉ handheld If you are importing records that contain a field with category names, select All in the Category box. Make sure that the same categories that appear in the imported file also exist in the application. If the categories do not exist, create them now;... - Page 88 Communicating using your CLIÉ handheld Communicating using your CLIÉ handheld This part describes how to communicate with another Palm™ OS or the Memory Stick™. For information on how to use the MS Gate application software for managing the data in the Memory Stick™, please see the online Software Guide. Beaming between your CLIÉ...
-
Page 89: Beaming Information
Communicating using your CLIÉ handheld Beaming information You can beam a record, business card, or category of records between your CLIÉ handheld and another Palm™ OS PDA. To beam data from your CLIÉ handheld to another Palm™ OS PDA, proceed as follows: Locate the record, business card, or category you want to beam. -
Page 90: Receiving Beamed Information
Communicating using your CLIÉ handheld Receiving beamed information To receive beamed information, proceed as follows: Turn on your CLIÉ handheld. Point the IR port directly at the IR port of the other Palm™ OS The Beam dialog box is displayed. Beaming data starts. You can select the category in which you save the data in a dialog box. -
Page 91: Using The Memory Stick
There are currently two different types of Memory Stick™: The generic Memory Stick™, coloured blue. The MagicGate Memory Stick™, coloured white. or from your local Sony dealer. You can purchase Memory Sticks™ from the Sony Style website ( your local Sony dealer. ) or from http://www.sonystyle-europe.com... - Page 92 Using the Memory Stick™ Why Memory Stick™? Sony's vision is to expand the world of communication, promoting the portability of digital data. The Memory Stick™ is the resulting medium, through which digital devices can be instantly connected. With it, you can download data from any compatible device, and then transfer it to another in a single and instant transfer.
- Page 93 Using the Memory Stick™ Generic Memory Stick™ The original Memory Stick™, blue in colour, can be used to record image data taken with digital still cameras, etc. or data from the PC. With it, you can record, play back and transfer various kinds of data at any given time.
- Page 94 Using the Memory Stick™ MagicGate Memory Stick™ The MagicGate Memory Stick™, white in colour, records PC and image data just like its blue counterpart; the difference is it uses the MagicGate copyright protection technology. With this type of Memory Stick™, also called the MG Memory Stick™, you can enjoy the following features: 32MB, 64MB and 128MB capacity versions.
-
Page 95: Copyright Protection
MagicGate is a copyright protection technology that complies with the standards set by SDMI (Secure Digital Music Initiative, an organization working to draw up industry standard specifications in order to protect copyrights of digital music). The logo devised by Sony. It is not meant to guarantee compatibility with other media. MagicGate MagicGate refers to the copyright protection technology used by the MagicGate Memory Stick™... -
Page 96: Compatible Devices
(SDMI) to study technology for protecting copyrights during the electronic distribution of music. Sony offers the MagicGate Memory Stick™ and Memory Stick™ Walkman with a copyright protection function that complies with SDMI standards, thereby providing an environment where individuals can record and enjoy third-party music data without worrying about copyright infringement. - Page 97 Using the Memory Stick™ VAIO notebooks VAIO desktops CLIÉ Handheld Entertainment Organiser Sony mobile phones...
-
Page 98: Inserting And Removing A Memory Stick
Using the Memory Stick™ Inserting and removing a Memory Stick™ Inserting a Memory Stick™ Insert the Memory Stick™ into the Memory Stick™ slot with the arrow facing up and toward the slot. Insert the Memory Stick™ in the right direction. If the Memory Stick™ is forced in the wrong way, it may be damaged. -
Page 99: Removing A Memory Stick
Using the Memory Stick™ Removing a Memory Stick™ Before removing a Memory Stick™, make sure that data is not being written to or read from the Memory Stick™. To remove a Memory Stick™, proceed as follows: Gently push the Memory Stick™ into the slot (1). The Memory Stick™... -
Page 100: Enabling Write-Protection
Using the Memory Stick™ Enabling write-protection You can write-protect your Memory Stick™, so that important data will not be deleted by mistake. At the back of your Memory Stick™, you will find the write-protect tab. With this tab you can enable or disable write-protection. -
Page 101: Formatting A Memory Stick
Using the Memory Stick™ Starting an application on the Memory Stick™ To open an application on the Memory Stick™ from the Application Launcher screen, tap the arrow the top right-hand corner of the Application Launcher screen and select Card (or a category with the Card icon). - Page 102 Using the Memory Stick™ Make sure you use your CLIÉ handheld to format a Memory Stick™ if you intend to use it with your CLIÉ handheld. If you use the computer to format a Memory Stick™ for use with a CLIÉ handheld, some data may not be accessed correctly. If you failed to initialise the Memory Stick™...
-
Page 103: Changing Preferences
Customizing your CLIÉ handheld Customizing your CLIÉ handheld Changing preferences You can customize your CLIÉ handheld’s operation settings and default settings by changing the Preferences. General: Set the date and time, the auto shut-off interval, the Stay on in cradle feature, the Beam Receive feature, and the system, alarm, and game sounds. -
Page 104: Date And Time Preferences
Customizing your CLIÉ handheld Date and Time preferences Setting the time To set the time, proceed as follows: From the drop-down list in the corner of the Preferences screen, tap Date & Time. Tap Set Time. The Set Time screen appears. Tap the Tap the Minute box and tap Tap AM or PM to specify the morning or afternoon. -
Page 105: Setting The Time Zone And Daylight Saving Time
Customizing your CLIÉ handheld Setting the time zone and daylight saving time To set the time zone, proceed as follows: Tap Date & Time from the drop-down list on the Preferences screen. The Date & Time Preferences screen is displayed. Tap the Set Time Zone field. - Page 106 Customizing your CLIÉ handheld Choosing different formats You can select the preferred formats of the time, date, week starting, and numbers. These formats appear in all applications. To choose time, date and number formats, proceed as follows: Tap the Time drop-down list in Format Preferences, and select a format. Tap the Date drop-down list in the Format Preferences, and select a format.
-
Page 107: Setting The Sound
Customizing your CLIÉ handheld Setting the sound You can select the sounds for system alerts, alarms, games, or choose the turn the sound off for operations. To set sounds, proceed as follows: From the drop-down list of the Preferences screen, tap General. Tap the System Sound drop-down list and select the preferred sound level or choose to turn the sound off. - Page 108 Customizing your CLIÉ handheld To assign applications to buttons, proceed as follows: In the Preferences screen, select Buttons from the drop-down list Tap the application you want to assign to the button. When you have assigned another application to the button, you can launch the original application with the Application Launcher. If you want to reset the application button, tap Default in the step 2.
- Page 109 Customizing your CLIÉ handheld Keyboard: Opens the onscreen keyboard for entering text characters. ® Graffiti Help: Opens a series of screens that show the complete Graffiti applications that support text entry). Turn Off & Lock: turns off and locks your CLIÉ handheld. You must assign your password to lock the CLIÉ...
- Page 110 Customizing your CLIÉ handheld Changing the Jog Dial™ preferences The Jog Preferences screen enables you to change the Jog Dial™ and BACK button functions. With the JogAssist feature, you can use the Jog Dial™ to operate a third-party application that is not designed to use Jog Dial™...
-
Page 111: Network Preferences
Customizing your CLIÉ handheld Network preferences In order to use your CLIÉ handheld with a network (such as using the Web Clipping application or performing a network HotSync The Network settings preferences provides the ability to connect to your ISP (Internet Service Provider) or dial-in (remote access) server with applications (for example, Web Clipping) that allow you to view the transmitted data. -
Page 112: Entering A Password
Customizing your CLIÉ handheld Entering a password The Password box identifies the password you use to log into your server or ISP. Your entry in this field determines whether your CLIÉ handheld prompts you to enter a password each time you log into your network: If you do not enter a password, your CLIÉ... -
Page 113: Adding Telephone Settings
Customizing your CLIÉ handheld Adding telephone settings When you select the Phone field, your CLIÉ handheld opens a dialog box in which you define the telephone number you use to connect with your ISP or dial-in server. In addition, you can also define a prefix, disable Call Waiting, and give special instructions for using a calling card. -
Page 114: Creating Additional Service Templates
Customizing your CLIÉ handheld Creating additional service templates You can create additional service templates from scratch or by duplicating existing templates and editing information. After you create a new or duplicate template, you can add and edit settings. To add a new service template, proceed as follows: In the Network Preferences screen, tap the Menu icon. -
Page 115: Adding Detailed Information To A Service Template
Customizing your CLIÉ handheld Adding detailed information to a service template If you are using one of the predefined service templates, you probably only need to enter your user name and telephone number. If you are creating a new service template, you may need to provide additional information to your ISP or dial-in server. -
Page 116: Creating A Log In Script
Customizing your CLIÉ handheld If you need to enter the CLIÉ handheld's IP Address, tap the IP Address check box to deselect it and display a permanent IP address field below the check box. Normally, you do not have to enter this. If you are not sure, select Automatic and go to step 10. - Page 117 Customizing your CLIÉ handheld Wait For Prompt: Detects a challenge-response prompt coming from the server and then displays the dynamically generated challenge value. You then enter the challenge value into your token card, which in turn generates a response value for you to enter on your CLIÉ handheld. This command takes two arguments, separated by a vertical bar (|) on the input line.
-
Page 118: Non-Ascii Characters For Log In Scripts
Customizing your CLIÉ handheld Non-ASCII Characters for Log in Scripts The following information enables you to create custom log in scripts that require non-ASCII characters. It is provided for advanced users who understand the use and requirements of such characters in a custom log in script. -
Page 119: Using The Network Preferences Menus
Customizing your CLIÉ handheld Using the network preferences menus This section explains the menu commands specific to network preferences. For the Edit menu, see Using the Edit menu. Service menus New: Creates a new service template. Delete: Deletes the current service template. The Delete Service dialog box appears. Duplicate: Duplicates the current service template. -
Page 120: Getting Help
Getting help Getting help Sony provides several support options for your CLIÉ handheld. If you have any questions about your CLIÉ handheld and its related software, check these options for answers: This guide explains how to use your CLIÉ handheld. -
Page 121: Troubleshooting
Services Center. Thousands of third-party add-on applications have been written for the Palm™ OS platform. Sony does not support such a large number of third- party applications. If you have any problems with a third-party application, please contact the developer or publisher of that software. -
Page 122: Tapping And Writing Problems
Getting help I get a warning message telling me there is not enough memory Purge records from Date Book and To Do List. This deletes To Do List items and past Date Book events from the memory of your CLIÉ handheld. Delete unused memos and records. -
Page 123: Application Problems
Getting help Application problems The records I created do not appear in the application Check the categories drop-down list (top right-hand corner). Choose All to display all the records for the application. Check Security and confirm that Private Records is set to Show private records. In To Do List, tap Show and see if Show Only Due Items is selected. - Page 124 Getting help ® HotSync problems I cannot perform a HotSync Check the Windows If it is not, open the HotSync Make sure the cradle is connected securely. After a HotSync ® Click the HotSync I am using Outlook Click the HotSync Check that the correct conduit is installed.
-
Page 125: I Cannot Perform An Ir Hotsync ® Operation
Getting help Make sure HotSync Make sure you selected Local from the HotSync software menu. Check the cable connection between the cradle and the USB connector on your computer. Try a lower baud rate setting on the Local tab in the Setup dialog. Read the HotSync Make sure your CLIÉ... - Page 126 Getting help Close and restart the HotSync Make a copy of your CLIÉ Handheld folder. Uninstall, and then reinstall the Palm™ Desktop software. Turn on your CLIÉ handheld, tap the HotSync When I perform a HotSync Desktop for CLIÉ software If you have performed a HotSync handheld in the Palm™...
-
Page 127: Beaming Problems
Getting help I want to synchronize my computer with more than one CLIÉ handheld If the computer running the Palm™ Desktop for CLIÉ software synchronizes with more than one CLIÉ handheld, each handheld must have a unique name. Assign a user name to your CLIÉ handheld the first time you perform a HotSync Please be aware that synchronizing more than one CLIÉ... -
Page 128: Password Problems
Getting help Password problems I forgot the password: My CLIÉ handheld is not locked You can use Security to delete the password, but your CLIÉ handheld deletes all entries marked as private. However, if you perform a HotSync process backs up all entries, whether or not they are marked private. Then, you can follow these steps to restore your private entries: Use the Palm™... -
Page 129: Notes On Use
Precautions Precautions This chapter provides information on how to correctly use and charge your CLIÉ handheld. Notes on use Your CLIÉ handheld is well designed to provide years of reliable use. To make the most of its durability, follow these precautions. Do not scratch or damage your CLIÉ... -
Page 130: Notes On Charging
Precautions Notes on charging Please note the following when charging your CLIÉ handheld: It takes about three hours to charge for the first time. You can usually use the CLIÉ handheld for about fifteen days, at 30 minutes a day, with a full charge. If you charge your CLIÉ handheld everyday, it will only take a few minutes. -
Page 131: Specifications
Memory Interface LCD display mode Colour External input/output Dimensions PEG-N770C/E Palm™ OS 4.1 Motorola DragonBall EZ 33Mhz - supplied AC power adapter - DC5.7V (dedicated connector) - built-in and non-removable lithium polymer battery 15 days (based on an average of 30 minutes use per day) - Page 132 Accessories Operating temperature The battery life span varies depending on the temperature and conditions of use. Design and specifications are subject to change without notice. PEG-N770C/E 160g (including supplied stylus) Optional extras: - USB cradle - Mobile Kit for J5/6...