Table of Contents
Advertisement
Available languages
Available languages
Advertisement
Table of Contents

Related Manuals for Honeywell T9


Summary of Contents for Honeywell T9
-
Page 1: Installation Guide
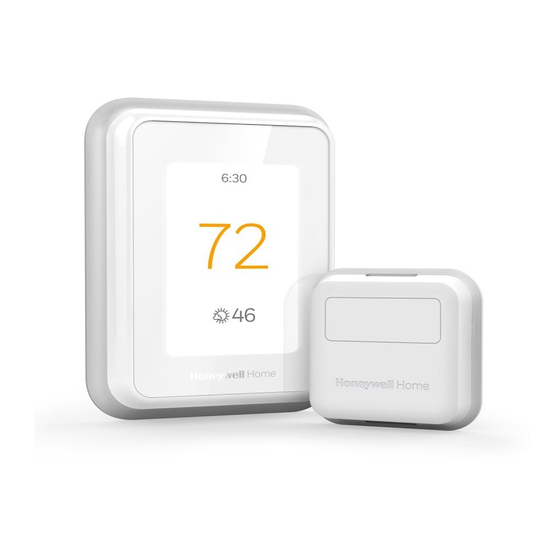
T9 THERMOSTAT Installation Guide Online Guides honeywellhome.com... - Page 2 Read before installing. Included in your box: Installation Guide Screws and anchors T9 Wi-Fi Thermostat Wireless room sensor Wallplate C-Wire Wire labels Adapter (optional) Tools you will need: You may need: Phillips screwdriver Wire Stripper Small flat head screwdriver Needle-nose pliers...
- Page 3 Contact your local waste management authority for instructions regarding recycling and proper disposal. For help, see: ONLINE GUIDES AND SUPPORT VIDEOS AT: honeywellhome.com/support SOCIAL Twitter: @Honeywell_Home, Facebook: Honeywell Home Or contact: EMAIL honeywellhomessupport@honeywell.com Electrical Specifications PHONE 1-800-633-3991...
- Page 4 Removing your old thermostat You will need: Screwdriver, needle-nose pliers Turn off power To protect your equipment, turn off the power at the breaker box or switch that controls you heating and cooling equipment. Note: The thermostat off switch Switch will not turn off the power to the equipment.
- Page 5 Compatibility Check Do you have a line voltage system? Line voltage systems have thick black wires with wire nuts or are labeled high voltage (120V or higher). Your system is not compatible. Call 1-855-733-5465 to find a pro- Wire nut installer in your area.
- Page 6 Write down the colors of the wires Check the boxes and write down the color of the wires connected to terminals that are coming from the wall. Check all that apply (not all will apply). Terminal Wire Color Terminal Wire Color ¨...
- Page 7 Only complete this section if you answered No to Step 10 Connecting Your Unused C-Wire You will need: Screwdriver, flashlight, wire strippers Compatibility Check Do you have a zoning panel? You have a zoning panel if you have multiple thermostats and one Furnace furnace or heating system.
- Page 8 Remove cover from furnace or heating system Open the heating and cooling system’s cover to find the control board. You should see the same terminal labels that are on your thermostat. Note: You may need to unscrew the cover. The control board may be at the top or bottom.
- Page 9 Installing Your New Thermostat You will need: Level, pencil, drill and a 7/32in drill bit Thermostat Screws Anchors Wall wallplate...
- Page 10 Position wall plate Pull open the wall plate that was included with your new thermostat. Insert the bundle of wires through the back of the wall plate. Make sure at least 1/4-inch of each wire is exposed for easy insertion into the wire terminals.
- Page 11 Determine Correct R-Switch Position and Insert R-wire or wires Set the R-switch up or down based on your wiring notes in Step 8. Insert wires into the inner holes of the terminals on the wall plate. The tabs will stay down once the wire is inserted.
- Page 12 Close the door and mount the wall plate Mount the wall plate using the provided screws. Install all three screws for a secure fit on your wall. Tip: Prior to tightening the screws, use a level to ensure the wall plate is level. Attach your thermostat Align the thermostat on the wall plate and firmly snap into place.
- Page 13 Getting the most from the T9 Wi-Fi Thermostat Prioritize Rooms Prioritize a specific room or multiple rooms, or let comfort follow your move using built-in motion detection. Control on the Go Adjust your thermostat from anywhere using your tablet or smartphone.
- Page 14 Using your thermostat The screen will wake up by pressing the center area of the displayed temperature. Indoor Temperature Current Priority Indoor Humidity Displays the current Displays the type of priority and Displays the current indoor temperature. number of rooms being prioritized. indoor humidity.
- Page 15 Using Priority Priority creates an average temperature in your home based on specific rooms. This allows you to prioritize comfort where you want it. Selected Rooms Rooms you manually select create an average temperature in your home. Unselected Room Will not contribute to the average temperature. Selected Room Will contribute to the average temperature.
-
Page 16: Troubleshooting
Troubleshooting If you have difficulty with your thermostat, please try the following suggestions. Most problems can be corrected quickly and easily. Display is blank • Check circuit breaker and reset if necessary. • Make sure power switch for heating & cooling system is on. •... - Page 17 2-year limited warranty Resideo warrants this product, excluding battery, to be free from defects in workmanship or materials, under normal use and service, for a period of two (2) years from the date of first purchase by the original purchaser. If at any time during the warranty period the product is determined to be defective due to workmanship or materials, Resideo shall repair or replace it (at Resideo’s option).
- Page 18 Resideo Inc., 1985 Douglas Drive North Golden Valley, MN 55422 www.resideo.com ©2018 Resideo Technologies, Inc. All rights reserved. The Honeywell Home trademark is used under license from Honeywell International Inc. 33-00421ES—01 M.S. 11-18 33-00421ES-01 Printed in U.S.A.
- Page 19 TERMOSTATO T9 Guía de instalación Guías en línea honeywellhome.com...
- Page 20 Leer antes de instalar. Contenido de la caja: Guía de Tornillos y instalación anclajes Accesorio del termostato T9 con conexión wifi Sensor Placa de pared inalámbrico para habitación Adaptador Etiquetas de para el cable C cableado (opcional) Necesitará las siguientes Podría necesitar:...
- Page 21 Para obtener ayuda, consulte lo siguiente: GUÍAS Y VIDEOS DE SOPORTE EN LÍNEA EN: honeywellhome.com/support REDES SOCIALES Twitter: @Honeywell_Home, Facebook: Honeywell Home O póngase en contacto: CORREO ELECTRÓNICO honeywellhomessupport@honeywell.com Especificaciones eléctricas TELÉFONO 1-800-633-3991...
- Page 22 Quitar el termostato anterior Necesitará lo siguiente: Destornillador, alicates de punta Desconecte el suministro de energía Para proteger el equipo, desconecte el suministro de energía en el interruptor o la caja de disyuntores que controla el equipo de calefacción y refrigeración. Interruptor Nota: El interruptor de apagado del termostato no interrumpirá...
- Page 23 Verificación de compatibilidad ¿Tiene un sistema de tensión de línea? Los sistemas de tensión de línea tienen cables negros y gruesos con conectores de cable o se etiquetan como de alto voltaje (120 V o superior). SÍ Conector de cables Su sistema no es compatible.
- Page 24 Anote los colores de los cables Marque las casillas y anote el color de los cables conectados a las terminales que salen de la pared. Marque todos los que correspondan (no todos corresponderán). Terminal Color de cable Terminal Color de cable ¨...
- Page 25 Complete esta sección solamente si respondió en el paso 10 Conexión del cable C no usado Necesitará lo siguiente: Destornillador, linterna, pelacables Verificación de compatibilidad ¿Tiene un panel de zonas? Tiene un panel de zonas si cuenta con varios termostatos y un sistema Caldera de calefacción o caldera.
- Page 26 Retire la cubierta del sistema de caldera o calefacción Abra la cubierta del sistema de calefacción o refrigeración para ubicar la tarjeta de control. Debería ver las mismas etiquetas de terminales que se encuentran en el termostato. Nota: Es posible que necesite desatornillar la cubierta.
- Page 27 Instalación del termostato nuevo Necesitará lo siguiente: Nivel, lápiz, taladro y una broca de 7/32” Termostato Tornillos Placa Anclajes Pared de pared...
- Page 28 Posicione la placa de pared Abra la placa de pared provista con el termostato nuevo. Inserte el conjunto de cables por el orificio que se encuentra en la parte trasera de la placa de pared. Asegúrese que haya al menos 1/4 pulgada de cada cable expuesto para que sea más fácil la inserción en las terminales de cableado.
- Page 29 Determine la posición correcta del interruptor R e inserte el/los cable/s R Establezca el interruptor R hacia arriba o abajo según las notas de cableado del paso 8. Inserte los cables por los orificios interiores de las terminales de la placa de pared.
- Page 30 Cierre la puerta y monte la placa de pared Monte la placa de pared con los tornillos provistos. Instale los tres tornillos para lograr un ajuste seguro en la pared. Sugerencia: Antes de ajustar los tornillos, use un nivel para asegurarse que la placa de pared esté...
- Page 31 Aprovechar al máximo el termostato T9 Wi-Fi Priorice las habitaciones Priorice una o varias habitaciones específicas, o permita que la comodidad lo siga mediante la detección de movimiento incorporada. Control sobre la marcha Ajuste el termostato desde cualquier lugar usando su tablet o teléfono inteligente.
- Page 32 Usar su termostato La pantalla se activará cuando presione el área central de la temperatura que se muestra. Temperatura interior Prioridad actual Humedad interior Muestra la temperatura Muestra el tipo de prioridad y Muestra la humedad interior actual. la cantidad de habitaciones interior actual.
- Page 33 Uso de la prioridad La configuración de prioridades genera una temperatura promedio en el hogar tomando como referencia habitaciones específicas. Esto le permite priorizar la comodidad en los espacios que desee. Habitaciones seleccionadas Las habitaciones que seleccione manualmente crean una temperatura promedio en el hogar. Habitación no seleccionada No contribuirá...
- Page 34 Solución de problemas Si tiene dificultades con el termostato, intente las siguientes sugerencias. La mayoría de los problemas se puede corregir rápida y fácilmente. La pantalla está en • Revise el disyuntor del circuito y restablezca si es necesario. blanco •...
- Page 35 La única responsabilidad de Instromet será reparar o reemplazar el producto dentro de los términos establecidos más arriba. Instromet Mexicana S. de R.L. de C.V. Honeywell no será responsable de ninguna pérdida o daño de ningún tipo, incluidos los daños incidentales o derivados, que resulten, de manera directa o indirecta, del incumplimiento de la garantía, expresa o implícita, o de cualquier otra falla de este producto.
- Page 36 Resideo Inc., 1985 Douglas Drive North Golden Valley, MN 55422 www.resideo.com ©2018 Resideo Technologies, Inc. Todos los derechos reservados. La marca comercial Honeywell Home se utiliza en virtud de la licencia emitida por Honeywell International Inc.. 33-00421ES—01 M.S. 11-18 33-00421ES-01 Impreso en EE. UU.