Table of Contents
Advertisement
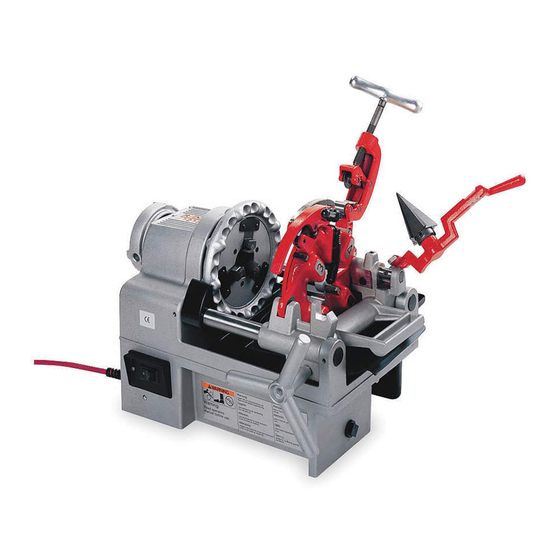
1215 Threading Machine
"
1
1
/
Capacity
2
WARNING!
Read this Operator's Manual
carefully before using this
tool. Failure to understand
and follow the contents of
this manual may result in
electrical shock, fire and/or
serious personal injury.
Threading Machine
99 Washington Street
Melrose, MA 02176
Phone 781-665-1400
Toll Free 1-800-517-8431
Visit us at www.TestEquipmentDepot.com
Manual
Advertisement
Table of Contents

Related Manuals for RIDGID 1215


Summary of Contents for RIDGID 1215
- Page 1 Threading Machine Manual 1215 Threading Machine ″ Capacity WARNING! Read this Operator’s Manual carefully before using this tool. Failure to understand and follow the contents of this manual may result in 99 Washington Street electrical shock, fire and/or Melrose, MA 02176 serious personal injury.
-
Page 2: General Safety Information
1215 Threading Machine General Safety Information • Do not abuse cord. Never use the cord to pull the plug from an outlet. Keep cord away from heat, oil, WARNING! Read and understand all instructions. Failure sharp edges or moving parts. Replace damaged to follow all instructions listed below may re- cords immediately. -
Page 3: Specific Safety Information
WARNING machine. Prevents oscillation of the pipe. Read this operator’s manual carefully before using the 1215 Threading Machine. Failure to under- • Keep covers in place. Do not operate the machine stand and follow the contents of this manual may with covers removed. -
Page 4: Description, Specifications And Standard Equipment
Description NPT Export Only ″ - 1 ″ BSPT 230V, 25-60Hz 1215 56092 The RIDGID Model 1215 Threading Machine is an electric ″ - 1 ″ 115V, 25-60Hz 1215 56097 motor-driven machine that centers and chucks the pipe No Die Head, Export Only and rotates it while cutting, reaming and threading oper- ″... -
Page 5: Machine Inspection
Handle Carriage On/Off Switch Handwheel Figure 3 – No. 1215 Threading Machine 2. Clean the speed chuck jaws with a wire brush. Figure 2 – Mounting Machine to Stand 3. Inspect the jaw inserts for excessive wear. Refer to the Maintenance Instructions if they need to be re- Mounting Machine To Bench placed. -
Page 6: Machine And Work Area Set-Up
Clean metal shavings and other debris from the chip 5. If necessary, fill the reservoir with RIDGID Thread tray of the Threading Machine. Check the level and Cutting Oil. -
Page 7: Operation Using Machine-Mounted Tools
1215 Threading Machine • Depress and hold the foot switch. Inspect the mov- 6. Secure the pipe by using repeated and forceful coun- ing parts for misalignment, binding, odd noises or terclockwise spins of the speed chuck handwheel at any other unusual conditions that may affect the the front of the Threading Machine. - Page 8 4. Depress and hold the foot switch down with left foot. Self-Opening 815A Die Head (Figure 9) – When die head trigger contacts end of pipe, throwout lever is au- NOTE! 1215 Machines have an automatic oiling system tomatically opened. that brings oil to the work through the die head.
- Page 9 1215 Threading Machine 7. Turn carriage handwheel to back die head off pipe. 10. Tighten clamp lever. For bolt threads, align index line with bolt line on size bar. 8. Swing die head back to UP position. 11. If oversize or undersize threads are required, set the 9.
- Page 10 1215 Threading Machine 10. With head in vertical position, rotate cam plate until roll 1. Depress handle so that cam plate rests (Figure 10 – Model 816/817 Semi-Automatic Die Head) against the pin on lock screw can be positioned in slot under size bar.
-
Page 11: Maintenance Instructions
1. Fill bearing cavity with oil. Only the following RIDGID products WARNING have been designed to function with the 1215 Threading 2. Depress ball bearing to allow oil to reach bearing. Machine. Other accessories designed for use with other tools may become hazardous when used on this Threading Machine. -
Page 12: Machine Storage
(Figure 14) NOTE! Do not disassemble oil pump. Pump should be 3. Fully loosen two motor cover screws and remove disassembled only by a RIDGID Authorized motor cover. Service Center. 4. Carefully remove carbon brushes. Cleaning Oil System 5. - Page 13 1215 Threading Machine Machine should be taken to a RIDGID Independent Authorized Service Center or returned to the factory. All repairs made by Ridge service facilities are warranted against defects in material and workmanship. When servicing this machine, only identical replace- ment parts should be used.
-
Page 14: Wiring Diagrams
1215 Threading Machine Wiring Diagrams Far East Version 115V 50-60 Hz Without Foot Switch 100V 50-60 Hz Without Foot Switch European Version 230V 50-60 Hz With Foot Switch 115V 50-60 Hz With Foot Switch 220/240V 50/60 Hz 2.5 mm 2.5 mm 2.5 mm... - Page 15 Visit us at www.TestEquipmentDepot.com E M E R S O N . C O N S I D E R I T S O L V E D . ™ Printed in U.S.A. 2/14 999-997-051.10 © 2014 RIDGID, Inc. EC39890 REV. A...