Epson TM-P20 Technical Reference Manual
Hide thumbs
Also See for TM-P20:
- Software user manual (69 pages) ,
- Setup manual (52 pages) ,
- User manual (25 pages)
Table of Contents
Advertisement
Technical Reference Guide
Product Overview
Describes features of the Product.
Setup
Describes setup and installation of the product.
Advanced Usage
Describes advanced usage methods for the product.
Application Development Information
Describes how to control the printer and necessary
information when you develop applications.
Handling
Describes how to handle the product.
Appendix
Describes general specifications and character code tables.
M00080008
Rev. H
Advertisement
Table of Contents

Related Manuals for Epson TM-P20


Summary of Contents for Epson TM-P20
- Page 1 Technical Reference Guide Product Overview Describes features of the Product. Setup Describes setup and installation of the product. Advanced Usage Describes advanced usage methods for the product. Application Development Information Describes how to control the printer and necessary information when you develop applications. Handling Describes how to handle the product.
- Page 2 Neither is any liability assumed for damages resulting from the use of the information contained herein. Neither Seiko Epson Corporation nor its affiliates shall be liable to the purchaser of this product or third par- ties for damages, losses, costs, or expenses incurred by the purchaser or third parties as a result of: accident, misuse, or abuse of this product or unauthorized modifications, repairs, or alterations to this product, or (excluding the U.S.) failure to strictly comply with Seiko Epson Corporation’s operating and maintenance...
-
Page 3: For Safety
For Safety Key to Symbols The symbols in this manual are identified by their level of importance, as defined below. Read the following carefully before handling the product. You must follow warnings carefully to avoid serious injury or death. DANGER You must follow warnings carefully to avoid serious bodily injury. -
Page 4: Cautions On Handling The Printer
Immediately shut down and remove the battery from the product, and contact your dealer or a Seiko Epson service center for advice. Do not disassemble the areas other than those mentioned in this manual. -
Page 5: Cautions On Handling The Single Charger
Cautions on Handling the Single Charger Do not charge any device other than the TM-P20 printer or the OT-BY20 battery. Doing so may cause heat, explosion, fire, leaks, or other damage. Do not use this product in a location with volatile substances such as alcohol or paint thinner, or WARNING near fire. -
Page 6: Battery Safety Precautions
Keep the battery out of the reach of children to avoid harm to the children. Do not use the battery with equipment other than TM-P20 printer, OT-SC20 battery charger, or OT-MC20 battery charger. Doing so may cause fire, explosion, leakage, overheating or other dam- WARNING age. -
Page 7: Cautions For Use And Storage Of The Battery
Cautions for Use and Storage of the Battery Do not pull or push the battery hook forcefully. Keep the battery terminals clean, so that no dirt or foreign material becomes attached. When cleaning the battery, do not use any solvents, such as alcohol, benzine, or thinner. Doing so CAUTION may deform or damage the plastic sections. -
Page 8: Restriction Of Use
Consult your dealer or an experienced radio/TV technician for help. Never disassemble or modify this product. Seiko Epson Corporation shall not be liable for interference to radio/TV resulting from changes or modifica- tions to this product not expressly approved by Seiko Epson Corporation. -
Page 9: About This Manual
About this Manual Aim of the Manual This manual was created to provide information on the development, design, and installation of POS systems and the development and design of printer applications for developers. Manual Content The manual is made up of the following sections: Chapter 1 Product Overview Chapter 2... -
Page 11: Table Of Contents
Contents ■ For Safety..........................3 Key to Symbols..................................3 Cautions on Handling the Printer..........................4 Cautions on Installation of the Printer........................4 Cautions on Handling the Single Charger ........................ 5 Cautions on the Power Supply for the Single Charger ..................5 Battery Safety Precautions.............................. - Page 12 ■ Useful Functions for Smart Devices.................. 30 NFC Tag....................................30 QR Code ....................................30 Setup....................... 31 ■ Flow of Setup ........................31 ■ Installing the Printer......................32 Installing the Battery ..............................33 Installing or Replacing the Roll Paper ........................35 ■...
- Page 13 Application Development Information............69 ■ Controlling the Printer ......................69 ePOS-Print XML.................................69 ESC/POS....................................69 ■ Software and Manuals ......................70 Development Kits ................................70 Drivers ....................................71 Utilities ....................................71 Others....................................72 Download ...................................72 ■ Application Development and Distribution for iOS............73 Handling ......................75 ■ Charging Battery ........................75 Using the printer itself..............................76 Battery’s charging status ...............................77 Battery malfunction ................................78...
-
Page 15: Product Overview
Product Overview This chapter describes features and specifications of the TM-P20, a portable receipt printer. Features TM-P20 is a thermal mobile printer. The main features of this product are as follows. Printing Maximum printing speed of 100 mm/s is possible. -
Page 16: Product Configurations
Product Configurations Interfaces Wi-Fi model (IEEE802.11 + USB) Bluetooth model (Bluetooth + USB) Wireless or USB is available. When you connect to the host with a USB cable and the printer is turned on, the USB interface is selected. NFC Tag You can perform wireless setup for terminals that support NFC by placing the terminal close to the NFC tag (mark) on the printer. - Page 17 Chapter 1 Product Overview Options Battery (OT-BY20) Single charger (OT-SC20) Quad charger (OT-MC20) Battery spacer (OT-BS20) Soft case (OT-PC20)
-
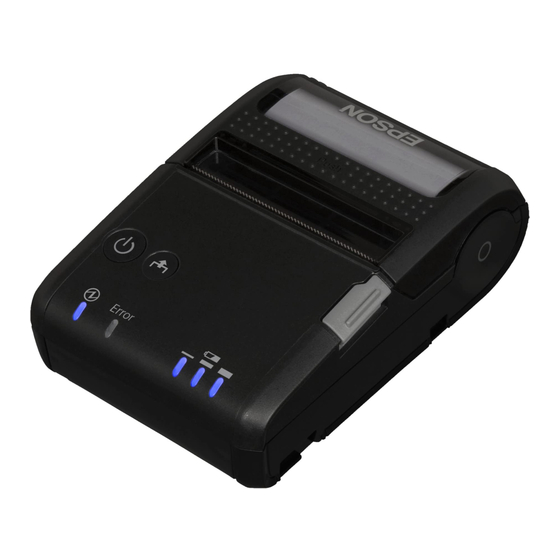
Page 18: Part Names And Functions
Part Names and Functions Roll paper cover Manual cutter NFC Tag Control panel Open button Single charger Connector for the USB Belt clip Roll Paper Cover Open this cover to install or remove the roll paper. Open Button Push this button to open the roll paper cover. Connector for the USB Connect the USB interface cable. - Page 19 Chapter 1 Product Overview Feed button Power button Error LED Power LED Battery LED Charge LED Buttons Power Button Press this button to turn the printer on. Press this button for 2 seconds or more to turn the printer off. ...
- Page 20 LEDs Power LED (Blue) The printer does not operate and the LEDs go out when the battery is not installed in the printer. Lights when the power is on. Goes out when the power is turned off. Flashes when the printer is powering-off or while the Feed button is being pressed in the software setting mode.
-
Page 21: Offline
Chapter 1 Product Overview Offline The printer automatically goes offline and stops printing under the following conditions. Once all of the following conditions are cleared, the printer becomes online and ready to print. During power on until the printer is ready ... -
Page 22: Power Functions
Power Functions You can customize the printer using the power functions, the auto-power off function and battery charge mode function to save the battery power or minimize the battery deterioration. Auto-Power Off The printer automatically turns off once the specified time has elapsed in the idle state. However, when the printer is in the following status, it is not considered as idle state, and the auto-power off function is not applied. -
Page 23: Operation Mode When Battery Is Low
Chapter 1 Product Overview Operation Mode When Battery is Low There are two operation modes for the printer when the battery is low. Change the mode depending on the usage status. Mode 1 (initial setting): Continues printing until the remaining battery becomes approximately 0%. This is appropriate if you want to maximize the battery operation time. -
Page 24: Mode 2
Mode 1 : On : Flash : Off Remaining Battery LED Error LED Printing Communication battery charge Approx. 60 100% Level H Possible Possible Approx. 20 60% Level M Possible Possible Approx. 10 20% Level L Possible Possible Level S Approx. - Page 25 Chapter 1 Product Overview Mode 2 : On : Flash : Off Remaining Battery LED Error LED Printing Communication battery charge Approx. 60 100% Level H Possible Possible Approx. 40 60% Level M Possible Possible Approx. 20 40% Level L Possible Possible...
-
Page 26: Error Status
Error Status When an error occurs, the printer stops printing, goes offline, and the Error LED flashes. There are three error types: automatically recoverable errors, recoverable errors, and unrecoverable errors. Automatically Recoverable Errors Printing is temporarily suspended when automatically recoverable errors occur. They can recover automatically, as described below. -
Page 27: Unrecoverable Errors
Printing is no longer possible when unrecoverable errors occur. If the same error occurs again even after turning the power back on, contact your dealer or a Epson service center. Immediately turn off the power and remove the battery when unrecoverable errors occur. -
Page 28: Nv Memory
Graphics, such as shop logos to be printed on receipts, can be stored. Even if communication speed is low, high speed graphic printing is possible. Use the TM-P20 Utility to register graphics. You can also print and confirm the registered graphics in the TM- P20 Utility or NV graphics print mode. -
Page 29: Maintenance Counter
Chapter 1 Product Overview Maintenance Counter With this function, printer information, such as the number of lines fed, and printer operation time after the printer starts working, is automatically stored in NV memory. You can read or reset the information with TM- P20 Utility, the Status API of the APD, or OPOS ADK to use it for periodical checks or part replacement. -
Page 30: Useful Functions For Smart Devices
See the "Epson ePOS SDK for Android/iOS User's Manual" and the Epson ePOS SDK sample program for more details. The sample program also contains a sample implementation method for reading an NFC tag and capturing a QR code. You can try a demo of these functions by using Epson TM Utility for iOS/Android. -
Page 31: Setup
This chapter describes setup and installation of the product. Flow of Setup This chapter consists of the following sections, along with the setup flow of the product. The TM-P20 has dual interfaces: a built-in USB interface and another interface selected by the customer, wireless LAN or Bluetooth interface. -
Page 32: Installing The Printer
Installing the Printer You can install the printer (1) horizontally or (2) vertically. You can also carry it using the belt clip on the back of the printer to hang the printer on your belt. When you install the printer horizontally, it is recommended to remove the belt clip. Remove the two screws fixing the clip to remove it. -
Page 33: Installing The Battery
Chapter 2 Setup Installing the Battery The printer does not operate without a charged battery installed. Follow the steps below to install the battery. Be sure to use the battery OT-BY20. Using a battery other than the one specified may cause fire, explosion, leakage, overheating or other damage. - Page 34 Install the battery. Insert the battery with its tabs fitted into the printer's grooves, until it clicks firmly into place in the holder. Return the belt clip to its original position. To charge the battery, see "Charging Battery" on page...
-
Page 35: Installing Or Replacing The Roll Paper
Chapter 2 Setup Installing or Replacing the Roll Paper Follow the steps below to install or replace the roll paper. Do not touch the manual cutter when inserting or replacing paper. Your hand could be injured on the manual cutter. WARNING ... - Page 36 Close the cover and tear off the paper. When Installing the Printer Vertically Press the open button to open the roll paper cover.
- Page 37 Chapter 2 Setup Remove the used roll paper core, if there is one. Set the new roll paper in the correct direction. When installing vertically, install so that the roll paper side is facing down. Pull the leading edge of the roll paper. Also, align the left edge of the roll paper with the end of the roll paper cover.
- Page 38 Close the cover and tear off the paper.
-
Page 39: Connecting The Printer
Chapter 2 Setup Connecting the Printer Before connecting the printer, confirm the current interface mode. The printer is initially set to the Automatic selection mode. To change the interface mode, see "Software Settings" on page Automatic selection: When the USB cable is connected with a host PC, the USB interface is preferentially selected. Other- wise, the wireless LAN/Bluetooth interface is selected. -
Page 40: Wireless Lan Interface
Wireless LAN Interface Using Epson TM Utility, you can easily connect the printer to the network from an iOS or Android devices. We also recommend connecting using a USB cable from a Windows computer, and setting up the wireless LAN using the network setup tool (EpsonNet Config). - Page 41 Chapter 2 Setup Setting up from a Windows Computer Necessary Items Prepare the following items. Printer: TM-P20 Computer for setting: Windows 10/8/7/Vista/XP Utility for setting: EpsonNet Config USB cable (Mini-B) Installing the EpsonNet Config to the computer used for setting Download the EpsonNet Config and install it in the computer, following the on-screen instructions.
- Page 42 If you need to configure other settings, use EpsonNet Config (web version). For information about EpsonNet Config (web version), see "Starting EpsonNet Config (Web Version)" on page Confirming the operation Confirm that the printer is connecting to the network. There are the following methods: ...
-
Page 43: Bluetooth Interface
If your device is a Windows computer, use EPSON TM Bluetooth Connector, which is a utility to easily pair a terminal and the printer. If your terminal is an iOS or Android terminal, use Epson TM Utility to easily pair your terminal and the printer. - Page 44 3. In the Bluetooth Settings dialog box, click the Hardware tab, and then search for the Micro- soft Bluetooth Enumerator. If it is not found, the Bluetooth software cannot detect the Epson Bluetooth printer, and you may not be able to connect to the computer.
- Page 45 If the window to enter a passkey appears, enter a passkey and click [OK]. Select the port to be used from the pull-down list, and then click [OK]. Printing method Port name APD print queue ESDPRTxxx (TM-P20: Queue name) UPOS ESDPRTxxx (UPOS for TM-P20) ESC/POS command Displayed virtual COM port (e.g. COM4)
- Page 46 The “Connection complete” window appears. Click [Test Buzzer] or [Test Printing] to check operation. Click [Back to Main screen] to return to the main window. ® Click the “x” button of TM Bluetooth Connector to exit. If “Error” is displayed when you click the [Search] on the TM Bluetooth ®...
-
Page 47: Advanced Usage
With the customized values and memory switches, which are software settings for this printer, you can set the various functions. For an outline of those functions, see the following section. Use TM Utility for iOS, TM Util- ity for Android, TM-P20 Utility for Windows, or Software setting mode to set the customized values and mem- ory switches. - Page 48 User NV memory capacity 1 KB (initial setting) 64 KB 128 KB 192 KB NV graphics memory capacity None 64 KB 128 KB 192 KB 256 KB 320 KB 384 KB (initial setting) Print density Selectable from levels 1 to 13 (70% ...
- Page 49 Selectable from: automatic selection, fixed to wireless LAN/Bluetooth interface, or fixed to built-in USB. The TM-P20 has dual interfaces: a built-in USB interface and another interface selected by the cus- tomer, wireless LAN or Bluetooth. The tables below describe the modes you can set for the printer to control the dual interfaces.
- Page 50 Automatic paper reduction Extra upper space reduction Disabled (initial setting) Enabled Extra lower space reduction Disabled (initial setting) Enabled Line space reduction rate Not reduced (initial setting) 25% 50% 75% ...
- Page 51 Chapter 3 Advanced Usage Operation mode when battery is low Mode 1 (initial setting) Mode 2 For detailed information about the operation mode when battery is low, see "Operation Mode When Battery is Low" on page USB power-saving function ...
- Page 52 Communication conditions using a USB interface Printer Class Vendor Class (initial setting) Communication conditions using a Bluetooth interface Passkey (initial setting: 0000) Device name (initial setting: TM-P20_xxxxxx) Security (initial setting: Low) Auto Re-Connect with iOS device (initial setting: Enabled) The device name is initially set to TM-P20_xxxxxx.
-
Page 53: Paper Layout Setting
Chapter 3 Advanced Usage Paper Layout Setting You can make settings for paper type and size in Paper layout setting. Paper type is set to Receipt paper (without black mark) as default. In case of using the Receipt paper (with black mark), you must select the Receipt paper (with black mark) for paper type. -
Page 54: Settings/Check Mode
Settings/Check Mode As well as print mode, the following modes are also provided for making various printer settings and checking items. Self-test mode NV graphics information print mode Software settings mode Radio field intensity check mode (Wi-Fi model only) ... -
Page 55: Self-Test Mode
Chapter 3 Advanced Usage In 1 and 2, the following guidances are printed, the Power LED flashes, and instructs the user's operations. 1. Continuing self-test guidance 2. Mode selection guidance Self-test mode You can check the following items using the self-test. ... -
Page 56: Nv Graphics Information Print Mode
NV graphics information print mode Prints the following NV graphic information registered to the printers. NV graphics capacity NV graphics usage capacity NV graphics free capacity NV graphics registration Key code for each data, number of X direction dots, number of Y direction dots ... - Page 57 Chapter 3 Advanced Usage Follow the steps below. After running a self test, hold down the FEED button for at least one second, and then select the Mode selection. The Mode selection guidance is printed, and the Power LED flashes. Briefly press the FEED button twice (less than one second), hold it down for at least one second, and then select the Software settings mode (Customized value setting).
-
Page 58: Radio Field Intensity Check Mode
Radio field intensity check mode Information on the strength of the wireless LAN radio field is printed. (Wi-Fi model only) Follow the steps below. After running a self test, hold down the FEED button for at least one second, and then select the Mode selection. -
Page 59: Wireless Module Setup Mode
Chapter 3 Advanced Usage Wireless module setup mode You can change settings or reset the wireless communication settings. For Wi-Fi models, you can change or reset the wireless LAN settings, and for Bluetooth models, you can change or reset the Bluetooth settings. For USB connections, the settings are not reset. - Page 60 When the security settings are changed, the link key (pairing information) is removed. You can change the settings for TM-P20 Utility and TM Utility for iOS/Android. For Bluetooth models, select 2: Bluetooth, and then select 2: Security, and you can change the Bluetooth security settings.
-
Page 61: Hexadecimal Dumping Mode
Chapter 3 Advanced Usage Pairing method when the security is set to Middle/High (from the printer) When the security is set to Middle/High and the printer is ready to be paired, perform the following procedure. Load paper in the printer, and then turn it on. Make sure no errors have occurred and that the printer is not off-line. - Page 62 Follow the steps below. Open the roll paper cover. While pressing the FEED button, turn on the printer. (Hold down the FEED button until the Error LED turns on.) Close the roll paper cover. From this point, all data received by the printer is printed in the corresponding hexadecimal num- bers and ASCII characters.
-
Page 63: Dynamic Status Sheet Print Mode
Chapter 3 Advanced Usage Dynamic Status Sheet Print Mode Wi-Fi Model In the dynamic status sheet print mode, the printer prints the dynamic status sheet indicating the wireless LAN settings. Do not run this mode while communicating with the wireless LAN interface. Otherwise, printing might not be performed normally. -
Page 64: Bluetooth Model
Bluetooth Model In the dynamic status sheet print mode, the printer prints the dynamic status sheet indicating the Bluetooth set- tings. When the firmware version is 1.01 ESC/POS or later, you can print the status sheet. Make sure the printer is turned on. Open the roll paper cover. -
Page 65: Epsonnet Config (Web Version)
In the initial setting, the user name and password will be required on the authentication screen when you access EpsonNet Config (web version) from a browser. Enter “epson” for both user name and password. You can change the password in [Password] in the Optional configuration menu. -
Page 66: Settings
Settings Select from the menu list on the left to check or configure the settings. Enable the time server when using a certificate. Otherwise, the printer's Stored Date/Time may not be set correctly and the wireless LAN may be unavailable. If this happens, enable the time server, or ini- tialize the Stored Date/Time from one of the following: ... - Page 67 Chapter 3 Advanced Usage Configuration menu You can configure the settings as shown in the table below. Menu Settings Wireless Settings (Communication Standard, Network Mode, SSID, Channel, Encryption Type) WPA Pre-Shared Key, Default WEP Key, WEP Key 1/2/3/4, Authentication Algorithm Power Save Roaming Wireless...
- Page 68 [Roaming] and [AP Density] in the [Wireless] menu can be set only when the Wi-Fi model's firmware is version 1.17 or later. [Wellknown Community Name] in the [SNMP] menu can be set only when the Wi-Fi model's firmware is version 1.19 or later. The initial value is enabled.
-
Page 69: Application Development Information
EPSON Advanced Printer Driver (APD) ePOS-Print XML ePOS-Print XML is the Epson original control command system for POS printers defined in XML. With ePOS- Print XML commands, you can print in environments where http communication is available and from OS applications. -
Page 70: Software And Manuals
Because controlling POS peripherals with original com- mands is not required on the application side, efficient system development is possible. EPSON OPOS ADK for .NET The OPOS ADK for .NET is a POS industry standard Bluetooth model, Wi-Fi model printer driver compatible with Microsoft POS for .NET. -
Page 71: Drivers
In addition to ordinary Windows printer driver functions, this driver Windows (APD) has controls specific to POS. The Status API (Epson original DLL) that monitors printer status and sends ESC/POS commands is also attached to this driver. EPSON TM Virtual Port Driver... -
Page 72: Others
TM printers at the same time. Monitoring Tool Use to check a list of status for the Epson printers connected to the network. Windows You can also update certificates for multiple printers used for WPA-Enterprise in a batch. -
Page 73: Application Development And Distribution For Ios
Application Development and Distribution for iOS If registering an application that uses Bluetooth in the App Store, Epson must submit an application to Apple in advance. Please apply for each application you want to register in the App Store from the URL below. -
Page 75: Handling
Chapter 5 Handling Handling This chapter describes basic handling of the printer. Charging Battery There are 4 ways to charge the battery: using the printer itself with the single charger (OT-SC20) using the printer itself with the quad charger (OT-MC20) ... -
Page 76: Using The Printer Itself
Using the printer itself Connect the single charger or quad charger, AC adapter, and the AC cable as shown in the illustration. Connect the power plug to an electrical outlet. Connect a printer with a battery installed to the single charger or the quad charger. Charging starts. -
Page 77: Battery's Charging Status
Chapter 5 Handling Battery’s charging status Make sure you charge the battery in an environment with a temperature of 0 to 40°C. Battery charging stops if it is charged in an environment outside the temperature range allowed for charging. The charging status of the battery is notified by the combination of three LED lights on the Control Panel. : On : flashes : Off... -
Page 78: Battery Malfunction
Battery malfunction If the battery has been charged for about five hours but cannot be fully charged, it is considered as a malfunction, and Charge LED flashes. If this happens, you cannot use the same battery again. Replace with another battery. : On : flashes : Off... -
Page 79: Using The Battery Spacer (Ot-Bs20)
Chapter 5 Handling Using the battery spacer (OT-BS20) Connect the single charger or quad charger, AC adapter, and the AC cable as shown in the illustration. Connect the power plug to an electrical outlet. Connect the battery spacer to the single charger or the quad charger. Set the battery. -
Page 80: Cleaning The Printer
Cleaning the Thermal Head Epson recommends cleaning the thermal head periodically (generally every 3 months) to maintain print qual- ity. After printing, the thermal head can be very hot. Be careful not to touch it and to let it cool before you clean it. -
Page 81: Cleaning The Platen Roller/Paper Sensor
Power off the printer and pull the single charger's AC cable from the outlet. Then, wipe off dirt with a dry cloth or cotton swab. Epson recommends cleaning the parts periodically (generally every 3 months). After charging, the charge terminals can be very hot. Be careful not to touch them and to let them cool before you clean them. -
Page 83: Appendix
Appendix Appendix Product Specifications Printing Specifications Printing method Thermal line printing Dot density 203 × 203 dpi Printing direction Unidirectional with friction feed Maximum print speed * 100 mm/s {3.94"/s} (Standard mode) 40 mm/s {1.57"/s} (Fine mode) * Printing width 48 mm {1.89"}, 384 dots Characters per line Font A... -
Page 84: Character Specifications
The maximum printing speed listed above may not be achieved depending on the type of inter- face, the data transmission speed, and the combination of control commands. Especially, the print- ing speed may change automatically depending on the communication environment if using a wireless interface. - Page 85 Appendix South Asia model Special Font A 12 × 24 Special Font B 9 × 24 Indian Font A Proportional x 32 Indian Font B Proportional x 24 Character size Standard/Double-height/Double-width/Double-width- Double-height W × H Common to all Font A 1.5 ×...
-
Page 86: Paper Specifications
Paper Specifications Type Thermal paper: Receipt paper (without black mark) Receipt paper (with black mark) Form Roll paper Size Width 57.5 ± 0.5 mm {2.26 ± 0.02"} Outside diameter 40.4 mm {1.59"} maximum Roll width when taken up 57.5 ± 0.5 mm {2.26 ± 0.02"} Roll paper core Outside diameter: 18.0 mm {0.71"} or more Width: Same as the paper width or less than the paper width by 1 mm {0.04"}... - Page 87 Appendix Requirement for black mark printing 30 to 300 Preprintable area 3 to 5 15 or 21.25 more 21.25 Units: mm The allowable relation between the reflecting rate in the black mark portion (1) and the non black mark portion (2) must be as shown in the below: Black mark portion (1): 16% or less...
-
Page 88: Printable Area
Printable Area Printing is automatically performed in one to six-part energization depending on the printing condi- tions. During printing with two to six-part energization, a misalignment (horizontal ruled line shift) of 1/12 to 1/4 dot might occur in the paper feeding direction due to segmented printing. Dot 1 57.5 ±... -
Page 89: Electrical Characteristics
Appendix Electrical Characteristics Be sure to install the battery in the printer. The printer does not operate with the single charger only. Dedicated battery Model: D171A Rated voltage: DC 7.2 V (OT-BY20) Capacity: Typ. 1240 mAh, Min. 1170 mAh Continuous operating Wi-Fi model Power save mode enabled: Approx. - Page 90 For print quality When using only battery for power supply Temperature: 5 to 45°C {41 to 113°F} Humidity: 10 to 90% RH When using battery and single charger Temperature: 5 to 40°C {41 to 104°F} Humidity: 10 to 90% RH For storage Temperature: -25 to 70°C {-13 to 158°F} Storage time: 120 hours...
-
Page 91: External Dimensions And Mass
Height: Approximately 43.6 mm {1.72"} (the belt clip excluded) Mass: Wi-Fi model: Approximately 221 g {0.49 lb} Bluetooth model: Approximately 212 g {0.47 lb} (Battery included; belt clip and roll paper excluded) 79.0 119.8 43.6 54.2 Units: mm Colors EBCK (Epson Black) -
Page 92: Specifications Of Interfaces And Connectors
04B8h 04B8h Product ID 0202h 0E1Ch String Descriptor Manufacturer EPSON EPSON Product TM-P20 Wi-Fi TM-P20 Wi-Fi TM-P20 Bluetooth TM-P20 Bluetooth Serial number Character string based on the prod- Character string based on the prod- uct serial number uct serial number... -
Page 93: Wireless Lan Interface
Appendix Wireless LAN Interface Countries where Wireless LAN can be used are limited. Since notes are provided for each country, check the sheet supplied with the product. Specification IEEE802.11a/b/g/n (2.4 GHz band or 5 GHz band) compliant wireless LAN communication compatible ... - Page 94 Settings in SimpleAP mode (Factory default settings) Parameter Setting value SSID EPSON_Printer Passphrase 12345678 IP Address 192.168.192.168 Subnet mask 255.255.255.0 Printing communication protocol LP, LPR: Transfers printing data TCP Socket Port: Transfers printing data and printer status via bidirectional direct socket communication. LP, LPR ...
- Page 95 Appendix Notes on Wireless LAN connection Because not all the combinations of the printer and wireless LAN devices have been checked for operation, the operation of the printer in combination with all the wireless LAN devices is not guaranteed. Especially in the ad-hoc mode, the printer may not operate normally, depending on the combination of the device to connect with.
-
Page 96: Bluetooth Wireless Interface
Setting Contents Setting Items Initial Settings Bluetooth communication Bluetooth passkey "0000" settings Bluetooth device name TM-P20 : "TM-P20_xxxxxx" (Where xxxxxx is the last six digits in the serial number) Bundle Seed ID "TXAEAV5RN4" Enable/Disable auto reconnect to "1" (Enable) iOS device... - Page 97 Appendix Auto Reconnect Enabled Disabled Feature Printer operations P e r f o r m t h e f o l l o w i n g r e c o n n e c t i o n Wait for a connection from the Bluetooth when Bluetooth is dis- sequence.
- Page 98 Solution Do not send data to the printer if the printer is not ready to print. For developers using the SDK from Epson, see the User's Manual - Chapter 3 Programming Guide - "Printing After Checking the Printer Status". Since Bluetooth is disconnected when this occurs, if the auto reconnect feature is not enabled, you need to reconnect from the Bluetooth settings screen on the iOS device.
-
Page 99: Nfc Tag
Appendix The iOS application cannot receive the data sent from the printer Situation Although the printer sends data to the iOS device and the data is received by the iOS device, depending on the combination of the iOS version and the iOS device, the iOS application may not be able to receive the data. Conditions This may occur in combinations of the following conditions. -
Page 100: Character Code Tables
Character Code Tables Refer to the following URL regarding the character code table. http://www.epson-biz.com/pos/reference/charcode/...