Table of Contents
Advertisement
Available languages
Available languages
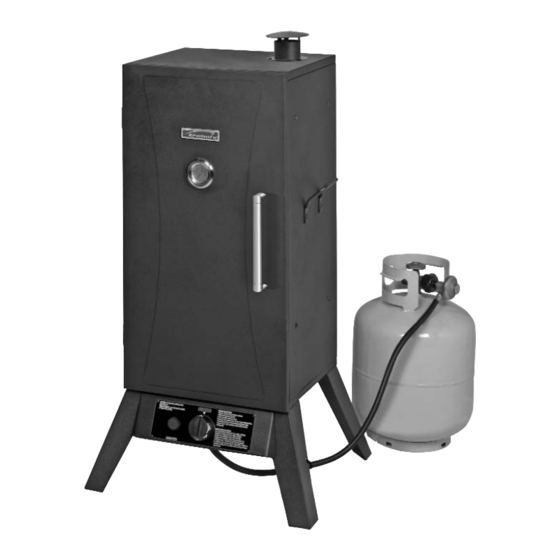
Outdoor Gas Smoker
Use & Care Guide
Ahumador a Gas
para uso al Aire Libre
Manual de uso y cuidado
Kenmore Model Number :
Numero de Modelo Kenmore:
125.15884800
NOTICE TO INSTALLER:
LEAVE THESE INSTRUCTIONS WITH THE GRILL
OWNER FOR FUTURE REFERENCE.
NOTICE TO CONSUMER:
RETAIN THIS OWNER'S MANUAL FOR FUTURE
REFERENCE.
AVISO PARA EL INSTALADOR:
ENTREGUE ESTAS INSTRUCCIONES AL
PROPIETARIO DE LA PARRILLA PARA REFERENCIA
FUTURA.
AVISO PARA EL PROPIETARIO:
GUARDE ESTAS INSTRUCCIONES DE LA PARRILLA
PARA REFERENCIA FUTURA.
Customer Support Center
Centro para Servicio al Cliente
Call us first if you have any problem with this product. We
can help you with questions about assembly and grill
operation or if there are damaged or missing parts when you
unpack this unit. Please call before returning to the store.
Llámenos primero si usted tiene cualquier problema con
este producto. Podemos ayudarle con preguntas sobre
asamblaje y la operación de esta parrilla o con piezas
dañadas o que hacen falta cuando usted saque esta unidad
de su envase. Por favor llame antes de volver a la tienda
donde hizo la compra de este producto.
1-800-848-8915
8:30am-5:00pm CST, Mon thru Friday
140-5525-0
1007
Rev. 1
Sears, Roebuck and Co., Hoffman Estates, IL 60179 U.S.A.
In the space below, record the model and serial
numbers and purchase date of your Outdoor
Electric Smoker. You will find the model and serial
numbers on the back of the unit.
En el espacio abajo, registre el modelo y los
números de serie y la fecha de compra de su
Ahumador Eléctrico para uso al aire libre. Usted
encontrará el modelo y los números de serie en la
parte posterior de la unidad.
Model No. / Num. de Modelo
Serial No. / Num. de Serie
Purchase Date / Dia de Compra ______________________
Keep this booklet and your Sears sales receipt in a safe
place for future reference.
Guarde esta manual y su recibo de venta de Sears en un
lugar seguro para referencia futura.
______________________
______________________
www.sears.com
Advertisement
Chapters
Table of Contents

Related Manuals for Kenmore 125.15884800


Summary of Contents for Kenmore 125.15884800
- Page 1 Purchase Date / Dia de Compra ______________________ Keep this booklet and your Sears sales receipt in a safe place for future reference. Guarde esta manual y su recibo de venta de Sears en un lugar seguro para referencia futura. ______________________ ______________________ www.sears.com...
-
Page 2: Table Of Contents
Kenmore One Year Full Warranty If this product fails due to a defect in material or workmanship within one year from the date of purchase, contact Sears at 1-800-4-MY-HOME® to arrange for free repair (or replacement if repair proves impossible). This warranty gives you specific legal rights, and you may also have other rights which vary from state to state. - Page 3 • DO NOT leave hot ashes unattended until the smoker cools completely. • DO NOT move the smoker while it is in use. Allow the smoker to cool completely before moving or storing. WARNING • This smoker becomes extremely hot - allow the smoker to cool completely before handling.
-
Page 4: Product Features
• While the smoker is not in use, the gas must be turned off at the supply cylinder. • LP gasses are heavier than air, tend to pool and collect in low- lying areas, are easily ignited and are highly flammable. - Page 5 PARTS DIAGRAM FOR MODEL 125.15884800 Inspect contents of the box to ensure all parts are included and undamaged.
- Page 6 Q Q U U A A N N T T I I T T Y Y Heat Resistant Washers (Door Handle) 1/4-20 X 5/8” Bolts 10-24 Flange Nuts 10-24 X 5/8” Bolts 10-24 X 1/3” Bolts #10 Washers HARDWARE BAG CONTENTS Heat Ressistant Washers (Door Handle) (15) 1/4-20 x 5/8”...
-
Page 7: Assembly Instructions
Bolt Holes Support Tabs ASSEMBLY Choose a good, cleared assembly area and get a friend to help you put your smoker together. Lay cardboard down to protect smoker finish and assembly area. CAUTION: Some parts may contain sharp edges. Wear protective gloves if necessary. - Page 8 Attach the loose igniter wire to the igniter on the control panel as shown below. Note: With the help of a friend, turn the smoker body to its upright position. Try to minimize stress on legs. CAUTION: Make sure the valve gas orifice slides and fits into the burner tube.
- Page 9 Complete steps for both sides of the cabinet assembly. Step 9 Insert the wood box rack into the bottom of the smoker. The feet of the rack sit in the four indentations in the bottom. Step 10 Set the wood chip box onto the rack. Make sure it is seated properly and securely in the center of the rack.
- Page 10 Step 12 Slide the water pan into the bottom rack position as shown. Make sure water pan is firm and level. Step 13 Mount the door handle with two 10-24 X 1/3” bolts, two #10 washers and two heat resistant washers. Insert each bolt through the door from the inside.
- Page 11 When an LP tank is not attached to the smoker, use the S-Hook to hang the hose/regulator from the carry handle on the side of the smoker. This will help prevent dirt and other particles from plugging the end of the assembly.
- Page 12 Tying the hose to the leg helps prevent the hose from coming into contact with the hot burner chamber. Inspect the installation underneath the smoker to ensure that the hose is not rubbing any portion of the burner chamber. Gas Smoker Assembled...
-
Page 13: Connecting The Lp Tank
1. The knob on the LP tank must be closed. See that the knob is turned clockwise to a full stop. 2. Check that control knob on the smoker is turned off. 3. Remove the protective cap from the LP tank valve and coupling nut, if present. -
Page 14: Connecting The Lp Tank
The gas hose/regulator assembly should be totally extended to the maximum distance so that the hose is straight and the tank is as far from the smoker as it can LP tanks are intended for operation in the upright position only. -
Page 15: Lighting Procedures
If burner still fails to light try match lighting the smoker using the instructions noted below. 8. Once the burner is lit, then close the door to allow heat to accumulate. -
Page 16: Cooking Instructions
Refer to the section that explains flavoring wood for recommended use of flavoring wood. • Place the water bowl inside the smoker in the lowest rack position as explained in the assembly section of this manual. Carefully fill the water bowl with water or marinade up to 1 inch below the rim. -
Page 17: Temperature Chart
Check water level periodically and add water if low. For best results and to retain heat, avoid opening the door of the smoker while in use. When the door must be opened, only open it briefly. The smoker will quickly resume cooking temperature after the door is closed. -
Page 18: Storage
• If rust is present on the exterior surface of the smoker, clean the area with steel wool or emery cloth and use heavy duty, heat resistant paint. -
Page 19: Información De Garantía
Si este producto falla debido a un defecto en material o a la ejecución en el plazo de un año a partir de la fecha de la compra, comuníquese a Sears al 1-800-4-MY-HOME® para hacer arreglos de reparación gratuita (o reemplazo si reparación es imposible). - Page 20 ADVERTENCIA • Este manual de uso y cuidado contiene información importante necesaria para uso y cuidado apropiado de este aparato. • Lea y siga todas las advertencias e instrucciones antes de usar este aparato. • Guarde este manual para referencia futura. •...
-
Page 21: Características Del Producto
ADVERTENCIA • Un cilindro de gas LP no conectado para uso no se debe almacenar en la vecindad del ahumador o otro aparato. No almacene los cilindros de gas LP menos de 10 pies del ahumador. Los cilindros de gas LP se deben almacenar al aire libre, fuera del alcance de niños. - Page 22 DIAGRAMA DE PIEZAS PARA MODELO 125.15884800 Inspeccione el contenido de la caja para cerciorarse de que tenga todas las piezas intactas.
- Page 23 CONTENIDO DE BOLSA DE FERRETERÍA C C A A N N T T I I D D A A D D Arandelas resistentes al calor (manija de la puerta) 1/4-20 X 5/8” Pernos 10-24 Tuercas de Reborde 10-24 X 5/8” Pernos 10-24 X 1/3”...
-
Page 24: Instrucciones De Asamblaje
Pierna con Agujero Orificios para los Pernos Lengüetas de Soporte ENSAMBLAJE Seleccione una zona buena y despejada y pídale a un amigo a que le ayude a ensamblar su ahumador. Ponga cartón debajo para proteger el acabado del ahumador y la zona del ensamblaje. PRECAUCIÓN: Algunas piezas pueden tener bordes filosos. - Page 25 Paso 4 Coloque el ensamblaje de la hornilla sobre el gabinete como se muestra. IMPORTANTE: El tubo del quemador debe deslizarse debidamente por el orificio de la válvula de gas como se muestra. Paso 5 Fije el ensamblaje del quemador con los tres pernos 1/4-20 X 5/8"...
- Page 26 Paso 8 Alinee la manija lateral con los orificios correspondientes ubicados lateralmente en el gabinete como se muestra. Las manijas deben ir colocadas en posición vertical con los orificios para los pernos en la parte inferior como se muestra. Inserte dos pernos 10-24 X 5/8"...
- Page 27 Paso 12 Deslice la bandeja de agua a la parte inferior de la rejilla como se muestra. Asegúrese de que la bandeja de agua esté firme y nivelada. Paso 13 Monte la manija de la puerta con dos pernos 10-24 X 1/3", dos arandelas #10 y dos arandelas resistentes al calor.
- Page 28 Paso 14 Inserte el indicador biselado de temperatura a través del agujero de montaje en el frente de la puerta. Coloque la placa trasera y una tuerca hexagonal al vástago del indicador de temperatura desde el interior del panel de la puerta y apriete bien. Paso 15 Coloque un extremo del gancho en “S”...
- Page 29 Step 18 Con una abrazadera, fije la manguera a la pata frontal como se muestra. No jale la abrazadera para apretarla, déjela sólo lo suficientemente floja para que la manguera puede ajustarse en caso necesario. Si amarra la manguera a la pata evitará que la manguera toque la cámara caliente del quemador.
-
Page 30: Conexión De Cilindro De Propano Líquido (Lp)
CONECTANDO EL TANQUE DE GAS LP ADVERTENCIA DEBEN SEGUIRSE TODAS LAS INSTRUCCIONES Y PRECAUCIONES DE ESTA PÁGINA PARA EVITAR DAÑOS, INCENDIOS O LESIONES. 1. Debe cerrarse la perilla del tanque de gas LP. Fíjese que la perilla haya sido girada hasta el tope en el sentido de las manecillas del reloj. -
Page 31: Instrucciones De Operación
CONECTANDO EL TANQUE DE GAS LP El ensamblaje de la manguera o del regulador debe manipularse cuidadosamente para evitar que se contamine con mugre u objetos extraños. Limpie y revise la manguera antes de usar cada vez la unidad. Si nota abrasión, desgaste o fugas, debe reemplazar la manguera antes de encender y operar la unidad. -
Page 32: Instrucciones De Encendido
C C Ó Ó M M O O A A G G R R E E G G A A R R L L E E Ñ Ñ A A O O C C A A R R B B Ó Ó N N Para agregar las astillas de madera antes del cocimiento, simplemente llene la caja para astillas de madera con sus pedacitos de leña favoritos para darle sabor. -
Page 33: Instrucciones De Cocción
C C Ó Ó M M O O A A P P A A G G A A R R E E L L A A H H U U M M A A D D O O R R PRECAUCIÓN: El ahumador puede calentarse mucho durante el uso. -
Page 34: Tabla De Temperatura
• Revise con regularidad el nivel del agua y añada si hay poca. Para resultados óptimos y conservar el calor, procure no abrir la puerta del ahumador mientras lo usa. Si tiene que abrir la puerta, hágalo sólo brevemente. El ahumador volverá... -
Page 35: Almacenamiento
• Si su indicador de calor parece ya no estar bien calibrado, retírelo de la puerta del ahumador aflojando y quitando la tuerca de montaje desde el interior. Hay una segunda tuerca montada en la parte trasera del indicador de calor que puede girarse para ajustar la aguja del indicador. - Page 36 Sears Parts & Repair Service Center 1-800-488-1222 www.sears.com To purchase a protection agreement on a product serviced by Sears: 1-800-827-6655 (U.S.A.) Para pedir servicio de reparación a domicilio, y para ordenar piezas:...