Table of Contents
Advertisement
GE
Measurement and control
Druck DPI611
Portable Pressure Calibrator
User Manual – K0571
© 2014 General Electric Company. All Rights Reserved. Specifications are
subject to change without notice. GE is a registered trademark of General
Electric Company. Other company or product names mentioned in this
document may be trademarks or registered trademarks of their respective
companies, which are not affiliated with GE.
Advertisement
Table of Contents

Related Manuals for GE Druck DPI611


Summary of Contents for GE Druck DPI611
- Page 1 User Manual – K0571 © 2014 General Electric Company. All Rights Reserved. Specifications are subject to change without notice. GE is a registered trademark of General Electric Company. Other company or product names mentioned in this document may be trademarks or registered trademarks of their respective...
- Page 2 Measurement and control Revision History This document supersedes all previously issued versions, providing new or revised information. The most recent publication can be determined by comparing the last three characters at the end of the part number and the date issued. DPI 611 Portable Pressure Calibrator User Manual Part Number: K0571 Revision...
-
Page 3: Table Of Contents
User Manual Druck DPI611 Contents 1 INTRODUCTION............................7 1.1 EQUIPMENT IN THE BOX ......................7 1.2 OBSERVANCE OF THE USER MANUAL ................7 1.3 GENERAL SAFETY PRECAUTIONS ..................7 1.4 GENERAL WARNINGS ......................8 1.5 ELECTRICAL WARNINGS ......................9 1.6 PRESSURE WARNINGS ......................10 1.7 OVERVOLTAGE CATEGORY .................... - Page 4 1.11.8 Pneumatic Hose ......................18 1.11.9 Pressure Adaptor set ....................19 1.11.10 Comparator Adaptor (P/N IO620-COMP) ..........19 1.12 DRUCK DPI611, MODES ....................... 20 1.12.1 Power ON .......................... 20 1.12.2 Power OFF ........................20 1.12.3 Power up from Standby Mode ................21 1.13 NAVIGATION ..........................
- Page 5 User Manual Druck DPI611 1.16.5 For more information contact ................26 1.17 ENVIRONMENT .......................... 26 1.18 MARKS AND SYMBOLS ......................27 2 OPERATIONS ............................28 2.1 PNEUMATIC PRESSURE OPERATIONS ................. 28 2.1.1 Introduction ........................28 2.1.2 Release the Pressure ....................28 2.1.3...
- Page 6 User Manual Druck DPI611 3.4.1 Transfer ..........................58 3.4.2 Erase ............................ 59 3.4.3 Memory Status ......................59 3.5 DATA FORMAT ........................... 59 4 DOCUMENTATION ..........................61 4.1 ANALYSIS ............................61 4.2 SET-UP ............................62 4.2.1 Define the Reference Channel ................62 4.2.2...
-
Page 7: Introduction
OBSERVANCE OF THE USER MANUAL This manual contains safety and battery installation information for the Druck DPI611. It is the responsibility of the customer, to make sure that all personnel operating and maintaining the equipment are correctly trained and qualified. Before operating or using the equipment read and obey all sections, including all WARNINGS and CAUTIONS given in the Quick Start Guide. -
Page 8: General Warnings
User Manual Druck DPI611 Make sure that: • a) All work areas are clean and clear of unwanted tools, equipment and materials. b) All unwanted consumable materials are discarded in accordance with local health and safety and environmental regulations. GENERAL WARNINGS It is dangerous to ignore the specified limits for the instrument •... -
Page 9: Electrical Warnings
User Manual Druck DPI611 ELECTRICAL WARNINGS The DC input to the DPI611 is rated at 5V (+/-5%) 4 Amps. • External circuits should have appropriate insulation to the • mains. To prevent electrical shocks or damage to the instrument, do •... -
Page 10: Pressure Warnings
User Manual Druck DPI611 PRESSURE WARNINGS Some liquid and gas mixtures are dangerous. This includes • mixtures that occur because of contamination. Make sure that the equipment is safe to use with the necessary media. It is dangerous to attach an external source of pressure to a •... -
Page 11: Overvoltage Category
User Manual Druck DPI611 Connect only clean equipment to the instrument. To avoid any • contamination, an external Dirt Moisture Trap (See Section 1.11.7) is recommended. Always wear appropriate eye protection when working with • pressure. OVERVOLTAGE CATEGORY The following summary of installation and measurement overvoltage categories are derived from IEC61010-1. -
Page 12: Install The Battery
User Manual Druck DPI611 Remove the plastic film that protects the display. • 1.8.2 Install the Battery Remove the battery cover by loosening the captive • battery cover fixing screw and lifting the cover upwards. Place the batteries in the battery compartment with •... -
Page 13: Parts
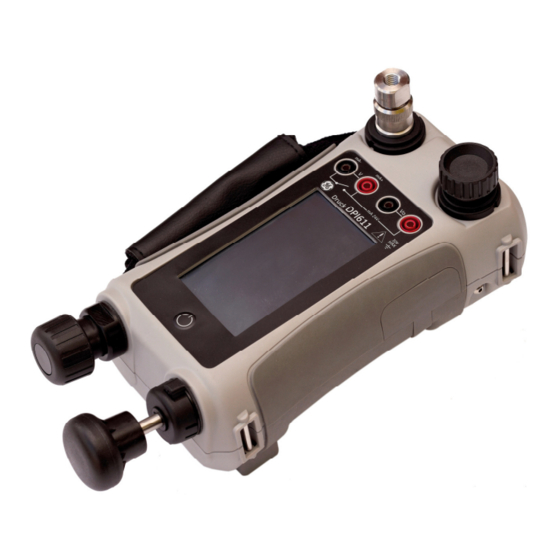
User Manual Druck DPI611 PARTS Figure 1-2 DPI611 Pressure Calibrator Page 13 of 79 [EN] English – K0571 Issue 1... -
Page 14: Test Port
User Manual Druck DPI611 Table 1-2 ON or OFF button. Pump mechanism and pressure/vacuum selector. Pneumatic volume adjuster. Test port: To attach the device under test. Pneumatic pressure release valve to release pressure in the system. Electrical connectors for: Voltage Measure (V);... -
Page 15: Pneumatic Pressure Release Valve
User Manual Druck DPI611 1.9.2 Pneumatic Pressure Release Valve This is a needle point valve that lets you release the pressure or vacuum, or seal the system. OPEN CLOSE Figure 1-4 Pressure Release Valve 1.10 SELECTOR Before you turn the pressure/vacuum selector to + or -, release all the pressure. -
Page 16: Pump
User Manual Druck DPI611 1.10.1 Pump When you have set the operation to pressure or vacuum (See Section 1.10), seal the system (See Section 1.9.2) and use the pump to set the necessary pressure or vacuum. Figure 1-6 then make... -
Page 17: Accessories
User Manual Druck DPI611 1.11 ACCESSORIES: 1.11.1 Carry Case (P/N IO611-CASE-1) A tailored fabric carry case with carrying strap allows the DPI611 to be used without removing it from the case. 1.11.2 Rechargeable Battery pack (P/N IO611-BATTERY) Use in place of AA cells. The battery pack is charged within the instrument. -
Page 18: Dirt Moisture Trap (P/N Io620-Idt621)
User Manual Druck DPI611 1.11.7 Dirt Moisture Trap (P/N IO620-IDT621) It prevents contamination of the DPI611 pneumatic system and cross contamination from one device under test to another. The trap connects directly to the pressure port and replicates DPI611 quick... -
Page 19: Pressure Adaptor Set
User Manual Druck DPI611 1.11.9 Pressure Adaptor set A set of test point adaptors to connect the tool-less quick fit DPI611 pressure port or the extension hoses to the device under test. P/N IO620-BSP: G1/8 male and G1/4 male, G1/4 female, G3/8 female and G1/2 female. -
Page 20: Druck Dpi611, Modes
User Manual Druck DPI611 1.12 DRUCK DPI611, MODES 1.12.1 Power ON From OFF – momentarily press the power button until the GE Logo appears. Power ON/OFF Figure 1-8 Power Button 1.12.2 Power OFF Press and Release the Power Button: Select SWITCH OFF from the POWERDOWN OPTIONS window displayed. -
Page 21: Power Up From Standby Mode
User Manual Druck DPI611 GO TO STANDBY– DPI611 placed in standby mode – Reduced power consumption from operating mode – recommended if unit is to be inactive for short periods. (DPI611 has fast turn on from STANDBY mode). CANCEL – Touch CANCEL option if you do not want to Switch Off or Standby the instrument. -
Page 22: Set Date, Time And Language
Select: DASHBOARD >> SETTINGS >> THEME 1.13.3 DRUCK DPI611 Manual Select the Help icon on the Dashboard to access the manual. The manual can be downloaded onto a memory stick for viewing or printing on a remote PC. -
Page 23: Upgrading The Software
User Manual Druck DPI611 Note: If the software revision number is highlighted red then an upgrade is available. 1.14.2 Upgrading the Software Follow the website instructions to download the files onto a USB flash memory drive. www.ge-mcs.com DASHBOARD >> SETTINGS >>... -
Page 24: Maintenance
1.15 MAINTENANCE The DPI611 instrument contains no user serviceable parts and should be returned to a GE service center or an approved service agent for all repairs. Do not dispose of this product as household waste. Use an approved organization that collects and/or recycles waste electrical and electronic equipment. -
Page 25: Cleaning
1.16 INSTRUMENT RETURN 1.16.1 Returned Material Procedure If the instrument is unserviceable and requires a repair return to a GE Service Center or approved Service Agents. Web site: www.ge-mcs.com Contact the GE Service Center, either by phone, fax or E-mail to obtain a Returned Material Authorization (RMA) number, providing the following information: Product (i.e. -
Page 26: Important Notice
Do not dispose of this product or its battery as household waste. Use an approved organization that collects and/or recycles the applicable item. 1.16.5 For more information contact GE Sensing customer service department: www.ge-mcs.com 1.17 ENVIRONMENT The following conditions apply for both shipping and storage: Temperature Range -20°C to +70°C (-40°F to +158°F) -
Page 27: Marks And Symbols
User Manual Druck DPI611 1.18 MARKS AND SYMBOLS Complies with European Union directives USB ports: Type A; Mini Type B connector Ground (Earth) DC adaptor polarity: the Centre of the plug is negative Page 27 of 79 [EN] English – K0571 Issue 1... -
Page 28: Operations
User Manual Druck DPI611 2 OPERATIONS PNEUMATIC PRESSURE OPERATIONS 2.1.1 Introduction This section gives examples of how to connect and use the DPI611 pressure calibrator for the necessary pressure or vacuum operations. Before you start: Read and understand the “Safety” section. - Page 29 User Manual Druck DPI611 To prevent damage to the instrument, do not let dirt get into the pressure mechanism. Before you attach equipment, make sure it is clean. Figure 2-3 Pressure Port The test port uses “Quick fit” pressure adaptors; See Section 1.11 (Accessories).
-
Page 30: Vacuum Or Pressure Operation
User Manual Druck DPI611 Table 2-1 Step Procedure Remove the adaptor Use an applicable seal for the pressure connection: i. NPT type: Use an applicable sealant on the thread. ii. BSP (parallel) type: We recommend a bonded seal at the bottom. -
Page 31: Calibrator Operations
User Manual Druck DPI611 Table 2-2 Table 2-3 Step Procedure (Vacuum) Step Procedure (Pressure) Set to vacuum operation Set to Pressure operation (-). (+). To do equal adjustments To do equal adjustments (up or down) at the end of (up or down) at the end of... - Page 32 User Manual Druck DPI611 Figure 2-6 Task Menu Saving Tasks At any point within the TASK MENU the currently active tasks can be saved to FAVOURITES by selecting Save Task. Note: Saved Function is what is currently active in the calibrator window. It is NOT a selected Task –...
- Page 33 User Manual Druck DPI611 Figure 2-7 Calibrator Select the required function by touching either the appropriate text or diagram. The DPI611 will set the functions and return to the main Calibrator screen. Page 33 of 79 [EN] English – K0571 Issue 1...
- Page 34 User Manual Druck DPI611 Figure 2-8 Calibrator with selected option III. Functions can be copied to FAVOURITES by selecting as shown in Figure 2-8 and selecting Copy Task If the required task is not available as a Default, a new task should be created using CUSTOM TASK.
- Page 35 User Manual Druck DPI611 Figure 2-9 Favourites Select the required function by touching either the appropriate text or diagram. The DPI611 will set the functions and return to the main calibrator screen. III. Task can be deleted by selecting DELETE...
- Page 36 User Manual Druck DPI611 Figure 2-10 Task Settings Menu Select to enter the CHANNEL SETTINGS menu. is used for pressure measurements. (See Section 2.3) IDOS is used for external IDOS sensors. (See Section 2.4) Page 36 of 79 [EN] English – K0571 Issue 1...
- Page 37 User Manual Druck DPI611 Figure 2-11 Channel Settings Menu III. Setup a channel for measurement DIRECTION selects Source or • measure for the selected function. FUNCTION selects the function required • (E.g.: Current or Voltage). For more options, scroll down the menu by swiping the display from bottom to top.
-
Page 38: Set The Function Utility Options
User Manual Druck DPI611 UTILITY selects the required utility (See Section • 2.2.2 for details). CAPTION allows the user to change the • caption, if required. CAPTION RESET allows the user to reset the • caption. Once all settings have been selected, press •... - Page 39 User Manual Druck DPI611 Figure 2-12 Max/Min Example b. Switch Test This utility is available with pressure functions. The additional values displayed show signal values (measure or source) when the instrument detects a switch opening and closing. The difference between the two values is displayed as hysteresis value for the switch.
- Page 40 User Manual Druck DPI611 Figure 2-13 Switch Test Example c. Relief Valve This utility is only available with measure functions. This utility tests circuits or mechanisms that have a cut-out response when an input reaches a defined threshold value. The utility allows the user to select a mode of operation which can be rising or falling.
- Page 41 User Manual Druck DPI611 Figure 2-14 Relief Valve Example Rising Falling Figure 2-15 Relief Valve Utility Page 41 of 79 [EN] English – K0571 Issue 1...
-
Page 42: Measurement Display Options
User Manual Druck DPI611 2.2.3 Measurement Display Options There are 2 display views in the CALIBRATOR screen when multiple channels are in use: Figure 2-16 displays a reduced view of all the selected • channels. Figure 2-16 Calibration Window – Reduced View Figure 2-17 displays an expanded view of the selected •... -
Page 43: Example Procedures
User Manual Druck DPI611 Figure 2-17 Calibration Window - Expanded View The display options can be changed by pressing the channel the user wants to display in expanded view. Selecting displays all channels in the reduced view. 2.2.4 Example Procedures... - Page 44 User Manual Druck DPI611 Figure 2-18 Measure current on CH1. Range ± 55 mA 1. Set the applicable software options. 2. Complete the electrical connections and continue with the measure or source operation. 3. Source only (Automation). Set the applicable output value.
- Page 45 User Manual Druck DPI611 1. Set the applicable software options. 2. Complete the electrical connections and continue with the measure operation. c. Example Procedure: Measure or Source Current with External Loop drive Figure 2-20 and Figure 2-21 show how to set-up to •...
- Page 46 User Manual Druck DPI611 Figure 2-21 Source current with external loop power. (Range: 0 to 24 mA) 1. Set the applicable software options. 2. Complete the electrical connections and continue with the measure or source operation. 3. Source only (Automation): Set the applicable output value.
- Page 47 User Manual Druck DPI611 Note: If there is an electrical function already selected it will automatically be disabled. The display will show a screen message. Figure 2-22 Switch Test e. Example Procedure: Measure Voltage with Internal Voltage Source Figure 2-23 shows CH1 set-up to measure a DC voltage (±...
-
Page 48: Pressure Calibration
User Manual Druck DPI611 Figure 2-23 Measure DC Volts (10V) or DC mV (10V) on CH1 1. Set the applicable software options. 2. Complete the electrical connections and continue with the measure operation. PRESSURE CALIBRATION PRESSURE TASKS are available in the TASK MENU. See Section 2.2.1 Basic Calibrator Operation for details. -
Page 49: Set Up A Leak Test
User Manual Druck DPI611 Figure 2-24 Channel Settings Note: UNITS and UTLILITIES are accessed through selecting the function through CUSTOM TASK. 2.3.1 Set up a Leak Test This utility is only available in Pressure Measurement modes. This utility provides a test to calculate the leak of a system. - Page 50 User Manual Druck DPI611 Figure 2-25 Leak Test Example To configure leak test: 1. Set the Utility to Leak Test. Select: 2. Set the following periods WAIT TIME: time before test starts hours:minutes:seconds (hh:mm:ss). TEST TIME: The period of the leak test in hours:minutes:seconds...
-
Page 51: Set The Pressure Module To Zero
User Manual Druck DPI611 3. Use to start the Leak Test 4. Use to stop the Leak Test. 2.3.2 Set the Pressure Module to Zero Use this option to write a new zero pressure value to the pressure module in use. The sensor adjustment is permitted if it obeys the condition that follows: Adjustment ≤10% FS positive pressure value (for the Sensor). -
Page 52: Measure Pressure: Idos Option
IDOS instrument. Before using an IDOS module, (Ref: User Manual: K0378, Druck IDOS UPM). Note: To attach an IDOS module to the Druck DPI611 use an IO620-IDOS-USB adaptor. Figure 2-26 IDOS Module 2.4.1... -
Page 53: Idos Function Procedures
User Manual Druck DPI611 2.4.2 IDOS Function Procedures The procedures for an IDOS module are the same as for the internal pressure sensor. Enable the IDOS module from the TASK menu: IDOS function (Measure or Differential) • If necessary, change the Units for the function •... -
Page 54: Data Logging Operation
User Manual Druck DPI611 3 DATA LOGGING OPERATION Select the DATA LOGGING option on the Dashboard. The Data Logging function records instrument readings so they can be reviewed or analyzed. Figure 3-1 Data Logging The data file can be reviewed by using the following: RECALL •... -
Page 55: Set-Up
User Manual Druck DPI611 This chapter describes how to use the Data Logging function to log data to a file. In Data Logging mode the display data from all active channels is stored at each data point. The data can be stored: Periodically •... - Page 56 User Manual Druck DPI611 Figure 3-2 Data logging Setup FILENAME • Enter the filename (10 characters maximum). TRIGGER • Select one of the following: a. Key Press (logs one data point each time the button is pressed). b. Periodic (logs one data point at a set time interval).
-
Page 57: Operation
User Manual Druck DPI611 To start Data Logging Mode: 1. Select appropriate options and enter filename for Data Log file. Note: When entering filename it is first necessary to select destination (INTERNAL or USB FLASH DRIVE) 2. Select the button. -
Page 58: File Management
User Manual Druck DPI611 5. To go back one data point, press the Previous Log button 6. Exit the screen. FILE MANAGEMENT The data log file management options are as follows: TRANSFER • Upload data log files to another computer. -
Page 59: Erase
User Manual Druck DPI611 3.4.2 Erase The Erase options are as follows: ERASE ONE FILE: Select file and tap tick bottom right • on the screen to erase. CLEAR INTERNAL: Clears all internal files. • 3.4.3 Memory Status The MEMORY STATUS button will show the amount of... - Page 60 User Manual Druck DPI611 Figure 3-3 Example .csv Data log File Page 60 of 79 [EN] English – K0571 Issue 1...
-
Page 61: Documentation
User Manual Druck DPI611 4 DOCUMENTATION This chapter describes the Documenting functions available with the Druck DPI611 calibrator as follows: ANALYSIS • RUN PROCEDURE • ANALYSIS The Analysis function takes readings from two or more DPI611 channels to calibrate the transfer characteristic of the device being tested. -
Page 62: Set-Up
The tolerance test result is shown a Pass Fail • icon. SET-UP 1. Set the Druck DPI611 channels in the Calibrator function. (See Section 2.2). 2. Connect the calibrator to the device under test. 3. Enter the Documenting function. DASHBOARD >>... -
Page 63: Define Each Input Channel
User Manual Druck DPI611 4.2.2 Define each Input Channel Tap each Input channel button to set the Input options. Figure 4-2 Select Input Options SCALING The scaling values are two pairs of values that define the ideal transfer characteristic: The maximum and minimum Reference signal values... -
Page 64: Analysis Function
User Manual Druck DPI611 LINEARITY - The transfer characteristic from Reference to Input signal. This can be one of the following: Linear - a proportional response. Square Root - often found in flow sensors. TOLERANCE - The test limits for the deviation from the transfer characteristic. -
Page 65: Run Procedure
A copy of the 4 Sight Calibration Software. • Standard USB lead (as supplied). • A Druck DPI611 calibrator device driver available as a • download from the website www.ge-mcs.com Page 65 of 79 [EN] English – K0571 Issue 1... -
Page 66: Sequence To Upload And Download File
Use the Download button in calibrator manager to Download the file to the Druck DPI611 calibrator. A communications symbol will be displayed at the bottom of the screen. Select: DASHBOARD >>... -
Page 67: Calibration
Note: A calibration technician must have the necessary technical knowledge, documentation, special test equipment and tools to carry out the calibration work on this equipment. Note: GE Measurement and Control can provide a calibration service that is traceable to international standards. Note: GE Measurement and Control recommend returning the instrument to the manufacturer or an approved service agent for calibration. -
Page 68: Calibration Adjustments
User Manual Druck DPI611 Note any deviations between the instrument and the pressure standard and consider traceability (accuracy to a National Standard). If, after a calibration check, the results exceed the tolerance in the specification (or other suitable performance standard), carry out a calibration adjustment. - Page 69 User Manual Druck DPI611 Table 5-1 Calibration equipment Function (ppm = parts per million) Current (mA) calibrator. Current Accuracy - Current measure/source, See Table 5-2 and Table 5-3. Volts calibrator. Voltage Accuracy - Voltage measure/source, or Table 5-6. Table Millivolts mV calibrator.
-
Page 70: Procedures: Current (Measure)
User Manual Druck DPI611 3. Select range (if applicable) 4. Follow on-screen instructions When the calibration is complete, set the next calibration date. PROCEDURES: CURRENT (measure) Do the procedure as follows: 1. Connect the applicable calibration equipment (See Table 2. Let the equipment get to a stable temperature (minimum: 5 minutes since the last power on). -
Page 71: Procedures: Current (Source)
User Manual Druck DPI611 PROCEDURES: CURRENT (source) When recalibrating measure and source functions for this range, the measure function must be adjusted before the source function. Do the procedure as follows: 1. Connect the applicable calibration equipment (See Table CH1 (24 mA range): (See Table 5-3). -
Page 72: Procedures: Dc Mv/Volts (Measure)
User Manual Druck DPI611 Table 5-3 Current (source) error limits Calibrator Permitted Applied uncertainty DPI611 error (mA) (mA) 0.00008 0.0013 0.00023 0.0017 0.00044 0.0020 0.0065 0.0024 0.0012 0.0028 PROCEDURES: DC mV/Volts (measure) Do the procedure as follows: 1. Connect the applicable calibration equipment (See Table 5-1). - Page 73 User Manual Druck DPI611 Volts (V): 0, 5, 10, 20, 21, 30. Check that the error is within limits (See Table 5-4 • and Table 5-5). Table 5-4 Millivolts (measure) error limits Calibrator Permitted Applied uncertainty DPI611 error (mV) (mV) ±2000...
-
Page 74: Procedures: Dc Volts (Source)
User Manual Druck DPI611 PROCEDURES: DC Volts (source) Do the procedure as follows: 1. Connect the applicable calibration equipment (See Table 2. Let the equipment get to a stable temperature (minimum: 5 minutes since the last power on). 3. Use the calibration menu (See Section 5.4) to do a two-point... -
Page 75: Procedures: Pressure Indicator
User Manual Druck DPI611 PROCEDURES: PRESSURE INDICATOR Do the procedure as follows: 1. Connect the instrument to the pressure standard. 2. Let the equipment get to a stable temperature (minimum: 60 minutes since the last power on). 3. Use the calibration menu (See Section 5.4) to do a two-point calibration. -
Page 76: Procedures: Idos Upm
User Manual Druck DPI611 5.10 PROCEDURES: IDOS UPM (Refer: User Manual IDOS UPM). When the calibration is complete, the instrument automatically sets a new calibration date in the UPM. Page 76 of 79 [EN] English – K0571 Issue 1... -
Page 77: General Specification
User Manual Druck DPI611 6 GENERAL SPECIFICATION For a full specification of the Druck DPI611 calibrator and its related accessories refer to the relevant product datasheet. The DPI 611 is suitable for indoor use with the following environmental requirements. It is permitted to use the DPI 611 outdoors as a portable instrument if the environmental requirements are met. - Page 78 User Manual Druck DPI611 8 x AA alkaline batteries Optional mains adaptor P/N IO620-PSU 100– Power supply 260V +/- 10%, 50 / 60Hz AC, Output DC V=5A, 1.6A Battery life 18 to 26 hours depending on functions Connectivity USB type A, USB type mini B...
-
Page 79: Manufacturer
User Manual Druck DPI611 MANUFACTURER Druck Limited Fir Tree Lane Groby Leicester LE6 0FH United Kingdom Tel: +44 (0)116 231 7100 Page 79 of 79 [EN] English – K0571 Issue 1...