Samsung SPP 2040 User Manual
Samsung photo printer user's guide
Hide thumbs
Also See for SPP 2040:
- Product manual (12 pages) ,
- Manual del usuario (81 pages) ,
- User manual (77 pages)
Table of Contents
Advertisement
Quick Links
- 1 Spp-2020 Series Photo Printer
- 2 Printing Directly from Your Digital Camera (for Spp-2020 and Spp-2040 Series)
- 3 Printing Via a Computer (for Spp-2020 and Spp-2040 Series)
- 4 Connecting Your Printer to a Windows-Based
- 5 Printing with Bluetooth (Optional: Spp-00Ba)
- Download this manual
See also:
Manual Del Usuario
Advertisement
Table of Contents

Related Manuals for Samsung SPP 2040


Summary of Contents for Samsung SPP 2040
- Page 1 Samsung P hoto Printer User’s Guide SPP-2040 Series / SPP-2020 Series...
- Page 2 This manual is provided for information purposes only. All information included herein is subject to change without notice. Samsung Electronics is not responsible for any changes, direct or indirect, arising from or related to use of this manual. ⓒ 2005 Samsung Electronics Co., Ltd. All rights reserved.
- Page 3 CONTACT SAMSUNG WORLD WIDE If you have any comments or questions regarding Samsung products, contact the SAMSUNG customer care center. Country CANADA 1-800-SAMSUNG (7267864) MEXICO 01-800-SAMSUNG (7267864) U.S.A 1-800-SAMSUNG (7267864) ARGENTINE 0800-333-3733 BRAZIL 0800-124-421 CHILE 800-726-7864 (SAMSUNG) COSTA RICA 0-800-507-7267...
- Page 4 MALAYSIA 1800-88-9999 PHILIPPINES 1800-10-SAMSUNG (7267864) SINGAPORE 1800-SAMSUNG (7267864) THAILAND 1800-29-3232 02-689-3232 TAIWAN 0800-329-999 VIETNAM 1 800 588 889 SOUTH AFRICA 0860 7267864 (SAMSUNG) U.A.E 800SAMSUNG (7267864) Customer Care Center Web Site www.samsung.com/it www.samsung.lu www.samsung.com/nl www.samsung.com/no www.samsung.com/pl www.samsung.com/pt www.samsung.com/sk www.samsung.com/es www.samsung.com/se www.samsung.com/uk...
-
Page 5: Important Safety Information
Important Safety Information Safety Instructions Your system is designed and tested to meet the latest standards for safety of information technology equipment. However, to ensure safe use of this product, it is important that the safety instructions marked on the product and in the documentation are followed. -
Page 6: Power Cord Requirements
Power Cord Requirements The power cord set (wall plug, cable and AC adapter plug) you received with your printer meets the requirements for use in the country where you purchased your equipment. Power cord sets for use in other countries must meet the requirements of the country where you use the printer. -
Page 7: Table Of Contents
CONTENTS Important Safety Information Safety Instructions Power Cord Requirements 1. Getting started Name of each part ...1.2 SPP-2040 Series Photo Printer...1.2 SPP-2020 Series Photo Printer...1.4 2. Installation Installing the Ribbon cartridge ...2.2 Loading paper ...2.3 Connecting the power cord ...2.4 3. - Page 8 Deleting the PhotoThru program ...5.9 Selecting your Photo printer as the default printer in Windows ...5.10 Printing from a Windows-based computer...5.11 Canceling printing ... 5.12 Setting up the printer in Windows ... 5.13 Opening the Properties screen... 5.13 Getting to know the properties screen ... 5.14 Printing with the PhotoThru program in Windows...
-
Page 9: Getting Started
1. Getting started You can print images with the Samsung SPP-2040 and SPP-2020 Series photo printer directly from your digital camera and memory card without connecting to a computer. This package contains the SPP-2040 or SPP-2020 Series photo printer, accessories, a user's guide and an installation CD. Please check that you have product and accessories after unpacking. -
Page 10: Name Of Each Part
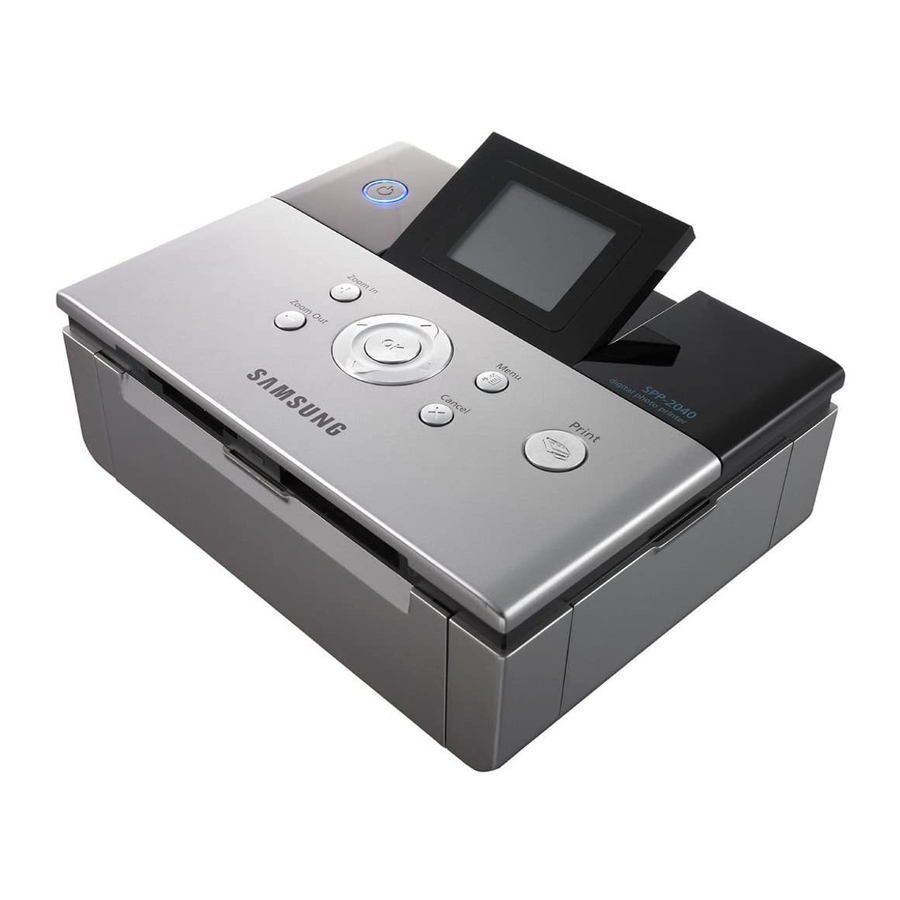
Name of each part This user's guide explains how to use the photo printer SPP-2040 and SPP-2020 Series. SPP-2020 Series printer is not equipped with a display panel. SPP-2040 Series Photo Printer <Front View> Display panel Shows printer power-on/off status, images,... - Page 11 <Side and Rear View > Side cover Open to install the Ribbon cartridge. When printing, the paper moves back and forth <Display> Copies Shows the number of copies being made of the current image. Ribbon cartridge release level Push upward to remove the existing Ribbon cartridge.
-
Page 12: Spp-2020 Series Photo Printer
Zoom In Zoom Out Up/Down Left/Right Cancel Menu Print SPP-2020 Series Photo Printer <Front View> On/Off button Turn the printer on or off. To turn the printer off, press and hold for more than 2 seconds. Power adapter port Use this to... - Page 13 <On/Off button light indications> Color Blue Flickers at 1 second of interval Flickers at 1 second of interval Flickers at 0.5 second of interval <Side and Rear View > Side cover Open to install the Ribbon cartridge. When printing, the paper moves back and forth through the printer.
- Page 14 Name of each part Accessories Ribbon cartridge Power adapter Paper Cassette (for 10 pieces printing) User’s guide (Memory Card) Power cord Quick installation guide (Only for SPP-2040 Series) USB cable Software program CD Paper (10 pieces) The appearance of the power cord may differ depending on the country’s specifications.
-
Page 15: Installation
2. Installation This photo printer prints images by moving the print paper back and forth through the printer. This chapter details the distances that need to be maintained between the printer and surrounding objects, how to turn the printer on and off, and how to load paper. -
Page 16: Installing The Ribbon Cartridge
Installing the Ribbon cartridge Only use Samsung-approved ribbon cartridges, designed for your printer. Ribbon cartridge/photo paper: IPP-4640G The supplied Ribbon cartridge allows you to print 10 pieces of paper. Do not use sharp objects, such as a knife or scissors, to open the ribbon cartridge package. -
Page 17: Loading Paper
Loading paper The supported paper size is Postcard(102x152mm/4"x6") size. You should use only paper designed for Samsung Photo Printer. Open the paper cassette. Load the paper shiny side up. Ensure that it is laid flat, and close the cover. Loading the paper shiny side down may cause a problem. -
Page 18: Connecting The Power Cord
Connecting the power cord To turn on the printer, you need the power cord and the power adapter. Connect the power adapter to the printer and connect the power cord to the an wall outlet or other power source. Connect the end of the power adapter to the power adapter port of the printer. -
Page 19: Printing From Memory Cards (For Spp-2040 Series Only)
3. Printing from memory cards (For SPP-2040 Series only) This printer can print images from seven kinds of memory cards. You can choose specific copy, size and language options without connecting to a computer. • Inserting memory cards • Printing images •... -
Page 20: Inserting Memory Cards
Inserting memory cards This printer can read seven kinds of memory cards. The memory cards support up to 2GB. Insert one memory card only. Do not force a card into the memory card slot as this may cause damage to your printer. There are many kinds of memory cards, and each memory card has many different sub types.In some cases a newly launched memory card may not be supported by your printer, even if it is a kind of memory card that is... -
Page 21: Printing Images
Printing images If you can see images on the display panel, select one and print it. Insert one memory card only. When a paper jam occurs during printing, do not pull out the jammed paper. After turning the power off and then on again, the jammed paper should come out automatically. -
Page 22: Printing Multiple Images
Printing multiple images You can select a group of images and a number of copies to be printed of each, rather than separately selecting the number of copies for each photo. Insert one memory card only. When a paper jam occurs during printing, do not pull out the jammed paper. After turning the power off and then on again, the jammed paper should come out automatically. - Page 23 Press the Left and Right buttons to select the previous or next image. Follow the step 3. The total copies of the selected image displays in the upper right corner. Press the Print button and press it again to start printing. After printing, the number of copies to print reverts to ‘0’...
-
Page 24: Printing Images Using Multi-Display
Printing images using multi- display You can select and print multiple images from the display panel. Insert one memory card only. Insert the memory card. For details about inserting memory cards, see page 3.2-Inserting memory cards. Press the Zoom Out button to display four images on the display panel. -
Page 25: Printing Enlargements Of Portions Of An Image
Printing enlargements of portions of an image You can enlarge and print part of an image. Insert one memory card only. Insert the memory card. For details about inserting memory cards, see page 3.2-Inserting memory cards. Press the Left and Right buttons to select an image from those on the display panel. - Page 26 Printing enlargements of portions of an image Press the Zoom In button until the size you want appears. By pressing the Zoom In button, you can see 1.25x, 1.5x, 1.75x, 2x, 2.25x. 2.5x, 2.75x, 3x enlargement. To zoom out of the image, press the Zoom Out button.
-
Page 27: Setting Various Effects
Setting various effects You can select color, clarity, and brightness options for your images. Press the Menu button after selecting an image with the Left and Right buttons. The effect you set is only applied only to those images you have selected. The selected effect is cancelled automatically after printing or turning off the printer. -
Page 28: Setting Additional Functions
You can set up borders for your photos, layout style and paper size. You can also print all of your images at one time or select an alternative language with your photo printer. Press the Menu button twice after selecting the image with the Left and Right buttons. -
Page 29: Selecting Layout
Selecting layout Press the Up and Down buttons to navigate to 'Layout.' Press the Left and Right buttons to select 'Off', '2-up', '4-up', '30x40mm', '1.18x1.57in', '20x30mm' '0.79x1.18in', '35x45mm', '1.38x1.77in', '50x70mm' or '1.97x2.76in' Press the OK button to complete the selection. Images printed with the various layout (For example: Paper size-Postcard, Borderless-Off) According to the layout, some portions of the image may not be printed. -
Page 30: Setting Print All Function
Setting additional functions Setting print all function Press the Up and Down buttons to navigate to 'Print All.' Press the Left and Right buttons to select 'No' or 'Yes.' Press the OK button complete the selection. Setting language Press the Up and Down buttons to navigate to 'Language.' Press the Left and Right buttons to select the desired language. -
Page 31: Printing Dpof Files
Printing DPOF files If your camera is compatible with and able to store DPOF files, the Samsung Photo Printer can print them. Insert the memory card with DPOF files. For details about inserting the memory cards, see page 3.2-Inserting memory cards. -
Page 32: Removing Memory Cards
Removing memory cards Please do not remove a memory card until the following steps have been taken. Insert one memory card only. If you remove the memory card while printing a job, the printing job will be canceled. When not connected to a computer Gently remove the memory card from the printer. -
Page 33: Printing Directly From Your Digital Camera (For Spp-2020 And Spp-2040 Series)
(For SPP-2020 and SPP-2040 Series) Samsung Photo Printer supports PictBridge. You can print images directly from your digital camera through a USB cable without connecting to a computer. You cannot use a memory card while a digital camera is connected... -
Page 34: Turn On The Printer
Printing directly from your digital camera You can print images by connecting a PictBridge-compatible device like a digital camera, camera phone, and camcoder to your printer. Turn on the printer. Connect your digital camera to the printer with the USB cable supplied with the camera. -
Page 35: Printing Via A Computer (For Spp-2020 And Spp-2040 Series)
• Connecting your printer to a Windows-based PC • Installing the program for Windows • Deleting the PhotoThru program • Selecting your Photo printer as the default printer in Windows • Printing from a Windows-based computer • Setting up the printer in Windows •... -
Page 36: Connecting Your Printer To A Windows-Based
Connecting your printer to a Windows-based PC Connect the Photo printer to the PC with the USB cable supplied with your digital camera. You can connect the Photo printer only with the USB cable. Connect the power cable to the printer. -
Page 37: Installing The Program For Windows
Installing the program for Windows Install the program on your Windows-based PC after loading paper and connecting cables. You should install the program version that was supplied with the printer. System requirements Before you begin, ensure that your system meets the minimum system requirements. -
Page 38: Installing The Program
Installing the program for Windows Installing the program Quit all programs. Turn on your PC and click 'Cancel' when the 'Found New Hardware Wizard' screen appears. Insert the supplied software program CD(label-side up) into into your CD-ROM drive. The installation window appears. If the installation window does not appear, eject the CD-ROM and insert it again. - Page 39 When the test page prints out correctly, click 'Yes.' If not, click 'No' to reprint it. To register yourself as a user of Samsung Printers in order to receive information from Samsung, select the checkbox and click 'Finish'. You are now sent to the Samsung web site.
-
Page 40: Reinstalling The Program
Reinstalling the Program Reinstallation is sometimes necessary if your installation fails or the software does not work properly. Select 'Start' → 'Programs' or 'All Programs' → 'Samsung SPP- 2040 Series' or 'Samsung SPP-2020 Series' → 'Maintenance.' Select 'Repair' when the screen appears. -
Page 41: Deleting The Program
When the test page prints out correctly, click 'Yes.' Click 'Finish' when the reinstallation is done. Deleting the program Select 'Start' → 'Programs' or 'All Programs' → 'Samsung SPP- 2040 Series' or 'Samsung SPP-2020 Series' → 'Maintenance.' Select 'Remove' when the screen appears. - Page 42 Installing the program for Windows Select the components you want to remove and click 'Next.' ▲ Windows XP screen Click 'Yes' when the window asking you to remove the component(s) you selected appears. Click 'Finish' when the uninstallation is done.
-
Page 43: Deleting The Photothru Program
Deleting the PhotoThru program PhotoThru is a photo-editing program. If any problems occur after installing the program, delete the program and reinstall it. Select 'Start' → 'Programs' or 'All Programs' → 'PhotoThru' → 'Uninstall.' Select 'OK' when the screen for confirming to delete program after the InstallShield Wizard screen appears. -
Page 44: Selecting Your Photo Printer As The Default Printer In Windows
Select 'Start' → 'Settings' → 'Printer'. (If you are using Windows XP, select 'Start' → 'Printers and Faxes') Select 'Samsung SPP-2040 Series' or 'Samsung SPP-2020 Series' and right click on the 'Printer' or ' Printers and Faxes' screen. Click 'Set as default printer'. -
Page 45: Printing From A Windows-Based Computer
Open the application and then the file you want to print. Select 'Print' in 'File' menu. The print screen appears. Check if the printer name is selected as 'Samsung SPP-2040 Series' or 'Samsung SPP-2020 Series.' You can print the selected images by selecting the printer icon in the bottom right corner of the Windows desktop or by selecting 'Print' from the application's File menu. -
Page 46: Canceling Printing
Windows desktop. Or click the 'Start' → 'Settings' → 'Printer'. (For Windows XP, click 'Start' → 'Printers and Faxes' and double-click 'Samsung SPP-2040 Series' or 'Samsung SPP-2020 Series') From the 'Document' menu: For Windows 98/Me, select 'Cancel Printing.'... -
Page 47: Setting Up The Printer In Windows
Setting up the printer in Windows You can use the Samsung SPP-2040 Series printer properties window, which allows you to access all of the printer options you need when using your printer. Opening the Properties screen When the printer properties are displayed, you can review and change whatever settings are needed for your print job. -
Page 48: Getting To Know The Properties Screen
Setting up the printer in Windows Getting to know the properties screen Basics tab The Basics tab provides options to adjust how the document appears on the printed page. ① ② ③ ④ ▲ Windows XP screen Property Borderless Orientation Quality Paper Options Make sure that the image direction and the paper direction you set are... -
Page 49: Output Tab
Output tab The Output tab provides layout options. ① ② Property Description Copies Select the number of copies from 1 to 99. Select the type in which information is printed on a page. The layout appears differently depending on the orientation and the quality that you selected on the Basics tab (see page 5.14-Basics tab) You can select the number of copies, type, pictures per... -
Page 50: Graphics Tab
Setting up the printer in Windows Graphics tab The Graphics tab allows you to choose various color and contrast options. ① ② ▲ Property Color Mode Color Adjust Windows XP screen Description Select 'Color' or 'Black/White.' You can adjust 'Brightness,' 'Contrast,' 'Saturation' and 'Cyan Red,' 'Magenta-Green,' 'Yellow-Blue.' To adjust color automatically, check 'Auto Adjustment' and click ‘OK.’... -
Page 51: About Tab
Deco tab You can use the Deco tab to set options for frames, message and font attributes. ① ② ③ ▲ Windows XP screen Property Frame Message Font Attributes About tab Use the About tab to display the copyright notice and the version number of the driver. -
Page 52: Using A Favorite Setting
Setting up the printer in Windows Using a favorite setting The favorites option, available in each tab except for the About tab, allows you to save the current properties settings for future use. ▲ Windows XP screen Select 'Printer Default' or 'Untitled' in 'Favorites.' Printer Default: You can set the current properties as the default setting for the printer driver. -
Page 53: Printing With The Photothru Program In Windows
Printing with the PhotoThru program in Windows With the PhotoThru program, you can edit images for more entertaining photos. For details about how to use PhotoThru, refer to the PhotoThru user's guide. Select 'Start' → 'Program' or 'All programs' → 'PhotoThru' → 'PhotoThru' menu. - Page 54 Printing with the PhotoThru program in Windows Click 'File' → 'Print' from the menu bar on the top. Click 'Print' after selecting the number of copies to be printed and any additional function. Make sure that the image direction and the paper direction you set are in the same direction.
-
Page 55: Installing The Program For Macintosh
Turn on your Macintosh and insert the supplied Software program CD(label side up) into your CD-ROM drive. The installation window appears automatically. Double-click the CD icon when it appears on 'Desktop' and click ‘Installer’ → ‘Printer.’ Enter the Macintosh user’s password. Double-click 'Samsung Photo Installer.' 5.21... - Page 56 Installing the program for Macintosh Click 'Continue' when the Samsung Photo Installer screen appears. Select the hard disk the program will be installed and click 'Continue.' 5.22...
- Page 57 Installing the program for Macintosh Select 'Easy Install' as the installation type and click 'Install.' Click 'Quit' when the installation is done. 5.23...
-
Page 58: Setting Up The Printer In Macintosh
Setting up the printer in Macintosh Using in MAC OS 10.3.X USB environment Open the hard disk and select 'Applications' → 'Utilities' → 'Printer Setup Utility.' Click 'Add' on the printer list. Select 'USB' tab. 5.24... - Page 59 Setting up the printer in Macintosh Select 'SPP-2040 Series' or 'SPP-2020 Series' and click 'Add.' If you fail to search the printer automatically, select 'Samsung' in 'Printer Model.' Select 'SPP-2040 Series' or 'SPP-2020 Series' and click 'Add.' When 'SPP-2040 Series' or 'SPP-2020 Series' is added in the printer list, the setting is finished.
-
Page 60: Printing From A Macintosh
Printing from a Macintosh Open the file that you want to print. Click 'Page Setup' after opening the file. Click 'OK' after setting the format, size, orientation and scale. Click 'Print' to print the selected image. 5.26... - Page 61 Click 'Print' after selecting the number of copies and the page range to be printed. On the right side of the tab you can set various option. You can set copies & pages, layout, output options, scheduler, paper handling, colorSync, printer features and summary. The screen confirming that the file was sent to the print queue appears and printing begins.
-
Page 62: Deleting The Program
Printing from a Macintosh Deleting the program Click 'Uninstall' after selecting installation type as 'Uninstall' on step 6. See page 5.21-Installing the program for Macintosh. Click 'Quit' when the uninstallation is done. 5.28... -
Page 63: Printing Using Photothru Program In Macintosh
Printing using PhotoThru program in Macintosh The PhotoThru program is convenient when you modify your image files. It provides various and interesting image editing features. For details about how to use PhotoThru, refer to the PhotoThru user's guide. Installing the program Turn on your Macintosh and insert the supplied Software program CD(label side up) into your CD-ROM drive. - Page 64 Printing using PhotoThru program in Macintosh Double-click the image you selected. The image is displayed in larger format in the work space and various editing tools appear. Edit the image using the available functions. Click 'File' → 'Print' from the menu bar on the top. Click 'Print' after selecting the number of copies to be printed and any additional function.
-
Page 65: Using Msc(Mass Storage Class) Function(For Spp-2040 Series Only) .5.31
Using MSC(Mass Storage Class) function(For SPP-2040 Series only) If you connect your printer to a Windows-based computer via a USB cable, and insert a memory card into the printer, the computer recognizes the memory card as a removable disk. The computer then serves the same function as a memory card reader and you can view and edit memory card data. -
Page 66: Printing With Bluetooth (Optional: Spp-00Ba)
Printing with Bluetooth (Optional: SPP-00BA) If you install the optional Bluetooth device, you can print wirelessly from only a camera phone equipped with Bluetooth. While this product complies with the Bluetooth Specification, it is not guaranteed to work with all devices enabled with Bluetooth wireless technology. -
Page 67: Maintenance
6. Maintenance This printer can be maintained quite easily. It is light and portable. When storing or carrying the printer, remove the paper and the paper cassette. • Maintaining the printer • Replacing the Ribbon cartridge • Troubleshooting • Specifications •... -
Page 68: Maintaining The Printer
Clean the outside of the printer using a damp cloth. If you want to use a cleanser, please contact a Samsung service center for a recommended detergent. Do not use other cleansers and soaps as they may cause damage to the print head. -
Page 69: Replacing The Ribbon Cartridge
Replacing the Ribbon cartridge Buy the Ribbon cartridge model named IPP-4640G (for 40 pieces printing). Open the side cover. Push the lever upward. Pull the existing cartridge out. Lever... - Page 70 Replacing the Ribbon cartridge After removing the cartridge from its package, rotate the roller to smooth out wrinkles or uneven areas in the film. If the film is not even, it could be damaged during installation. Insert the cartridge in the direction in the shown illustration. Make sure that the cartridge is under the lever and then close the side cover.
-
Page 71: Troubleshooting
Troubleshooting Error messages on the display Display •Error when there is no Insert Papers and then press •Paper jam Power Off and then Remove Paper Jam •Wrong paper size Check Paper Size and then press •Paper casette is not Insert Tray and then press •Ribbon Cartridge is not Power Off and then... -
Page 72: Display Problem
Troubleshooting Display Unsupported Image. Unsupported Image Image Format Error. Image Format Error Card Access Error. Please Remove Card Please Remove Card. There are no images in memory card in memory card. Not PictBridge Mode. Not PictBridge Mode Please Disconnect Please Disconnect Device. Problem •Ribbon Cartridge is empty. - Page 73 Display •There is a problem reading JPEG files. JPEG Paser Error •Cannot print if the image is 40 pixels x 60 pixels or less. Unsupported Image Image size is too small •Cannot print if the image is 5120 pixels x 7680 pixels or more.
-
Page 74: Scheduling Printer Status Checks
Troubleshooting Scheduling printer status checks Your computer can automatically check the status of the printer. Right click on the printer icon at the bottom of the screen and click 'Options' in the menu. Click the checkbox if you want to set the 'Status Monitor Alert Option.' Schedule and automatic status checking from 1 to 10 seconds. -
Page 75: Specifications
Specifications Model Name Type of unit Print Speed Resolution Input document size Capacity of paper cassette Sound pressure level Power consumption Operating conditions Power source Adapter requirements SET Dimension (WxDxH) Weight Memory Card Interface PC Interface Camera Interface Camera-Phone Interface Bluetooth Interface (Optional) Supported File Format... - Page 76 Declaration of Conformity (European Countries) Approvals and Certifications The CE marking applied to this product symbolises Samsung Electronics Co., Ltd. Declaration of Conformity with the following applicable 93/68/EEC Directives of the European Union as of the dates indicated: January 1, 1995: Council Directive 73/23/EEC Approximation of the laws of the member states related to low voltage equipment.
-
Page 77: Radio Frequency Emissions
Radio Frequency Emissions FCC Regulations This device complies with Part 15 of the FCC Rules. Operation is subject to the following two conditions: •This device may not cause harmful interference, and •This device must accept any interference received, including interference that may cause undesired operation. -
Page 78: Eu Declaration Of Conformity (R&Tte)
Specifications EU Declaration of Conformity (R&TTE) 6.12... -
Page 79: Index
Index About tab 5.17 accessories Basics tab 5.14 borderless, set 5.14 borders, set 3.10 brightness, set buttons cancel, print 5.12 cartridge install replace clean color adjust, set 5.16 color, set Deco tab 5.17 default printer, set delete driver macintosh windows PhotoThru Windows display... - Page 80 paper jam paper, load PhotoThru install macintosh windows print macintosh windows 5.19 power cord connect print all images 3.12 macintosh 5.26 PictBridge windows rear view reinstall, driver, windows removable disk 5.29 sharpness, set 5.29 side view spool system requirements macintosh windows 6.14 5.11...
- Page 81 Rev.2.00...