Table of Contents
Advertisement
Quick Links
Download this manual
See also:
User Manual
Advertisement
Table of Contents

Related Manuals for HIKVISION Blazer Pro


Summary of Contents for HIKVISION Blazer Pro
-
Page 1: Quick Start Guide
Quick Start Guide of Blazer Pro All-in-One Server Blazer Pro All-in-One Server Quick Start Guide... -
Page 2: About This Manual
Any and all information, including, among others, wordings, pictures, graphs are the properties of Hangzhou Hikvision Digital Technology Co., Ltd. or its subsidiaries (hereinafter referred to be “Hikvision”). This user manual (hereinafter referred to be “the Manual”) cannot be reproduced, changed, translated, or distributed, partially or wholly, by any means, without the prior written permission of Hikvision. - Page 3 RELEVANT LAWS IN YOUR JURISDICTION BEFORE USING THIS PRODUCT IN ORDER TO ENSURE THAT YOUR USE CONFORMS THE APPLICABLE LAW. HIKVISION SHALL NOT BE LIABLE IN THE EVENT THAT THIS PRODUCT IS USED WITH ILLEGITIMATE PURPOSES. IN THE EVENT OF ANY CONFLICTS BETWEEN THIS MANUAL AND THE...
-
Page 4: Regulatory Information
Quick Start Guide of Blazer Pro All-in-One Server Regulatory Information FCC Information FCC compliance: This equipment has been tested and found to comply with the limits for a Class A digital device, pursuant to part 15 of the FCC Rules. These limits are designed to provide reasonable protection against harmful interference when the equipment is operated in a commercial environment. -
Page 5: Safety Instruction
Quick Start Guide of Blazer Pro All-in-One Server Safety Instruction These instructions are intended to ensure that user can use the product correctly to avoid danger or property loss. The precaution measure is divided into “Warnings” and “Cautions” Warnings: Serious injury or death may occur if any of the warnings are neglected. - Page 6 Quick Start Guide of Blazer Pro All-in-One Server • Improper use or replacement of the battery may result in hazard of explosion. Replace with the same or equivalent type only. Dispose of used batteries according to the instructions provided by the battery manufacturer.
-
Page 7: Table Of Contents
8.4 Network Settings ........................14 8.5 Adding Network Cameras ..................... 15 9. Quick Start ..........................16 9.1 Accessing Blazer Pro via Web Client ................... 16 9.2 Resource Management ......................17 9.2.1 Adding Storage Board as Encoding Device ............... 17 9.2.2 Area Management ...................... 19 9.3 Live View .......................... - Page 8 Quick Start Guide of Blazer Pro All-in-One Server 9.6 Event and Alarm Configuration .................... 22 9.6.1 Configuring Motion Detection Event ................ 23 9.6.2 Configuring Motion Detection Alarm ............... 23 9.6.3 Checking Event Logs ....................24 Shutting Down Blazer Pro....................25...
-
Page 9: Overview
The Blazer Pro is an all-in-one server that combines Hikvision’s powerful video management system HikCentral (on Server Board) with a video storage device (Blazer Pro Storage Board). The Blazer Pro can manage up to 256 network cameras (for Blazer Pro/256/16H) or 128 network cameras (for Blazer Pro/128/16H) for recording, live view, and playback. -
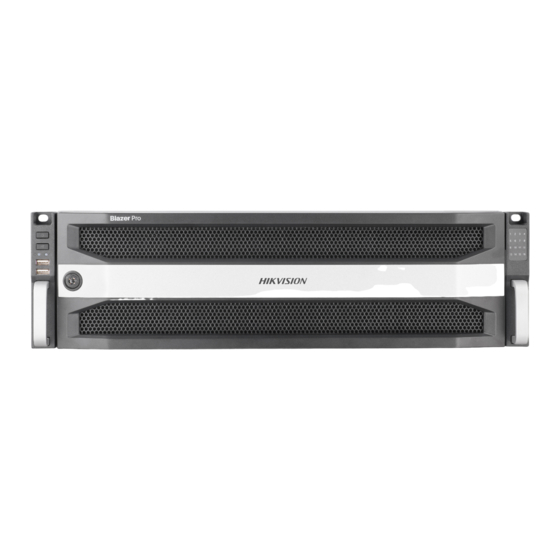
Page 10: Front Panel
Quick Start Guide of Blazer Pro All-in-One Server 4. Front Panel Name Function Description Power on/off device. Solid blue: device is running. POWER ON/OFF Solid red: device is shut down. Turn on/off buzzer. Solid blue: buzzer is turned off. -
Page 11: Rear Panel
Quick Start Guide of Blazer Pro All-in-One Server 5. Rear Panel Name Function Description HDMI Interfaces HDMI video output connector. AUDIO OUT RCA connector for audio output. AUDIO IN RCA connector for audio input. USB 3.0 ports for additional devices such as USB 3.0 Interfaces... -
Page 12: Hdd Storage Calculation Chart
Quick Start Guide of Blazer Pro All-in-One Server 6. HDD Storage Calculation Chart The following chart shows an estimation of storage space used based on recording at one camera for an hour at a fixed bit rate. Bit Rate Storage Used... -
Page 13: Basic Hardware Connection And Startup
Connect a VGA cable or HDMI cable to the video out interface (VGA or HDMI) on the server. Connect the VGA cable or HDMI cable to the display unit. If you need to locally operate the video management system and Blazer Pro Storage Board, please connect the display units to the server board and storage board respectively. - Page 14 Quick Start Guide of Blazer Pro All-in-One Server 3. Press the blue button to pop up the handle, hold the handle, and pull the HDD tray out of the slot. 4. Fix the HDD in the HDD tray. 1) Place an HDD in the HDD tray. The SATA interface must face the HDD tray bottom.
-
Page 15: Installing Hdd In Server Board
Quick Start Guide of Blazer Pro All-in-One Server 7. Install the bezel back to front panel. And lock it with key. 7.3.2 Installing HDD in Server Board 1. Unfasten the screws on the back and side of cover. 2. Push the cover along the direction shown in figure below to remove it. -
Page 16: Peripheral Connections
Quick Start Guide of Blazer Pro All-in-One Server 5. Place the HDD tray back and connect it with the server board. 6. Fix the HDD tray to server board with four screws. 7. Reinstall the cover to device and fasten the screws. -
Page 17: Wiring Of Alarm Output
To connect an AC load, jumpers should be removed. Example: If you connect an AC load to the alarm output 3 of the Blazer Pro, then you must remove the JP3. 7.4.3 Using of Alarm Connectors To connect alarm devices to the Blazer Pro: 1. -
Page 18: Power Connection And Startup
After plugging the power supply, press the POWER ON/OFF switch on the front panel to start up. You are required to log in to the operating system of Blazer Pro by inputting its user name and password. -
Page 19: Accessing Blazer Pro Storage Board
Quick Start Guide of Blazer Pro All-in-One Server 8. Accessing Blazer Pro Storage Board To operate the Blazer Pro Storage Board locally, you need to connect a display unit to storage board via VGA or HDMI interface. 8.1 Activating Storage Board Purpose: For the first-time access, you need to activate the storage board by setting an admin password. -
Page 20: Setup Wizard
Quick Start Guide of Blazer Pro All-in-One Server Notes: Connect at least 4 dots to draw the pattern. Each dot can be connected for once only. 2. Draw the same pattern again to confirm it. When the two patterns match, the pattern is configured successfully. -
Page 21: Adding Network Cameras
Quick Start Guide of Blazer Pro All-in-One Server IPv4 Gateway, MTU and DNS Server. If the DHCP server is available, you can check the DHCP checkbox to automatically obtain an IP address and other network settings from that device. 4. After configuring the general settings, click Apply to save the settings. -
Page 22: Quick Start
You can access the system via Web Client which is a B/S client for management of HikCentral. Steps: 1. In the address bar of the web browser, input the address of the Blazer Pro Server Board and press the Enter key. -
Page 23: Resource Management
9.2.1 Adding Storage Board as Encoding Device Purpose: You need to add the Blazer Pro Storage Board to the system for further management as encoding device. You can also add other encoding devices (such as DVR and network camera) to the system. - Page 24 Quick Start Guide of Blazer Pro All-in-One Server 5. Input the required information. Alias: Create a device name. Device Address: The device IP address will be obtained automatically in this adding mode. Device Port: Input the device port number. The port will be obtained automatically in this adding mode.
-
Page 25: Area Management
Quick Start Guide of Blazer Pro All-in-One Server 6. Set the Add Camera to Area switch to ON to import the cameras of the added devices to an area. Create a new area by the device name (or custom) or select an existing area. -
Page 26: Live View
Server Address: Input the address (IP address or domain name) of the Blazer Pro Server Board that you want to connect to. To access the local Blazer Pro, you can input localhost. Port: Input the port number. By default, it’s 80. -
Page 27: Live View
Quick Start Guide of Blazer Pro All-in-One Server 9.3.2 Live View Steps: 1. After logging into the Control Client, click to enter the Live View interface. 2. Click on the left to enter the area mode. 3. (Optional) Click and select the window division mode for live view. -
Page 28: Playback
Quick Start Guide of Blazer Pro All-in-One Server Overwrite: Overwrite the oldest videos when disk or allocated quota is full. Expired Time: When this option is selected, HikCentral will automatically delete the oldest videos after the specified retention period. This method allows you to define the longest time period for keeping videos. -
Page 29: Configuring Motion Detection Event
Quick Start Guide of Blazer Pro All-in-One Server In the HikCentral Web Client, you can set the linkage actions for the detected events and alarms. Status of the events and alarms can be received by the Control Client from the devices. -
Page 30: Checking Event Logs
Quick Start Guide of Blazer Pro All-in-One Server Lock Video Files for: Set the time duration for protecting the video file from being deleted. Related Map: Select the map to show the alarm information and you should add the camera to the map as a hot spot. -
Page 31: Shutting Down Blazer Pro
Quick Start Guide of Blazer Pro All-in-One Server Shutting Down Blazer Pro Press the following steps to shut down the boards separately. For server board: Steps: 1. Connect a display unit to the server board via VGA or HDMI interface. - Page 32 UD07700B...