
Related Manuals for RIDGID SeeSnake microReel


Summary of Contents for RIDGID SeeSnake microReel
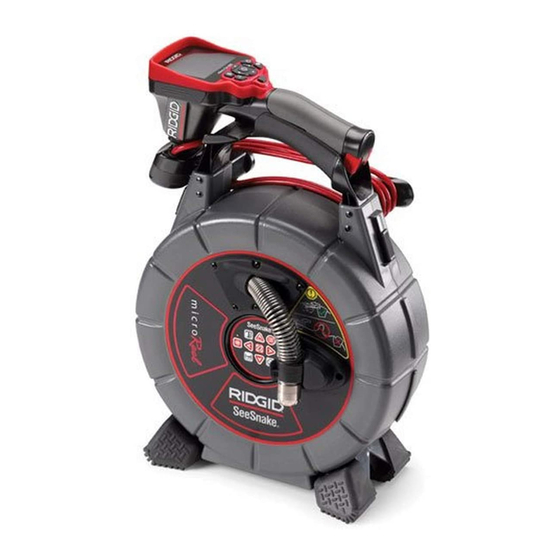
- Page 1 ® SeeSnake microReel Inspection System GlobalTestSupply www. .com Find Quality Products Online at: sales@GlobalTestSupply.com...
-
Page 2: Table Of Contents
Work Area Safety................................2 Electrical Safety ................................2 Personal Safety ................................2 Equipment Use and Care............................2 Service ..................................3 Specific Safety Information ............................3 SeeSnake microReel Inspection System Product Safety ..................3 Description, Specifications And Standard Equipment Description ..................................4 Specifications................................4 Standard Equipment ..............................4 Icon Legend ...................................4 microReel System Components ..........................5... -
Page 3: Safety Symbols
SeeSnake ® microReel Inspection System Safety Symbols In this operator’s manual and on the product, safety symbols and signal words are used to communicate important safety information. This section is provided to improve understanding of these signal words and symbols. This is the safety alert symbol. -
Page 4: Service
• Store idle equipment out of the reach of children and do not allow persons unfamiliar with the equip- SeeSnake microReel Inspection System ment or these instructions to operate the equip- Product Safety ment. Equipment can be dangerous in the hands of •... -
Page 5: Description, Specifications And Standard Equipment Description
SeeSnake ® microReel Inspection System RIDGID Drain Cleaning Gloves. Never grasp the ro- Dimensions: tating drain cleaning cable with anything else, including Length ......13.25" (33.6 cm) other gloves or a rag. They can become wrapped Depth......6.6 " (16.7 cm) around the cable, causing hand injuries. Only wear Height ......14.2"... -
Page 6: Microreel System Components
SeeSnake ® microReel Inspection System microReel System Components Pushrod Removable Pushrod Drum System Cable for Shoulder Strap SeeSnake CCU Camera Head Case Latch Pushrod Guide Camera Clip CountPlus Keypad Figure 3 – Opening The Case Camera Head Feet Front Case Assembly Figure 1 –... -
Page 7: Opening The Case
SeeSnake ® microReel Inspection System Opening the Case Never open the latches with the camera on the outside of the case. Move the camera all the way inside the case by pushing it back through the cable guide BEFORE you undo the latches. -
Page 8: Installing System Cable
SeeSnake ® microReel Inspection System Reversing/Installing The Display Cradle (microEXPLORER Camera Monitor) If you are using the microReel with the microEXPLORER Camera monitor unit, you may find it more convenient to have the microEXPLORER Camera monitor facing the other way when it is seated in its cradle. To reverse the ori- entation of the cradle, do the following: 1. -
Page 9: Connecting Microexplorer Camera Monitor To Microreel System
SeeSnake ® microReel Inspection System Connecting microEXPLORER Camera 1. Slide the red slide locks away from the blue latches on both sides of the guide (Figure 15) . Monitor to microReel System Latch Tab In (Closed) Latch Tab Out (Open) Align the microEXPLORER Camera Connector Plug with the plug on the microEXPLORER Camera and slide straight in, seating it squarely. -
Page 10: Work Area And Equipment Set Up
Ridge Tool Catalog, structions to make sure it is in good usable condition. on line at www.RIDGID.com or www.RIDGID.eu. 5. If any problems are found, do not use the unit until the 4. Make sure all equipment has been properly inspected. -
Page 11: Countplus Settings
SeeSnake microReel System. dragging on the ground. When properly located, push cable will only come off the reel when you pull it. -
Page 12: Operating Instructions
SeeSnake ® microReel Inspection System microDrain System pushrod and will not handle the close Up/Edit Arrow Menu/Back Key tight turns of a standard P-trap, closet bend or S-trap which the microDrain may pass through. The microReel is Text Key RightArrow designed for longer inspection runs and can readily ne- Left gotiate normal 90°... -
Page 13: Using The Countplus Counter Option
SeeSnake ® microReel Inspection System As the pushrod is fed into the line, watch the monitor to Drain Inlet know what is coming. When the lights are set at less than maximum setting, it may help to occasionally turn the brightness up to see what is coming further down the line. - Page 14 If the system is shut down or loses power for more than ating, the SeeSnake can be made to also start counting 10-20 seconds the SeeSnake microReel may re-zero its from any custom “local zero-point” you select with a sec- system zero point of reference, and any local zero-point ond counter.
-
Page 15: Locating The Microreel System Sonde
When the microReel System Sonde is turned on, a loca- pulling the pushrod, keep clear of any sharp edges and do tor such as the RIDGID SR-20, SR-60, Scout, or not pull at sharp angles to the inlet to prevent damage to NaviTrack ®... -
Page 16: Cleaning Instructions
NaviTrack ® WARNING Transmitters Make sure that the system cable is disconnected Various RIDGID SeeSnake Camera Control Units from the CCU prior to cleaning to reduce the risk 30063 RIDGID microEXPLORER Digital of electrical shock. Inspection Camera Clean the microEXPLORER Camera monitor or CCU... -
Page 17: Transport And Storage
Electronic Equipment and its implemen- Service and repair of the microReel System must be per- tation into national legislation, electrical formed by a RIDGID Independent Authorized Service equipment that is no longer usable must be collected Center. separately and disposed of in an environmentally correct manner.