D-Link DSA-3100 User Manual
Wireless service gateway
Hide thumbs
Also See for DSA-3100:
- User manual (87 pages) ,
- Manual (79 pages) ,
- Owner's manual (70 pages)

Related Manuals for D-Link DSA-3100


Summary of Contents for D-Link DSA-3100
-
Page 1: User Manual
DSA-3100 Wireless Service Gateway User Manual First Edition (December 2002) Printed In Taiwan RECYCLABLE... -
Page 2: Table Of Contents
DSA-3100 Wireless Service Gateway User Manual Table of Contents 1、Introduction......................1 1、Product Overview ....................1 2、Unpacking ......................1 3、Identifying External Components ..............2 a、Front Panel ....................2 b、Rear Panel ....................3 4、Specification ....................4 5、Key Features ....................4 2、Installation ......................6 1、Requirements ....................6 2、Procedure ......................7 3、Configure PCs on your LAN ................8 a、TCP/IP network setting ................8... - Page 3 DSA-3100 Wireless Service Gateway User Manual FCC Warning This equipment has been tested and found to comply with the limits for a Class A digital device, pursuant to Part 15 of the FCC Rules. These limits are designed to provide reasonable protection against harmful interference when the equipment is operated in a commercial environment.
-
Page 4: Introduction
Ethernet or an IEEE 802.11 wireless LAN. Even a mixed environment where wired Ethernet and WLAN co-exist could be managed. The DSA-3100 is compatible with almost every client operating system as long as the system supports TCP/IP and a capable HTML browser such as Internet Explorer. To name a few, Windows 9x/Me/NT/2000/XP, Linux, Mac OS and Pocket PC 2000/2002 are compatible with the DSA-3100. -
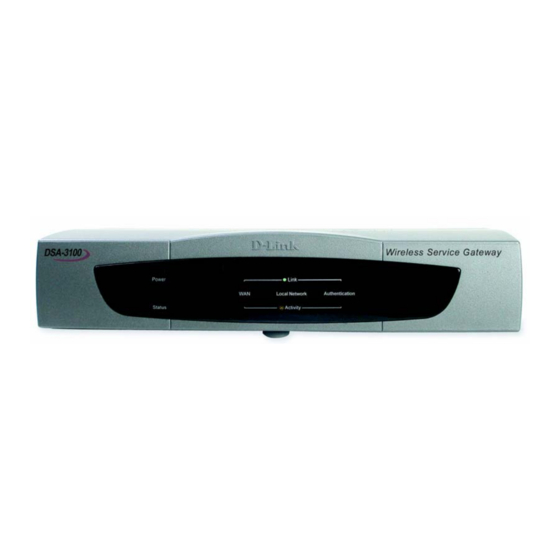
Page 5: Identifying External Components
♦ Local Network Indicator ♦ Authentication Indicator The power indicator is kept bright while DSA-3100 is power on. The indicators ordered from left to right are for WAN, Local Network and Authentication and every indicator has two LED lights. When you plug the cable end into a connector port, the upper light will light up to notify you that a link is detected on the internal interface. -
Page 6: B、Rear Panel
Connect to the PC, hub or switch to this port. Local Network port for connecting a trusted network onto the DSA-3100, which permits access to WAN, and LAN from Local Network without authentication, but must under the firewall rules. You can put the Web server, Mail server or FTP server under the Local Network Port. -
Page 7: Specification
DSA-3100 Wireless Service Gateway User Manual 4、Specification ♦ CPU: NS Geode GX1-300MHz ♦ System: 32MB SDRAM Memory ♦ WAN: One Realtek RTL8139C 10/100 Ethernet controller ♦ Authentication: One Realtek RTL8139C 10/100 Ethernet controller ♦ Local Network: One Realtek RTL8139C 10/100 Ethernet controller ♦... - Page 8 Customizable peremptory traffic redirection. (IP and Port Redirect) NTP client built-in. Provides a Local Network port for connecting a trusted network onto the DSA-3100, which permits access to WAN, and LAN from Local Network without authentication. It is useful to connect your wired Ethernet while connecting the wireless network to the...
-
Page 9: Installation
DSA-3100 Wireless Service Gateway User Manual 、 I NSTALLATION 1、Requirements ♦ Network cable. Use standard 10/100Base T network (UTP) cable with RJ45 connectors. ♦ TCP/IP network protocol must be installed on all PCs. -
Page 10: Procedure
Use 10/100BaseT connections to connect your admin PC with the internal Switch or Hub that connected to the Local Network Port on DSA-3100. If you want to directly connect the DSA-3100 to this PC or the wireless AP, you have to use a Cross Over Line. d、Authentication port connection Use 10/100BaseT connections to connect your client PC with the internal Switch or Hub that connected to the Authentication Port on DSA-3100. -
Page 11: Configure Pcs On Your Lan
DSA-3100 Wireless Service Gateway User Manual 3、Configure PCs on your LAN After DSA-3100 installation, for each PC, the following may need to be configured: ♦ TCP/IP network setting ♦ Internet Access configuration 、 TCP/IP network setting ♦ If your PC uses the default Windows 95/98/ME/2000/XP setting, no changes need to be made. -
Page 12: B、Internet Access Configuration
DSA-3100 Wireless Service Gateway User Manual 、 Internet Access Configuration To configure your PCs to use the DSA-3100 for Internet access, follow this procedure. For Windows 9x/2000 1、Please select Star Menu - Control Panel - Internet Options. 2、Select the Connection tab, and click the Setup button. - Page 13 DSA-3100 Wireless Service Gateway User Manual 4、Select "I connect through a local area network (LAN)" and click Next. 5、Ensure all of the boxes on the following Local area network Internet Configuration screen are unchecked. 6、Check the "No" option when promoted "Do you want to set up an Internet mail account now?"...
-
Page 14: Network Configuration
、 N ETWORK ONFIGURATION For using further applications of DSA-3100, you have to set up related configurations by following steps after reboot the PC. Step 1、Please ensure that system admin connects his PC to Local Network Port of the DSA-3100, because by default DSA-3100 is configurable only by PCs that are connected to Local Network Port. - Page 15 DSA-3100 Wireless Service Gateway User Manual Enter: a.) Select one mode for WAN to obtain IP (ex: Dynamic IP Address) b.) Authentication DHCP Configuration DNS-Primary IP Address (ex: 168.95.1.1) c.) Local Network DHCP Configuration DNS-Primary IP Address (ex: 168.95.1.1) Step 8、Click Apply.
- Page 16 DSA-3100 Wireless Service Gateway User Manual in the following screen: Step 10、When entering the WEB management interface of DSA-3100, you'll find the following main items on the screen. ♦ Home Basic settings of the D-Link DSA-3100, including system, interface and user management.
- Page 17 DSA-3100 Wireless Service Gateway User Manual Various tools for system customization and maintenance, including “Monitor IP List”, ”Change Password”, “Upload Login Page”, “Upload Logout Page”, “Back Up Restore”, “Firmware” and “Restart”. ♦ Status System status information and on-line user status, including “System”, “Interface”, “Current Users”...
-
Page 18: Home
The time zone of the DSA-3100 internal clock is UTC (Coordinated Universal Time, formerly know as GMT, Greenwich Mean Time). f.) History Email: The DSA-3100 keeps traffic history in its volatile memory. To have the traffic history sent to you automatically, enter your e-mail address in the History Email field. -
Page 19: B、Interface
Figure 1-1 Sample system configuration page 、 Interface a.) WAN:The DSA-3100 offers three ways for WAN to obtain IP address(as shown in following screens): 1.) Static IP Address: Manually specify WAN Port IP address, suitable when WAN Port cannot automatically obtain an IP address. - Page 20 Authentication:Select one mode for Authentication Port and specify IP address, Subnet Mask, and Broadcast(as shown below). The DSA-3100 comes with three Authentication modes, namely NAT and Router (as shown below). 1.) NAT mode: All outbound IP addresses (the addresses must belong to the network connected to Authentication Port) on Authentication Port will be translated to the IP address of WAN Port to proceed.
- Page 21 DSA-3100 Wireless Service Gateway User Manual c.) Authentication DHCP Configuration: Configure DHCP Server on Authentication Port. The DSA-3100 comes with three DHCP Server options (as shown below): 1.) DHCP Disable: Shut down DHCP Server. 2.) DHCP Server: Activate DHCP Server. DHCP Server needs to be configured properly for successful activation.
- Page 22 Local Network: Select one mode for Local Network Port and specify IP address, Subnet Mask, and Broadcast (as shown below). The DSA-3100 comes with two Local Network Port modes, NAT and Router (as shown below). 1.) NAT mode: All outbound IP addresses (the IP addresses must belong to the network connected to Local Network Port) on Local Network Port will be translated to the IP address of WAN Port to proceed.
- Page 23 DSA-3100 Wireless Service Gateway User Manual Note: The LAN IP address must be set to enable network access between the DSA-3100 and managed client devices. The built-in DHCP server could be enabled or not. It is recommended that a DNS server be specified to provide the DSA-3100 and clients complete networking parameters.
-
Page 24: C、User Management
DSA-3100 Wireless Service Gateway User Manual Figure 1-2 Sample Interface configuration page Note: After changing configuration information, you had better restart the DSA-3100 to ensure proper system operation with the new configuration. 、 User Management a.) User Control:Define Logout Time and Multiple Login (as shown below). - Page 25 DSA-3100 Wireless Service Gateway User Manual period will be logged out automatically. The period can range from 1~1440, with 10 minutes as the default value. 2.) Multiple Login: Check this function to allow a single user account to log into the system multiple times.
- Page 26 MAC ACL Control: When MAC Address Control is enabled, users connected to Authentication Port can not login to DSA-3100 unless they have registered their MAC Address at MAC ACL Control. In other words, only 40 users will be allowed to login when this function is enabled.
- Page 27 DSA-3100 Wireless Service Gateway User Manual Note: MAC address format is XX:XX:XX:XX:XX:XX or XX-XX-XX-XX-XX-XX. Newly created user account will be valid instantly. Restart of the DSA-3100 is not necessary (as shown below). d.) Bandwidth: Limit the outbound traffic bandwidth for users connected to Authentication Port, from 190Kbps~1.0Mbps(as shown below).
- Page 28 Note: To let the functions take effect, you need to click Apply, and then Save All after Management Type is selected. 1.) Local: User accounts are stored in the embedded database on DSA-3100 (as shown below). (1.) Add Users: Create new accounts, including Username (mandatory), Password (mandatory), and MAC (blank accepted), as shown below.
- Page 29 DSA-3100. As the below figure shows, the DSA-3100 provides you a way to upload user account data. The user account data file is a text file. Each line of the text file contains one user account data.
- Page 30 “Accounting Service” and “Authentication Method” function. The settings will take effect immediately after you click the Apply button. However, it is recommended that you restart the DSA-3100 after these changes if there is any on-line user (1.) 802.1x: DSA-3100 support integrated single sign-on when using combine with the 802.1x enabled APs.
- Page 31 Wireless LAN. We suggest the system administrator perform the authentication test and make sure every thing is correct before you connect the network to DSA-3100. Note: The function of 802.1x can only be enabled when the user authentication method was set to “RADIUS”...
- Page 32 Note: If you are using the 802.1x supplicant provided by Microsoft, the idle time out will be the longer one of the settings in RADIUS/AP and DSA-3100. Except the idle timer, there is no way for user to logoff from the 802.1x AP in the current 802.1x implementation by Microsoft.
- Page 33 DSA-3100 Wireless Service Gateway User Manual f.) Login Schedule: Define the time zone where DSA-3100 is located and login duration for Guest and General accounts. 1.) Time Zone: Define the time zone where DSA-3100 is located. By default the time zone is GMT-07:00.
- Page 34 DSA-3100 Wireless Service Gateway User Manual Note: The default user management menu is shown in Figure1-3. The DSA-3100 user management interface allows you to add, list, delete users and define guest accounts for visitors if it is configured to use embedded database for user accounts.
-
Page 35: D、Logout
DSA-3100 Wireless Service Gateway User Manual Figure1-3 Sample User management interface 、 Logout Terminates current administration session. You have to login again to use the administration interface. The administration interface also has a built-in session timer, if you do not interact with the interface for some time, the session times out and you have to log in again. -
Page 36: B、Pass Through
DSA-3100 Wireless Service Gateway User Manual Figure 2-1 Port and destination IP redirection Clients who try to access a specific destination that matches one of the defined destinations will be enforced to a matching redirection target. These settings will take effect immediately after you click the Apply button. -
Page 37: C、Virtual Server
DSA-3100 Wireless Service Gateway User Manual Figure 2-2 Pass-through host definition 、 Virtual Server This feature allows you to define up to 10 virtual servers to enable access to servers connected to Authentication and Local Network Port from outside of the managed network. -
Page 38: D、Dmz
2-2 Pass-through host definition 、 DMZ If you have multiple IP addresses available to assign to the DSA-3100’s WAN interface, you could define up to 10 pairs of Ethernet side (Private IP) and WAN side (Public IP Address). The WAN interface will bind the extra public IP addresses automatically. -
Page 39: E、Free Surfing Area
In the above example, if you want the 192.168.202.0/24 and 192.168.100.0/24 network to have access to each other, you should add a static route in the DSA-3100 and also in the 192.168.200.253 IP Router. The following settings show the DSA-3100’s static route... - Page 40 : For the static route to work, the next hop route must also have added a static route to forward all 192.168.100.0/24 IP packets to the DSA-3100, After clicking the Apply button, you will see the added route is shown in the current running routing table. Click “ View Routing table “...
-
Page 41: G、Firewall
DSA-3100 Wireless Service Gateway User Manual 、 Firewall Click the Filter Rule index button to enter the firewall Page for each filter. The following explains each configurable item in detail. Figure 2-7 Defining Filter Rule a.) Name: Enter filter set name/description. Maximum length is 15 characters. -
Page 42: Tools
DSA-3100 Wireless Service Gateway User Manual and the End Port column will be ignored. The filter rule will filter out any port number. =:If the End Port is empty , the filter rule will set the port number to be value of the Start Port . - Page 43 Login Page To provide a custom user login page, please specify the file name to upload it onto the DSA-3100. If you want to get back to the default user login page, simply click the Use Default Page button.
- Page 44 D-Link DSA-3100 restarts. Figure 3-7 Defining Free Surfing Area hosts f、Backup Restore Allow you to make a backup and restore the backup copy to the D-Link DSA-3100. This function also enables you to restore the D-Link DSA-3100 back to the factory default.
- Page 45 DSA-3100 firmware. h、Restart Reboots the DSA-3100. It takes about 1 minute for the DSA-3100 to reboot. If you have to turn off the power of the DSA-3100 for some time, please reboot it and remove the power after your...
-
Page 46: Status
DSA-3100 Wireless Service Gateway User Manual Note:. On-line user sessions will be terminated when the system restarts. 4、Status This feature displays a system configuration summary. An example is shown in Figure 4-1 below. a、System Figure 4-1 Sample System Status... - Page 47 History This feature gives you access to network access history collected by the DSA-3100. Traffic histories are organized by day. The DSA-3100 will store up to 3 days of history data in its volatile memory.. Note: Since the traffic history is stored in a volatile memory, please copy the log data manually...
- Page 48 DSA-3100 Wireless Service Gateway User Manual If you have an e-mail address entered in the system configuration interface, you will have the log sent to that e-mail everyday. The traffic history is a pure text log. The first line is the header. From line two and so on, each line contains a single log record.
-
Page 49: Windows Tcp/Ip Setup
If using the default DSA-3100 settings, and the default Windows 95/98/ME/2000 TCP/IP settings, no changes need to be made. By default, the DSA-3100 will act as a DHCP Server, automatically providing a suitable IP Address (and related information) to each PC when the PC boots. - Page 50 4、Ensure your TCP/IP settings are correct, as follows. ♦ Using DHCP To use DHCP, select the radio button to obtain an IP Address automatically. This is the default Windows settings. Restart your PC to ensure it obtains an IP Address from the DSA-3100.
- Page 51 DSA-3100 Wireless Service Gateway User Manual ♦ Using "Specify an IP Address" If your PC is already configured, check with your network administrator before making the following changes. 1、If the DNS Server fields are empty, select Use the following DNS server addresses, and...
- Page 52 DSA-3100 Wireless Service Gateway User Manual 2、On the Gateway tab, enter the DSA-3100's IP address in the New Gateway field and click Add. (Your Ethernet administrator can advise you of the IP Address they assigned to the DSA-3100.) Check TCP/IP Setting - Windows 2000 1、Select Control Panel - Network and Dial-up Connection.
- Page 53 If your PC is already configured, check with your network administrator before making the following changes. 1、Enter the DSA-3100's IP address in the Default gateway field and click OK. (Your LAN administrator can advise you of the IP Address they assigned to the DSA-3100.) 2、If the DNS Server fields are empty, select Use the following DNS server addresses, and...