Philips CGA7740N Quick Start Manual
Wireless adsl modem router
Hide thumbs
Also See for CGA7740N:
- User manual (1 page) ,
- Quick start manual (2 pages) ,
- Quick start manual (2 pages)

Related Manuals for Philips CGA7740N


Summary of Contents for Philips CGA7740N
- Page 1 Register your product and get support at www.philips.com/welcome CGA7740N Wireless ADSL Modem Router...
-
Page 3: Table Of Contents
Table of contents Important Safety information Network range & speed information Conformity Recycling and disposal FCC Radiation Exposure Statement Software licenses Disclaimer Your Wireless ADSL Modem Router What’s in the box What else will you need Overview of the front side of the wireless ADSL modem router Overview of the rear side of the wireless ADSL modem router... -
Page 4: Important
1.7 Disclaimer This product is provided by "Philips" "as is" and without any express or implied warranty of any kind of warranties, including, but not limited to, the implied warranties of merchantability and fitness for a particular purpose are disclaimed. -
Page 5: Your Wireless Adsl Modem Router
Your Wireless ADSL Modem Router Congratulations on your purchase and welcome to Philips ! To fully benefit from the support that Philips offers, register your product at www.philips.com/welcome. 2.1 What’s in the box Wireless ADSL Modem Router Installation CDRom 2.2 What else will you need... -
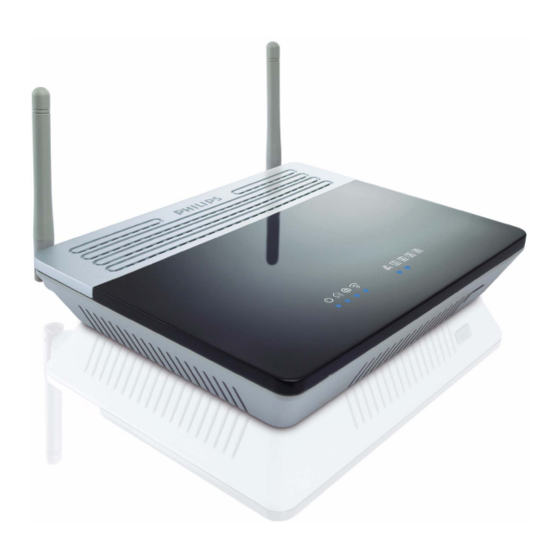
Page 6: Overview Of The Front Side Of The Wireless Adsl Modem Router
2.3 Overview of the front side of the wireless ADSL modem router A B C D ON : Power on, normal operation OFF : Power off or failure ON : ADSL loop is brought up Blinking : Start up OFF : ADSL loop is down ON : Internet connection is up OFF : No data transfering ON : Wireless link is up... -
Page 7: Getting Started
• Power light will turn on Take the Ethernet cable supplied in the box Connect this Ethernet cable to the LAN 1 port on the CGA7740N Connect the other end of the Ethernet cable to your computer • LAN 1 light will turn on... -
Page 8: Install A Wifi Device
• Once the installation completed, the following screen will be displayed Note This screen is the Philips support site. It is a live Internet page, subject to change. The screen displayed may differ from the one shown. Click on Menu if you want to go back to the menu screen Your WiFi network is running but not secured. -
Page 9: Via The Pbc Method
3.4.2 via the PBC method Check that your Wireless router and that the other WPS device are connected and ON Push and hold the WPS button, located on the front side on your router, for 3 seconds Push and hold the WPS button of the other WPS device for 3 seconds (refer to the manual of the other WPS device for location) •... -
Page 10: Configuring The Wireless Modem Router
Configuring the Wireless Modem Router Advanced users may want to change the configuration of their Wireless Modem Router. This chapter explains how to access the configuration webpages, show you the struture of these webpages and it describes them. 4.1 Log on the webpages Open your Internet Browser Enter http://192.168.2.1 in the address field Click on GO... -
Page 11: Isp Settings
4.3.4 DNS Domain Name Servers (DNS) are used to map a domain name (e.g., www.philips.com) with the IP address (e.g., 64.147.25.20). The DNS address is usually configured automatically. If this is not the case, one or more DNS address will be provided to you by your ISP. - Page 12 Access Control Access Control allows users to define the outgoing traffic permitted or not-permitted through the WAN interface. The default is to permit all outgoing traffic. To add the PC to the filtering table : 1- Click "Add PC" on the Access Control screen 2- Define the appropriate settings for client PC services 3- Click "OK"...
-
Page 13: Wireless Security
Intrusion Detection Intrusion Detection Feature Stateful Packet Inspection (SPI) and Anti-DoS firewall protection (Default : Enabled) - The Intrusion Detection Feature of the ADSL Wireless Base Station limits access for incoming traffic at the WAN port. When the SPI feature is turned on, all incoming packets will be blocked except for those types marked in the Stateful Packet Inspection section. -
Page 14: Wps
Wireless Encryption The ADSL Wireless Base Station supports WEP (Wired Equivalent Privacy), WPA/WPA2 (Wi-Fi Protected Access), and 802.1x security mechanisms. It is highly recommended to use WPA/WPA2 security. Access Control Access Control allows users to define the outgoing traffic permitted or not-permitted through the WAN interface. -
Page 15: Home Network Settings Webpages
WPS can be done in any of the following ways : - PIN method - PBC method - Manual method Enter the PIN from the client device and click Start PIN. Push and hold the WPS button, located on the front side on your router, for 3 seconds or click Start PBC. -
Page 16: Advanced Settings Webpages
Channel and SSID You must specify a common radio channel and SSID (Service Set ID) to be used by the ADSL Wireless Base Station and all of its wireless clients. Make sure you configure all of its clients to the same values. 4.6 Advanced settings webpages When you click on the Advanced Settings tab, you will first have this warning window displayed. -
Page 17: Maintenance
Use the Firmware Upgrade screen to update the firmware or user interface to the latest versions. Download the upgrade file from www.philips.com/support (Model CGA5722), and save it to your hard drive. Then click "Browse..." to look for the downloaded file. Click "BEGIN UPGRADE". -
Page 18: System
4.6.3 System Time Settings Select your local time zone from the drop down list. This information is used for log entries and client filtering. If you want to automatically synchronize the ADSL Wireless Base Station with a public time server, chech the box to Enable Automatic Time Server Maintenance. -
Page 19: Upnp
SNMP Trap Specify the IP address of the NMS to notify when a significant event is detected by the agent. When a trap condition occurs, the SNMP agent sends an SNMP trap message to any NMS specified as a trap receiver. 4.7 UPNP UPNP (Universal Plug and Play) settings With Universal Plug and Play, a device can automatically join a network,... -
Page 20: Routing
Address of your server, such as a web server, and then click on the port option HTTP Port 80 so users can access your web server from the Internet connection. This DNS feature is powered by a DDNS service provider. With a DDNS connection you can host your own web site, email server, FTP site, and more at your own location even if you have a dynamic IP address. - Page 21 ADSL settings In step 3 you have to enter the settings applicable to your ADSL Internet Service Provider (ISP) subscription. For easy installation you can select your ISP from a list of predifined ADSL ISP’s per country. If you cannot find your ISP in the list you can enter the settings manually. To do so select as "Country"...
-
Page 22: Technical Data
Technical data Ports • Four 10/100Mbps Rj-45 Ports • One ADSL RJ-11 ADSL Features • Supports DMT line modulation • Supports Annex A Full-Rate ADSL : up to 8 Mbps downstream, up to 1 Mbps upstream (G.992.1 & TI.143, Issue 2) •... -
Page 23: Frequently Asked Questions
Frequently asked questions In this chapter you will find the most frequently asked questions and answers about your Wireless ADSL Modem Router. Set-up I cannot connect using the Web browser • Check that you have a valid network connection to your ADSL Wireless Base Station •... - Page 26 Copyright © 2007 Koninklijke Philips Electronics N.V. All rights reserved. Trademarks are the property of Koninklijke Philips Electronics N.V. or their respective owners. Specifications are subject to change without notice. Document order number : 3111 285 42901...