
Related Manuals for NETGEAR D2200D-1FRNAS


Summary of Contents for NETGEAR D2200D-1FRNAS
- Page 1 ADSL2+ Gateway Mode l D22 00D -1 FR N A S Us e r Manual May 2015 202-11541-01 350 East Plumeria Drive San Jose, CA 95134 DRAFT...
- Page 2 Thank you for selecting NETGEAR products. Contact your Internet service provider for technical support. Trademarks © NETGEAR, Inc., NETGEAR and the NETGEAR logo are trademarks of NETGEAR, Inc. Any non-NETGEAR trademarks are used for reference purposes only. Compliance For regulatory compliance information, visit http://www.netgear.com/about/regulatory/.
-
Page 3: Table Of Contents
Contents Chapter 1 Hardware Setup Unpack Your Gateway..........7 Front and Top Panel. - Page 4 ADSL2+ Gateway Specify Private LAN Settings ........35 Specify Public LAN Settings .
- Page 5 ADSL2+ Gateway Appendix A Supplemental Information Factory Settings........... . . 78 Technical Specifications .
-
Page 6: Chapter 1 Hardware Setup
Hardware Setup This chapter covers the following topics: • Unpack Your Gateway • Front and Top Panel • Rear Panel • Position Your Gateway • Cable Your Gateway DRAFT... -
Page 7: Unpack Your Gateway
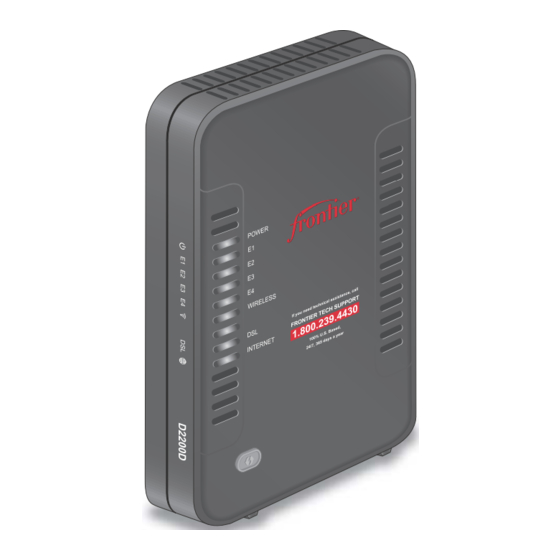
ADSL2+ Gateway Unpack Your Gateway Your package contains the following items. Gateway Power adapter Ethernet cable Phone cable Figure 1. Package contents Front and Top Panel The gateway has status LEDs. POWER E1, E2, E3, E4 INTERNET WIRELESS Figure 2. Gateway front and side view DRAFT Hardware Setup... -
Page 8: Rear Panel
ADSL2+ Gateway You can use the LEDs to verify status and connections. The following table lists and describes each LED and button on the front panel of the gateway. Description POWER • Green. Power is supplied to the gateway. • Off. -
Page 9: Position Your Gateway
ADSL2+ Gateway Position Your Gateway The gateway lets you access your network anywhere within the operating range of your wireless network. However, the operating distance or range of your wireless connection can vary significantly depending on the physical placement of your gateway. For example, the thickness and number of walls the wireless signal passes through can limit the range. -
Page 10: Cable Your Gateway
ADSL2+ Gateway Cable Your Gateway The gateway comes configured to work as both a modem and a router. You can share your Internet connection without connecting the gateway to a router or gateway. To cable your gateway: Connect the phone line cable that came in the package to the DSL port. DSL port Power Power... -
Page 11: Chapter 2 Connect To The Network And Access The Gateway
Connect to the Network and Access the Gateway This chapter contains the following sections: • Connect to the Network • Types of Logins • Log In to the Gateway DRAFT... -
Page 12: Connect To The Network
ADSL2+ Gateway Connect to the Network You can connect to the gateway’s network through a wired or WiFi connection. If you set up your computer to use a static IP address, change the settings so that it uses Dynamic Host Configuration Protocol (DHCP). -
Page 13: Label
Log In to the Gateway When you first set up your gateway, NETGEAR genie automatically starts when you launch an Internet browser on a computer that is connected to the gateway. If you want to view or change settings for the gateway, you can use genie again. - Page 14 ADSL2+ Gateway If you are accessing the gateway for the first time, the Auto Configuration page displays. To bypass Auto Configuration, click the Cancel button. The login window opens. Enter the gateway user name and password. The user name is admin. The default password is admin. The user name and password are case-sensitive.
-
Page 15: Chapter 3 Specify Your Internet Settings
Specify Your Internet Settings Usually, the quickest way to set up the gateway to use your Internet connection is to allow the genie to detect the Internet connection when you first access the gateway with an Internet browser. You can also customize or specify your Internet settings. This chapter contains the following sections: •... -
Page 16: Use Auto Configuration To Set Up Your Internet Connection
ADSL2+ Gateway Use Auto Configuration to Set Up Your Internet Connection The first time that you use a web browser to access the gateway, the Auto Configuration page displays. You can use Auto Configuration to detect the Internet connection, or you can click the Cancel button to exit, and then log in to the gateway. - Page 17 ADSL2+ Gateway If you are prompted to enter PPP account settings, enter your Frontier email address and password. The gateway detects your Internet connection and the Main page displays. DRAFT Specify Your Internet Settings...
-
Page 18: Chapter 4 Control Access To The Internet
Control Access to the Internet The gateway comes with a built-in firewall that helps protect your home network from unwanted intrusions from the Internet. This chapter includes the following sections: • Set General Firewall Settings • Set Up Custom Firewall Rules •... -
Page 19: Set General Firewall Settings
ADSL2+ Gateway Set General Firewall Settings To set general firewall settings: Launch an Internet browser from a computer or wireless device that is connected to the network. Type http:/192.168.254.254. A login window opens. Enter the user name and password. The user name is admin. -
Page 20: Set Up Custom Firewall Rules
ADSL2+ Gateway Set Up Custom Firewall Rules To add a custom firewall rule: Launch an Internet browser from a computer or wireless device that is connected to the network. Type http:/192.168.254.254. A login window opens. Enter the user name and password. The user name is admin. -
Page 21: View The Security Log
ADSL2+ Gateway Select a Security Default radio button: Allow. Allow the packet if no rule matches it. Deny. Block the packet if no rule matches it. This specifies the default action to be taken if no rule is found to match the given packet. In the Add Rules section, complete the following fields: •... -
Page 22: Port Forwarding Overview
ADSL2+ Gateway When prompted, click the Yes button to proceed. To customize the log, do the following: a. Click the Settings button. The Security Log Settings page displays. b. Select Enabled or Disabled for each of these settings: • Log Allowed Traffic. •... -
Page 23: Port Forwarding To Permit External Host Communications
ADSL2+ Gateway The user of a remote computer opens a browser and requests a web page from www.example.com, which resolves to the public IP address of your gateway. The remote computer composes a web page request message with the following destination information: Destination address. -
Page 24: Set Up Port Forwarding To Local Servers
ADSL2+ Gateway The remote computer sends this request message through the Internet to your gateway. Your gateway receives the request message and looks in its rules table for any rules covering the disposition of incoming port 80 traffic. Your port forwarding rule specifies that incoming port 80 traffic should be forwarded to local IP address 192.168.1.123. -
Page 25: Add Or Edit A Port Forwarding Profile
ADSL2+ Gateway Enter the user name and password. The user name is admin. The default password is admin. The user name and password are case-sensitive. The Main page displays. Select Firewall Settings > Port Forwarding. When prompted, click the Yes button to proceed. Click the Add button. -
Page 26: Set Up A Default Dmz Host
ADSL2+ Gateway To add or edit a port forwarding profile: Launch an Internet browser from a computer or wireless device that is connected to the network. Type http:/192.168.254.254. A login window opens. Enter the user name and password. The user name is admin. The default password is admin. The user name and password are case-sensitive. - Page 27 ADSL2+ Gateway WARNING: DMZ servers pose a security risk. A computer designated as the default DMZ server loses much of the protection of the firewall and is exposed to exploits from the Internet. If compromised, the DMZ server computer can be used to attack other computers on your network.
-
Page 28: Set Up Static Nat
ADSL2+ Gateway Set Up Static NAT Static NAT provides a one-to-one private to public static IP address mapping. This can be useful when you want to access a local computer from outside the network. To set up static NAT: Launch an Internet browser from a computer or wireless device that is connected to the network. -
Page 29: Set Up Remote Management
ADSL2+ Gateway Set Up Remote Management You can use remote management to access your gateway over the Internet to view or change its settings. You need to know the gateway’s WAN IP address to use this feature. For information about remote access using Dynamic DNS, see Dynamic DNS on page 72. -
Page 30: Specify Alg Settings
ADSL2+ Gateway Select the Enable Remote Access check box. Click the Apply button. Your changes take effect. Specify ALG Settings You can configure the ALG services. When the firewall is set to High, some services are not configurable. To specify ALG settings: Launch an Internet browser from a computer or wireless device that is connected to the network. -
Page 31: Chapter 5 Specify Network Settings
Specify Network Settings This chapter includes the following sections: • View Network Computers and Devices • Specify the IP Addresses that the Gateway Assigns • Disable the DHCP Server Feature in the Gateway • Improve Network Connections with Universal Plug and Play •... -
Page 32: View Network Computers And Devices
ADSL2+ Gateway View Network Computers and Devices To view network computers and devices: Launch an Internet browser from a computer or wireless device that is connected to the network. Type http:/192.168.254.254. A login window opens. Enter the user name and password. The user name is admin. -
Page 33: Disable The Dhcp Server Feature In The Gateway
ADSL2+ Gateway The Main page displays. Select Advanced. When prompted, click the Yes button to proceed. The Advanced page displays. Select IP Address Distribution. In the DHCP Start Address field, enter the lowest IP address in the range. In the DHCP End Address field, enter the highest IP address in the range. Click the Apply button. - Page 34 ADSL2+ Gateway You can use another device on your network as the DHCP server, or specify the network settings of all your computers. To disable the DHCP server feature in the gateway: Launch an Internet browser from a computer or wireless device that is connected to the network.
-
Page 35: Specify Private Lan Settings
ADSL2+ Gateway Specify Private LAN Settings You can specify how the gateway interacts with computers and devices that are connected to its network. To specify private LAN settings: Launch an Internet browser from a computer or wireless device that is connected to the network. -
Page 36: Specify Public Lan Settings
ADSL2+ Gateway Click the Apply button. Your settings are saved. Specify Public LAN Settings You can specify how the gateway interacts with computers and devices that are connected to its network. To specify public LAN settings: Launch an Internet browser from a computer or wireless device that is connected to the network. -
Page 37: Reserve Lan Ip Addresses
ADSL2+ Gateway Your settings are saved. Reserve LAN IP Addresses When you specify a reserved IP address for a computer on the LAN, that computer always receives the same IP address each time it accesses the gateway’s DHCP server. Assign reserved IP addresses to computers or servers that require permanent IP settings. -
Page 38: Rip Configuration
ADSL2+ Gateway The IP Address Reservation table displays a list of IP addresses from the DHCP pool range that are reserved for specific LAN devices. To add an entry into the Address Reservation table, complete the fields in the Add/Edit Host Information section: •... -
Page 39: Enable Or Disable Multicast Igmp Proxy
ADSL2+ Gateway Select RIP Configuration. To enable RIP, select the RIP LAN Enable check box. In the Interface Type list, select LAN or WAN. The WAN side is receive-only. Complete the fields to specify the RIP version and the authentication mode. To specify a default gateway, select the Default Gateway check box. -
Page 40: View The Routing Table
ADSL2+ Gateway The Main page displays. Select Advanced. When prompted, click the Yes button to proceed. The Advanced page displays. Select Multicast.. The Multicast page displays. Select or clear the IGMP Proxy Enable check box. Click the Apply button. Your settings are saved. View the Routing Table ... -
Page 41: Improve Network Connections With Universal Plug And Play
ADSL2+ Gateway Improve Network Connections with Universal Plug and Play Universal Plug and Play (UPnP) helps devices, such as Internet appliances and computers, access the network and connect to other devices as needed. UPnP devices can automatically discover the services from other registered UPnP devices on the network. If you use applications such as multiplayer gaming, peer-to-peer connections, or real-time communications such as instant messaging or remote assistance (a feature in Windows XP), enable UPnP. - Page 42 ADSL2+ Gateway Note: The preset SSID and password are uniquely generated for every device to protect and maximize your wireless security. It is recommended that you do not change your preset security settings. If you change your preset security settings, make a note of the new settings and store it in a safe place where you can easily find it.
- Page 43 ADSL2+ Gateway Select Wireless. To change the network name (SSID), type a new name in the SSID field. The name can be up to 32 characters long and it is case-sensitive. The default SSID is randomly generated and is on the product label. If you change the name, make sure to write down the new name and keep it in a safe place.
-
Page 44: Change The Wifi Security Settings
Your gateway comes with preset WPA2 or WPA security. The password that you enter to connect to your network is unique to your gateway and is on the product label. NETGEAR recommends that you use the preset security, but you can change them. NETGEAR recommends that you do not disable security. -
Page 45: Create A Hidden Wireless Network
ADSL2+ Gateway In the Wireless Security list, select WPA, WEP, or Disable. The WPA is recommended because it uses the newest standard for the strongest security. The fields displayed in this page depend on what is currently selected in the Wireless Security List. -
Page 46: Restrict Wireless Access By Mac Address
ADSL2+ Gateway Scroll down to the Level 2 section. Select the SSID Broadcast Disable radio button. Click the Apply button. Your settings are saved. Restrict Wireless Access by MAC Address You can restrict wireless access to certain computers and wireless devices based on their MAC addresses. -
Page 47: Set Up A Guest Network
ADSL2+ Gateway Scroll down to the Level 3 section. Click the Add button. Click the Apply button. Your settings are saved. Set Up a Guest Network A guest network allows visitors at your home to use the Internet without using your wireless security key. - Page 48 Select a radio button for a security option. The WPA2 options use the newest standard for the strongest security, but some older computers and wireless devices cannot use it. NETGEAR recommends that you select the WPA-PSK [TKIP] + WPA2-PSK [AES] radio button. This setting protects your WiFi network and lets computers and wireless devices can connect to the WiFi network by using either WPA2 or WPA security.
-
Page 49: Wps Overview
ADSL2+ Gateway WPS Overview Wi-Fi Protected Setup (WPS) lets you add a wireless computer or device to your WiFi network without typing the WiFi password. Enable WPS Simple Config To use WPS, you must enable WPS simple config first. To enable WPS connections (simple config): Launch an Internet browser from a computer or wireless device that is connected to the network. -
Page 50: Control The Wireless Radios
ADSL2+ Gateway • Use Push Button method. Click the Begin Simple Config button. • Use PIN entry method. In the Device PIN field, type the client security PIN and click the Begin Simple Config button. Within two minutes, go to the client device and use its WPS software to connect to the WiFi network. -
Page 51: Quality Of Service
ADSL2+ Gateway The user name is admin. The default password is admin. The user name and password are case-sensitive. The Main page displays. Select Wireless Settings > Basic Settings. Select The Wireless On or Off radio button. Click the Apply button. If you turned off the wireless radios, the WiFi On/Off LED turns off. -
Page 52: Manage Qos Rules And Filters
ADSL2+ Gateway The Main page displays. Select Advanced. When prompted, click the Yes button to proceed. The Advanced page displays. Select Quality of Service (QoS). To enable QoS, select the Enable QoS Services check box. Manage QoS Rules and Filters You can add, edit, or delete QoS filters and you can control the priority of the rules in relation to each other. -
Page 53: Add A Queue
ADSL2+ Gateway The Queue and Summary page displays. Click the View/Add Filter Rules link. To add a filter, click the New Filter button. To modify a filter, click the Edit button for a rule. To delete a filter, click the Delete button. To change the priority of a rule, click the Down button or the Up button. -
Page 54: Change The Wireless Mode
ADSL2+ Gateway When prompted, click the Yes button to proceed. The Advanced page displays. Select Quality of Service (QoS). The Queue and Summary page displays. Click the Add Queue link. Specify the following: • Precedence. The range is 1 to 15. Lower values have higher priority. •... - Page 55 ADSL2+ Gateway Select Wireless Settings > Advanced Settings. In the 802.11b/ Mode list, select an option. In the High Performance list, select an option. Click the Apply button. Your settings are saved. DRAFT Specify Network Settings...
-
Page 56: Chapter 6 Manage Your Network
Manage Your Network This chapter describes the gateway settings for administering and maintaining your gateway and home network. This chapter includes the following sections: • Change the admin Password • View Gateway Status • Run the Ping Utility • Run the Traceroute Utility •... -
Page 57: Change The Admin Password
ADSL2+ Gateway Change the admin Password This feature let you change the default password that is used to log in to the gateway with the user name admin. This password is not the one that you use for WiFi access. The label on your gateway shows your unique wireless network name (SSID) and password for wireless access. -
Page 58: View Advanced Status
ADSL2+ Gateway Select System Monitoring. For information about the displayed settings, click the Help icon in the upper right corner of the page. View Advanced Status To view gateway status and usage information: Launch an Internet browser from a computer or wireless device that is connected to the network. -
Page 59: View The Ethernet Status
ADSL2+ Gateway Select System Monitoring > Advanced Status. For information about the content of this page, click the Help icon. View the Ethernet Status To view the gateway Ethernet status: Launch an Internet browser from a computer or wireless device that is connected to the network. -
Page 60: View The Atm Status
ADSL2+ Gateway Select System Monitoring > Advanced Status > Ethernet. View the ATM Status To view gateway status and usage information: Launch an Internet browser from a computer or wireless device that is connected to the network. Type http:/192.168.254.254. A login window opens. -
Page 61: View The Dsl Status
ADSL2+ Gateway Select System Monitoring > Advanced Status > ATM. View the DSL Status To view the gateway DSL status: Launch an Internet browser from a computer or wireless device that is connected to the network. Type http:/192.168.254.254. A login window opens. Enter the user name and password. -
Page 62: View The Adsl Status
ADSL2+ Gateway Select System Monitoring > Advanced Status > DSL. View the ADSL Status To view the gateway ADSL status: Launch an Internet browser from a computer or wireless device that is connected to the network. Type http:/192.168.254.254. A login window opens. Enter the user name and password. -
Page 63: View The Wireless Status
ADSL2+ Gateway View the Wireless Status To view the gateway wireless status: Launch an Internet browser from a computer or wireless device that is connected to the network. Type http:/192.168.254.254. A login window opens. Enter the user name and password. The user name is admin. -
Page 64: Upgrade Firmware From The Internet
ADSL2+ Gateway Upgrade Firmware from the Internet To upgrade the firmware from the Internet:: Launch an Internet browser from a computer or wireless device that is connected to the network. Type http:/192.168.254.254. A login window opens. Enter the gateway user name and password. The user name is admin. -
Page 65: Upgrade Firmware From A Computer
ADSL2+ Gateway The gateway checks for new firmware. If new firmware is available, the modem downloads it. If you clicked the Update from web now button, the gateway loads the new firmware and reboots. WARNING: To avoid the risk of corrupting the firmware, do not interrupt the upgrade. - Page 66 ADSL2+ Gateway Select Firmware Upgrade. Scroll down and click Upgrade From a Computer in the Network Update Now button. The Software Upgrade page displays. Click the Browse button and select the upgrade file. Click the Upload File button. If you clicked the Update from web now button, the gateway loads the new firmware and reboots.
-
Page 67: Run The Ping Utility
ADSL2+ Gateway Run the Ping Utility Ping is an administration utility that tests whether a computer on the network is reachable and measures the time it takes messages sent from the originating device to reach a destination computer and return. ... -
Page 68: Run The Traceroute Utility
ADSL2+ Gateway • To ping an IP address, complete the IP Address/Host Name field, and click the IP Address Host Name Test button. The ping results display. Run the Traceroute Utility To display the route and measure transit delays of packets across an IP, run the traceroute utility. -
Page 69: View Devices Currently On The Network
ADSL2+ Gateway View Devices Currently on the Network You can view all computers or devices that are currently connected to your network. To view devices on the network: Launch an Internet browser from a computer or wireless device that is connected to the network. -
Page 70: Load Configuration Settings
ADSL2+ Gateway The Main page displays. Select Advanced. When prompted, click the Yes button to proceed. The Advanced page displays. Select Configuration File. To save the configuration settings onto the gateway, click the Save Configuration File button. To save the configuration settings onto a computer, click the Save Configuration File to LAN PC button. -
Page 71: Restore The Factory Settings
ADSL2+ Gateway The Main page displays. Select Advanced. When prompted, click the Yes button to proceed. The Advanced page displays. Select Configuration File. To load configuration settings that you saved on the gateway, click the Load Configuration File button. To load configuration files that you saved on a computer, click the Load Configuration File from LAN PC button. -
Page 72: Dynamic Dns
ADSL2+ Gateway Enter the user name and password. The user name is admin. The default password is admin. The user name and password are case-sensitive. The Main page displays. Select Advanced. When prompted, click the Yes button to proceed. The Advanced page displays. Select Restore Defaults. -
Page 73: Specify A Dns Server
ADSL2+ Gateway The Main page displays. Select Advanced. When prompted, click the Yes button to proceed. The Advanced page displays. Select Dynamic DNS. Select the DNS Client Enable radio button. In the Service Provider list, select your service provider. In the Host .Domain Name field, type the host name (sometimes called the domain name) for your account. -
Page 74: Specify The Date And Time Settings
ADSL2+ Gateway The Advanced page displays. Select DNS Server. To add a DNS entry, click the Add DNS Entry link and complete the fields. To specify the DNS server, click the Set button. Click the Apply button. Your changes are saved. Specify the Date and Time Settings By default, the gateway is set to Eastern time with Daylight Saving Time enabled. -
Page 75: Reboot The Gateway
ADSL2+ Gateway The Advanced page displays. Select Date and Time. Complete the fields to specify the date and time settings. Click the Apply button. Your settings are saved. Reboot the Gateway To reboot the gateway: Launch an Internet browser from a computer or wireless device that is connected to the network. -
Page 76: Specify The Vpn Pass-Through Method
ADSL2+ Gateway When prompted, click the OK button to confirm that you want to reboot the gateway. The gateway reboots. Specify the VPN Pass-Through Method You can specify which kind of VPN pass-through the gateway uses. By default, the gateway is set up to use PPTP, L2TP, and IPSec. - Page 77 Supplemental Information This appendix covers the following topics: • Factory Settings • Technical Specifications DRAFT...
-
Page 78: Factory Settings
ADSL2+ Gateway Factory Settings You can return the gateway to its factory settings. To reset the gateway: Use the end of a paper clip or a similar object to press and hold the Reset button on the back of the gateway for 10 seconds. Reset button The gateway resets, and returns to the factory configuration settings shown in the... -
Page 79: Technical Specifications
ADSL2+ Gateway Table 1. Factory default settings (continued) Feature Default behavior Firewall Inbound (communications coming Disabled (except traffic on port 80, the HTTP port) in from the Internet) Outbound (communications going Enabled (all) out to the Internet) Wireless Wireless communication Enabled SSID name See the product label... - Page 80 ADSL2+ Gateway Table 2. Gateway specifications (continued) Feature Description Data encoding standards IEEE 802.11n version 2.0 IEEE 802.11g IEEE 802.11b 2.4 GHz Maximum computers per Limited by the amount of wireless network traffic generated by each node wireless network (typically 50–70 nodes). Operating frequency range 2.4 GHz: 2.412–2.462 GHz 802.11 security...
- Page 81 Wall-Mount the Gateway This appendix describes how to wall-mount the gateway. The gateway lets you access your network from anywhere within the operating range of your WiFi network. However, the operating distance or range of your WiFi connection can vary significantly depending on the physical placement of your gateway.
- Page 82 ADSL2+ Gateway Concrete To wall-mount the gateway: Drill holes in the wall where you want to wall-mount the gateway. Holes must be 6-9/16 in. (167 cm) center to center. Install wall anchors in the holes. Use pan head Phillips wood screws, 3.5 x 20 mm (diameter x length, European) or No. 6 type screws, 1"...
- Page 83 ADSL2+ Gateway 1/16 inch (1.6 mm) Attach the gateway to the screws and secure it into place. DRAFT Wall-Mount the Gateway...
- Page 84 FCC statement Warning: Changes or modifications to this unit not expressly approved by the party responsible for compliance could void the user’s authority to operate the equipment. NOTE: This equipment has been tested and found to comply with the limits for a Class B digital device, pursuant to Part 15 of the FCC Rules.