Orion Atlas EQ-G Instruction Manual
Computerized goto equatorial mount #9929
Hide thumbs
Also See for Atlas EQ-G:
- Manual (27 pages) ,
- Instruction manual (12 pages) ,
- Instruction manual (12 pages)
Table of Contents
Advertisement
Quick Links
Download this manual
See also:
Manual
Advertisement
Table of Contents

Related Manuals for Orion Atlas EQ-G


Summary of Contents for Orion Atlas EQ-G
- Page 1 Manual orion atlas EQ‑G ® ™ Computerized GoTo Equatorial Mount #9929 customer support (800)‑676‑1343 E‑mail: support@telescope.com Corporate Offices (831)‑763‑7000 P.O. Box 1815, Santa Cruz, CA 95061 Providing Exceptional Consumer Optical Products Since 1975 IN 266 Rev. B 10/05...
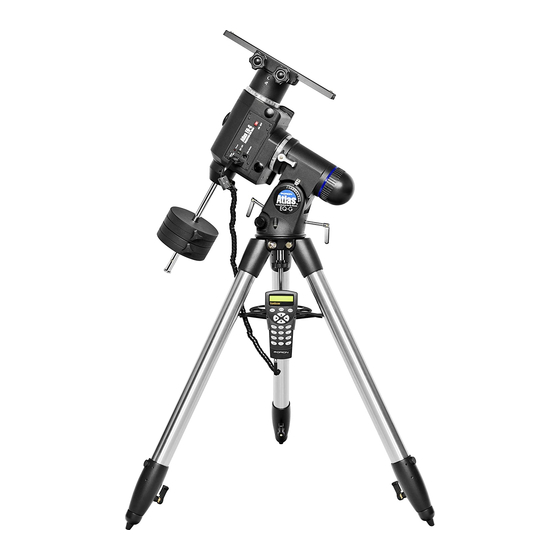
- Page 2 Hand controller jack Counterweight shaft lock lever Latitude scale Counterweight shaft Latitude adjustment L-bolts Counterweights Center support shaft Counterweight lock knobs Tripod center support tray “Toe-saver” Hand controller Hand controller cable Tripod leg Leg lock levers Figure 1. The Atlas EQ-G mount.
-
Page 3: Table Of Contents
Moon, galaxies, nebulae, stars, and star clusters. With a little practice, you’ll find that the Atlas EQ-G mount is an invaluable tool for getting the most out of your astronomical observing sessions. -
Page 4: Attaching A Telescope
Close the tube rings and tighten them. installed and explained in Section 7. Note: The Atlas EQ-G mount is very heavy. Alone it weighs 54 lbs. With a large optical tube and counterweights it can 4. attaching a telescope easily weigh over 100 lbs. -
Page 5: Polar Alignment
35° North, set the pointer to 35. The latitude Azimuth Latitude scale setting should not have to be adjusted again unless you adjustment move to a different viewing location some distance away. Latitude knobs (2) adjustment L-bolts Figure 5. The Atlas EQ-G mount. - Page 6 The telescope should be moved only about its R.A. and Dec. axes. Using the Polar Axis Finder Scope The reticle of the polar axis finder scope for the Atlas EQ-G the Polar axis Finder scope has a tiny star map printed on it that makes precise polar align- The Atlas EQ-G mount comes with a polar axis finder scope ment quick and easy.
- Page 7 do not appear in scale, but they indicate the general posi- is focused, it should not need to be adjusted again. tions of Cassiopeia and the Big Dipper relative to the north confused about Pointing the telescope? celestial pole (which is indicated by the cross at the cen- ter of the reticle).
-
Page 8: The Atlas Eq-G Hand Controller
(Figure 12). You now have a spot to store the the variety of features the Atlas EQ-G offers in just a few hand controller while you are viewing. observing sessions. -
Page 9: Initial Setup
(and pointing accu- racy for one-star alignments). Dual Purpose buttons 2. Point the telescope you have mounted on the Atlas EQ-G Mode Buttons roughly to the North Celestial Pole (or Polaris) if you are The three mode buttons are located at the top of the controller, in the Northern Hemisphere. - Page 10 (which stops the slewing). numeric keypad. Press ENTER to confirm your choice. 3. The Atlas EQ-G will provide a list of stars that can be used 9. Enter your current local time using the 24 hour time mode as the second alignment star. Choose a star using the (example: 2:00PM = 14:00).
-
Page 11: Selecting An Object
2. The Atlas EQ-G will provide a list of stars available in your M, NGC, IC: These shortcut buttons give you access to the current sky for you to choose as the first alignment star. - Page 12 Display Time: This function displays the local time and local using the user‑Defined Database Sidereal time. The Atlas EQ-G allows you to save up to 25 objects in the Park Scope: This function moves the telescope to the Home User Defined Database. You can save unidentifiable objects, position.
- Page 13 IDENTIFY menu. Press ESC to exit this function. linking with a computer The Atlas EQ-G can be connected to a computer via the sup- plied computer interface cable. Many commercially available planetarium softwares can utilize this function and be used to control the Atlas EQ-G.
- Page 14 atlas EQ‑G Menu tree...
-
Page 15: Specifications
Alignment method: One-star alignment, two- axis of the telescope not being aligned to the R.A. axis of the star alignment, three-star mount. This affects the pointing accuracy of the Atlas EQ-G. alignment Three-star alignment automatically compensates for some of Database: 25 user-defined objects, the “cone”... - Page 16 Atlas EQ-G object database and press ENTER mount. to slew the telescope to the star. If the optical axis is perfectly 6.
- Page 17 Figure 18a‑b. Rotate the telescope 180° about the R.A.axis. Figure 20a. Adjust the optical axis offset screws this way if Polaris moves toward the center of the eyepiece when the tube is pushed as in Figure 19. Figure 19. gently push the telescope horizontally to determine direction of optical axis offset.
- Page 18 1. Perform an accurate Polar alignment using the polar axis finder scope. 2. Manually point or electronically slew the telescope mount- ed on the Atlas EQ-G to a star with a small value DEC coordinate (DEC between +10° and –10°). This object will be used as the guide star.
- Page 19 Alt high byte, Alt low byte. sidereal mode until another tracking mode is selected. If the power is turned off while the Atlas EQ-G is in the PEC + sidereal mode, the hand controller loses synchronization with the R.A. worm gear and the PEC training will have to be repeated when the power is turned back on.
- Page 20 Orion’s option, any warranted instrument that proves to be defective, provided it is returned postage paid to: Orion Warranty Repair, 89 Hangar Way, Watsonville, CA 95076. If the product is not reg- istered, proof of purchase (such as a copy of the original invoice) is required.