
Related Manuals for Omega OC90TZ


Summary of Contents for Omega OC90TZ
-
Page 1: Ceramic Cooktop
Ceramic Cooktop Instruction Manual / Installation Manual OC90TZ Congratulations Enjoy your new ceramic cooktop... -
Page 3: Table Of Contents
Content 1. Foreword ..................3 1.1 Safety Warnings ................. 3 1.2 Installation ................3 1.2.1 Electrical Shock Hazard ..........3 1.2.2 Cut Hazard ..............3 1.2.3 Important safety instructions .......... 3 1.3 Operation and maintenance ............4 1.3.1 Electrical Shock Hazard ..........4 1.3.2 Health Hazard .............. -
Page 4: Foreword
1. Foreword 1.1 Safety Warnings Your safety is important to us. Please read this information before using your cooktop. 1.2 Installation 1.2.1 Electrical Shock Hazard Disconnect the appliance from the mains electricity supply before carrying out any cleaning or maintenance on it. ... -
Page 5: Operation And Maintenance
This appliance should be connected to a circuit which incorporates an isolating switch providing full disconnection from the power supply. Failure to install the appliance correctly could invalidate any warranty or liability claims. 1.3 Operation and maintenance 1.3.1 Electrical Shock Hazard ... -
Page 6: Cut Hazard
1.3.4 Cut Hazard The razor-sharp blade of a cooktop scraper is exposed when the safety cover is retracted. Use with extreme care and always store safely and out of reach of children. Failure to use caution could result in injury or cuts. 1.3.5 Important safety instructions ... - Page 7 Ceramic glass. If the supply cord is damaged, it must be replaced by the manufacturer, its service agent or similarly qualified persons in order to avoid a hazard. This appliance is intended to be used in household and similar applications such as: -staff kitchen areas in shops, offices and other working environments;...
-
Page 8: Product Introduction
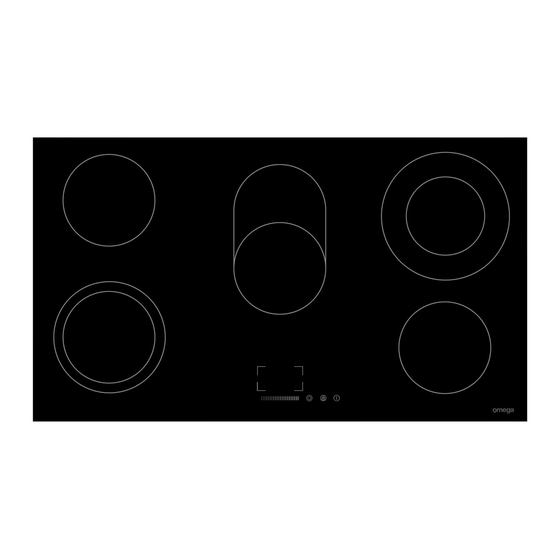
2. Product Introduction 2.1 Top View 1. Max. 1800 W zone 2. Max. 1200 W zone 3. Max. 1100/ 2000W dual zone 4. Max. 1000/ 2200W dual zone 5. Max. 1200 W zone 6. Glass plate 7. Control panel 2.2 Control Panel 1. -
Page 9: Technical Specification
2.5 Technical Specification Cooking Hob MC-HV848 Cooking Zones 5 Zones Supply Voltage 220-240V~ 50/60Hz Installed Electric Power 7600-9200W Product Size L×W×H(mm) 900x520x55 Building-in Dimensions A×B (mm) 875x495 Weight and Dimensions are approximate. Because we continually strive to improve our products we may change specifications and designs without prior notice. -
Page 10: How To Use
Always lift pans off the ceramic hob – do not slide, or they may scratch the glass. 3.3 How to use 3.3.1 Start cooking After power on, the buzzer beeps once, all the indicators light up for 1 second then go out, indicating that the ceramic hob has entered the standby mode. -
Page 11: Finish Cooking
3.3.2 Finish cooking Touching the heating zone selection control that you wish to switch off. Turn the cooking zone off by touching the slider to the lowest point. Make sure the display shows ”0”. After cooking an H symbol will appear to indicate the surface is still hot and will go out when the surface is cooler. -
Page 12: Using The Double Zone Function
3.3.4 Using the dual zone function • This function only works on zones 3# and 4#. • The dual cooking zone has two cooking areas that you can use a central section and an outer section. You can use the central section (A) independently or both sections (B) at once. Zone 3# Zone 4# Activate the Dual zone... - Page 13 a) Using the Timer as a Minute Minder If you are not selecting any cooking zone Make sure the cooktop is turned on. Note: you can use the minute minder even if you’re not selecting any cooking zone. Touch the timer control, the “10” will show in the timer display.
-
Page 14: Over-Temperature Protection
Set the time by touching the slider control. (e.g. 5) Touch timer control again, the “1” will flash. To set a time less than 10 minutes you will need to set the right number first and then the left number to “0” set the time by touching the slider control (e.g.9), now the timer you set is 95 minutes. -
Page 15: Cooking Tips
4.1 Cooking Tips When food comes to the boil, reduce the power setting as needed to maintain a steady boil. Using a lid will reduce cooking times on some dishes and save energy by retaining the heat. 4.1.1 Simmering, cooking rice ... -
Page 16: Care And Cleaning
• cooking rice • pancakes 5 - 6 • sautéing 7 - 8 • cooking pasta • stir-frying • searing • bringing soup to the boil • boiling water 6. Care and Cleaning What? How? Important! Everyday soiling on 1. Make sure the cooktop is off. •... -
Page 17: Hints And Tips
7. Hints and Tips Problem Possible causes What to do The cooktop cannot No power. Make sure the ceramic hob is Be turned on. connected to the power supply and that it is switched on. Check whether there is a power outage in your home or area. -
Page 18: Before Locating The Fixing Brackets
L(mm) W(mm) H(mm) D(mm) A(mm) B(mm) X(mm) 875+4 495+4 50 mini Under any circumstances, make sure the ceramic cooker hob is well ventilated and the air inlet and outlet are not blocked. Ensure the ceramic cooker hob is in good work state. As shown below Note: The safety distance between the hotplate and the cupboard above the hotplate should be at least 760mm. -
Page 19: Cautions
8.3 Cautions 1. The ceramic cooker hob must be installed by qualified personnel or technicians. We have professionals at your service. Please never conduct the operation by yourself. 2. The ceramic cooker hob shall not be mounted to cooling equipment, dishwashers and rotary dryers. 3. - Page 20 This appliance is labelled in compliance with European directive 2012/19/EU for Waste Electrical and Electronic Equipment (WEEE). By ensuring that this appliance is disposed of correctly, you will help prevent any possible damage to the environment and to human health, which might otherwise be caused if it were disposed of in the wrong way.
- Page 21 Our warranty (which is subject to the conditions below) covers rectification free of charge of any fault arising from defective materials or components, or faulty workmanship. The product will be repaired or replaced at the option of Omega, and all costs of installation, removal, cartage, freight travelling and insurance are to be paid by the customer.