Table of Contents
Advertisement
Available languages
Available languages
ESTUFAS A GAS 30"
MANUAL DE INSTRUCCIONES,
INSTALACIÓN Y USO
LEA CUIDADOSAMENTE ESTE INSTRUCTIVO ANTES DE
USAR POR PRIMERA VEZ SU ESTUFA
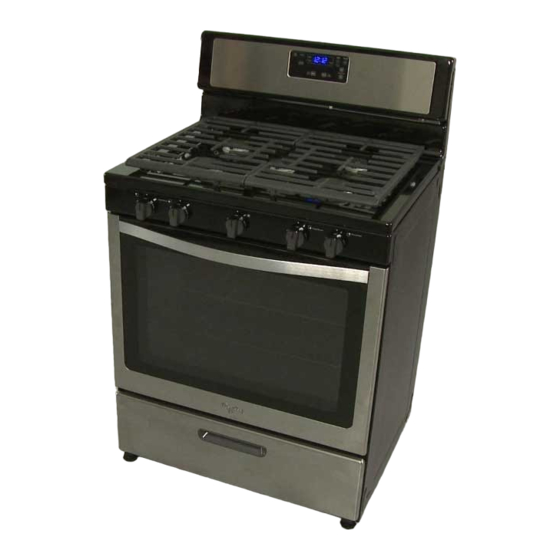
30" GAS RANGE
INSTRUCTIONS MANUAL, INSTALLATION AND USE GUIDE
PLEASE READ THIS DOCUMENT CAREFULLY BEFORE
USING YOUR RANGE FOR THE FIRST TIME
09-May-2014 18:21:12 EDT | RELEASED
STM W10668149 Rev.
This document in English language covers the following models:
In some European factories the letter "W" of the part code mentioned herein will be automatically
replaced by the number "4000" (e.g. "W12345678" becomes "400012345678")
C
No. Parte W10665437 Rev.
Ampara los siguientes modelos:
LWF7200
LWF7230
LWF7550
LWF7551
LWF7200
C
LWF7230
LWF7550
LWF7551
5
Advertisement
Table of Contents

Related Manuals for Whirlpool LWF7200


Summary of Contents for Whirlpool LWF7200
- Page 1 ESTUFAS A GAS 30” MANUAL DE INSTRUCCIONES, INSTALACIÓN Y USO LEA CUIDADOSAMENTE ESTE INSTRUCTIVO ANTES DE USAR POR PRIMERA VEZ SU ESTUFA Ampara los siguientes modelos: LWF7200 LWF7230 LWF7550 LWF7551 30” GAS RANGE INSTRUCTIONS MANUAL, INSTALLATION AND USE GUIDE PLEASE READ THIS DOCUMENT CAREFULLY BEFORE...
-
Page 2: Table Of Contents
Warranty Service PRODUCTO FABRICADO POR / PRODUCT MANUFACTURED BY: Industrias Acros Whirlpool S.A. de C.V., Unidad Celaya Carretera Panamericana Km. 280 C.P. 38020, Celaya, Gto. Tel. 01 (461) 6 18 55 00 In some European factories the letter "W" of the part code mentioned herein will be automatically 09-May-2014 18:21:12 EDT | RELEASED replaced by the number "4000"... -
Page 3: Seguridad De La Estufa
¡Felicidades por la compra de su nueva estufa! Acaba de adquirir un producto desarrollado con las más avanzadas técnicas de diseño y fabricación, con calidad Whirlpool. Le sugerimos que antes de usar su estufa lea cuidadosamente las instrucciones de este manual. Consérvelo ya que la información contenida en el mismo será... -
Page 4: Instalación De La Estufa, Recomendaciones Generales E Instalación
La instalación apropiada es su responsabilidad, por lo cual es recomendable que su estufa sea instalada por personal calificado o un técnico de Whirlpool Service. Vea la sección “Requisitos del Suministro Eléctrico”. Revise las normas locales. Revise que existan suministros eléctricos. -
Page 5: Requisitos De Ubicación
Gas Natural [Segunda Familia (Grupo 2H)], se requiere el juego de conversión de acuerdo con la siguiente tabla y puede solicitarlo en su Centro de Soluciones Whirlpool Autorizado, de lo contrario su estufa generará hollín y esto incurrirá en un servicio de limpieza de la misma, el cual no se incluye en la garantía del producto, para cambiar las espreas y hacer los... - Page 6 Salida 5/8” Flared Una vez conectado su línea de gas, abra el paso de gas y verifique que no existan fugas vertiendo espuma de jabón en las conexiones y curvas de los tubos. Verifique que el tubo de cobre no esté dañado o doblado de manera que obstruya el paso de gas a su estufa.
- Page 7 Regulador de presión de Gas 2. Compruebe que la válvula de cierre del regulador de presión de gas esté en la posición "ON". IMPORTANTE: El ajuste predeterminado de fábrica es la posición "ON". Si la estufa no funciona, verifique que la válvula está...
-
Page 8: Requisitos Del Suministro Eléctrico
Requisitos del Suministro Eléctrico Si su estufa cuenta con accesorios eléctricos, colóquela cerca de un tomacorriente de pared. El cable tomacorriente debe conectarse a una toma de corriente con un voltaje de 105V -140V ~. Cerciórese de que la instalación está... -
Page 9: Ajuste De Flamas
Al realizar conversión de su producto de gas LP a gas natural, algunos componentes requieren de ajustes para poder utilizar su estufa correctamente. Para realizar este ajuste llame al técnico especializado Whirlpool. Flama del quemador de horno Las diferentes altitudes sobre el nivel del mar, las variaciones en el suministro de gas y el cambio de configuración de la estufa para ser utilizada con gas LP o gas Natural, hacen necesario regular la entrada de aire primario del quemador de horno para obtener una adecuada mezcla de aire-gas y obtener un buen funcionamiento cuando se utiliza. -
Page 10: Uso De La Estufa
Cuando el quemador de horno ha sido ajustado y está colocado dentro de la estufa, retorne la charola del piso a su posición original. Continúe con la verificación de funcionamiento del quemador de horno. NOTA: No obstruya la salida de aire del horno, no cubra los orificios de la charola de horno. -
Page 11: Comal
La estufa cuenta con quemadores de distintas capacidades. Para conseguir un rendimiento óptimo de los quemadores se recomienda respetar lo siguiente: - Utilice recipientes cuya base tenga un diámetro igual o ligeramente superior al de los quemadores (consulte tabla). - Utilice exclusivamente ollas y sartenes con fondo plano. Quemador Ø... - Page 12 Al terminar de hornear gire la perilla a la posición de apagado. “En el evento de que se extingan accidentalmente las flamas del quemador, apague el control del quemador y no intente volver a encender por lo menos durante 1 min.” Parrillas del horno Las parrillas interiores del horno son deslizadas de manera, abra la puerta del horno y/o broiler (en el modelo que aplique).
- Page 13 Inicio Start (Inicio) iniciará cualquier función del horno. Si no se presiona Start (Inicio) dentro de los 5segundos después de presionar el botón de una característica, la luz indicadora de “PSH” (Empuje para iniciar) destellará y se escuchará el tono de presionar para poner en marcha, como recordatorio.Si no se presiona Start en menos de 1minuto después de haber presionado un botón de función, la pantalla del horno volverá...
-
Page 14: Cuidado Y Limpieza De La Estufa
Antes de bloquearlo, asegúrese de que las funciones de cocción estén apagadas. Presione y sostenga START (Inicio) por 3 segundos y aparecerá en la pantalla “Lock” (Bloqueo). Repita el procedimiento para desbloquearlo. “Lock” (Bloqueo) desaparecerá de la pantalla. Control de temperatura del horno IMPORTANTE: No use un termómetro para medir la temperatura del horno, ya que el abrir la puerta del mismo puede hacer que el ciclo del quemador dé... -
Page 15: Limpieza General
Recomendaciones de Cuidados Siga las siguientes recomendaciones de cuidado de su estufa: Cubierta Superior No exponga los quemadores de su estufa a periodos prolongados de uso. No sobrecargue las parrillas de su estufa con ollas excesivamente pesadas soportan una carga máxima de 20 kg aproximadamente. - Page 16 Quemadores superiores estampados (algunos modelos) Colocación Antes de encender los quemadores asegúrese que estén bien colocados en su sitio. Orificios del quemador Una buena flama es de color azul, no amarillo. Mantenga los orificios libres de suciedad y no permita el ingreso de derrames, alimentos, productos de limpieza o cualquier otro material.
-
Page 17: Solución De Problemas
Solución de Problemas Antes de llamar a Servicio, pruebe las soluciones aquí sugeridas. Problema Revisar Solución Nada funciona Si su regulador tiene un buen funcionamiento y/o está en Es responsabilidad del cliente mantener en buen buen estado estado el regulador Si se ha cableado y polarizado debidamente el contacto al Conecte a un tomacorriente aterrizado suministro de energía... -
Page 18: Range Safety
Congratulations for your new appliance! You just purchased a new appliance, designed and manufactured following the most advanced techniques, Whirlpool guaranteed! We strongly recommend you to read the instructions on this manual before using your range. Please keep this literature in a safe place for further reference;... -
Page 19: Range Installation
The correct installation of this appliance is your responsibility, we strongly recommend you to have a qualified technician or Whirlpool Service Technician to install your new range. Check the local regulations. Make sure there is power supply available. See section Electrical Requirements. -
Page 20: Connect The Gas Supply Line
To use your stove with natural gas you should contact Whirlpool Service to change the nozzle and make the necessary adjustments. See the “Service” section in page 34. The qualified technician should make the conversion on the nozzles of each cooktop burner; the technician must test the... - Page 21 2. Attach one adapter to the gas pressure regulator and the other adapter to the gas shutoff valve. Tighten both adapters, being certain not to move or turn the gas pressure regulator. 3. Use a ¹⁵⁄₁₆" combination wrench and an adjustable wrench to attach the flexible connector to the adapters. IMPORTANT: All connections must be wrench-tightened.
-
Page 22: Electrical Requirements
4. Test all connections by brushing on an approved noncorrosive leak-detection solution. Bubbles will show a leak. Correct any leak found. Remove cooktop burner caps and grates from parts package. Align burner caps with burner base. Burner caps should be level when properly positioned. -
Page 23: Testing Your Range
When converting your range from LP gas to Natural gas, you will need to adjust some components to get the best performance from your appliance. Please contact a qualified Whirlpool technician for this fix. In some European factories the letter "W" of the part code mentioned herein will be automatically 09-May-2014 18:21:12 EDT | RELEASED replaced by the number "4000"... -
Page 24: Range Use
Oven Burner Flame The different altitudes from the sea level, the variations on the gas supply line and the type gas conversion may cause the need to adjust the primary air intake in the oven burner for an adequate air-gas blend, and therefore a better performance of the burner. The oven burner flame should be blue colored and steady, follow these steps to adjust the flame: Check the range is cold and all the cooktop burners are in the OFF position. -
Page 25: Griddle
The clean cap over the burner will help to ignite the burner correctly and keep the flame uniform. Always keep the burner cap clean after spilling any liquids and periodically remove and clean the burner caps as indicated on the section “Range Care”, “Cooktop Burners”. Opening on gas line The gas should flow freely through the line gas opening for the burner to turn on correctly. -
Page 26: Oven Racks
Oven Racks Manual sliding The oven has 5 different rack positions. There is a bump in the oven rails that stop the rack from falling when they are slide out. To change the position of the racks follow these steps: Pull the oven rack out until the bump. - Page 27 ■Function has been entered Three tones ■Invalid pad press ■Push to start reminder Cycling tones ■End of cycle Fahrenheit and Celsius The temperature is preset at Fahrenheit, but can be changed to Celsius. To Change: Press and hold BROIL for 5seconds. A tone will sound, and “C”...
-
Page 28: Range Care And Cleaning
The temperature can be changed at any time after this step by pressing the Temp/Time or Temp/Hour “up” or “down” arrow pads. Start does not need to be pressed again. If baking/roasting while the Timer is counting down, the set baking/roasting temperature can be displayed for 5 seconds by pressing Bake. - Page 29 Contact a qualified repair technician. DON’T ASSY THE BURNER CAPS IF THEY ARE STILL WET, WAIT UNTIL ALL PIECES ARE TOTALLY DRY Whirlpool Service. If your Range have assembly burner it must be reviewed by In some European factories the letter "W" of the part code mentioned herein will be automatically 09-May-2014 18:21:12 EDT | RELEASED replaced by the number "4000"...
-
Page 30: Troubleshooting
Troubleshooting Before calling to Service, prove the solutions here suggested. Problem Check over Solution Nothing works If wiring is properly connected and polarized energy supply Connect to a properly grounded Has blown a fuse in the house or tripped circuit breaker Replace fuse or reconnect the circuit If there is gas in your home, check if other gas appliances Call your gas supplier... -
Page 31: Diagramas Eléctricos
Diagramas Eléctricos/ Wiring diagrams Modelos/ Models: LWF7230 In some European factories the letter "W" of the part code mentioned herein will be automatically 09-May-2014 18:21:12 EDT | RELEASED replaced by the number "4000" (e.g. "W12345678" becomes "400012345678") - Page 32 Modelos/ Models: LWF7550 / LWF7551 In some European factories the letter "W" of the part code mentioned herein will be automatically 09-May-2014 18:21:12 EDT | RELEASED replaced by the number "4000" (e.g. "W12345678" becomes "400012345678")
-
Page 33: Garantía
In some European factories the letter "W" of the part code mentioned herein will be automatically 09-May-2014 18:21:12 EDT | RELEASED replaced by the number "4000" (e.g. "W12345678" becomes "400012345678") -
Page 34: Servicio
In some European factories the letter "W" of the part code mentioned herein will be automatically 09-May-2014 18:21:12 EDT | RELEASED replaced by the number "4000" (e.g. "W12345678" becomes "400012345678") - Page 35 In some European factories the letter "W" of the part code mentioned herein will be automatically 09-May-2014 18:21:12 EDT | RELEASED replaced by the number "4000" (e.g. "W12345678" becomes "400012345678")
- Page 36 In some European factories the letter "W" of the part code mentioned herein will be automatically 09-May-2014 18:21:12 EDT | RELEASED replaced by the number "4000" (e.g. "W12345678" becomes "400012345678")
- Page 37 In some European factories the letter "W" of the part code mentioned herein will be automatically 09-May-2014 18:21:12 EDT | RELEASED replaced by the number "4000" (e.g. "W12345678" becomes "400012345678")
- Page 38 In some European factories the letter "W" of the part code mentioned herein will be automatically 09-May-2014 18:21:12 EDT | RELEASED replaced by the number "4000" (e.g. "W12345678" becomes "400012345678")
- Page 39 NOTAS: In some European factories the letter "W" of the part code mentioned herein will be automatically 09-May-2014 18:21:12 EDT | RELEASED replaced by the number "4000" (e.g. "W12345678" becomes "400012345678")
- Page 40 NOTAS: In some European factories the letter "W" of the part code mentioned herein will be automatically 09-May-2014 18:21:12 EDT | RELEASED replaced by the number "4000" (e.g. "W12345678" becomes "400012345678")