
Related Manuals for Panasonic AW-PB309P


Summary of Contents for Panasonic AW-PB309P
- Page 1 WEB card Before attempting to connect, operate or adjust this product, please read these instructions completely.
- Page 2 CAUTION: TO REDUCE THE RISK OF ELECTRIC SHOCK, DO NOT REMOVE COVER (OR BACK). NO USER SERVICEABLE PARTS INSIDE. REFER TO SERVICING TO QUALIFIED SERVICE PERSONNEL. The lightning flash with arrowhead symbol, within an equilateral triangle, is intended to alert the user to the presence of uninsulated “dangerous voltage”...
-
Page 3: Table Of Contents
Contents Introduction ... 3 Precautions for use ... 3 Before use ... 4 Parts and their functions... 4 Installation ... 5 System upgrading... 6 Image display method ... 9 Config screen ... 10 Passwords ... 12 Pan/tilt head and camera control ... 15 Server functions... -
Page 4: Before Use
Before use Since the WEB card is a device which is connected to a network, read through the following points to ensure proper use. 1) The image updating interval is not a fixed one. ≥JPEG compression is implemented for the camera images at fixed intervals but the image updating interval as seen from the terminal end via the network varies from one status to another. -
Page 5: Installation
Installation Bear in mind the following points when installing the card. ≥ Be absolutely sure to ask your dealer to install the card. ≥ Before installing the card, disconnect the camera’s power supply. ≥ Before handling the card, touch a metal part of the camera to release any static stored in the body. -
Page 6: System Upgrading
System upgrading [1] Connections An example of the basic connections is presented below. Install the WEB card (AW-PB309) in the convertible camera. AW-PS505 AC adapter [2] Recommended system requirements 1) Personal computer Provide a Windows-compatible personal computer (PC) with the following performance specifications: •... - Page 7 System upgrading The screen here shows what appears when Windows ME is used as the operating system. 1 Right click on the desktop’s My Network icon, and open Properties. 3 Now set the IP address and net mask. IP address: 192.168.1.100 Net mask : 255.255.255.0 After inputting the addresses, click “OK,”...
- Page 8 System upgrading Start up the browser. Input the following address into the browser. http://192.168.1.50/config/config.html A setting screen such as the one shown in the figure below now appears. Input the addresses. Upon completion of the input, press the screen. The new IP address is set when the settings completed screen has appeared. [5] Re-setting the PC’s address The WEB card’s IP address and other settings are completed with the steps taken in the previous sections.
-
Page 9: Image Display Method
Image display method Start up the browser, and input the address. http://(new IP address setting)/user/pb309.html Images can be displayed when the following address is input in the factory setting status. http://192.168.1.50/user/pb309.html When this address is input, an image such as the one shown in Fig. -
Page 10: Config Screen
Config screen A number of different settings can be performed on the Config screen. Start up the browser. Input the following address into the browser. http://(new IP address setting)/config/config.html The following address is used in the factory setting status: http://192.168.1.50/config/config.html A setting screen such as the one shown in the figure now appears. - Page 11 Config screen 1Network Set the IP address, net mask and gateway address in the fields provided here. Consult your network administrator for details on the addresses. After setting the information, you must click the settings will not take effect unless this button is clicked. Refer also to the pages on system upgrading.
-
Page 12: Passwords
Passwords Three kinds of passwords can be set for the WEB card so that three levels of access restriction can be established. 1) Monitor password 2) Operation password 3) Management password Types of passwords Each password serves to restrict the kinds of operations that a user can perform. In terms of their functions, the management password has the highest level of authority. - Page 13 Passwords Types of passwords 1) Monitor password This is used to restrict access to images. The following window appears when an image has been accessed. Input “monitor” into the user name field, and input the password which was set on the Config screen into the password field.
- Page 14 Passwords The following anomalies do not indicate that something is wrong with the WEB card. What kind of window appears differs according to the type and version of the browser used. The following anomalies may appear due to the characteristics of the browser but they do not indicate that something is wrong with the WEB card.
-
Page 15: Pan/Tilt Head And Camera Control
Pan/tilt head and camera control The pan/tilt head and camera can be controlled from the WEB card. ≥ The pan/tilt head that can be connected is the AW-PH350. (A dedicated software cable is required. Contact your local dealer for details.) ≥... -
Page 16: Before Requesting Service
Before requesting service Item Power Is the RDY LED lighted? Communication Is the LINK/RX LED lighted? Is there any ping*1 response? Screen display Is an image displayed? ¢1 How to use the ping command The ping command is used to check whether the PC and WEB card are connected on the network. -
Page 17: Specifications And Accessories
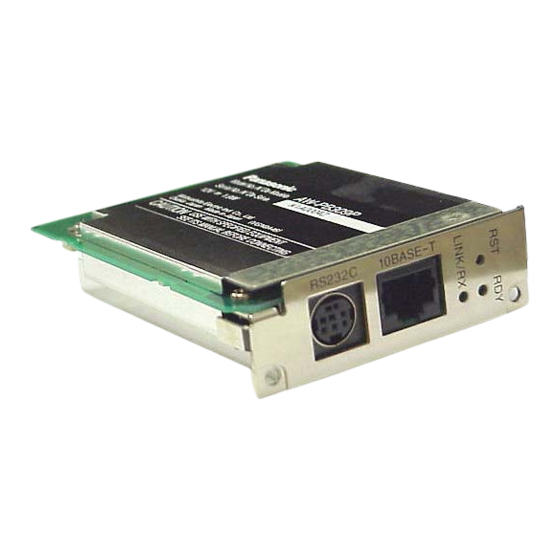
Specifications and accessories Specifications Power supply : DC 12 V (supplied from camera unit) Power consumption : 1.9 W indicates safety information. Dimensions (W a H a D) Weight Image compression system : JPEG Image quality Screen size Image updating interval I/O connectors LED displays Switch... - Page 20 DIVISION OF MATSUSHITA ELECTRIC CORPORATION OF AMERICA Executive Office: 3330 Cahuenga Blvd W., Los Angeles, CA 90068 (323) 436-3500 EASTERN ZONE: One Panasonic Way 4E-7, Secaucus, NJ 07094 (201) 348-7621 Southeast Region: 1225 Northbrook Parkway, Ste 1-160, Suwanee, GA 30024 (770) 338-6835 Central Region:...