D-Link DCS-5222L User Manual
Hd pan & tilt day/night network camera
Hide thumbs
Also See for DCS-5222L:
- User manual (85 pages) ,
- Quick installation manual (80 pages) ,
- Quick install manual (8 pages)

Related Manuals for D-Link DCS-5222L


Summary of Contents for D-Link DCS-5222L
-
Page 1: User Manual
Version 2.0 | 01/23/2014 User Manual HD Pan & Tilt Day/Night Network Camera DCS-5222L... -
Page 2: Manual Overview
Manual Overview D-Link reserves the right to revise this publication and to make changes in the content hereof without obligation to notify any person or organization of such revisions or changes. Information in this document may become obsolete as our services and websites develop and change. -
Page 3: Safety Instructions
• Position product cables and power cables carefully; route cables so that they cannot be stepped on or tripped over. Be sure that nothing rests on any cables. Do not modify power cables or plugs. Consult a licensed electrician or your power company for site modifications. Always follow your local/national wiring rules. D-Link DCS-5222L User Manual... -
Page 4: Warnings
MOBILE INTERNET SUBSCRIPTION SERVICES, COVERAGE AND PRODUCTS; CAMERA MANAGEMENT SOFTWARE, AND; A NETWORK CONNECTION. D-LINK HAS NO CONTROL OVER SUCH SERVICES AND PRODUCTS AND EXPRESSLY DISCLAIMS ANY AND ALL LIABILITY FOR THE FAILURE OF THE DEVICE OR ANY FEATURE THEREOF RESULTING FROM THE FAILURE OF ANY THIRD-PARTY SERVICE OR PRODUCT. -
Page 5: Table Of Contents
Camera Installation Wizard ............9 Add Media ................45 mydlink ................12 Add Event .................47 Camera Status ................13 Add Recording ..............49 Live Video ..................14 Advanced ..................51 SD Card ...................15 Digital Input/Output ............51 Settings ..................16 ICR and IR ................52 D-Link DCS-5222L User Manual... - Page 6 System ..................57 Firmware Upgrade ..............58 Status ....................59 Device Info ................59 Log ...................60 Help ....................61 Configuring the DCS-5222L with a Router ....62 Troubleshooting ..............68 Networking Basics ............71 Check your IP address ...............71 Statically Assign an IP Address ..........72 DI/DO Specifications ............73 Technical Specifications ..........74...
-
Page 7: Product Overview
• Quick Install Guide Note: Using a power supply with a different voltage rating than the one included with the DCS-5222L will cause damage and void the warranty for this product. If any of the above items are missing from your package, please contact your retailer. -
Page 8: System Requirements
• Broadband Internet connection • Computer with: • Internet Explorer 7 or higher (ActiveX) mydlink Website Requirements • Firefox 12 or higher • Safari 4 or higher • Chrome 20 or higher D-Link DCS-5222L User Manual... -
Page 9: Introduction
Congratulations on your purchase of the DCS-5222L. The DCS-5222L is a versatile solution for your small office or home. The DCS-5222L is a complete system with a built-in CPU and web server that transmits high quality video images for security and surveillance. -
Page 10: Features
Simple to Use The DCS-5222L is a stand-alone system with a built-in CPU, requiring no special hardware or software such as PC frame grabber cards. The DCS-5222L supports both ActiveX mode for Internet Explorer and Java mode for other browsers such as Firefox, Chrome, and Safari. -
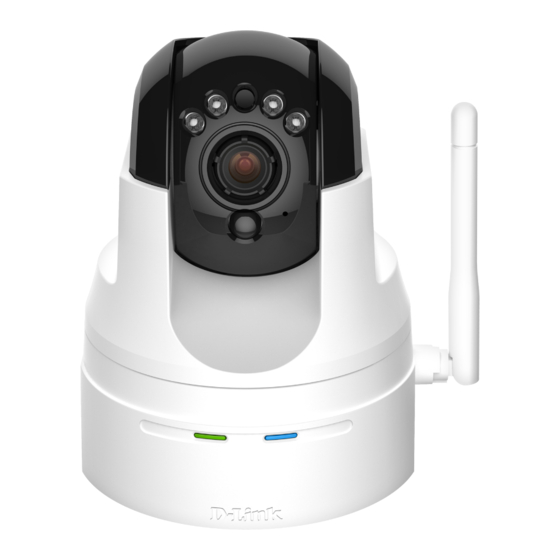
Page 11: Hardware Overview
Detects light levels and adjusts IR-LEDS accordingly. Camera Lens Records video of the surrounding area. Microphone Records audio from the surrounding area. WPS Status LED Indicates the WPS (Wi-Fi Protected Setup) connection status of the camera. D-Link DCS-5222L User Manual... -
Page 12: Back
3.5 mm jack for audio I/O devices such as microphones and speakers. Reset Button Press the reset button to return the device back to it’s factory conditions. DI/DO Attach digital I/O devices such as alarms or motion sensors. Power Receptor Connects to the power adapter. D-Link DCS-5222L User Manual... -
Page 13: Left And Right Side
The external antenna increases the device’s range of connectivity. WPS Button Use WPS (Wi-Fi Protected Setup) to easily create a secure connection to your network. microSD Slot Insert a microSD card to store recorded images and video. D-Link DCS-5222L User Manual... -
Page 14: Wireless Installation Considerations
Wireless Installation Considerations The D-Link Wireless Network Camera lets you access your network using a wireless connection from anywhere within the operating range of your wireless network. However, the number, thickness and location of walls, ceilings, or other objects that the wireless signals must pass through, may limit the range. -
Page 15: Installation
Installation Camera Installation Wizard If you have a D-Link Cloud Router, skip to the next page and follow the steps. You do not have to download and run the setup wizard software. If you do not have a cloud router, open a web browser and go to http://www.mydlink.com/download. Click your camera model and then under Wizard, click the link of the version (Windows or Mac) you want to download. - Page 16 Section 2 - Installation Note: The Zero Configuration Setup will only work with a registered D-Link Cloud Router and an active mydlink account. Your Cloud Router will automatically assign your network settings (both wired and wireless) to your camera. Step 1: Attach the power supply to the power input on the DCS-5222L and connect it to a wall outlet or power strip.
- Page 17 Your camera is now set up, and you can skip to “mydlink” on the next page to learn more about the mydlink features of this camera, or to “Configuration” on page 17 for advanced configuration of your camera. D-Link DCS-5222L User Manual...
-
Page 18: Mydlink
After registering your DCS-5222L camera with a mydlink account in the Camera Setup Wizard. You will be able to remotely access your camera from the mydlink.com website. After signing in to your mydlink account, you will see a screen similar to... -
Page 19: Camera Status
If you still cannot access your camera, reset your camera and Success Blue run the Camera Setup Wizard again from the CD-ROM included Blinking 10 seconds Fail / Standby in your package. (0.1 sec interval) Off D-Link DCS-5222L User Manual... -
Page 20: Live Video
If the camera is available, a Live Video feed will be displayed. Video will be shown at full resolution if viewing your camera from a PC on the same local network, or viewing your camera from a PC on a remote network. D-Link DCS-5222L User Manual... -
Page 21: Sd Card
Section 3 - mydlink SD Card Select the recording date and click GO to view recorded video Recording Date: from your microSD card. D-Link DCS-5222L User Manual... -
Page 22: Settings
Click to configure advanced features for your camera. You will need Setting: to enter the username and password of your camera (not mydlink). Remove Device: Click to remove and unregister the camera from your mydlink account. D-Link DCS-5222L User Manual... -
Page 23: Configuration
After completing the Camera Installation Wizard, you are ready to use your camera. The camera’s built-in Web configuration utility is designed to allow you to easily access and configure your DCS-5222L. At the end of the wizard, click Go To Camera, or enter the IP address of your camera into a web browser. -
Page 24: Live Video
Set the length of time in seconds for the camera to remain at each preset point on a path. Language Select the default language for the user interface. Selection: The next page contains several icons which can be used to control the camera’s main functions. D-Link DCS-5222L User Manual... - Page 25 Listen Button camera’s microphone to the PC’s speakers. Click again to turn off. Sends audio from a microphone Talk Button connected to your PC to the speakers connected to the camera. Zoom Buttons Zooms in or out. D-Link DCS-5222L User Manual...
- Page 26 Recording Indicator change color. Starts the automatic panning function. The ROI will Auto Pan pan from back and forth within the FOV Stop Stops automatic panning. Preset Path Starts the camera's motion along the predefined path. D-Link DCS-5222L User Manual...
-
Page 27: Setup
26 for more details. Manual If you would rather manually setup the camera’s Motion motion detection features, you can refer to Detection page “Motion Detection” on page 39 which Setup: provides more details on the information required. D-Link DCS-5222L User Manual... -
Page 28: Internet Connection Setup Wizard
Section 4 - Configuration Internet Connection Setup Wizard This wizard will guide you through a step-by-step process to configure your new D-Link Camera and connect the camera to the Internet. Note: This wizard will not register your camera with mydlink.com. - Page 29 Password: Enter your password used to connect to the DDNS server. Timeout: You can setup how often the camera notifies the DDNS server of its current global IP address by entering a whole number in hours. D-Link DCS-5222L User Manual...
- Page 30 Enable Daylight Saving box and select Auto Daylight Saving to have DST set automatically or select Set date and time manually to enable drop-down menus so that you can set the start and end time of daylight saving yourself. Click Next to continue. D-Link DCS-5222L User Manual...
- Page 31 Section 4 - Configuration A summary of the options you selected is displayed for confirmation. If you are happy with the selected configuration, click Apply otherwise click Back to make the required changes. D-Link DCS-5222L User Manual...
-
Page 32: Motion Detection Setup Wizard
Please see “Motion Detection” on page 4239 for information about how to configure motion detection. Step 2 This step allows you to enable motion detection based on a customized schedule. Specify the day and hours. You may also choose to always record motion. D-Link DCS-5222L User Manual... - Page 33 Click Next to continue. Step 4 You have completed the Motion Detection Wizard. Please verify your settings and click Apply to save them. Please wait a few moments while the camera saves your settings and re- starts. D-Link DCS-5222L User Manual...
-
Page 34: Network
Primary DNS: The primary domain name server translates names to IP addresses. Secondary The secondary DNS acts as a backup to the primary DNS: DNS. D-Link DCS-5222L User Manual... - Page 35 The default name is video#.mjpg, where # is the for Stream 1~3: number of the stream. HTTPS Port: You may use a PC with a secure browser to connect to the HTTPS port of the camera. The default port number is 443. D-Link DCS-5222L User Manual...
- Page 36 IP address, specify an optional router and an optional primary DNS. Enable The DCS-5222L allows you to multicast each of the available streams Multicast for via group address and specify the TTL value for each stream. Enter the...
-
Page 37: Wireless
Check this box to display the key. Antenna: Select to use the internal or external wireless antenna. After making any changes, click the Save Settings button to save your changes, or click the Don’t Save Settings button to discard your changes. D-Link DCS-5222L User Manual... -
Page 38: Dynamic Dns
Enter your password again for verification. Timeout: You can setup how often the camera notifies the DDNS server of its current global IP address by entering a whole number in hours. Status: Displays the connection status of your DDNS account. D-Link DCS-5222L User Manual... -
Page 39: Image Setup
Select the frequency used by your power lines to avoid interference or distortion. White Balance: Use the drop-down menu to change the white balance settings to help balance colors in different lighting environments. You can choose from Auto, Outdoor, Indoor, Fluorescent, and Push Hold. D-Link DCS-5222L User Manual... - Page 40 Mount type: Select the correct mounting type from either Ceiling or Desktop to ensure the PTZ controls respond accurately. Note: Mirror and Flip can be used if you have mounted the DCS-5222L on the ceiling. D-Link DCS-5222L User Manual...
-
Page 41: Audio And Video
960 x 720, 800 x 592, 640 x 480, 480 x 352, 320 x 240 Maximum frame A higher frame rate provides smoother motion for rate: videos, and requires more bandwidth. Lower frame rates will result in stuttering motion, and requires less bandwidth. D-Link DCS-5222L User Manual... - Page 42 5 fps and the bit rate to 20 Kbps. Similarly, select appropriate audio encoding for your bandwidth requirements. After making any changes, click the Save Settings button to save your changes, or click the Don’t Save Settings button to discard your changes. D-Link DCS-5222L User Manual...
-
Page 43: Ptz
Click to set the Home position with the default Home: setting. Auto Pan Select the speed at which the camera will pan from Speed: the drop-down menu. Select a value between 0 and 10, 0 being the slowest. D-Link DCS-5222L User Manual... - Page 44 Clicking the trash can button will remove the currently selected preset from the sequence. If you want to change the dwell time for a preset, select it from the list, enter a new dwell time, then click the Update button. D-Link DCS-5222L User Manual...
-
Page 45: Motion Detection
No Motion Motion The motion notification will continue to blink as long as motion is detected. If no additional motion is detected, it will return to its original state after eight seconds. D-Link DCS-5222L User Manual... -
Page 46: Sound Detection
50 and 90. The higher the number the less sensitive the camera will be. After making any changes, click the Save Settings button to save your changes, or click the Don’t Save Settings button to discard your changes. D-Link DCS-5222L User Manual... -
Page 47: Time And Date
Copy your Computer’s Click to synchronize the time information Time Settings: from your PC. After making any changes, click the Save Settings button to save your changes, or click the Don’t Save Settings button to discard your changes. D-Link DCS-5222L User Manual... -
Page 48: Event Setup
Event Setup In a typical application, when motion is detected, the DCS-5222L sends images to a FTP server or via e-mail as notifications. As shown in the illustration below, an event can be triggered by many sources, such as motion detection or external digital input devices. When an event is triggered, a specified action will be performed. - Page 49 2. To delete the selected item from the drop-down menu of event, server or media, click Delete. 3. Click on the item name to pop up a window for modifying. D-Link DCS-5222L User Manual...
-
Page 50: Add Server
Enter the configuration for the target e-mail server account. FTP: Enter the configuration for the target FTP server account. Network Storage: Specify a network storage device. Only one network storage device is supported. SD Card: Use the camera's onboard SD card storage. D-Link DCS-5222L User Manual... -
Page 51: Add Media
7 post-event images to be taken. File name prefix: The prefix name will be added on the file name. Add date and Check this to add timing information as file time suffix to file name suffix. name: D-Link DCS-5222L User Manual... - Page 52 System log: Select this option to set the media type to system logs. This will save the event to the camera system log, but will not record any snapshots or video. D-Link DCS-5222L User Manual...
-
Page 53: Add Event
Digital input: The external digital input triggers an event. System Boot: Triggers an event when the system boots up. Network Lost: Triggers an event when the network connection is lost. D-Link DCS-5222L User Manual... - Page 54 Sound Detection: Triggers an event when sound is detected. Time: Select Always or enter the time interval. Trigger D/O: Select to trigger the digital output for a specific number of seconds when an event occurs. D-Link DCS-5222L User Manual...
-
Page 55: Add Recording
Source: The source of the stream. Recording Scheduling the recording entry. schedule: Recording Configuring the setting for the recording. settings: Destination: Select the folder where the recording file will be stored. D-Link DCS-5222L User Manual... - Page 56 Time of each file If this is selected, files will be separated based on for recording: the maximum length you specify. File Name Prefix: The prefix name will be added on the file name of the recording file(s). D-Link DCS-5222L User Manual...
-
Page 57: Advanced
"Open." N.O. stands for Normally Open. This means that the normal state of the circuit is open. There- fore events are triggered when the device status changes to "Closed." D-Link DCS-5222L User Manual... -
Page 58: Icr And Ir
The IR light will always be on. Sync: The IR light will turn on when the ICR sensor is on. Schedule: The IR light will turn on or off according to the schedule that you specify below. D-Link DCS-5222L User Manual... -
Page 59: Https
Create a certificate request and install Status: Displays the status of the certificate. Note: The certificate cannot be removed while the HTTPS is still enabled. To remove the certificate, you must first uncheck Enable HTTPS secure connection. D-Link DCS-5222L User Manual... -
Page 60: Access List
Section 4 - Configuration Access List Here you can set access permissions for users to view your DCS-5222L. Allow list: The list of IP addresses that have the access right to the camera. Start IP ad- The starting IP Address of the devices (such as... -
Page 61: Maintenance
Check to enable HTTP streaming. Snapshot URL Select Enable to allow access to the current camera snapshot Authentication: via the web address indicated. Camera Name: Enter the name of your camera. This is useful if you have multiple cameras. D-Link DCS-5222L User Manual... - Page 62 Select on/off or schedule the privacy mode for your camera to ensure the privacy. When the privacy mode is turned on, the camera hides the lens by rolling it back into the unit. After making any changes, click the Save button to save your changes. D-Link DCS-5222L User Manual...
-
Page 63: System
Click this button to reset all settings to their Defaults: factory defaults. If you reset your settings, you will need to set up your camera again. Reboot Device: Clicking the Reboot button will reboot your device. D-Link DCS-5222L User Manual... -
Page 64: Firmware Upgrade
Note: It is recommended that you use a wired connection for your computer and camera when upgrading the firmware. D-Link DCS-5222L User Manual... -
Page 65: Status
Section 4 - Configuration Status Device Info This screen displays various information about your camera and its current settings. D-Link DCS-5222L User Manual... -
Page 66: Log
Section 4 - Configuration The log shows you a list of events that have happened recently. You can download the log by clicking the Download button, or you can empty the log by clicking the Clear button. D-Link DCS-5222L User Manual... -
Page 67: Help
Section 4 - Configuration Help D-Link DCS-5222L User Manual... -
Page 68: Configuring The Dcs-5222L With A Router
DCS-5222L, follow the steps outlined in the Quick Installation Guide. After you have completed the setup of the DCS-5222L outlined in the Quick Installation Guide you will have an operating camera that has an assigned IP Address. Because you are using a router to share the Internet with one or more PCs, the IP Address assigned to the Network Camera will be a local IP Address. - Page 69 1. Assign a Local IP Address to Your Camera Run the setup wizard for the DCS-5222L. Follow the steps in the Quick Install Guide to configure the DCS-5222L. The camera will be assigned a local IP Address that allows it to be recognized by the router. Write down this IP Address for future reference.
- Page 70 The Setup > Network page displays the port settings for your camera. If necessary, these ports can be changed if they are already in use by other devices (e.g. in a multiple camera environment). Note: Both the HTTP port and RTSP port are required to be opened for the DCS-5222L. D-Link DCS-5222L User Manual...
- Page 71 Router Set-Up and Installation The following steps generally apply to any router that you have on your network. The D-Link DIR-655 is used as an example to clarify the configuration process. Refer to the router’s user manual for more information on router operation and configuration.
- Page 72 The firewall security features built into the DIR-655 router prevent users from accessing the video from the DCS-5222L over the Internet. The router connects to the Internet over a series of numbered ports. The ports normally used by the DCS-5222L are blocked from access over the Internet.
- Page 73 800. Not all routers are the same, so refer to your user manual for specific instructions on how to open ports. Enter valid ports in the Virtual Server section of your router. Please make sure to check the box next to the camera name on the Virtual Server List to enable your settings. D-Link DCS-5222L User Manual...
-
Page 74: Troubleshooting
Section 6 - Troubleshooting Troubleshooting This chapter provides solutions to problems that can occur during the installation and operation of the DCS-5222L. 1. What is Remote Access? How do I enable it? Remote Access allows you to access your camera from any PC connected to the Internet through a web browser. This lets you view your camera feed and manage your camera’s settings when you’re away from home. - Page 75 Reposition the DCS-5222L camera into a more shaded area immediately, as prolonged exposure to bright lights will damage the CMOS sensor.
- Page 76 2.5 meters, at the height of an average adult. A larger movement of an object is required for detection between a distance of 2.5 and 5 meters. • Install this camera on a firm, static, anti-shock surface. D-Link DCS-5222L User Manual...
-
Page 77: Networking Basics
Check your IP address After you install your new D-Link DCS-5222L camera, by default, the TCP/IP settings should be set to obtain an IP address from a DHCP server (i.e. wireless router) automatically. To verify your IP address, please follow the steps below. -
Page 78: Statically Assign An Ip Address
Set Primary DNS the same as the LAN IP address of your router (192.168.0.1). The Secondary DNS is not needed or you may enter a DNS server from your ISP. Step 5 Click OK twice to save your settings. D-Link DCS-5222L User Manual... -
Page 79: Di/Do Specifications
A switch from DI to GND, activated by setting NO. or NC. Internal 5V Power External 3~12V Power GPIO GPIO DI Input DI Input PTC 1 PTC 1 DC3 V ~ 12V PTC 2 PTC 2 DO Output DO Output D-Link DCS-5222L User Manual... -
Page 80: Technical Specifications
• Multicast • SMTP client • IGMP • FTP client • ONVIF compliant Network Interface • IEEE 802.11n • 10/100 BASE-TX Fast Ethernet External Device Interface • microSD/SDHC Slot • DI/DO Port • Single audio input/output port D-Link DCS-5222L User Manual... - Page 81 • Operating: 32 to 104 °F (0 to 40 °C) • Storage: -4 to 158 ºF (-20 to 70 ºC) Humidity • Operating: 20% to 80% non-condensing Certifications • CE • C-Tick • FCC Class B • CE LVD D-Link DCS-5222L User Manual...
-
Page 82: Contacting Technical Support
• Hardware Revision (located on the label on the bottom of the Network Camera (e.g. rev B1)) • Serial Number (s/n number located on the label on the bottom of the Network Camera). You can find software updates and user documentation on the D-Link website as well as frequently asked questions and answers to technical issues. -
Page 83: Warranty
Any repair or replacement will be rendered by D-Link at an Authorized D-Link Service Office. The replacement hardware need not be new or have an identical make, model or part. D-Link may, at its option, replace the defective Hardware or any part thereof with any reconditioned product that D-Link reasonably determines is substantially equivalent (or superior) in all material respects to the defective Hardware. - Page 84 D-Link further warrants that, during the Software Warranty Period, the magnetic media on which D-Link delivers the Software will be free of physical defects. The customer’s sole and exclusive remedy and the entire liability of D-Link and its suppliers under this Limited Warranty will be, at D-Link’s option, to replace the non-conforming Software (or defective media) with software that substantially conforms to D-Link’s...
- Page 85 • USA residents send to 17595 Mt. Herrmann, Fountain Valley, CA 92708. D-Link will not be held responsible for any packages that are lost in transit to D-Link. The repaired or replaced packages will be shipped to the customer via UPS Ground or any common carrier selected by D-Link.
-
Page 86: Limitation Of Liability
Appendix C - Warranty While necessary maintenance or repairs on your Product can be performed by any company, we recommend that you use only an Authorized D-Link Service Office. Improper or incorrectly performed maintenance or repair voids this Limited Warranty. -
Page 87: Copyright Statement
No part of this publication or documentation accompanying this product may be reproduced in any form or by any means or used to make any derivative such as translation, transformation, or adaptation without permission from D-Link Corporation/D-Link Systems, Inc., as stipulated by the United States Copyright Act of 1976 and any amendments thereto. - Page 88 The availability of some specific channels and/or operational frequency bands are country dependent and are firmware programmed at the factory to match the intended destination. The firmware setting is not accessible by the end user. For detailed warranty information applicable to products purchased outside the United States, please contact the corresponding local D-Link office.
-
Page 89: Registration
Appendix D - Registration Registration Product registration is entirely voluntary and failure to complete or return this form will not diminish your warranty rights. Version 2.0 January 23, 2014 D-Link DCS-5222L User Manual...