Table of Contents
Advertisement
Available languages
Available languages
Advertisement
Table of Contents

Related Manuals for Asus samplepad pro

Summary of Contents for Asus samplepad pro
- Page 1 SAMPLEPAD PRO User Guide English ( 2 – 9 ) Guía del usuario Español ( 10 – 17 ) Guide d’utilisation Français ( 18 – 25 ) Guida per l'uso Italiano ( 26 – 33 ) Benutzerhandbuch Deutsch ( 34 – 42 )
-
Page 3: Box Contents
User Guide (English) Make sure all items listed in the Box Contents are included in Box Contents the box. SamplePad Pro READ SAFETY INSTRUCTION BOOKLET BEFORE USING Power Adapter THE PRODUCT. User Guide Study the connection diagram. -
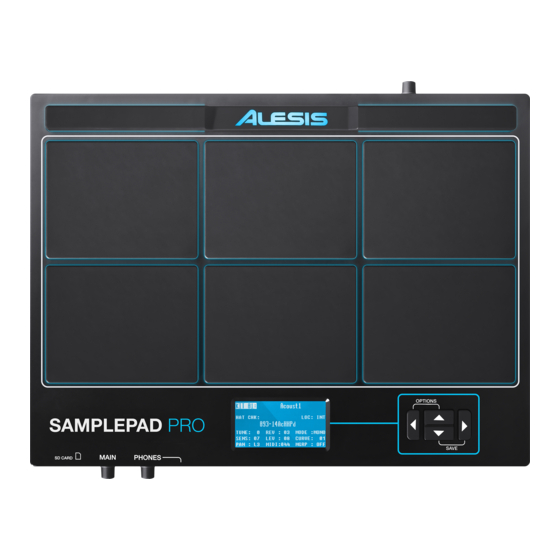
Page 4: Top Panel Features
Aux In: Connect a phone, CD player, or media player to this input using a stereo 1/8" cable. Aux In Volume: Adjusts the level of the device connected to the Aux Input. Power Switch: Press this button to turn SamplePad Pro on. Hold this button for two seconds and release to turn SamplePad Pro off. -
Page 5: Lcd Screen
LCD Screen Kit: Displays the name of the kit that is currently being edited. Sample Location: Displays the location of the sample assigned to the velocity layer being edited. Sample Name: Displays the sample that is currently assigned to the velocity layer of the trigger location being edited. - Page 6 • The max number of files that can be located in the root directory is 512. • When a .WAV file is selected, it will take a few seconds to load into the memory. • SamplePad Pro supports mono or stereo .WAV files, with a sample rate of 48K, 44.1K, 32K, 22.05K, and 11.025K.
-
Page 7: Mute Groups
• STOP After the pad or ext. trigger is struck, all samples currently being played by SamplePad Pro will be muted. • Strike the pad or ext. trigger several times in the TMP mode to set the tempo of the metronome. - Page 8 7/4, 7/8, 7/16, 8/2, 8/4, 8/8, 8/16, 9/2, 9/4, 9/8, and 9/16. Footswitch The footswitch input of SamplePad Pro supports both standard 1/4" TS single-button and 1/4" TRS dual-button footswitches. For 1/4" TS single-button footswitches, you can only assign one...
-
Page 9: Copying A Kit
• Send Program Changes: Sets whether SamplePad Pro will send program changes over the MIDI Send Channel when a kit is changed. The available parameters are Yes and No. • Ext. Clock: Sets whether the SamplePad Pro will send or receive MIDI Clock. This feature can also be set to OFF. Load Samples/Kits Via USB •... -
Page 10: Contenido De La Caja
Asegúrese de que todos los artículos indicados en “Contenido Contenido de la caja de la caja" estén incluidos en la caja. LEA EL FOLLETO DE INSTRUCCIONES DE SEGURIDAD SamplePad Pro ANTES DE UTILIZAR EL PRODUCTO. Adaptador de corriente ... - Page 11 Salida MIDI : Utilice un cable MIDI estándar de cinco patillas para conectar esta salida a la ENTRADA MIDI de un dispositivo MIDI externo. Puerto USB/MIDI : Conecte el SamplePad Pro a un ordenador para enviar y recibir datos MIDI o para cargar muestras en la tarjeta SD.
-
Page 12: Pantalla Lcd
Pantalla LCD Kit : Muestra el nombre del kit que se está editando actualmente. Ubicación de la muestra : Muestra la ubicación de la muestra asignada a la capa de velocidad que se está editando. Nombre de la muestra : Exhibe la muestra actualmente asignada a la capa de velocidad de la ubicación de disparo que se está... - Page 13 • Cuando se selecciona un archivo .WAV, demora algunos segundos en cargarse en la memoria. • SamplePad Pro es compatible con archivos .WAV mono o estéreo con frecuencia de muestreo de 48 K, 44.1 K, 32 K, 22.05 K y 11.025 K.
- Page 14 • PARAR Tras golpear un pad o disparador externo, todas las muestras actualmente en reproducción en el SamplePad Pro se silenciarán. • Golpee el pad o disparador externo varias veces en modo TMP para establecer el tempo del metrónomo. •...
-
Page 15: Menú De Opciones
Menú de opciones El menú de opciones del SamplePad Pro contiene ajustes globales que afectan la operación general así como también la información y las funciones relacionadas con el sistema. Cómo entrar al menú de opciones y modificar estos ajuste globales: Mantenga pulsado los botones cursor arriba y cursor abajo durante dos segundos para entrar al menú... - Page 16 MIDI cuando se cambia un kit. Los parámetros disponibles son Yes (Sí) y No. • Ext. Clock (Reloj externo): Establece si el SamplePad Pro enviará o recibirá un reloj MIDI. Esta característica también puede ajustarse en OFF (Apagada). Carga de muestras/kits por USB •...
- Page 17 Para restablecer los kits internos y ajustes globales a los valores de fábrica, mantenga pulsados los botones cursor izquierdo y cursor derecho mientras enciende el SamplePad Pro. Esto no afectará a las muestras o kits almacenados en su tarjeta SD.
-
Page 18: Contenu De La Boîte
Veuillez vous assurer que tous les articles énumérés dans Contenu de la boîte le contenu de la boîte de ce guide sont inclus dans la boîte. SamplePad Pro VEUILLEZ LIRE LE LIVRET DES CONSIGNES DE Adaptateur secteur SÉCURITÉ AVANT D'UTILISER LE PRODUIT. -
Page 19: Caractéristiques Du Panneau Supérieur
Sortie MIDI : Utilisez un câble MIDI à cinq broches afin de brancher cette sortie à l’entrée MIDI IN d’un appareil MIDI externe. Port USB/MIDI : Ce port permet de brancher le SamplePad Pro à un ordinateur pour envoyer et recevoir des données MIDI ou pour charger des échantillons sur la carte SD. -
Page 20: Écran Acl
Écran ACL Kit : Affiche le nom de l’ensemble d’échantillons (kit) en cours de modification. Emplacement de l’échantillon (LOC) : Affiche l'emplacement de l'échantillon assigné au niveau de dynamique en cours de modification. Nom de l’échantillon : Affiche le nom de l'échantillon assigné... - Page 21 • Lorsqu'un fichier .wav est sélectionné, cela prend quelques secondes pour le charger en mémoire. • Le SamplePad Pro prend en charge les fichiers .wav mono et stéréo avec des fréquences d’échantillonnage de 48 K, 44,1 K, 32 K, 22,05 K et 11,025 K.
- Page 22 STOP (Arrêt) Après que le pad ou le déclencheur externe est frappé, tous les échantillons en cours de lecture par le SamplePad Pro sont mis en sourdine. • Frappez le pad ou le déclencheur externe plusieurs fois en mode TMP afin de régler le tempo du métronome.
-
Page 23: Menu Options
Menu Options Le menu Options du SamplePad Pro contient les réglages globaux qui affectent le fonctionnement global, ainsi que des informations et fonctions système. - Page 24 MIDI (Send Channel) lorsqu’un kit est modifié. Les paramètres sont Yes (oui) et No (non). • Ext. Clock : Définit si le SamplePad Pro transmet ou reçoit les données d’horloge MIDI (MIDI Clock). Cette fonction peut également être désactivée (OFF). Chargement d’échantillons/kits par connexion USB •...
-
Page 25: Réinitialisation Des Paramètres D'usine
Pour réinitialiser les kits internes et les paramètres globaux aux paramètres d'usine par défaut, maintenez les deux touches de déplacement horizontales enfoncées lors de la mise sous tension du SamplePad Pro. Cela n'affectera pas les échantillons ou les kits sauvegardés sur votre carte SD. -
Page 26: Guida Per L'uso (Italiano)
Guida per l'uso (Italiano) Assicurarsi che tutti gli elementi elencati nel paragrafo Contenuti della confezione “Contenuti della confezione” siano contenuti nella confezione stessa. SamplePad Pro LEGGERE ATTENTAMENTE LIBRETTO DELLE Adattatore di alimentazione ISTRUZIONI DI SICUREZZA PRIMA DI UTILIZZARE IL ... - Page 27 MIDI Out (uscita MIDI) : Servirsi di un cavo MIDI standard a cinque poli per collegare questa uscita all’ingresso MIDI di un dispositivo MIDI esterno. Porta USB/MIDI Port : Collegare il SamplePad Pro a un computer per inviare e ricevere dati MIDI o caricare campioni sulla scheda SD.
-
Page 28: Schermo Lcd
Schermo LCD Kit : Mostra a display il nome del kit attualmente in via di modifica. Sede campione : Mostra a display la sede del campione assegnato allo strato di velocità in via di modifica. Nome campione : Mostra a display il campione attualmente assegnato allo strato di velocità... - Page 29 • Il numero massimo di file che possono trovarsi nella directory principale è 512. • Quando un file .Wav viene selezionato, occorreranno pochi secondi per caricarlo nella memoria. • Il SamplePad Pro supporta file WAV mono o stereo con una frequenza di campionamento di 48K, 44,1K, 32K, 22,05K, e 11,025K.
- Page 30 Per interrompere il loop, battere nuovamente il pad o il trigger esterno. • STOP Dopo aver battuto il pad o il trigger esterno, tutti i campioni attualmente riprodotti dal SamplePad Pro saranno silenziati. •...
-
Page 31: Menu Opzioni
Battere un altro pad o trigger esterno, navigare fino all'MGRP e servirsi dei tasti Cursore sinistro o Cursore destro per impostare questo pad sullo stesso numero impostato per il primo pad. Menu Opzioni Il menu Opzioni del SamplePad Pro contiene impostazioni globali che influiscono sul funzionamento complessivo, nonché su informazioni e sistemi relativi al sistema. - Page 32 MIDI quando un kit viene modificato. I parametri disponibili sono Sì e No. • Ext. Clock: stabilisce se il SamplePad Pro invia o riceve MIDI Clock. Questa funzione può anche essere impostata su OFF. Possibilità di caricare campioni/kit tramite USB •...
- Page 33 Salvataggio dei Kit Selezionare il kit sulla schermata principale che è stato modificato e che si desidera salvare. Tenere premuti contemporaneamente i tasti Cursore giù e Cursore destro per 2 secondi per entrare nel menu Save. Spostare il cursore sull'opzione SAVE KIT premendo i tasti Cursore su o Cursore giù.
-
Page 34: Deutsch
Benutzerhandbuch (Deutsch) Stellen Sie sicher, dass alle im Lieferumfang aufgelisteten Lieferumfang Teile in der Verpackung enthalten sind. SamplePad Pro LESEN SIE DIE SICHERHEITSHINWEISE, BEVOR SIE DAS Netzteil PRODUKT VERWENDEN. Benutzerhandbuch Werfen Sie einen Blick auf die Anschlussübersicht. - Page 35 Aux In : Schließen Sie Telefon, CD-Player oder Media-Player über ein 1/8"-Stereokabel an diesen Eingang an. Aux In Pegel : Stellt den Pegel des Geräts ein, das an den Aux-Eingang angeschlossen ist. Ein-/Ausschalter : Drücken dieser Taste, um SamplePad Pro ein- und auszuschalten. Halten Sie diese Taste zwei Sekunden lang gedrückt, um SamplePad Pro auszuschalten.
- Page 36 LCD-Bildschirm Kit : Zeigt den Namen des Kits an, das gerade bearbeitet wird. Sample-Speicherort : Zeigt den Speicherort des Samples an, das der bearbeiteten Dynamik-Layer zugeordnet ist. Sample-Name : Zeigt das Sample, das derzeit der Dynamik-Layer der bearbeiteten Trigger-Position zugewiesen ist. Trigger-Position : Zeigt die Trigger-Position, die gerade bearbeitet wird.
- Page 37 • Die maximale Anzahl von Wave-Dateien im Stammverzeichnis ist 512. • Das Laden einer ausgewählten Wave-Datei dauert einige Sekunden. • SamplePad Pro unterstützt Mono und Stereo Wave-Dateien mit einer Samplerate von 48K, 44.1K, 32K, 22.05K und 11.025K. • Wenn keine SD-Karte eingesteckt ist, kann kein Speicherort auf der Karte ausgewählt werden.
- Page 38 Bearbeiten von Layer-Parametern So stellen Sie die Tonhöhe eines Samples ein: Schlagen Sie auf ein Pad oder den ext. Trigger. Bewegen Sie den Cursor auf den Bereich TUNE, indem Sie die Tasten Cursor Aufwärts oder Cursor Abwärts drücken. Drücken Sie dann die Tasten Cursor Links oder Cursor Rechts, um das Tuning anzupassen. [-4, -3, -2, -1, 0, 1, 2, 3, 4] So stellen Sie den Reverb-Anteil eines Samples ein: Schlagen Sie auf ein Pad oder den ext.
- Page 39 STOP Nachdem das Pad oder der ext. Trigger angeschlagen wurde, werden alle Samples, die derzeit von SamplePad Pro abgespielt werden, stumm geschaltet. • Schlagen Sie das Pad oder den ext. Trigger im TMP-Modus mehrmals an, um das Tempo des Metronoms einzustellen.
- Page 40 Optionsmenü Das Optionsmenü von SamplePad Pro enthält die globalen Einstellungen, die den gesamten Betrieb sowie systembezogene Informationen und Funktionen betreffen. So gelangen Sie in das Optionsmenü und ändern diese globalen Einstellungen: Halten Sie die Tasten Cursor Aufwärts und Cursor Links 2 Sekunden gedrückt, um das Optionsmenü...
- Page 41 • Senden von Programmwechsel: Legt fest, ob SamplePad Pro Programmwechsel über den MIDI-Sendekanal sendet, wenn ein Kit geändert wird. Die verfügbaren Parameter sind Ja und Nein. • Ext. Uhr: Legt fest, ob SamplePad Pro MIDI Clock sendet oder empfängt. Diese Funktion kann auch auf OFF gestellt werden. Laden von Samples/Kits via USB •...
-
Page 42: Zurücksetzen Auf Die Werkseinstellung
Um die internen Kits und globalen Einstellungen auf die Werkseinstellungen zurückzusetzen, halten Sie die Tasten Cursor Links und Cursor Rechts beim Einschalten des SamplePad Pro gedrückt. Dies wirkt sich nicht auf Samples oder Kits aus, die auf der SD-Karte gespeichert sind. -
Page 43: Technical Specifications
Appendix (English) Technical Specifications Power: 9V DC, 800mA, center-positive Dimensions (Length x Width x Height): 15” x 11.2” x 1.5” (381 mm x 284 mm x 38 mm) Weight: 5.8 lbs (2.6 kg) SD Card Specs: Supports SD/SDHC cards up to 32 GB with a FAT32 file system Supported File Type: 16-bit, mono or stereo .WAV files with a sample rate of 48K, 44.1K, 32K, 22.05K, or 11.025K. - Page 44 alesis.com Manual Version 1.2...