Table of Contents
Advertisement
Quick Links
Advertisement
Table of Contents

Related Manuals for Motorola SD7550


Summary of Contents for Motorola SD7550
- Page 1 C51 Series Wireless Camera Model Family: SD7504 Users Guide...
- Page 2 1-888-390-6456 TTY (Text Telephone) Copyright © 2006 Motorola, Inc. All rights reserved. No part of this publication may be reproduced in any form or by any means or used to make any derivative work (such as translation, transformation, or adaptation) without written permission from Motorola, Inc.
-
Page 3: Table Of Contents
Table of Contents Important Safety Instructions...vii Welcome ...1 Camera Overview ...2 How to Use this Guide ...3 Getting Started ...4 Battery Safety Instructions ...4 Installing the Camera Battery ...5 Selecting a Location for Your Camera ...6 Charging the Camera Battery ...7 Camera Indicators ...8 Registering Your New Camera ...9 Using Your New Camera...10... - Page 4 Customizing Your New Camera ... 14 Transferring Calls from Your Handset to Your Camera ... 16 Changing the Order of Devices... 18 Troubleshooting... 19 Warranty ... 20...
-
Page 5: Fcc Information
Consult the dealer or an experienced radio/TV technician for help. Privacy of communications may not be ensured when using this telephone. Caution: Changes or modifications not expressly approved by Motorola for compliance could void the user’s authority to operate the equipment. -
Page 6: Fcc Declaration Of Conformity
Federal Communications Commission (FCC) Part 68 Statement This Motorola cordless phone complies with Part 68 of the FCC rules and the requirements adopted by the Administrative Council for Terminal Attachments (ACTA). On the bottom of this equipment is a label that contains, among other information, a product identifier in format US: AAAEQ##TXXXX. - Page 7 If trouble is experienced with this equipment, for repair or warranty information, please contact Motorola, Inc. at 1-877-466-8646. If the equipment is causing harm to the telephone network, the telephone company may request that you disconnect the equipment from the network until the problem is solved.
- Page 8 For body worn operation, this phone has been tested and meets the FCC RF exposure guidelines when used with the belt clip supplied or designated for this product. Use of other accessories may not ensure compliance with FCC RF exposure guidelines. Industry Canada CS-03 Declaration of Conformity This product meets the applicable Industry Canada technical specifications.
-
Page 9: Important Safety Instructions
Important Safety Instructions When using your telephone equipment, basic safety precautions should always be followed to reduce the risk of fire, electric shock, and injury: Read and understand all instructions. Follow all warnings and instructions marked on the product. Unplug this product from the wall outlet before cleaning. Do not use liquid or aerosol cleaners. Use a damp cloth for cleaning. - Page 10 may expose you to dangerous voltages or other risks. Incorrect reassembly can cause electric shock when the product is subsequently used. Do not overload wall outlets and extension cords, as this can result in the risk of fire or electric shock.
-
Page 11: Welcome
Product registration is not available in Canada. Please retain your original dated sales receipt for your records. For warranty service of your Motorola product, you will need to provide a copy of your dated sales receipt to confirm warranty status. -
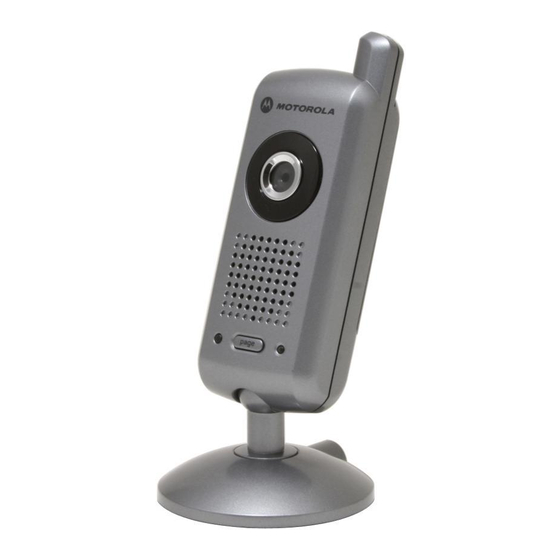
Page 12: Camera Overview
Camera Overview Camera lens Speaker Microphone Light sensor Page/registration button In use/page/registration indicator... -
Page 13: How To Use This Guide
How to Use this Guide It is necessary to use a color or black and white handset to receive images and sound from your camera. This guide makes use of two fonts to distinguish between the FUNCTIONS some base units. •... -
Page 14: Getting Started
Getting Started Battery Safety Instructions • Do not burn, disassemble, mutilate, or puncture the battery. The battery contains toxic materials that could be released, resulting in injury and/or explosion. • CAUTION: There is a risk of explosion if you replace the battery with an incorrect battery type. -
Page 15: Installing The Camera Battery
Installing the Camera Battery Remove any stickers or inserts, if present. Remove the battery door by pressing down on the indentation and sliding upward. Plug the battery connector into the receptacle. (Make sure the black wire is on the right.) Insert the battery into the battery compartment. -
Page 16: Selecting A Location For Your Camera
Selecting a Location for Your Camera After the camera battery is fully charged, you can disconnect the power cord and place the camera in any room you wish to monitor. -
Page 17: Charging The Camera Battery
Charging the Camera Battery Insert the power cord into the back of the camera base. Plug the power cord into an electrical outlet. Place the base on a sturdy surface. NOTES: • The initial battery charge time is 10–12 hours. •... -
Page 18: Camera Indicators
Camera Indicators The LED on your wireless camera changes to indicate different actions. The table below details each change. Green (flashing quickly) Green (solid) Red (flashing quickly) Red (slow flash) Red (solid) Description The camera is not registered The camera is registered and charging, but not in use The camera is in the registration process The camera is being paged... -
Page 19: Registering Your New Camera
Registering Your New Camera Before you can use your new wireless camera, you must register it to your base unit. SD7500 Series base units allow you to register up to 12 devices (e.g., handsets, cameras, cell docks), and use up to four devices at one time. To register a new camera: Ensure that your camera is plugged into an electrical outlet. -
Page 20: Using Your New Camera
Using Your New Camera All SD7500 Series handsets are compatible with your new camera. You can use the black and white or color handsets to monitor a room. Only the color handsets offer both audio and visual monitoring. NOTES: • All monitoring sessions automatically set to the speakerphone off, press the handset’s SPKRPHONE button. -
Page 21: Monitoring A Room With A Registered Handset
Monitoring a Room with a Registered Camera To monitor a room: Place your camera in the room you wish to monitor. Press the CONNECT TO Scroll to your camera, and then press the softkey. • If you have an SD7501 black and white handset, you can hear activity in the room where your camera is located. -
Page 22: Using The Zoom And Pan Features (Color Handset Only)
Using the Zoom and Pan Features (Color handset only) To use the zoom and pan features: CONNECT TO Press the scroll keys to activate the zoom feature. The magnification level appears in upper right corner of the handset display. • x1 = Full screen •... -
Page 23: Capturing Images From Your Camera (Color Handset Only)
Capturing Images from Your Camera (Color handset only) You can use images that you capture from your camera as wallpaper for your handset. To capture an image: Press the CONNECT TO Scroll to your camera, and then press the Use the zoom and/or pan features, if necessary, to magnify and center your subject. -
Page 24: Customizing Your New Camera
Customizing Your New Camera Setup Devices your camera, after you have registered them to your base unit. To set up your camera: Press the Scroll to and select Scroll to and select your camera from the list. Press the Scroll to and select the option (see the listing on the following page) you wish to change. - Page 25 Camera Setup Menu Options OPTION SETTINGS Name Camera • Speaker Monitor Mode Volume o Low, Medium, High, Mute • Page Mode o Low, Medium, High • Brightness • Medium • High • IR (Infrared) Auto • Mode • • Set Intercom No Auto Answer •...
-
Page 26: Transferring Calls From Your Handset To Your Camera
Transferring Calls from Your Handset to Your Camera If you are in an area of your home (e.g., basement, pet area), where you have a camera, but not a handset, you can have an outside call transferred to the camera in that location. - Page 27 Using the Camera Page Feature Pressing the PAGE button on your camera sends out a global page. All devices registered to your base unit beep in response. The beeping stops when any equipped device answers the page, or by pressing the camera’s PAGE button again.
-
Page 28: Changing The Order Of Devices
Changing the Order of Devices If you CONNECT TO on the list of registered devices. By default, registered devices appear on your list in the order in which they were registered. You can change this CONNECT TO order using the To change the order of registered devices: Press the Scroll to and select... -
Page 29: Troubleshooting
Troubleshooting The suggestions below should solve most problems you might encounter while using your camera. If you still have difficulty after trying these suggestions, visit us on the web at www.motorola.com/cordless. If the camera does not work at all: •... -
Page 30: Warranty
Warranty Motorola Limited Warranty for Consumer Products, Accessories, and Software Purchased in the United States or Canada What Does this Warranty Cover? Subject to the exclusions contained below, Motorola, Inc. warrants its cordless telephones ("Products"), Motorola- branded or certified accessories sold for use with these Products ("Accessories"), and Motorola software contained on CD-ROMs or other tangible media and sold for use with these Products ("Software") to be free from defects in... - Page 31 (c) use of the Products or Accessories for commercial purposes or subjecting the Product or Accessory to abnormal usage or conditions; or (d) other acts which are not the fault of Motorola, are excluded from coverage. Use of Non-Motorola Products and Accessories. Defects or damage that result from the use of Non-Motorola branded or certified Products, Accessories, Software or other peripheral equipment are excluded from coverage.
- Page 32 You will receive instructions on how to ship the Products, Accessories, or Software, at your expense, to a Motorola Authorized Repair Center. To obtain service, you must include: (a) a copy of your receipt, bill of sale or other comparable proof of purchase;...
- Page 33 Motorola software such as the exclusive rights to reproduce and distribute copies of the Motorola software. Motorola software may only be copied into, used in, and redistributed with, the Products associated with such Motorola software. No other use, including without limitation disassembly of such Motorola software or exercise of the exclusive rights reserved for Motorola, is permitted.
- Page 34 Wireless Camera Model Family: SD7504 525836-001 02/06...