
Related Manuals for GE 25833


Summary of Contents for GE 25833
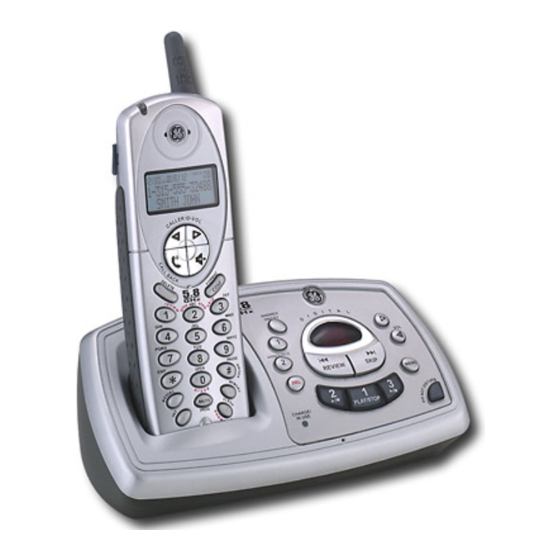
- Page 1 25833 5.8 GHz Digital Cordless Handset Call Waiting Caller ID Phone/ Answering System...
-
Page 2: Important Information
Important Information NOTICE:This product meets the applicable Industry Canada technical specifications. The equipment must be installed using an acceptable method of connection.The customer should be aware that compliance with the above conditions may not prevent degradation of service in some situations. Repairs to certified equipment should be made by an authorized Canadian maintenance facility designated by the supplier. -
Page 3: Table Of Contents
Table of Contents ......15 ....... 2 MPORTANT NFORMATION ESSAGES LAYBACK ......2 ........16 EMORY NTERFERENCE NFORMATION ........... 2 ....... 16 ICENSING RASING ESSAGES (HAC) ....2 ........16 EARING OMPATIBILITY EAVING A ........3 ........17 ABLE OF ONTENTS ELEPHONE FCC RF R... - Page 4 ......26 ID (CID) ........35 PEAKERPHONE PERATION ALLER .. 26 CID E ......... 35 NSWERING A ALL WITH PEAKERPHONE RROR ODES ..26 CID R ......35 AKING A ALL WITH PEAKERPHONE ECEIVING ECORDS ..........27 CID R IMER TORING ECORDS ALLER...
-
Page 5: Fcc Rf Radiation Exposure
SAFETY INSTRUCTIONS provided with this product and save them for future reference. Congratulations on purchasing the GE Dual Cordless Handset Telephone System. This system operates in the 5.8 GHz frequency range, and is unique to conventional cordless telephones. When the base is connected to electrical power and a telephone line, you can place a fully-featured cordless handset anywhere electrical power is available. - Page 6 Your Caller ID Call Waiting phone allows you to: • View the name and telephone number of a caller (Call Waiting Caller ID) while you are on the phone. • Identify callers before you answer the phone. • View the time and date of each incoming call. •...
-
Page 7: Handset Layout
Handset Layout display SPEAKER CALLER ID-VOL SPEAKER (caller ID/volume button) (speaker button) TALK•CALL BACK (button) FORMAT/CONF (format/conference button) DELETE (button) skip (button) review (button) # PAUSE/ RINGER (button) play/stop (button) erase (button) * EXIT (button) MEMORY (button) REDIAL (button) FLASH/answerer (button) (intercom button) MUTE/PROG (mute/program button) -
Page 8: Base Layout
Base Layout DAY/CHECK SPEAKER (button) HOUR (minute button) (button) Message counter LANGUAGE (button) ANSWER ON/ (volume buttons) OFF (button) PAGE (button) SKIP (button) MEMO ANNOUNCE 1 (button) (button) DO NOT DISTURB (button) ANNOUNCE 2 (button) PLAY/STOP 3 Microphone (button/indicator) (delete button) PLAY/STOP 2 REVIEW PLAY/STOP 1... -
Page 9: Telephone Jackr
Telephone Jack Requirements Wall plate To use this phone, you need an RJ11C type modular phone telephone jack, which might look like the one pictured here, installed in your home. If you don’t have a modular jack, call your Modular local phone company to find out how to get one installed. -
Page 10: Installing The Phone
Installing the Phone Choose the best location to install your base.Your base should be placed on a level surface such as a desk or table top. Installing the Handset Battery NOTE: You must connect the handset battery before use. 1. Locate battery and battery door which are packaged together inside a plastic bag and are separate from the handset. -
Page 11: Connecting The Telephone
Allow handset to charge for 16 hours prior to first use. If you don’t properly charge the handset, battery performance is compromised. CAUTION: Use only the ATLINKS USA, Inc. power adaptor 5-2605 that came with this unit. Using other power adaptors may damage the unit. Connecting the Telephone Line On the base, plug the one end of the telephone line cord into the jack on the back of the base and the other end into a modular wall phone jack. -
Page 12: Speaker Volume
Setting the Voice Prompt Language The default voice prompt language is English. To change the answering system’s voice prompt language, • Press the LANGUAGE button on back of base to change to the FRENCH voice prompt. The unit announces “OPTION FRANCAISE “ and “Fr “ shows in the message counter. •... -
Page 13: Voice Instruction
Voice Instruction If you need additional assistance, press the REVIEW button in standby mode and follow the voice instructions. Recording the Outgoing Announcement For best results when recording, you should be about nine inches from the microphone, and eliminate as much background noise as possible. You may record 2 outgoing announcements in the answerer or choose the default for your current outgoing announcement. -
Page 14: Answering System Operation
Answering System Operation This section discusses the buttons and features on the answering system. Message Counter The message counter gives you a numeric display of how many messages you have. See below for the details. a) Message counter has a number displayed without flashing - No new messages. Shows total number of old messages. -
Page 15: Leaving A Message
Leaving a Message 1. After the answerer gets the line and plays the outgoing announcement, the caller can enter the mailbox number (1, 2 or 3) during the play of outgoing announcement or within the 2 seconds after the end of outgoing announcement and then leave a message in that specific mailbox. -
Page 16: Memory Full
Memory Full When the answering system memory is full, the system answers after 10 rings.You should erase some messages so the answering system may record new messages. Erasing Messages You may erase messages in the following three ways: To erase a message while it is playing 1. -
Page 17: Elephone Set U P
Telephone Set Up Programming the Telephone Standby Screen The handset displays the handset number and user name. 11:30 RAYMOND HANDSET 1 Programming Functions The system uses a menu structure to give you access to all of the built-in features.You may program the following items in main menu: Room Monitor and Handset Setup. Room Monitor (This is only applicable with addition of Model 25832 optional handset) 1. -
Page 18: Handset Setup
NOTE: If handsets have been named, then the name will be displayed on LCD instead of handset numbers. NOTE: During the room monitoring, it will emit a beep tone if there are incoming calls. You may press TALK•CALL BACK button to answer the call and quit the room monitor mode. -
Page 19: Ringer Tone
4. Press MUTE/PROG button to confirm. 5. Press the CALLER ID-VOL ( or ) button to scroll to the HANDSET NAME menu. 6. Press MUTE/PROG button to enter the menu. HANDSET NAME shows in the display. 7. Use the touch-tone pad to enter a name (up to 15 characters). More than one letter is stored in each of the number keys. -
Page 20: Vip Melody
4. Press MUTE/PROG button to confirm. 5. Press the CALLER ID-VOL (or) button to scroll to the RINGERVOLUME menu. 6. Press MUTE/PROG button to enter the menu. SET RINGER 1HI 2LOW 3OFF shows in the display. 7. Use the touch tone pad on the handset to select 1, 2 or 3, or use the CALLER ID-VOL (or) button to scroll to your selection. -
Page 21: Changing A Stored Reviewing And Deleting Melody Record
NOTE: If the memory dialing storage is empty, “NO USER MEMORY” shows in the display. 9. Press the CALLER ID-VOL (or) button to select the desired memory record. 10. Press the MUTE/PROG button to confirm your selection.The display shows VIP MELODY. -
Page 22: Message Alert
7. Use the touch tone pad on the handset to select 1 or 2, or use the CALLER ID-VOL (or) button to scroll to your selection. 1ON is the default setting. 8. Press the MUTE/PROG button to confirm.You will hear a confirmation tone and the key tone setting shows in the display. -
Page 23: Registration
Security Code (for answering system) You can access the answering system from a tone dialing telephone in another (remote) location.The security code is required for remote access, and it prevents unauthorized access to your answering system. 1. Make sure your phone is OFF (not in talk mode). 2. -
Page 24: De-Registration
1. Make sure your phone is OFF (not in talk mode). 2. Press the MUTE/PROG button to go to the main menu. 3. Press CALLER ID-VOL (or) button to scroll to HANDSET SETUP. 4. Press MUTE/PROG button to confirm. 5. If necessary, press the CALLER ID-VOL (or) button to scroll to the REGISTRATION menu.Then, press MUTE/PROG button to enter the menu. -
Page 25: Global De-Registration
9. Press the touch-tone pad to select 1YES or 2NO, or use the CALLER ID-VOL (or) button to scroll to 1YES or 2NO. 10. If you select YES, press the MUTE/PROG button to confirm. REGISTER ..shows in the display followed by a confirmation tone.Then HANDSET X DEREGISTERED shows in the display to confirm the handset is deregistered. -
Page 26: Telephone Operation
NOTE: If you choose “YES” all the settings in the programmable menu are returned to factory default setting. 8. Press the MUTE/PROG button to save your selection.You will hear a confirmation tone. Telephone Operation Charge Indicator When the CHARGE/IN USE indicator on the base is lit, the handset is correctly seated in the cradle and is charging. -
Page 27: Answering A Call With S Making A Call With Speakerphone Call Timer
Call Timer After you press the TALK•CALL BACK button on the handset, the built-in call timer shows on the display and counts the length of time of the call in minutes and seconds. Pre-Dialing 1. Make sure the phone is OFF (not in talk mode). 2. -
Page 28: Number Redial
• To connect to the waiting call, press the FLASH/answerer button on the handset, and your original call is put on hold. • To switch between the two calls, press the FLASH/answerer button. TIP: Don’t press the TALK•CALL BACK button on the handset to activate a custom calling service, such as call waiting, or you’ll hang up the phone. -
Page 29: Handset To Handset Paging Paging From The Base /Group Mute
NOTE: If more than 2 handsets have been registered, you can page all handsets by pressing 5. 4. To cancel the page, press the *EXIT button, or press the INT button. Or you may press TALK•CALL BACK on the receiving handset to enter intercom mode. Paging from the Base/Group Page (This is ONLY applicable with addition of Model 25832A optional handset) Use the base-only to page one or all registered handsets at the same time. -
Page 30: Intercom Operation
Intercom Operation (This is ONLY applicable with addition of Model 25832A optional handset) The intercom feature allows you to have a conversation with another registered handset without tying up the telephone line. And since the telephone line is not in use, you may still receive incoming calls. -
Page 31: Two-Way Calling
Two-Way Calling 1. During an external call, press the INT button, and use the touch-tone pad to enter the handset number (1 or 4) you want to call. NOTE: The receiving handset presses the INT button to answer the intercom call. -
Page 32: Memory
Memory You may store fifty 15-character names and 20-digit telephone numbers in the handset memory. Storing a Name and Number in Memory 1. Make sure the phone is OFF (not in talk mode). 2. Press the MEMORY button to display SELECT MEMORY 01-50. 3. -
Page 33: Handsets
3. Press MEMORY button again to confirm.You will hear a confirmation tone. -OR- 1. Press the REDIAL button on the handset. 2. Use the CALLER ID-VOL (or) to select the desired redial number. 3. Repeat steps 1 through 5 in Storing a Name and Number in Memory. 4. -
Page 34: Dialing A Number From Memory Chain Dialing From Memory
5. Press the DELETE button to delete the record. DELETED shows in the display. NOTE: If you don’t want to change or delete a record, simply press the *EXIT button, or wait for one minute to exit the review mode automatically. Dialing a Number from Memory 1. -
Page 35: Cid Error
Caller ID (CID) Caller ID (CID) is a service available from your local telephone company. For Caller ID to work on this system, you must subscribe to Caller ID service.To receive Caller ID information for a Call Waiting call, you must subscribe to the combined Call Waiting Caller ID service. -
Page 36: Cid Records
Reviewing CID Records As calls are received and stored, the display is updated to let you know how many calls have been received.To scroll CID records: 1. Make sure the phone is OFF (not in talk mode). 2. Press the CALLER ID-VOL () button to review the newest CID record. 3. -
Page 37: Umber
Dialing a CID Number While reviewing CID records, you may dial the phone number showing in the display. 1. Make sure the phone is OFF (not in talk mode). 2. Press CALLER ID-VOL ( or ) button until the desired CID record shows in the display. -
Page 38: Cid Records
Deleting All CID Records 1. Make sure the phone is OFF (not in talk mode). 2. Use the CALLER ID-VOL( or ) button to scroll to any CID record. 3. Press and hold the DELETE button until DELETE ALL? shows in the display. 4. - Page 39 Accessing the Answering System from Another Location You can access your answering system from any touch-tone phone by entering your 3-digit security code during the playing of outgoing announcement or after you hear the outgoing announcement. 1. Dial the telephone number to which the answering system is connected. 2.
-
Page 40: Elephone Call Connecting The Connecting An Optional Headset To The Telephone Handset
3. Disconnect the cord attached to the battery pack from the jack inside the battery compartment and remove the battery pack from the handset. Battery 4. Insert the new battery pack and reconnect the battery compartment plug. 5. Put the battery compartment cover back on. Battery pack 6. -
Page 41: D Isplay M Essages
Display Messages The following messages shows the status of the phone, provides Caller ID information, or helps you set up and use your phone. CID information is interrupted during transmission or the INCOMPLETE DATA phone line is excessively noisy. HANDSET NAME Prompt telling you to enter the user name for the registered handset. - Page 42 SEARCHING Indicates handset is searching for the base. OUT OF RANGE Indicates handset is too far away from the base. Move closer to the base. PAGING or Someone pressed the INT button on the handset PAGING FROM or the PAGE button on the base. BLOCKED NUMBER Indicates the person is calling from a number which is blocked from transmission.
-
Page 43: T Roubleshooting G Uide
Troubleshooting Guide Telephone Solutions No dial tone • Check or repeat installation steps: Make sure the base power cord is connected to a working electrical outlet. Make sure the telephone line cord is connected to the base and the wall jack. •... - Page 44 Memory dialing doesn’t work • Did you program the memory location keys correctly? • Did you follow proper dialing sequence? Unit locks up and no communication between the base and cordless handset • Unplug the power adaptor from the electrical outlet and the back of the base. Remove the handset battery.
-
Page 45: Are
Battery If you experience any of the following problems, even after recharging the battery, you may need to replace the battery pack: • Short talk time • Poor sound quality • Limited range • CHARGE/IN USE indicator of the base fails to turn on. General Product Care To keep your unit working and looking good, follow these guidelines: •... -
Page 46: Nformation
Telephone Network Information Should your equipment cause trouble on your line which may harm the telephone network, the telephone company, where practicable, may notify you that temporary discontinuance of service may be required. Where prior notice is not practicable and the circumstances warrant such action, the telephone company may temporarily discontinue service immediately. -
Page 47: Sequence Service
Service ATLINKS Communications Canada, Inc., warrants to the purchaser or gift recipient that if any manufacturing defect becomes apparent in this product within 1 year from the original date of purchase, it will be replaced free of charge, including return transportation. This warranty does not include damage to the product resulting from accidents, misuse or leaking batteries. -
Page 48: Index
Index Deleting All CID Records Accessing the Answering System from Another Location Deleting Records Stored in Memory Accessory Order Form Dialing a CID Number Advanced Intercom Features Dialing a Number from Memory 34 Answering a Call with Speakerphone Display Messages Answering Calls Do Not Disturb (DND)29 Answering System Operation... - Page 49 Reviewing CID Records Reviewing Records Stored in Memory Language 18 Ringer HI/LOW/OFF Shortcut Leaving a Memo RingerTone Leaving Message Ringer Volume Licensing 2 Rings to Answer Limited Warranty Room Monitor Mailbox Indicator Security Code Making an Intercom Call Service Making a Call with Speakerphone Setting the Voice Prompt Language Making Calls Speakerphone Operation...
- Page 50 Model 25833 ATLINKS Communications Canada Inc. 00003416 (Rev 0 E/F ) © 2005 ATLINKS Communications Canada, Inc. 05-12 Trademark(s) ® Registered Marque(s) ® déposée(s) Printed in China...
- Page 51 25833 Système téléphonique 5,8 GHz à combiné sans fil avec appel en attente, identification de l’appelant et répondeur...
-
Page 52: Licensing
Renseignements Importants AVIS : Ce produit est conforme aux spécifications techniques applicables d’Industrie Canada. Avant d’installer cet appareil, l’utilisateur doit vérifier s’il est permis de le raccorder aux installations de la compagnie locale de télécommunications. L’installation doit de plus respecter les méthodes de raccordement approuvées. L’abonné doit savoir que le respect des conditions mentionnées ci-dessus n’empêche pas nécessairement la détérioration du service dans certaines situations. - Page 53 Table des matieres ......14 ....... 2 ENSEIGNEMENTS MPORTANTS OMPTEUR DE ESSAGE L’ ..... 2 ...... 15 OUR LAISSER UN MESSAGE ENSEIGNEMENTS SUR INTERFÉRENCE ........... 2 ICENSING ILTRAGE DES PPELS À ARTIR DE LA ..... 15 OMPATIBILITÉ AVEC LES ROTHÈSES UDITIVES NDICATEURS DES BOÎTES VOCALES ....
- Page 54 ....26 . 34 ONCTIONNEMENT DU ELEPHONE ONSULTATION DES UMEROS EMORISES ....26 . 34 NDICATEUR DE HARGEMENT EMPLACEMENT DE OSSIERS EMORISES ........27 ..34 AIRE DES PPELS UPPRESSION DE OSSIERS EMORISES ......27 D’ ... 35 EPONDRE AUX PPELS OMPOSITION UMERO...
-
Page 55: Énonce Sur L' Exposition Au
Nous vous félicitons d’avoir acheté ce système téléphonique à deux combinés sans cordon de GE. Ce système, qui fonctionne dans l’échelle de fréquences de 5,8 GHz, est unique par rapport aux téléphones sans cordon conventionnels. Lorsque la base est branchée dans une prise de courant et une ligne téléphonique, vous pouvez placer un... - Page 56 Ce téléphone est un appareil facile à utiliser, mais vous pouvez en tirer le maximum plus rapidement en prenant quelques minutes pour lire ce guide de l’utilisateur. Ce téléphone est un appareil multifonctionnel compatible avec les services d’appel en attente et d’afficheur offerts par la compagnie de téléphone.
-
Page 57: Presentation Du Combine
Presentation du Combine afficheur Haut-parleur CALLER ID-VOL SPEAKER (bouton ID appelant/ (bouton haut-parleur) volume) TALK•CALL BACK FORMAT/CONF (bouton parler/rappeler) (bouton format/conférence) DELETE (bouton effacer) skip (bouton évitement) review (bouton réviser) # PAUSE/RINGER (bouton #pause/ play/stop sonnerie) (bouton écoute/arrêt) erase * EXIT (bouton effacer) (bouton *quitter) MEMORY... -
Page 58: Presentation De La Base
Presentation de la Base HOUR DAY/CHECK Haut-parleur (minute bouton) (bouton (bouton jour/ Compteur de heure) vérification) messages LANGUAGE (bouton) ANSWER ON/ (boutons OFF (bouton) volume) SKIP PAGE (bouton (bouton recherche ) évitement) MEMO (bouton ANNOUNCE 1 mémo) (bouton annonce 1) DO NOT DISTURB (bouton ne pas... -
Page 59: Exigences De La Priset
Exigences de la Prise Teléephonique Plaque murale Pour utiliser ce téléphone, vous devez disposer dans la maison d’une prise téléphonique modulaire de type RJ11C (CA11A), qui Prise peut ressembler à celle illustrée ici. Si aucune prise modulaire n’est de ligne installée, en faire installer une par la compagnie de téléphone. -
Page 60: Installation Du Telephone Installation De Lap
• Évitez les endroits poussiéreux. • Évitez les autres téléphones sans cordon et les ordinateurs personnels. Installation du Telephone Choisissez le meilleur endroit possible pour installer la base. La base doivent être placés sur une surface plane comme un bureau ou une table. Installation de la Pile du Combine REMARQUE : Vous devez brancher la pile du combiné... -
Page 61: Igne Telephonique
Laissez les combinés se charger pendant 16 heures avant l’utilisation initiale. Si vous ne chargez pas correctement les combinés, le rendement de la pile sera compromis. ATTENTION : Utilisez seulement l’alimentation 5-2605 de ATLINKS USA, Inc. qui accompagne l’appareil. L’utilisation d’autres alimentations peut endommager l’appareil. -
Page 62: Programmation Du R Annonce Vocale Date En Temps Reel
Selection de la langue du message d’accueil L’anglais est la langue par défaut du message d’accueil. Pour modifier la langue du message d’accueil du répondeur, • Appuyez sur le bouton de sélection de la langue du message d’accueil pour Français. L’appareil annonce “OPTION FRANÇAISE”... -
Page 63: Volume Du Haut - Parleur Instructions Vocales
Volume du Haut-parleur Utilisez les boutons de VOL ( or ) pour régler le volume du haut-parleur de la base à un niveau agréable. L1 est le volume minimal du haut-parleur et L8, le volume maximal. Instructions Vocales Si vous avez besoin d’aide supplémentaire, appuyez sur le bouton REVIEW en mode attente et suivez les instructions vocales. -
Page 64: Epondeur
Programmation du Répondeur Cette section traite des boutons et des fonctions du répondeur. Compteur de Message Le compteur de messages vous indique numériquement le nombre de messages que vous avez. Voyez ci-dessous pour plus de renseignements. a) Le compteur de messages affiche un nombre sans clignoter – Pas de nouveaux messages. -
Page 65: Pour Laisser Un Message
Pour laisser un message 1. Une fois que l’appareil a pris l’appel et lorsqu’il joue le message d’accueil, l’appelant peut entrer le numéro de boîte vocale (1, 2 ou 3) pendant le message d’accueil ou dans les 2 secondes suivant la fin du message et laisser un message dans la boîte vocale spécifiée. -
Page 66: Ffacer Les Essages
Effacer les Messages Vous pouvez effacer les messages de trois façons : un message à la fois à partir de la base ; tous les messages à partir de la base ; ou un message à la fois à partir du combiné ou d’un téléphone placé... -
Page 67: Aramètres Du Téléphone
Paramètres du téléphone Programmation du Téléphone Écran D’attente Le combiné affiche le numéro du combiné et le nom de l’utilisateur. 11:30 PHILLIPE COMBINE 1 Functions Programmables Le système utilise un menu structuré pour vous permettre d’avoir accès à toutes ses fonctionnalités. -
Page 68: Paramètres Du Combiné
REMARQUE : Si les combinés ont été désignés par des noms, ceux-ci seront affichés sur l’ACL au lieu des numéros. REMARQUE : En mode d’écoute à distance, le combiné émettra une tonalité s’il y a un appel entrant. Vous pouvez appuyer sur le bouton TALK•CALL BACK pour prendre l’appel et quitter le mode d’écoute à... -
Page 69: Nom De Combine
Nom de Combine 1. Assurez-vous que le téléphone est DÉSACTIVÉ (pas en mode conversation). 2. Appuyez sur le bouton MUTE/PROG pour aller au menu principal. 3. Appuyez sur le bouton CALLER ID-VOL ( or ) pour afficher PROGRAM COMBIN. 4. Appuyez sur le bouton MUTE/PROG pour confirmer. 5. -
Page 70: Olume De La Onnerie
9. Appuyez sur le bouton MUTE/PROG pour enregistrer votre sélection. Vous entendrez une tonalité de confirmation et la tonalité de sonnerie sélectionnée s’affichera. REMARQUE: Les numéros 1 à 10 correspondent à la sonnerie et les numéros 11 à 20, aux mélodies. Volume de la Sonnerie 1. -
Page 71: Un Dossier Enregistré
4. Appuyez sur le bouton MUT E/PROG pour confirmer. 5. Appuyez sur le bouton CALLER ID-VOL (or) pour afficher le sous-menu MELODIE VIP (MELODY VIP). 6. Appuyez sur le bouton MUTE/PROG pour ouvrir ce menu. Le message VIP 1 s’affiche. 7. -
Page 72: Tonalité Du Clavier
3. Si vous voulez supprimer l’information, appuyez sur le bouton DELETE du combiné quand l’information est affichée. Le message EFFACE VIP # ? apparaît. 4. Appuyez de nouveau sur le bouton DELETE pour confirmer. Vous entendrez une tonalité de confirmation et le message VIP# EFFACE s’affichera. Tonalité... -
Page 73: Sélection De Sonnerie
Sélection de sonnerie (pour le répondeur) Cette caractéristique vous permet de choisir le nombre de fois que l’appareil sonnera avant que le répondeur prenne l’appel. 1. Assurez-vous que le téléphone est DÉSACTIVÉ (pas en mode conversation). 2. Appuyez sur le bouton MUTE/PROG pour aller au menu principal. 3. -
Page 74: Code Régional
REMARQUE: Si vous faites une erreur, appuyez sur le bouton DELETE pour reculer en effaçant le mauvais chiffre Code régional 1. Assurez-vous que le téléphone est DÉSACTIVÉ (pas en mode conversation). 2. Appuyez sur le bouton MUTE/PROG pour aller au menu principal. 3. -
Page 75: Desenregistrement
REMARQUE: Attendez 10 secondes après avoir enregistré un combiné et avant d’en enregistrer un autre pour assurer la réussite de l’enregistrement.. Desenregistrement Le désenregistrement annule l’enregistrement. Pendant le processus de désenregistrement, gardez le combiné près de la base. 1. Assurez-vous que le téléphone est DÉSACTIVÉ (pas en mode conversation). 2. -
Page 76: Reglage Par Defaut
AVERTISSEMENT: Il n’est pas recommandé de désenregistrer un combiné à moins que cela ne soit absolument nécessaire parce qu’un combiné est désenregistré, que les fonctions du combiné sont inutilisables tant que le combiné n’a pas été réenregistré. REMARQUE: Avant d’entreprendre un désenregistrement complet, laissez tous les combinés en mode attente pendant 20 seconde. -
Page 77: Repondre Aux Appels
Faire des Appels 1. Décrochez le combiné et appuyez sur le bouton TALK•CALL BACK. Écoutez le signal de manœuvre. 2. Composez le numéro désiré. 3. Quand vous avez terminé, appuyez sur le bouton TALK•CALL BACK pour raccrocher. Repondre aux Appels 1. -
Page 78: Attente Automatique
3. Appuyer sur les boutonsTALK•CALLBACK ou SPEAKER” sur le combiné et le numéro est composé automatiquement. REMARQUE: Vous pouvez entrer jusqu’à 32 chiffres de précomposition. REMARQUE: Pour supprimer le numéro de précomposition entré, Appuyez et gardez enfoncé le bouton DELETE jusqu’à ce que tous les caractères soient effacés, ou appuyez sur le bouton *EXIT pour effacer tous les numéros en même temps. -
Page 79: Quitter
To quickly redial the last number you dialed: 1. Appuyez sur les boutonsTALK•CALL BACK ou SPEAKER. 2. Appuyez sur le bouton REDIAL. -OU- Pour choisir entre les trois derniers numéros que vous avez composés: 1. Appuyez d’abord sur le bouton REDIAL et utilisez le bouton CALLER ID-VOL(or) pour sélectionner le numéro à... -
Page 80: Recherche De Groupe Mute
Recherche a Partir de la Base/Recherche de Groupe (C’est SEULEMENT applicable avec l’addition du combiné facultatif de Model 25832A) Utilisez le socle seulement pour rechercher simultanément tous les combinés enregistrés. 1. Appuyez sur le bouton PAGE de la base. Les deux combinés émettent un bip pendant deux minutes et RECHERCHE DE BASE apparaît dans l’afficheur de chaque combiné. -
Page 81: Fonctionnement De L
Fonctionnement de L’interphone (C’est SEULEMENT applicable avec l’addition du combiné facultatif de Model 25832A) La fonction d’interphone permet de converser avec une personne à un autre combiné, sans occuper la ligne téléphonique. Puisque la ligne téléphonique n’est pas utilisée, vous pouvez toujours recevoir les appels. -
Page 82: Appel A Trois
REMARQUE: La personne au combiné récepteur doit appuyer sur le bouton INT pour répondre à l’appel par interphone. Les deux personnes à l’interphone peuvent converser en privé. L’appelant extérieur ne peut entendre la conversation par l’interphone. 2. Quand vous avez terminé, appuyez sur le bouton *EXIT ou INT pour interrompre l’appel par interphone, retourner en mode de conversation et poursuivre la conversation téléphonique initiale. -
Page 83: Memoire
Memoire Vous pouvez mémoriser cinquante noms de 15 caractères et numéros de téléphone à 20 chiffres dans la mémoire du combiné. Memorisation D’un Nom et D’un Numero 1. Assurez-vous que le téléphone est DÉSACTIVÉ (pas en mode conversation). 2. Appuyez sur la touche MEMORY pour afficher CHOISIR MEM 01-50. 3. - Page 84 3. Appuyez de nouveau sur le bouton MEMORY pour confirmer. Vous entendrez une tonalité de confirmation. -OU- 1. Appuyez sur le bouton REDIAL du combiné. 2. Utilisez le bouton CALLER ID-VOL(or) pour sélectionner le numéro à recomposer. 3. Reprenez les étapes 1 à 5 de la Section Mémorisation d’un Nom et d’un Numéro. 4.
-
Page 85: Memoire
4. Appuyez sur le bouton DELETE pour marquer le dossier à supprimer. L’affichage indique EFFACER? 5. Appuyez sur le bouton DELETE pour supprimer le dossier. EFFACE apparaît dans l’afficheur. REMARQUE: Si vous ne souhaitez pas changer ou supprimer un dossier, appuyez simplement sur le bouton *EXIT, ou attendez une minute avant de quitter automatiquement le mode de consultation. -
Page 86: Afficheur
Afficheur Le service d’afficheur est offert par la compagnie de téléphone. Pour que l’afficheur fonctionne avec ce système, vous devez être abonné au service d’afficheur. Pour recevoir l’information d’appelant d’un appel en attente, vous devez être abonné au service combiné d’afficheur d’appel en attente. Ce système téléphonique reçoit et affiche l’information d’appelant transmise par la compagnie de téléphone. -
Page 87: Ossiers D' Appelants 36 Ossiers D' Appelants Nterne
2. Appuyez sur le bouton CALLER ID-VOL () pour consulter le plus récent dossier d’appelant. 3. Appuyez sur le bouton CALLER ID-VOL () pour consulter le plus ancien dossier d’appelant. À mesure que vous consultez les dossiers d’appelants, l’afficheur indique l’information suivante pour chaque appel: •... -
Page 88: Umero D' Appelant . 38 Ossier D' Appelant
Composition D’un Numero D’appelant Pendant la consultation des dossiers d’appelants, vous pouvez composer le numéro de téléphone affiché. 1. Assurez-vous que le téléphone est DÉSACTIVÉ (pas en mode conversation). 2. Appuyez sur le bouton CALLER ID-VOL ( or ) jusqu’à ce que le dossier désiré soit affiché. -
Page 89: Composition D' Un N Suppression D' Un D Effacement De Tous Les Accès À Distance
Effacement de Tous les Dossiers 1. Assurez-vous que le téléphone est DÉSACTIVÉ (pas en mode conversation). 2. Utilisez le bouton CALLER ID-VOL( or ) pour atteindre le dossier d’appelant désiré. 3. Maintenez le bouton DELETE enfoncé jusqu’à ce que EFFACERTOUT? soit affiché. 4. -
Page 90: Mémoire Pleine
Accès au Répondeur à Partir d’un Autre Endroit Vous pouvez accéder au répondeur à partir de tout appareil à tonalité en entrant votre code de sécurité de 3 chiffres pendant l’écoute du message d’accueil ou à la suite de ce message. -
Page 91: Précautions À Prendre
4. Insérez la nouvelle pile et rebranchez la fiche. 5. Remettez la porte du logement à pile en place. 6. Placez le combiné sur la base ou le socle de chargement Porte du pour charger la pile. logement à pile Si vous ne chargez pas correctement la pile du combiné... -
Page 92: Messages D'afficheur
Messages D’afficheur Les messages suivants indiquent l’état du téléphone, fournissent l’information d’appelant ou vous aident à programmer et à utiliser votre téléphone. DONNEES INCOMPL L’information de l’appelant a été interrompue en cours de transmission ou la ligne téléphonique est excessivement bruyante. -
Page 93: Ombine
HORS PORTEE Le combiné est trop éloigné de la base. Rapprochez- vous de la base. RECHERCHE ou Quelqu’un a appuyé sur le bouton de recherche/ RECHERCEH DE interphone de la base ou du combiné. NUMERO BLOQUE La personne appelle d’un numéro dont la transmission a été... -
Page 94: Guide De Depannage
Guide de Depannage Solutions-Telephone Aucun signal de manœuvre • Vérifiez ou répétez les étapes d’installation: Le cordon d’alimentation de la base est-il branché dans une prise sous tension ? Le cordon téléphonique est-il branché dans la base et la prise murale ? •... - Page 95 La composition-mémoire ne fonctionne pas • Avez-vous programmé les touches d’emplacement-mémoire correctement? • Avez-vous suivi la bonne séquence de composition?? L’appareil bloque et aucune communication entre la base et le combiné sans cordon • Débranchez l’alimentation de la prise de courant et à l’arrière de la base. Retirez la pile du combiné.
-
Page 96: Soins Et Entretien
Pile Si vous éprouvez l’un ou l’autre des problèmes suivants, même après avoir rechargé complètement la pile, vous devrez peut-être remplacer la pile: • Courte période de conversation • Mauvaise qualité du son. • Portée limitée • L’indicateur CHARGE/IN USE situé sur le socle ne s’allument pas. Soins et Entretien Pour maintenir le bon fonctionnement et la belle apparence de votre appareil, suivez les lignes directrices ci-dessous:... -
Page 97: Ccessoires
Information sur le Réseau Téléphonique Si cet appareil provoque des dérangements sur la ligne et, par conséquent, sur le réseau téléphonique, la compagnie de téléphone signalera, s’il y a lieu, qu’elle doit temporairement interrompre le service. Si elle est dans l’impossibilité de le faire et que les circonstances dictent une telle mesure, la compagnie de téléphone peut immédiatement interrompre le service pendant un certain temps. -
Page 98: Information Sur Le Réseau Facteur D' Équivalence De Information Pour A Index
Index Exigences de la PriseTeléephonique Accès à Distance` Accès au Répondeur à Partir d’un Facteur D’équivalence de Sonnerie Autre Endroit Faire des Appels Afficheur Faire un Appel D’interphone Alerte de message (répondeur) Filtrage des Appels à Partir de la Base Annonce Vocale Date/Heure et Horloge enTemps Reel Filtrer les Appels à... - Page 99 Mémoire Pleine Recevoir un Appel Pendant un Appel D’interphone Memorisation D’un Nom et D’un Numero Recherche 29 Memorisation de Dossiers D’appelants (Dans la Memoire de L’afficheur) Recherche a Partir de la Base/Recherche de Groupe Memorisation des Dossiers D’appelants dans la Memoire Interne Recherche de Combine a Combine Mémorisation des Mélodies VIP...
-
Page 100: Service Après - Vente
Joindre le reçu de caisse à ce guide pour référence ultérieure. Cette information pourrait être demandée s’il faut faire réparer l’appareil pendant qu’il est sous garanti. DATE D’ACHAT _____________________________________________________________________ OM DU MAGASIN _____________________________________________________________________ Modèle 25833 ATLINKS Communications Canada Inc. 00003416 (Rév 0 E/F ) © 2005 ATLINKS Communications Canada, Inc.