
Related Manuals for Black & Decker BL2010BPA


Summary of Contents for Black & Decker BL2010BPA
- Page 1 10-SPEED BLENDER LICUADORA DE 10 VELOCIDADES MÉLANGEUR DE 10 VITESSES Use & Care Manual manual de uso y cuidado guide d’utilisation et d ’entretien BL2010BPA...
-
Page 2: Important Safeguards
Please Read and Save this Use and Care Book. IMPORTANT SAFEGUARDS. When using electrical appliances, basic safety precautions should always be followed, including the following: • Read all instructions. • Keep hands and utensils out of container while blending • To protect against risk of electrical shock do not immerse to reduce the risk of severe injury to persons or damage cord, plugs or appliance in to the blender. A scraper may water or other liquid. be used, but must be used • Close supervision is necessary only when the blender is not when any appliance is used by running. or near children. -
Page 3: Safety Features
SAVE THESE INSTRUCTIONS. This product is for household use only. SAFETY FEATURES POLARIZED PLUG (120V models only) This appliance has a polarized plug (one blade is wider than the other). To reduce the risk of electric shock, this plug is intended to fit into a polarized outlet only one way. If the plug does not fit fully into the outlet, reverse the plug. If it still does not fit, contact a qualified electrician. Do not attempt to modify the plug in any way. TAMPER-RESISTANT SCREW Warning: This appliance is equipped with a tamper-resistant screw to prevent removal of the outer cover. To reduce the risk of fire or electric shock, do not attempt to remove the outer cover. There are no user-serviceable parts inside. Repair should be done only by authorized service personnel. ELECTRICAL CORD 1. A short power-supply cord is provided to reduce the risk resulting from becoming entangled in or tripping over a longer cord. 2. Extension cords may be used if care is exercised in their use. 3. If a long detachable extension cord is used: a) T he marked electrical rating of the power cord or extension cord should be at least as great as the electrical rating of the appliance. b) I f the appliance is of the grounded type, the extension cord should be a grounding-type 3-wire cord. c) T he cord should be arranged so that it will not drape over the countertop or tabletop where it can be pulled on by children or tripped over. -
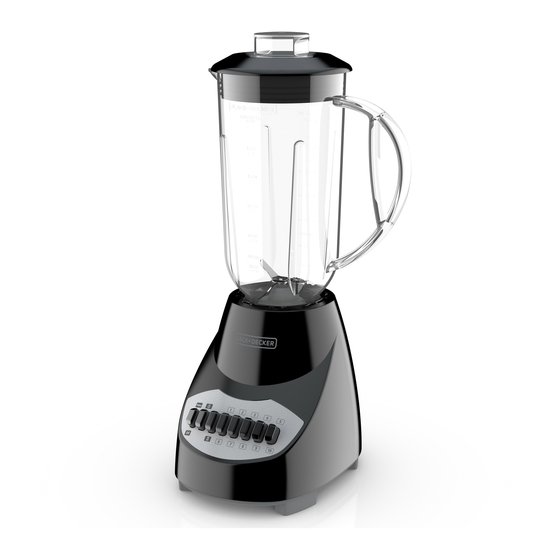
Page 4: Ge Tt I Ng To K N Ow Your B Le Nd E R
GE TT I NG TO K N OW YOUR B LE ND E R Speed Button Blender Base Blending jar Blade assembly (Part # BL2010WP-07) (part # Bl2010WG-03) Gasket Measuring cup lid insert (Part # BL2010WP-05) (part # Bl2010WG-01) Jar base Lid (Part # BL2010BP-02) (Part # BL2010BP-08) Handle Product may vary slightly from what is illustrated. -
Page 5: How To Use
HOW TO U S E This appliance is intended for household use only. G E T T I NG STARTE D • Remove all packing material, any stickers from the product, and the plastic band around the plug. • Remove and save literature. • Please go to www.prodprotect.com/applica to register your warranty. • Wash all removable parts as instructed in Care & Cleaning Section of this manual. BL E N D ER JAR ASS E MB LY 1. T urn blending jar upside down and place flat on countertop or work surface. 2. P lace the gasket against the glass jar. Important: Gasket MUST be between the jar and blade assembly or the blender will not function properly. -
Page 6: Bl E N D I Ng Ti P S A Nd T E C Hn Iq Ues
BL E N D I NG TI P S A ND T E C HN IQ UES ⁄ • Cut food into pieces no larger than inch for use in the blender. • W hen preparing foods with several different kinds of ingredients, always add liquids first. • I f ingredients splatter onto the sides of the jar or the mixture is very thick, press the OFF button to turn appliance off. Remove the lid and use a rubber spatula to scrape down the sides of the jar. Replace the lid and continue blending. Important: Blender should always have lid in place when in use. Caution: Do not place blending jar on base when motor is running. -
Page 7: S P Ee D C Ha Rt
S P EE D C HA RT Pulse/Off • Use for thick mixtures Fast Clean • C ombine drop of dishwashing liquid and hot water to clean blender Stir/Mix • Prepare sauces • Remove lumps from gravies • Reconstitute frozen juices, drink mixes and condensed soups • Prepare salad dressings • Puree hot liquids Blend • Mix puddings • Combine pancake and waffle batter or mixes • Beat eggs for omelets and custards Grate • Grate hard cheeses and coconut • Make superfine sugar • Grind coffee beans, spices and chocolate Beat • Beat eggs for omelets and custards... -
Page 8: Care And Cleaning
C ARE A N D C LEA N IN G This product contains no user serviceable parts. Refer service to qualified service personnel. CLEANING 1. Before cleaning, turn off and unplug appliance. 2. Lift blending jar by handle off power base. 3. Remove jar base by turning counterclockwise until loose. 4. Remove gasket and blade assembly. Caution: Blades are sharp, handle carefully. 5. Remove lid and lid cap. 6. W ash removable parts by hand or in your dishwasher. Place jar on bottom rack and rest of parts on top-rack only. Important: • Do not place jar parts in boiling liquids. •... -
Page 9: Need Help
NE E D H E LP ? For service, repair or any questions regarding your appliance, call the appropriate 800 number listed within this section. Please DO NOT return the product to the place of purchase. Also, please DO NOT mail product back to manufacturer, nor bring it to a service center. You may also want to consult the website listed in this manual. Two-Year Limited Warranty (Applies only in the United States and Canada) What does it cover? • Any defect in material or workmanship provided; however, Spectrum Brands’ liability will not exceed the purchase price of product. For how long? • Two years from the date of original purchase with proof of purchase. What will we do to help you? • Provide you with a reasonably similar replacement product that is either new or factory refurbished. -
Page 10: Instrucciones Importantes De Seguridad
Por favor lea este instructivo antes de usar el producto. INSTRUCCIONES IMPORTANTES DE SEGURIDAD Cuando se usan aparatos eléctricos, siempre se deben respetar las siguientes medidas básicas de seguridad: • Por favor lea todas las • No coloque el aparato sobre ni instrucciones. -
Page 11: Características De Seguridad
CONSERVE ESTAS INSTRUCCIONES. Este aparato eléctrico es para uso doméstico únicamente. CARACTERÍSTICAS DE SEGURIDAD ENCHUFE POLARIZADO (SOLAMENTE PARA LOS MODELOS DE 120V) Este aparato cuenta con un enchufe polarizado (un contacto es más ancho que el otro). A fin de reducir el riesgo de un choque eléctrico, este enchufe encaja en un tomacorriente polarizado en un solo sentido. Si el enchufe no entra en el tomacorriente,inviértalo y si aun así no encaja, consulte con un electricista. Por favor no trate de alterar esta medida de seguridad. TORNILLO DE SEGURIDAD Advertencia: Este aparato cuenta con un tornillo de seguridad para evitar la remoción de la cubierta exterior del mismo. A fin de reducir el riesgo de incendio o de choque eléctrico, por favor no trate de remover la cubierta exterior. Este producto no contiene piezas reparables por el consumidor. Toda reparación se debe llevar a cabo únicamente por personal de servicio autorizado CABLE ELÉCTRICO 1. El producto debe proporcionarse con un cable corto para reducir el riesgo de enredarse o de tropezar con un cable largo. 2.Se encuentran disponibles cables de extensión más largos, que es posible utilizar si se emplea el cuidado debido. 3. Si se utiliza un cable de extensión: a ) E l régimen nominal del cable separable o del cable de extensión debe ser, como mínimo, igual al del régimen nominal del aparato. - Page 12 FA MIL I A R ÍC ES E SU L IC UA DOR A B otones para regular la velocidad Base de la licuadora Jarra Cuchillas (Pieza N° BL2010WP-07) (Pieza N° Bl2010WG-03) Junta Tapón (Pieza N° Bl2010WG-01) (Pieza N° BL2010WP-05) Tapa (Pieza N° BL2010BP-02) Base de la jarra (Pieza N° BL2010BP-08) El producto puede variar ligeramente del que aparece ilustrado aquí.
-
Page 13: Primeros Pasos
COM O U SA R Este producto es para uso doméstico solamente. P RIM E R OS PASOS • Retire todo el material de embalaje, calcomanía adherida al producto, y labanda de plástico alrededor de la clavija. • Retire y conserve la literatura. • Por favor visite www.prodprotect.com/applica para registrar su garantía. • Lave todas las piezas removibles de acuerdo a las instrucciones en la sección de Cuidado y Limpieza. EN SAM B L A J E D E L A JA RR A 1. P onga la jarra boca abajo y colóquela plana sobre la encimera o la superficie de trabajo. 2. Coloque la junta en contra de la jarra de vidrio. - Page 14 CO NS EJ OS Y TE C N IC AS PA R A LICUA R ⁄ • Pique los alimentos que va a licuar en pedazos de no más de de pulgada. • C uando vaya a preparar alimentos con diferentes tipos de ingredientes, siempre se debe añadir los líquidos primero. • C uando los ingredientes salpiquen a los lados de la jarra o la mezcla esté muy espesa, presione el botón de pulso/apagado (Pulse/Off) para apagar el aparato. Retire la tapa y use una espátula de goma para raspar los lados de la jarra hacia abajo. Coloque la tapa de nuevo antes de continuar licuando. Importante: El aparato siempre debe estar tapado mientras esté en uso Precaución: No coloque la jarra de la licuadora sobre la base cuando el motor esté...
-
Page 15: G U Í A D E V Eloci Da D E S
G U Í A D E V ELOCI DA D E S Pulse/Off (Pulso/Apagado) • Usar para mezclas espesas BAJO (LOW) 1. Fast Clean • C ombine una gota de líquido de lavar platos y agua caliente para limpiar la licuadora 2. Mix/Stir (Batir/ • P reparar salsas • S acar los grumos de las salsas Revolver) • U se para reconstituir jugos congelados, bebidas instantáneas y sopas condensadas • P reparar aderezos para ensaladas • H acer puré de líquidos calientes... -
Page 16: R E So Lu C Ió N De Fa Llas
CU IDA D O Y L I M PI E ZA Este producto no contiene piezas reparables por el consumidor. Para servicio, por favor consulte con personal calificado. LIMPIEZA 1. Antes de limpiar, apague y desenchufe el aparato. 2. Agarre la jarra por el asa para extraerla de la base eléctrica. 3. Retire la jarra haciéndola girar en sentido antihorario hasta que se suelte. 4. Retire la junta y las cuchillas. Precaución: Las cuchillas están afiladas y deben manejarse con sumo cuidado. 5. Retire la tapa y el tapón. 6. Lave las piezas desmontables a mano o en una máquina lavaplatos. Coloque jarra en la cesta inferior de la máquina y el resto de las piezas sólo en la cesta superior. Importante: • No introduzca las piezas de la jarra en líquidos hirviendo. •... -
Page 17: N E C Esi Ta Ay Uda
¿N E C ESI TA AY UDA? Para servicio, reparaciones o preguntas relacionadas al producto, por favor llame al número del centro de servicio que se indica para el país donde usted compró su producto. NO devuélva el producto al fabricante. Llame o lleve el producto a un centro de servicio autorizado. Usted también puede consultar a nuestro Centro de Protección del Producto en www.productprotect.com/applica. Dos Años de Garantía Limitada (No aplica en México, Estados Unidos y Canada) ¿Qué cubre mi garantía? • Su garantía cubre cualquier defecto de material o de mano de obra, siempre y cuando la responsabilidad de Spectrum Brands, Inc. no exceda el precio de compra del producto. ¿Por cuánto tiempo es valida la garantía? • Su garantía se extiende por dos años a partir de la fecha original de compra mientras que tenga una prueba de la compra. - Page 18 Por favor llame al número correspondiente que aparece en la lista a continuación para solicitar que se haga efectiva la garantía y donde Ud. puede solicitar servicio, reparaciones o partes en el país donde el producto fué comprado. Argentina México Servicio Técnico Articulo 123 # 95 Local 109 y 112 Monroe 3351 Col. Centro, Cuauhtemoc, CABA Argentina México, D.F. Tel: 0800 – 444 - 7296 Tel. 01 800 714 2503 servicios@rayovac.com.ar Nicaragua Chile ServiTotal SERVICIO DE MAQUINAS Y HERRAMIENTAS De semáforo de portezuelo LTDA. 500 metros al sur. Portugal Nº 644 Managua, Nicaragua, Santiago – Chile Tel. (505) 248-7001 Fonos: 02-6355208 / 02-6341169 Panamá Email: servicio@spectrumbrands.cl Servicios Técnicos CAPRI Call center: 800-171-051 Tumbamuerto Boulevard Colombia El Dorado Panamá Rayovac Varta S.A 500 metros al sur. Carrera 17 Número 89-40 Tel. 3020-480-800 sin costo Línea gratuita nacional (507) 2360-236 / 159 Tel. 018000510012 Perú...
- Page 19 Sello del Distribuidor: Código de fecha / Date Code / Le code de date: Fecha de compra: Modelo: BL2010BPA - 350 W 120 V ~ 60 Hz Comercializado por: Venta de Refacciones y Accesorios Rayovac de México S.A de C.V 01 800 714 2503 Autopista México Querétaro Importado por / Imported by: No 3069-C Oficina 004 RAYOVAC ARGENTINA S.R.L. Colonia San Andrés Atenco, Tlalnepantla Humboldt 2495 Piso# 3 Estado de México, C.P. 54040 (C1425FUG) C.A.B.A. Argentina. Mexico.
- Page 20 www.BlackAndDeckerAppliances.com © 2014 The Black & Decker Corporation and Spectrum Brands, Inc. Middleton, WI 53562 2014/9/17/129...