Table of Contents
Advertisement
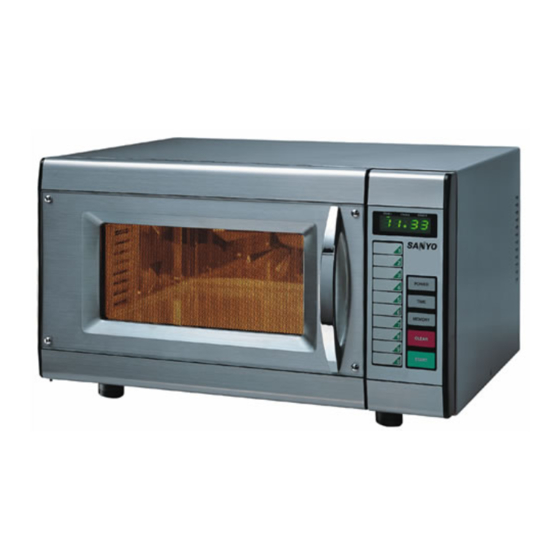
INSTRUCTION MANUAL
Commercial Microwave Oven
Power Source
Max. Output Power
Cavity Size
Overall Dimensions
(WxDxH)
Net Weight
Read these instructions carefully before use.
If you follow these instructions, your Microwave Oven will serve you long and well.
230V AC, 50Hz
1000 Watts
0.8 cu-ft
520mm x 412mm x 296mm
Approx. 17 kgs
EM-S1000
EUK/ECO
English
Advertisement
Table of Contents

Related Manuals for Sanyo EM-S1000


Summary of Contents for Sanyo EM-S1000
-
Page 1: Instruction Manual
Cavity Size 0.8 cu-ft Overall Dimensions (WxDxH) 520mm x 412mm x 296mm Net Weight Approx. 17 kgs Read these instructions carefully before use. If you follow these instructions, your Microwave Oven will serve you long and well. EM-S1000 EUK/ECO English... -
Page 2: Table Of Contents
TABLE OF CONTENTS Description Of Oven Parts Installation How To Use Your Microwave Oven Safely Care of Your Microwave Oven Oven Control Panel Microwave Oven Cooking Know-How Operating Instructions Power Level List Program (2 Stage) Cooking Precautions While Heating Usable Cooking Utensils And Materials... -
Page 3: Installation
WARNING (a) Do not adjust or repair microwave oven yourself. Do not operate the oven if it is dam aged, until it has been repaired by a service enginer trained by the manufacturer. -
Page 4: How To Use Your Microwave Oven Safely
This is merely condensation from the heat of the food and does not affect the safety of your oven.The door is not intended to seal the oven cavity completely but its special SANYO design contributes to the complete safety of the appliance. WARNING 1. -
Page 5: Care Of Your Microwave Oven
HOW TO USE YOUR MICROWAVE OVEN SAFELY (cont.) Although your oven is provided with safety features, it is important to observe the following: It is important not to defeat or tamper with safety interlocks. Do not place any object between the oven face and the door or allow residue to accumulate on sealing surfaces. Wipe the sealing area frequently with a mild detergent, rinse and wipe dry. -
Page 6: Oven Control Panel
OVEN CONTROL PANEL DISPLAY: 1. LED Display - Cooking time, power level, function indicators are displayed. KEYS: 2. Program Selection Keys - The unit is ready to begin operation as soon as the heating time has been programmed, using these ten keys (numbered 1 to 0). -
Page 7: Microwave Oven Cooking Know-How
MICROWAVE OVEN COOKING KNOW-HOW 1. Cooking times with quantity Input the cooking time that is appropriate to the quantity of foods being prepared. When heating double or triple quantity, use the appropriate multiple-quantity key. Note: Before use, the user should check that utensils are suitable for use in microwave oven. - Page 8 OPERATING INSTRUCTIONS (2) USING THE PROGRAM KEY FOR MEMORY STORAGE Programmed (1-Stage) Cooking at maximum power. (Example) To program the following on program No. 3: ( Power Level ...max power for 30 seconds.) Operational flow Touch “Memory” Key (1st time) Touch “Memory”...
-
Page 9: Display Window
OPERATING INSTRUCTIONS (3) USING THE PROGRAM KEY FOR MEMORY STORAGE Programmed (1-Stage) Cooking at lower power level. (Example) To program the following on program No. 4: ( Power Level 5 for 45 seconds.) Operational flow Touch “Memory” Key (1st time) Touch “Memory”... -
Page 10: Operating Instructions
OPERATING INSTRUCTIONS (4) HEATING METHOD Ordinary Use (Example) When program No. 3 is programmed as: First stage ( Max power for 30 seconds.) and Second stage (Power Level 2 for 1 min.) Operational flow Place food in oven Touch PROGRAM key number “3”... -
Page 11: Power Level List
5. The storing process is completed by touching “Memory” key. If “Memory” key is not touched, the new settings will not be stored and the previous memory information will be retained. POWER (W) Max. Input time EM-S1000 Manual Set 1000 10 min. 00 sec. 30 min. 00 sec. -
Page 12: Program (2 Stage) Cooking
PROGRAM (2-STAGE) COOKING Programmed (2 Stage) Cooking (Example) To program the following on program No. 3: First stage (Max power for 30 seconds.) Operating flow 1-6 of 1-stage cooking, then: (see page 8) Operational flow Touch “Power” Key Input POWER level 2 with the PROGRAM keys Touch : number “2”... - Page 13 PROGRAM (2-STAGE) COOKING (cont.) Confirmation of Memory (Example) When program No.3 is programmed as: First stage (Max power for 30 seconds.) Operational flow Open door Touch number “3” Touch another “3” Touch “Clear” key NOTE: 1. Touch “Clear” key after confirming the contents of the units memory. 2.
-
Page 14: Precautions While Heating
Any aluminum foil use should never be closer than 1 inch from side walls of oven. WOOD Wooden bowls and boards will become dried out when used in the microwave oven and may split or crack. OTHER Avoid using cracked, flawed, or defective utensils, including ovenproof glassware. -
Page 15: Checking Accumulative Cooking Time, Number Of Door Operations And Control Of The Buzzer Sound
CHECKING ACCUMULATIVE COOKING TIME, NUMBER OF DOOR OPERATIONS AND CONTROL OF THE BUZZER SOUND (DOOR MUST BE CLOSED) Display shows accumulative cooking time or the number of door operations by key operation. Also, you can change any remaining cooking time, buzzer sound or buzzer volume. Operational flow Touch “Clear”... -
Page 16: How To Confirm The Frequency Of Each Course Used
HOW TO CONFIRM THE FREQUENCY OF EACH COURSE USED Operational flow Touch “Clear” Key Touch “Time” key Touch “Start” key Touch “Start” key again Touch “Start” key again By touching Start key it is possible to check all 10 course memory functions. Touch “Clear”... -
Page 17: Care And Cleaning
Any food left in the oven could possibly cause arcing due to carbonisation.Never use abra- sive powders or pads. WHAT TO DO IF REPAIRS ARE NEEDED 1. Get in contact with your nearest SANYO SERVICE CENTER. It is dangerous for anyone other than a properly qualified service engineer trained by SANYO to carry out adjustments or repairs. - Page 18 03-03 SANYO Electric Co., Ltd. CODE NO. MO- P xxxx Printed in Thailand...