Table of Contents
Advertisement
Quick Links
Download this manual
See also:
Instruction Manual
Advertisement
Table of Contents

Related Manuals for Bosch MUC68 Series


Summary of Contents for Bosch MUC68 Series
- Page 1 Register your new Bosch now: www.bosch-home.com/welcome MUC6...GB MUC8...GB en Instruction manual ms Arahan pengendalian zf 使用說明書 zh 使用说明书 إرشادات االستخدام...
- Page 2 www.devicemanuals.eu/ en English ms Bahasa Melayu 繁體中文 zf 简体中文 zh العربية ar ...
- Page 3 www.devicemanuals.eu/ 15 16...
- Page 4 www.devicemanuals.eu/...
-
Page 5: Intended Use
www.devicemanuals.eu/ Intended use Intended use Please read and follow the operating instructions carefully and keep them for later reference! Please read all instructions! Enclose these instructions when you give this appliance to someone else. If the instructions for correct use of the appliance are not observed, the manufacturer’s liability for any resulting damage will be excluded. This appliance is intended for domestic use only. The appliance is suitable for cooking with steam pressure, cooking, baking, roasting, stewing, steam-cooking, soft frying, pasteurising and heating up food, as well as keeping food warm. It must not be used for processing other substances or objects. All ingredients ... -
Page 6: Safety Instructions
www.devicemanuals.eu/ Safety instructions Safety instructions W Risk of electric shock and fire! The appliance may only be connected to a power supply with alternating current via a correctly installed socket with earthing. Ensure that the protective conductor system of the domestic supply has been correctly installed. Connect and operate the appliance only in accordance with the specifications on the rating plate. Do not use the appliance if the power cord and/or appliance are damaged. To prevent hazards, the appliance may only be repaired by customer service. If the power cord of this appliance is damaged, it must be replaced with a special connection cord, which is available from our after-sales service. Never connect the appliance to timer switches or remote-controllable sockets. Never leave the appliance unattended while it is switched on! If there is a fault, pull out the mains plug immediately or switch off the power supply. The mains cable must not come into contact with hot parts or be pulled across sharp edges. Never immerse the appliance or the mains cable in water or place it in the dishwasher. Unplug the appliance before cleaning it. W Risk of scalding! The appliance uses steam pressure for cooking. There is a risk of scalding with improper use of the appliance. Before heating the appliance, check that it has been properly closed. Refer to the operating instructions. Before using the appliance each time, regularly check the steam valve openings to make sure that they are not blocked. Refer to the operating instructions. Never tamper with the safety systems in any manner that goes beyond the maintenance instructions described in the operating instructions. X “Care and daily cleaning”... - Page 7 www.devicemanuals.eu/ Safety instructions Never use force to open the appliance! Do not open the appliance until you have checked that the internal pressure has been completely reduced. Refer to the operating instructions. X “Preparation with steam pressure” see page 16 After preparing doughy food, shake the appliance slightly before opening the lid to prevent the food spraying out. After preparing meat still with the skin on it (e.g. ox tongue) that can swell up under pressure, do not pierce the skin while swollen as there is a risk of scalding. Open the lid with care. Only transport or clean the appliance once it has fully cooled down! Parts that show visible discolouration, cracks or other damage or are not seated correctly must be replaced with original spare parts. W Health risk! Sous-vide cooking is a method of cooking at low temperatures. Please pay particular attention to the safety instructions and the recommendations for preparation! X “Sous-vide cooking” see page 15 W Risk of suffocation! Do not allow children to play with packaging material. W Important! After usage or cleaning, allow the appliance to dry for at ...
-
Page 8: Table Of Contents
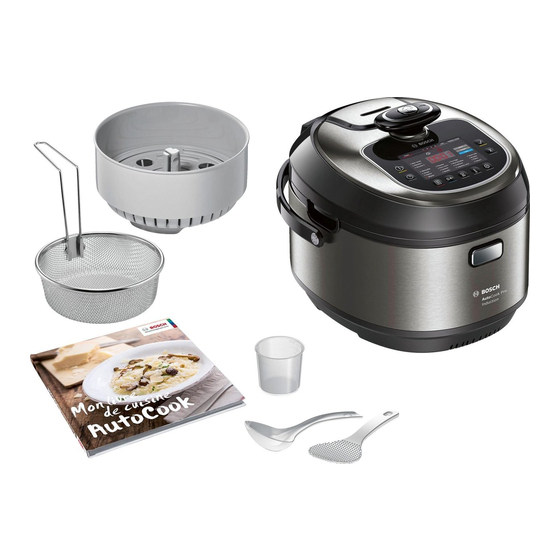
Contents Overview Congratulations on the purchase of your new Bosch appliance. X Figure A On the following pages of these operating 1 Multi-cooker with steam pressure instructions you will find useful information function (basic appliance) for safe use of this appliance. 2 Lid Please read these operating instructions 3 Control panel carefully and observe all instructions. 4 Pressure locking handle This ensures you will be able to enjoy this 5 Steam release button appliance for a long time, and the results 6 Removable steam outlet will confirm your choice of this appliance. -
Page 9: Control Panel
www.devicemanuals.eu/ Control panel Control panel Steam pressure function The steam pressure functions The control panel consists of controls “low steam pressure” [ K ] or (buttons) and indicators (LEDs). The “high steam pressure” [ L ] are buttons can be used to select the individual selected by pressing button L. The preparation programmes and adopt the respective indicators (f) light up. different setting options (e.g. to select X “Preparation with steam pressure” steam pressure function, preparation see page 16 temperature / time). The settings are Confirm the programme indicated via the illuminated LEDs and/or Pressing button G starts the the display. selected preparation programme. Controls Delete a setting or abort the X Fig. -
Page 10: Before Using For The First Time
www.devicemanuals.eu/ Before using for the first time Before using for the Steam pressure function [ K ] shows that low steam pressure first time (105°C) is selected. Before the new appliance can be used, [ L ] shows that high steam pressure it must be fully unpacked, cleaned and (115°C) is selected. X “Preparation with connected to the power outlet. To do this, steam pressure” see page 16 perform the following steps: g Display of the pre-configured 1. Remove the base unit and all preparation time accessories from the packaging and The pre-configured preparation time dispose of all packing materials. [ medium ] for a preparation programme 2. Use the carrying handle to lift the can be shortened [ short ] or lengthened ... - Page 11 www.devicemanuals.eu/ Before using for the first time 5. Remove the valve plug 8. Remove the lid insert Pull off the valve plug in the steam Turn the fastening screw anti-clockwise release chamber. and remove it. Use one hand to keep the lid insert in position on the inside of the lid. Use the other hand on the outside of the lid to push the steam valve in the steam release chamber through the opening by applying slight pressure. Carefully remove the lid insert from the lid. 6. Open the appliance lid Open the pressure locking handle (M). For this purpose, rotate the pressure locking handle as far as possible in an anti-clockwise direction. Press the opening button on the basic appliance to open the lid. 9. Remove the packaging material that is on the appliance and the accessory parts. 10. Check all parts for completeness. X Figure A 11.
- Page 12 www.devicemanuals.eu/ Before using for the first time 14. Insert pan 18. Insert the steam outlet Reinsert the pan in the appliance Place the steam outlet on the lid from interior. The pan handles must be sunk above and press down firmly. into the indentations. Caution! Before inserting the pan, check that the appliance interior is dry and clean. 15. Place lid insert The pressure locking handle must be opened (M). Place the lid insert on the lid insert mount with the steam valve at the bottom. At the same time, guide the 19. Insert the condensation water tank steam valve through the steam valve Fold up the carrying handle. Hold the opening. Tighten the fastening screw for tank by the sides at the top and insert at the lid insert clockwise on the lid insert the rear of the appliance. mount. 16. Close the lid Press the lid down until it clicks into ...
-
Page 13: Preparation
www.devicemanuals.eu/ Preparation Preparation Preparation without steam pressure General recommendations There are 16 pre-configured preparation For the best and tastiest results, we programmes available to choose from. recommend using the suggestions in our X “List of preparation programmes” see recipe book, which was specially developed page 26 for use with the appliance. Note: When selecting and starting the The recipe book features detailed preparation programme without the steam information on the required quantities pressure function, make sure that the of ingredients, recommendations for the pressure locking handle is open at all preparation time and the preparation times (M). temperature, use of the steam pressure function and useful combinations of the 1. The appliance is ready to use. Fill the preparation programmes. appliance with the desired ingredients. Use these recipe recommendations in To do this, open the lid and pour the ... - Page 14 www.devicemanuals.eu/ Preparation Notes: The preparation time counts down. ■ Certain preparation programmes or steps are carried out with the lid open. X See recipe book provided ■ If no input is made on the control panel within 5 minutes, the appliance automatically switches to standby mode. 1. Keep pressing button D until the desired preparation programme is selected. Cooking produces steam, which escapes from the appliance to prevent excess pressure from building up. Increasing or reducing the temperature during preparation If the current temperature has been set too high or too low during preparation, this can also be increased (by +10°C max.) or decreased (by -10°C max.) accordingly The corresponding LED lights up in the during the cooking process. control panel and the pre-configured prepa- To increase the temperature, press and ration time for the selected preparation hold button C. The current temperature will ...
- Page 15 www.devicemanuals.eu/ Preparation Sous-vide cooking The display flashes and shows “00:00”. 3. Open the lid of the appliance and serve Sous-vide cooking is a method of cooking the meal that has been prepared. under a vacuum at low temperatures. W Risk of scalding! Sous-vide cooking is a gentle, low-fat ■ During preparation, large amounts of method of preparing meat, fish, vegetables steam accumulate in the appliance. and desserts. A vacuum-packing machine is Always open the lid with care. Do not used to heat-seal the food in a special air- lean over the lid of the appliance. tight, heat-resistant cooking bag. ■ The pan and any inserts that are used W Health risk! may be very hot. Always use suitable Sous-vide cooking is a method of cooking at handles or oven gloves. low temperatures. As a result, it is important Caution! that you always follow the application and Condensation is formed during cooking. hygiene instructions below: Empty the condensation tank regularly.
- Page 16 www.devicemanuals.eu/ Preparation Vacuum-sealing Steam pressure function activated ■ Use a chamber vacuum-sealing machine To be able to select preparation pro- that can create a vacuum of at least 99% grammes with the steam pressure function, to vacuum-seal the food. This is the only the pressure locking handle must first of all way to achieve an even heat transfer and be closed (N). For this purpose, rotate the therefore a perfect cooking result. pressure locking handle as far as possible in a clockwise direction. Notes: ■ The maximum capacity for sous-vide cooking is 3 l. After the food is added, the water level in the pan should not exceed 3 l. ■ Make sure you put the lid on whenever using the sous-vide cooking method. Preparation with steam pressure The multi-cooker is additionally equipped An audible signal is emitted when the with a steam pressure function. With the appliance is correctly closed and the steam pressure function, the food cooks steam pressure function is switched on. ...
- Page 17 www.devicemanuals.eu/ Preparation There are 8 pre-configured preparation Note: If no input is made on the control programmes which can be used with panel within 5 minutes, the appliance the steam pressure function. X “List of automatically switches to standby mode. preparation programmes” see page 26 5. Keep pressing button D until the W Risk of scalding! desired preparation programme is ■ Ingredients which are liable to froth up, selected. e.g. like milk and cream must not be heated under steam pressure. ■ Do not use the steam pressure function to soft fry food in oil under pressure. 1. Open the appliance. Open the pressure locking handle for this purpose (M) and press the opening button on the basic appliance. 2. Fill the pan with the desired ingredients. The corresponding LED lights up in the ...
- Page 18 www.devicemanuals.eu/ Preparation The preparation process starts automati- ■ Automatic steam release can take some cally. The preparation time counts down. time. In order to accelerate the process or if the appliance is not completely depressurised, the steam can also be released manually. X “Release steam manually” see page 18 8. Serve the prepared meal. W Risk of scalding! ■ The pan and any inserts that are used may be very hot. Always use suitable handles or oven gloves. Once the preparation time is completed, Caution! an audible signal sounds, the display Condensation is formed during cooking. flashes and shows “P”. Steam auto- Empty the condensation tank regularly. matically escapes from the appliance intermittently to reduce the pressure in Notes: the appliance interior. ■ The preparation programme can be W Risk of scalding! stopped at any time using button H. ...
-
Page 19: Additional Functions
www.devicemanuals.eu/ Additional functions 1. Keep the steam release button pressed 1. Keep pressing button E until the until no more steam escapes from the desired indicator is lit. The display steam outlet. changes from [ medium ] to [ long ] and then to [ short ] before returning to [ medium ]. The corresponding pre-configured values for the preparation time are shown in the display. 2. Press button G to start the preparation programme. Setting a start time delay 2. Open the appliance. Open the pressure The start time delay can be set for the locking handle for this purpose (M) selected preparation programme so you and press the opening button on the can enjoy a freshly prepared meal at a basic appliance. specific time. Note: If the pressure locking handle cannot Note: The start time delay can only be be opened, the appliance is not completely set for certain preparation programmes. depressurised. In this case, manually The pre-configured start time delay varies depress the overpressure protection using among these preparation programmes. -
Page 20: Using Inserts
www.devicemanuals.eu/ Using inserts Multiple preparation steps If the preparation programme features the keep warm function, this is switched on Certain preparation programmes can consist automatically once the dish is ready and of several preparation steps. An audible keeps the dish warm for up to 10 hours signal sounds once the next step is required. at 40°C (pre-configured keep warm time In the control panel, LEDs 1, 2, 3 or 4 are depending on the preparation programme). shown accordingly and button G flashes. [ finished ] and [ keep warm ] light up. A rec- ■ Open the lid of the appliance. tangle lights up in the display (dotted lines). ■ Add additional ingredients. The keep warm function can be ended ■ Depending on the recipe, refer to the using button H. The appliance subsequently preparation method (e.g. with or without switches to function selection mode. steam pressure function, open lid). X See recipe book provided Using inserts ■ Start the next preparation step using Using the frying basket button G. ... - Page 21 www.devicemanuals.eu/ Using inserts 4. In function selection mode, select Example: Preparation programme [ steam ] without steam pressure function the preparation programme [ soft fry ] X “List of preparation programmes” see W Risk of scalding! page 26 ■ Fill with water up to the mark [ 0.5 J ] at 5. Press button G to start the preparation maximum. programme. ■ During preparation, large amounts of The oil is heated. Once the target steam may accumulate in the appliance. temperature is reached, an audible signal ...
-
Page 22: Customised Setting Options
www.devicemanuals.eu/ Customised setting options Customised setting options The corresponding LED lights up in the control panel and the pre-configured The pre-configured values for the prepara- preparation time for this preparation tion time and the preparation temperature programme is shown. or steam pressure can be adapted to indi- 2. Press button C once. vidual needs and the recipe guidelines. The pre-configured preparation temperature Setting the preparation time flashes in the display. 1. In function selection mode, keep 3. Keep pressing button C until the desired pressing button D until the desired preparation temperature is displayed. preparation programme is selected. When button C is briefly pressed, the The corresponding LED lights up in the preparation temperature is increased by control panel and the pre-configured 5°C. The temperature increases up to the preparation time for this preparation pre-configured maximum value and then programme is shown. returns to the pre-configured minimum 2. Press button F once. value. When button C is pressed for a The pre-configured preparation time flashes ... - Page 23 www.devicemanuals.eu/ Customised setting options Note: If [ K ] or [ L ] does not light up, the 4. Press button G to start with the steam pressure function is not available for selected settings. the selected programme. The appliance heats up the pan until the target temperature or the steam pressure is 2. Press button L to switch between [ K ] reached. and [ L ]. Once the target temperature or steam 3. If the desired steam pressure is pressure is reached, the lines go out and displayed, press button G. the next preparation time is shown in the The preparation programme is started with display. The preparation process starts the set steam pressure function. automatically. Note: These settings are not saved. If this recipe 1 / recipe 2 – preparation programme is selected again, saving personal preparation the set steam pressure function will be shown in the display once more. programmes my mode (manual) Personal preparation programmes with ...
-
Page 24: Child Lock
www.devicemanuals.eu/ Child lock Child lock Saving the preparation temperature or steam pressure: The child lock can be activated and deac- 4. Preparation temperature: Press tivated during a preparation process. If the button C once. The pre-configured child lock has been activated, all buttons on preparation temperature is shown in the the control panel are locked and settings display. Press button C repeatedly until can no longer be made on the appliance. the desired preparation temperature is W Warning displayed. When the child lock is active, the preparation processes cannot be changed Steam pressure: Press button L to or terminated. The child lock must be switch between [ K ] and [ L ]. deactivated first. 5. Press and hold button G (>2 seconds) Press the following button combination: to save the set values. 1. Activate Note: Either the temperature or the steam ... -
Page 25: Disposal
www.devicemanuals.eu/ Disposal Disposal 1. Let the appliance cool down completely. 2. Open the pressure locking handle (M). Dispose of packaging in an environ- 3. Press the opening button on the basic mentally-friendly manner. This appliance to open the lid. a ppliance is labelled in accordance 4. Remove the pan, lid insert, steam outlet, with European Directive 2012/19/EU valve plug, condensation tank and concerning used electrical and accessories. X “Before using for the e lectronic appliances (waste electrical first time” see page 10 and electronic equipment – WEEE). The guideline determines the frame- Cleaning the basic appliance work for the return and recycling 1. Wipe the outside of the appliance with a of used appliances as applicable soft, damp cloth and dry off. -
Page 26: List Of Preparation Programmes
www.devicemanuals.eu/ List of preparation programmes List of preparation programmes AutoCook Pro offers you a total of 50 preparation programmes. They consist of 16 basic programmes, each with 3 time setting options, as well as 2 additional steam pressure functions. The following table contains the most important data for the various preparation programmes. Programme Number of Keep warm Steam preparation function pressure steps available function available my mode Open / Customised setting for the desired temperature — closed* and preparation time recipe 1&2 Open / —... -
Page 27: Cooking Times
www.devicemanuals.eu/ Cooking times Programme Number of Keep warm Steam preparation function pressure steps available function available lentils short: 1 Cooking beans medium: 2 Closed long: 2 sous vide — — Closed Gently cooking foods in a vacuum bag risotto short: 3 Open / Preparing risotto medium: 3... - Page 28 www.devicemanuals.eu/ Cooking times Programme Setting Time (without Food Recommended steam pressure quantity (maximum) function) rice medium 30 mins White, medium grain rice 500 g rice, (side dish) 700 ml water medium 25 mins White, medium grain rice 250 g rice, (side dish) 500 ml water long 60 mins...
-
Page 29: Model Overview And Technical Data
www.devicemanuals.eu/ Model overview and technical data Model overview and technical data MUC68... MUC88... Individual memory locations Nominal volume Maximum capacity without steam pressure function Maximum capacity with steam pressure function 3.3 l 3.3 l Temperature range 40-160°C 40-160°C Operating pressure 80 kPa 80 kPa Safety pressure 150 kPa 150 kPa... -
Page 30: Troubleshooting
www.devicemanuals.eu/ Troubleshooting Troubleshooting Problem Cause Remedy The prepared meal is Filled beyond capacity. Do not fill the pan beyond the marking half-raw. [ 4.0 litres ]! The ratio of the amount of water Adjust the ratio of the amount of water and the ingredients is incorrect. - Page 31 www.devicemanuals.eu/ Troubleshooting Problem Cause Remedy Display screen Fault in the appliance. Abort the preparation programme. Discon- E1~E6 nect the appliance from the power supply. Switch the appliance on again. If the problem persists, contact customer service. Display screen Incorrect pan inserted or pan not Insert the pan properly.