Sony UWP-D11 Operating Instructions Manual
Wireless microphone
package
Hide thumbs
Also See for UWP-D11:
- Specifications (8 pages) ,
- Quick start manual (2 pages) ,
- Operating instructions manual (38 pages)

Related Manuals for Sony UWP-D11


Summary of Contents for Sony UWP-D11
-
Page 1: Operating Instructions
4-530-735-12 (1) Wireless Microphone Package Operating Instructions Before operating the unit, please read this manual thoroughly and retain it for future reference. UWP-D11/D12/D16 © 2014 Sony Corporation... -
Page 2: Table Of Contents
Table of Contents Important Notes on Use......34 Usage and storage ........34 Cleaning............34 Configuration of the Packages ....3 Specifications ..........34 UWP-D11 ............. 3 Transmitter (UTX-B03/M03/P03)....34 UWP-D12 ............. 4 Tuner............36 UWP-D16 ............. 5 Models available separately......6 Features ............7... -
Page 3: Configuration Of The Packages
Configuration of the Packages This manual is for the UWP-D11/D12/D16 Wireless Microphone Packages. The contents of each package are described below. Note Some of the packages may not be available in certain countries or areas. For details, consult your Sony dealer. -
Page 4: Uwp-D12
UWP-D12 The package consists of a hand-held microphone (UTX-M03), a portable diversity tuner (URX-P03), and their accessories. When used in conjunction with a compact camcorder, a mobile system for ENG (Electronic News Gathering) or EFP (Electronic Field Production) applications can be constructed. Hand-held microphone Portable diversity tuner (UTX-M03) (1) -
Page 5: Uwp-D16
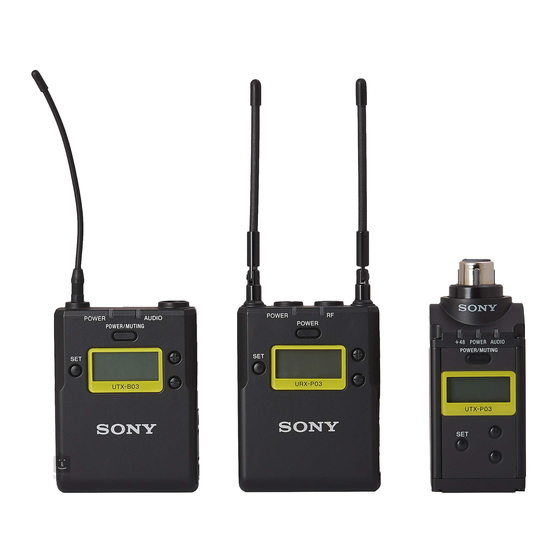
UWP-D16 The UWP-D16 consists of a plug-on transmitter (UTX-P03), a body-pack transmitter (UTX-B03), a portable diversity tuner (URX-P03), and their accessories. When used in conjunction with a compact camcorder, a mobile system for ENG (Electronic News Gathering) or EFP (Electronic Field Production) applications can be constructed. Note The UWP-D16 model is not available in China. -
Page 6: Models Available Separately
Models available separately The transmitter and tuner in each package are available for purchase separately. The components provided with each product are given below. UTX-B03 • Body-pack transmitter (UTX-B03) (1) • Omni-directional lavalier microphone (1) • Wind screen (1) • Holder clip (1) •... -
Page 7: Features
(HXR-NX3, etc.). It also features a Clear Channel Scan quality sound using digital compander processing. They function to search for available channels automatically. can be used in combination with current Sony analog wireless microphone systems (UWP series, WRT series, WRR series, WRU series) by switching the compander UWP-D16 mode. -
Page 8: Name And Function Of Parts
Notes Name and Function of • When the audio input level is set to MIC, a voltage for Parts the lavalier microphone power supply is applied to the audio input connector. Special electrical wiring is used inside the audio input connector for this purpose. •... -
Page 9: Hand-Held Microphone (Utx-M03)
i Display section k Infrared detector Receives the frequency and compander mode set on the tuner. Hand-held microphone (UTX-M03) A RF transmission indicator Displays the current transmission status. : Transmitting – : Transmission stopped B RF transmission power indicator Indicates the current transmission power setting. You can change the setting with the RF transmission power setting function. - Page 10 c POWER/MUTING button E Battery level indicator Turns the power on/off. You also use this button to turn Displays the battery level. the muting function on/off. For details, see “Battery level indicator” (page 15). Function Operation Supply ON Press button for one second or longer F Menu display section Supply OFF Press button until the indicator turns...
-
Page 11: Plug-On Transmitter (Utx-P03)
Flashing (orange): Audio is muted (i.e., disabled). Plug-on transmitter (UTX-P03) e POWER/MUTING button Turns the power on/off. You also use this button to turn Front the muting function on/off. Function Operation Supply ON Press button for one second or longer Supply OFF Press button until the indicator turns Muting ON... -
Page 12: Portable Diversity Tuner (Urx-P03)
G Menu display section Portable diversity tuner (URX-P03) Displays various functions. Press the + or – button to switch functions. Front For details, see “Configuration menu” (page 23). g + or – button Selects functions or values shown on the display. h SET button Adjusts displayed function settings and enters the displayed value. - Page 13 d RF (radio frequency input) indicator i SET button Displays the RF input level using the following colors. Adjusts displayed function settings and enters the On (green): Input level is 25 dBμ or more. displayed value. On (red): Input level is 15 to 25 dBμ. Holding down the SET button while turning on the power Off: Input level is 15 dBμ...
-
Page 14: Power Supply
Inserting the batteries Power Supply Notes This section describes the power supply of each device • Always use sets of the same type of battery. Do not use and the charging of nickel metal hydride batteries. batteries of different types or batteries with different charge level together. -
Page 15: Supplying Power From A Usb Connector
• When BATTERY is set to TYPE1, the battery level is the power off. indicated based on the use of new LR6 (size AA) Sony alkaline batteries. The battery level may not be Turn the grip in the direction of the arrow, and pull... -
Page 16: Charging Nickel Metal Hydride Batteries
Charging nickel metal hydride Attaching Accessories batteries You can charge nickel metal hydride batteries inserted in This section describes how to attach the supplied the transmitter (UTX-B03/M03/P03) and tuner accessories to each device. (URX-P03). When charging nickel metal hydride batteries, turn the Attaching accessories to the body- power off and connect a commercially available USB- output type AC adapter or portable power supply to the... -
Page 17: Attaching Accessories To The Hand-Held Microphone (Utx-M03)
Attaching the wind screen to the Attaching accessories to the hand- microphone held microphone (UTX-M03) Attaching the microphone holder Align and insert the microphone into the hole in the wind screen. Insert the base of the Attaching a belt clip microphone into the holder. -
Page 18: Attaching Accessories To The Portable Diversity Tuner (Urx-P03)
Disconnecting a microphone or cable Attaching the shoe mount adapter Attach the belt clip before attaching the shoe mount Microphone or adapter (page 17). cable connector Note Release button Attach belt clips upside-down if planning to attach the shoe mount adapter. Press the release button and pull the microphone or cable out slowly. -
Page 19: Operation
Place the infrared transmitter port on the tuner near Operation the infrared detector on the transmitter. Information about the channel set on the tuner is sent to the transmitter, and a prompt appears on the Procedure for UWP-D series devices (UTX-B03/ transmitter display asking if you want to change to M03/P03 and URX-P03) that frequency. -
Page 20: Tuner Settings
• When operating two or more UWP-D series packages Tuner Settings simultaneously with different channel groups, make sure that they are at least 100 meters (330 feet) apart if they are used within clear sight of each other (actual distance may vary depending on the circumstances). Menu structure and operation Procedure for portable diversity tuner (URX-P03) There are two menu display modes that can be selected... -
Page 21: Setting The Receive Channel
Basic menu operation Use the + or – button to select the desired group name, then press the SET button. The basic menu operation is the same in simple mode and extended mode. The channel group is set, and the channel number display starts flashing. -
Page 22: Searching For Active Channels Within A Group (Active Channel Scan)
Press and hold the SET button for one second or longer. Press and hold until the channel group and “+” display starts flashing. Press the + button. The tuner starts to scan through the selected channel group. When available channels are found, the first channel number among the available channels starts flashing on the display. -
Page 23: Configuration Menu
Configuration menu Note The monitor output level does not change when you Procedure for portable diversity tuner (URX-P03) change the output level in the OUT LEVEL menu. The This section describes each function and configurable monitor output level is adjusted separately. items. - Page 24 • When power from the preferred source is cut off, the (size AA) batteries. Indicates the battery level based on power supply automatically switches to the other the characteristics of new Sony alkaline LR6 (size AA) source. batteries. • When only one power supply is available, that power...
-
Page 25: Transmitter Settings
Setting the display contrast (CONTRAST) Transmitter Settings You can adjust the contrast of text and icons on the display in the range 1 to 10. The configurable values are given below. (Light) 1 2 3 4 5 6 7 8 9 10 (Dark) Menu structure and operation Note Procedure for all transmitters (UTX-B03/M03/... -
Page 26: Setting The Transmit Channel
• IN LEVEL (audio input level) select (UTX-B03/P03 Press the + or – button to display the function to be only) set. • +48V (+48 V supply) setting (UTX-P03 only) • TIME (accumulated running time) display Press and hold the SET button until the setting starts •... -
Page 27: Configuration Menu
Use the + or – button to select the desired channel Note number, then press the SET button. This function can be modified in transmission stopped The displays stops flashing and the desired channel is mode only. set. Adjusting the audio input attenuation Notes level (ATT) •... - Page 28 POWER/MUTING button. (size AA) batteries. Indicates the battery level based on To release the lock state the characteristics of new Sony alkaline LR6 (size AA) To release the lock state, either set the PWR LOCK menu batteries. to UNLOCK or use the following procedure.
- Page 29 Setting the display contrast (CONTRAST) You can adjust the contrast of text and icons on the display in the range 1 to 10. The configurable values are given below. (Light) 1 2 3 4 5 6 7 8 9 10 (Dark) Note This function is displayed in extended mode only.
-
Page 30: System Configuration Examples
System Configuration Examples The following are configuration examples for use with UWP-D series devices. Sample configuration for ENG (Electronic News Gathering) or EFP (Electronic Field Production) with a camcorder Portable diversity tuner (URX-P03) (with shoe mount adapter attached) Hand-held Body-pack microphone transmitter (UTX-M03) -
Page 31: Error Messages
Meaning Solution EEP ERROR An error has occurred in the backup memory data. Contact your point of purchase or Sony service representative. PLL ERROR An error occurred in the PLL synthesizer circuit. Restart the unit. If the message persists, contact your point of purchase or Sony service representative. -
Page 32: Troubleshooting
Troubleshooting If you have any problem, use the following checklist before asking for repairs. If the problem persists, contact your point of purchase or Sony service representative. Symptom Cause Solution The unit does not turn The 3 and # polarity orientation of the batteries is Insert the batteries with the correct polarity incorrect. - Page 33 Symptom Cause Solution There is sound The channel setting on the transmitter is different Use the same channel setting on both the interruption or noise. from that on the tuner. transmitter and tuner. Two or more transmitters are set to the same Two or more transmitters cannot be used on the channel.
-
Page 34: Important Notes On Use
• To avoid degradation of the signal to noise ratio, do not ANY OTHER REASON WHATSOEVER. use UWP-D devices in noisy places or in locations • SONY WILL NOT BE LIABLE FOR CLAIMS OF subject to vibration, such as the following: ANY KIND MADE BY USERS OF THIS UNIT OR –... - Page 35 0 dB to 27 dB (3 dB steps) Korea) Indicators AUDIO, POWER/MUTING Frequency response Battery life (measured with two Sony LR6/AA size 70 Hz to 18 kHz alkaline batteries at 25 °C (77 °F)) Attenuation 0 dB to 21 dB (3 dB steps) Approx.
-
Page 36: Tuner
AF/PEAK, POWER/MUTING, +48V –60 dBV Battery life Approx. 6 hours (measured with two Audio output connector Sony LR6/AA size alkaline batteries 3.5 mm diameter mini jack at 25 °C (77 °F)) Headphone output level 5 mW (16 Ω) Reception method... - Page 37 Supply voltage 3.0 V DC (two LR6/AA size alkaline batteries) 5.0 V DC (supplied from USB connector) Battery life Approx. 6 hours (measured with two Sony LR6/AA size alkaline batteries at 25 °C (77 °F)) Dimensions 63 × 82 × 23.8 mm × 3 ×...
- Page 38 Sony Corporation...