
Related Manuals for Kenwood KDBU 170


Summary of Contents for Kenwood KDBU 170
-
Page 1: Double Oven
BUILT UNDER DOUBLE OVEN KDBU 170 model Instructions for use - Installation advice Before operating this oven, please read these instructions carefully... -
Page 3: Table Of Contents
CONTENTS Page Number Introduction ..................4 - 5 Important Safeguards & Recommendations ......... 6 - 7 Control Panel ..................How to use the conventional top oven ..........9 - 11 How to use the multifunction bottom main oven ........12 - 16 Digital electronic programmer (main oven only) ........ -
Page 4: Introduction
Dear Customer, Thank you for having purchased and given your preference to our product. The safety precautions and recommendations within this booklet are for your own safety and that of others. They will also provide a means by which to make full use of the features offered by your appliance. - Page 5 DECLARATION OF CE CONFORMITY This built under double oven has been designed, constructed, and marketed in compliance with: • Safety requirements of the “Low voltage” Directive 2006/95/EC; • Safety requirements of the “EMC” Directive 2004/108/EC; • Requirements of EU Directive 93/68/EEC. IMPORTANT INFORMATION FOR CORRECT DISPOSAL OF THE PRODUCT IN AC- CORDANCE WITH EC DIRECTIVE 2002/96/EC.
-
Page 6: Important Safeguards & Recommendations
IMPORTANT PRECAUTIONS AND RECOMMENDATIONS After having unpacked the appliance, check to ensure that it is not damaged and that the oven door closes correctly. In case of doubt, do not use it and consult your supplier or a professionally qualified technician. Packing elements (i.e. - Page 7 • Do not hang towels, dishcloths or other items on the double oven or its handles – as this could be a fire hazard. • Clean the ovens regularly and do not allow fat or oils to build up in the oven base or trays.
-
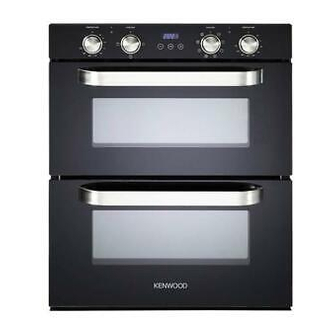
Page 8: Control Panel
1 - CONTROL PANEL Fig. 1.1 CONTROLS DESCRIPTION Oven temperature knob (Top oven) Function selector knob (Top oven) Digital electronic programmer (Main oven only) Function selector knob (Main oven) Oven temperature knob (Main oven) Main oven temperature indicator light Top oven temperature indicator light NB: Your appliance has been fitted with a cooling fan to achieve optimum efficiency of the controls and to ensure lower surface temperatures are maintained. -
Page 9: How To Use The Conventional Top Oven
2 - HOW TO USE THE CONVENTIONAL TOP OVEN WARNING: The door is hot, use the handle. Attention: The oven door becomes very hot during operation. During use the appliance becomes hot. Keep children away. Care should be taken to avoid touching heating elements inside the oven. - Page 10 THERMOSTAT KNOB (fig. 2.1) To turn on the heating elements of the oven, set function selector knob to the required po- sition and the thermostat knob to the desired temperature. To set the temperature, turn the thermostat control knob indicator mark to the required temperature.
- Page 11 USE OF THE GRILL Leave to warm up for approximately 5 minutes with the door closed. Place the food inside positioning the rack as near as possible to the grill. Insert the drip pan under the rack to collect the cooking juices. Grilling with the oven door closed.
-
Page 12: How To Use The Multifunction Bottom Main Oven
3 - HOW TO USE THE MULTIFUNCTION BOTTOM MAIN OVEN WARNING: The door is hot, use the handle. Attention: The oven door becomes very hot during operation. During use the appliance becomes hot. Keep children away. Care should be taken to avoid touching heating elements inside the oven. -
Page 13: Thermostat Knob
Fig. 3.1 Fig. 3.2 THERMOSTAT KNOB To turn on the heating elements of the oven, set function selector knob to the required po- sition and the thermostat knob to the desired temperature. To set the temperature, turn the thermostat control knob indicator mark to the required temperature. - Page 14 GRILLING The infra-red heating element is switched on. The heat is diffused by radiation. Use with the oven door closed and the thermostat knob to position 225 °C for max 15 minutes, then to position 175 °C. For correct use see chapter “USE OF THE GRILL”. Recommended for: Intense grilling, browning, cooking au gratin and toasting etc.
-
Page 15: Cooking Advice
THAWING AND WARMING UP The upper element and the circular element connected in series, are switched on; also the fan is on. The heat is diffused by forced convection with the most heat being produced by the upper element. The temperature must be regulated between 50 and 140°C with the thermostat knob. Recommended for: To keep foods hot after cooking. - Page 16 SIMULTANEOUS COOKING OF DIFFERENT FOODS The MULTI-FUNCTION oven set on position gives simultaneous heteroge- neous cooking of different foods. Different foods such as fish, cake and meat can be coo- ked together without mixing the smells and flavours. This is possible since the fats and vapors are oxidized while passing through the electrical element and therefore are not deposited onto the foods.
-
Page 17: Digital Electronic Programmer (Main Oven Only)
4 - DIGITAL ELECTRONIC PROGRAMMER (MAIN OVEN ONLY) CLOCK and TIMER with “ TOUCH CONTROL” KEYS Keys: Touched simultaneously (for more than 2 seconds): • setting the clock; • setting the timer vo- lume touching once, along with the “MODE” key); •... -
Page 18: Using The Timer
“TOUCH-CONTROL” KEYS The “touch-control” keys shall be operated by the fingers (just by touching the key). When using touch controls it is best to use the ball of your finger rather than the tip. The keys are automatically deactivated: • 8 seconds after the last selection;... -
Page 19: Automatic Cooking
SETTING THE TIMER VOLUME You can select from three volume levels. • Touch the “ ” and “ ” keys simultaneously for more than 2 seconds. • Touch the “ MODE ” key; you can read on the display the current timer volume (“ton1”, “ton2”... -
Page 20: Cleaning And Maintenance
5 - CLEANING AND MAINTENANCE GENERAL ADVICE ENAMELLED PARTS • Before you begin cleaning, you must All the enamelled parts must be cleaned ensure that the appliance is switched with a sponge and soapy water or other off. non-abrasive products. Dry preferably with a microfibre or soft •... - Page 21 WIRE RACKS • Assemble the wire racks to the oven walls using the 2 screws (Fig.5.1a - 5.1b). • Slide into the guides, the shelf and the tray (fig. 5.2a - 5.2b). The shelf must be fitted so that the safety catch, which stops it sliding out, faces the inside of the oven.
- Page 22 INSIDE OF OVEN The oven should always be cleaned after use when it has cooled down. The cavity should be cleaned using a mild detergent solution and warm water. Suitable proprietary chemical cleaners may be used after first consulting with the manufac- turers recommendations and testing a small sample of the oven cavity.
- Page 23 REMOVING THE OVEN DOORS The oven doors can easily be removed as follows: • Open the door to the full extent (fig. 5.4a). • Open the lever “A” completely on the left and right hinges (fig. 5.4b). • Hold the door as shown in fig. 5.4. Fig.
- Page 24 TOP AND LOWER OVEN DOOR REMOVABLE INNER PANE GLASS Cleaning the panes of glass The oven door is fitted with no. 2 panes: • no. 1 outside; • no. 1 inner; To clean the panes on both sides it is neces- sary to remove the inner pane as follows.
- Page 25 Replacing the inner pane of glass Make sure the door is locked open (see fig. 5.5c). Replace the inner pane: • Check that the four rubber pads are in place (“D” in Fig. 5.6a). • Check that you are holding the pane the correct way.
-
Page 26: Advice For The Installer
Advice for the installer IMPORTANT • The appliance is designed and approved for domestic use only and should not be installed in a commercial, semi commercial or communal environment. Your product will not be guaranteed if installed in any of the above environments and could affect any third party or public liability insurances you may have. -
Page 27: Installation
6 - INSTALLATION IMPORTANT • The appliance should be installed by a QUALIFIED INSTALLATION TECHNICIAN. The appliance must be installed in compliance with regulations in force. The built under double oven shall be fitted under the working surface into a kitchen base unit (width and depth 60 cm) but you must ensure that it is properly ventilated. - Page 28 INSTALLATION “A” BETWEEN EXISTING INSTALLATION “A” SIDE CABINETS (560 or 600 mm GAP) 560 mm Gap (figs. 6.1a, 6.1b, 6.2a, 6.2c) • Mount the 2 (two) metal supports “B” (sup- plied with the appliance in a separate kit) as indicated in Figs. 6.1b or 6.2c. •...
- Page 29 INSTALLATION “A” INSTALLATION “B” 600 mm Gap Pre existing 600 mm cabinetry Fig. 6.2a Fig. 6.2b (*) Measure calculated from the underneath of the worktop to the top support base of the “B” supports. WARNING ! VERY IMPORTANT The underside of the cabinet shall be opened to allow correct air...
- Page 30 INSTALLATION “C” BY USING HOUSING UNIT (figs. 6.3a, 6.3b, 6.3c) • Remove the single oven shelf, if fitted, as indicated in figure 6.3a. • Remove the upper cross member support as indicated in figure 6.3b. • Cut the bottom of the housing as indicated in figure 6.3b. •...
- Page 31 INSTALLATION “C” (*) Measure calculated from the underneath of the worktop to the top support base of the “B” supports. Cabinet for installing the oven Remove single oven shelf, if fitted. Support base Fig. 6.3a Fig. 6.3b Fig. 6.3c...
- Page 32 FIXING THE DOUBLE OVEN The double oven should then be secured by 6 screws (not supplied) fitted into the holes provided at the sides of the oven (Fig. 6.4). If you open the oven doors, you will see some screw holes. Remember the housing should not be free standing but be secured to the wall and/or adja- cent fittings.
- Page 33 IMPORTANT: To avoid damage to the lower trim please note the following instructions. The lower trim is designed to allow for good air circulation and the correct opening of the oven door. To ensure the trim is not damaged due to the appliance being placed on the floor, the ap- pliance should be suitably supported as in below illustrations.
-
Page 34: Electrical Installation
7 - ELECTRICAL INSTALLATION GENERAL IMPORTANT: The double oven must be • The connection to the electrical net- installed in accordance with the manu- work must be carried out by qualified facturer’s instructions. personnel and must be according to Incorrect installation, for which the existing norms. - Page 35 CONNECTING THE DOUBLE OVEN MAINS CABLE Important! This oven must be connected to the mains power supply only by a suitably qualified person. • Unscrew the screws “A” securing the cover plate “B” behind the oven (fig. 7.1). • Remove the cover plate “B”. •...
-
Page 36: Guarantee
8 - GUARANTEE Your new “KENWOOD” product comes with 12-month guarantee covering all parts and labour. If your appliance proves to be defective as a result of faulty materials or workmanship during the guarantee period, these parts will be repaired or replaced free of charge. - Page 39 Descriptions and illustrations in this booklet are given as simply indicative. The manufacturer reserves the right, considering the characteristics of the models described here, at any time and without notice, to make eventual necessary modifications for their construction or for commercial needs.
- Page 40 Code: 1104093 - ß2...