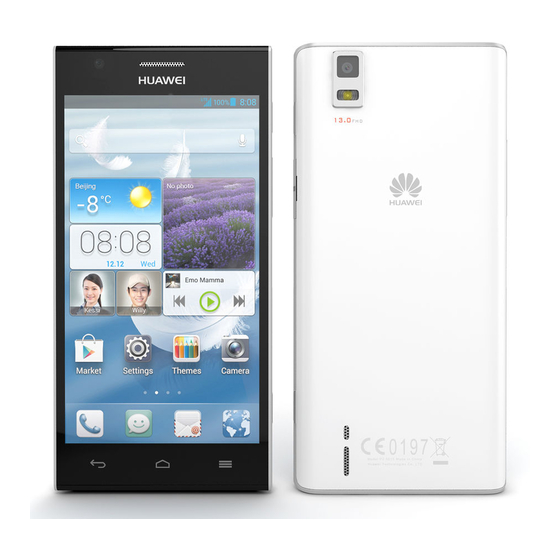
Huawei Ascend P2 User Manual
Mobile phones
Hide thumbs
Also See for Ascend P2:
- Quick start manual (108 pages) ,
- User manual (162 pages) ,
- Quick start manual (2 pages)
Table of Contents
Advertisement
Quick Links
Advertisement
Table of Contents

Related Manuals for Huawei Ascend P2


Summary of Contents for Huawei Ascend P2
- Page 1 HUAWEI User Guide...
-
Page 2: Table Of Contents
Contents Foreword ..................1 Safety precautions ................2 Preparations ..................3 Your phone at a glance Inserting a micro-SIM card Charging the battery Powering your phone on and off Setting up your phone for the first time Getting started ................. 7 Gestures Locking and unlocking the screen Getting to know your home screen... - Page 3 Making a conference call Answering a third-party call Making emergency calls Other call services People .................... 30 Creating a contact Searching for a contact Copying contacts Importing or exporting contacts Adding a contact to your favorites Deleting a contact Joining or splitting contacts Sharing contacts Contact groups Messaging ..................
- Page 4 Music Internet connection ................. 52 Mobile data connection Setting up a Wi-Fi connection Wi-Fi Direct Sharing your phone's mobile data connection Controlling your data usage Sharing data ................... 58 Bluetooth DLNA Android Beam Connecting your phone to a computer Connecting your phone to a USB storage device File Manager ...................
- Page 5 Play Store Basic utilities .................. 74 Calendar Clock Calculator Notes Weather FM radio Accounts and sync ................80 Adding an account Deleting an account Turning on data synchronization Modifying account synchronization settings Settings ..................82 Turning on or off airplane mode Tone settings Display settings Turning on the power manager...
-
Page 6: Foreword
Foreword Thank you for choosing the HUAWEI Ascend P2 smartphone. This guide introduces you to the features and functions of your new phone. Please read it carefully before you start using the phone. All pictures and illustrations in this document are for your reference only. The actual product may vary. -
Page 7: Safety Precautions
Safety precautions Please read these safety precautions carefully before operating your phone. Do not crush, throw, or puncture your phone. Avoid dropping, squeezing, or bending it also. Your phone is not meant for use in a damp environment, such as the bathroom. -
Page 8: Preparations
Preparations Your phone at a glance ............................— Headset jack Status indicator Front camera Volume button Screen Buttons Micro-SIM card slot Camera button Proximity sensor Power button Noise reduction Earpiece microphone Micro USB port Rear camera... -
Page 9: Inserting A Micro-Sim Card
Preparations Flashlight Speaker Microphone Buttons •When your phone is powered off, press and hold to power it •From any screens, press to turn on or off the screen. When the screen is turned on, press and hold to display an option menu. -
Page 10: Charging The Battery
Preparations The dimensions of a standard micro-SIM card are 15 mm x 12 mm (0.59 in. x 0.47 in.). Refer to the following figure to install a micro-SIM card. Charging the battery ............................Your phone's built-in battery is not user-removable. To replace the battery, contact an authorized service center. -
Page 11: Powering Your Phone On And Off
Preparations • Steady yellow (when charging): The battery level is higher than 10%. • Steady green (when charging): The battery is almost or already full. Important information about the battery • If the battery power is depleted, you may not be able to power on your phone immediately after you begin charging the battery. -
Page 12: Getting Started
Getting started Gestures ............................Touch: Tap an item once. For example, touch to select an item or open an application. Touch and hold: Touch and leave your finger on the screen for 2 seconds or more. For example, touch and hold an application, widget, or blank area to display the related option menu. -
Page 13: Getting To Know Your Home Screen
Getting started You can lock and unlock your screen in a number of ways. The pre-installed screen unlock method is used as an example in this section. Locking the screen • Press to lock the screen. • After being idle for a specified period of time, your phone automatically locks its screen. -
Page 14: Status Icons
Getting started Status bar: displays notifications and icons. Flick down from the status bar to open the notification panel. Display area: displays application icons, folders, and widgets. Screen position indicator: shows the current screen's position. Dock: displays your most common applications. Status icons Signal strength No signal... -
Page 15: Switching Between Home Screens
Getting started Airplane mode enabled Bluetooth on Receiving location data Vibration mode enabled from GPS Silence mode enabled Alarms enabled Charging Battery full Battery low Call in progress Missed calls New messages New emails New voicemail Select input method Wi-Fi network available Connected to a Wi-Fi Uploading data network... -
Page 16: Taking A Screenshot
Getting started • Flick left and right across the screen to switch between the home screens. • Pinch two fingers together to display the home screen thumbnails. Touch a thumbnail to enter that particular home screen. Taking a screenshot Want to share an interesting scene in a movie or show off your new high score in a game? Take a screenshot and share away. -
Page 17: Using The Notification Panel
Getting started To quickly turn the auto-rotate screen function on or off, flick down from the status bar to open the notification panel and touch Using the notification panel ............................Flick down from the status bar to open the notification panel. Touch to display the settings screen. -
Page 18: Accessing Applications
Then touch the All tab. Under PERSONAL, touch Language & input > Default to select an input method. Huawei input method Slide your finger left or right across the onscreen keyboard to switch between the QWERTY and 9-key keyboards. -
Page 19: Android Input Method
Getting started Touch to switch between lowercase letters, uppercase letters, and caps lock. *#12 Touch to enter numbers and symbols. Touch to enter emoticons. Touch to switch between QWERTY, 9-key, and other input modes. Android input method •Touch to switch between lowercase and uppercase letters. •Quickly touch twice to turn on caps lock. -
Page 20: Editing Text
Getting started •Touch to switch to voice input. •Touch and hold to open the Input options menu. •Touch to enter a space. •Touch and hold to choose another input method. •Touch to enter a period. •Touch and hold to enter symbols. •Touch to delete the character to the left of the cursor. -
Page 21: Configuring An Input Method
Getting started Configuring an input method On the home screen, touch then the All tab. 2. Under PERSONAL, touch Language & input. 3. Under Keyboard & input methods, touch the input method you wish to configure. -
Page 22: Personalizing Your Phone
Personalizing your phone Setting the theme ............................Your phone comes with a variety of themes. Changing the theme On the home screen, touch 2. Select a theme and touch APPLY to apply it. Customizing a theme From the theme grid, touch CUSTOMIZE CURRENT THEME. 2. -
Page 23: Organizing Home Screen Widgets And Application Icons
Personalizing your phone 3. Select a home screen transition effect. Organizing home screen widgets and application icons ............................Adding a widget to the home screen On the home screen, touch and hold a blank area to display the Set home screen dialog box. -
Page 24: Customizing Me Widget
Personalizing your phone Removing an item from a folder On the home screen, touch a folder. 2. Drag an item out from the folder to remove the item. A folder must contain at least two items; otherwise, the folder will automatically disappear. Customizing Me Widget ............................ -
Page 25: Customizing Your Home Screens
Personalizing your phone enough space for a new widget unit, delete some existing ones first. 4. When you are done, touch Moving a widget unit Before you move a widget unit, make sure there is enough space to hold it in the new position. -
Page 26: Customizing Switch Shortcuts On The Notification Panel
Personalizing your phone 3. Touch to delete a home screen. Customizing switch shortcuts on the notification panel ............................You can rearrange your switch shortcuts and move those you use most to top the list. Shortcuts on the top will be fully displayed on the notification panel. Flick down from the status bar to open the notification panel. -
Page 27: Setting Tones
Personalizing your phone 3. Select the profiles you wish to delete. 4. Touch DELETE. 5. Touch OK. Preset profiles cannot be deleted. Setting tones ............................Setting the ringtone On the home screen, touch then the All tab. 2. Under DEVICE, touch Sound. 3. -
Page 28: Setting The Screen Unlock Method
Personalizing your phone Setting the screen unlock method ............................Face unlock Enable your data service before using face unlock for the first time. On the home screen, touch then the All tab. 2. Under PERSONAL, touch Security. 3. Touch Screen lock > Face Unlock. 4. -
Page 29: Adjusting The Screen Brightness
Personalizing your phone Unlocking the screen with a password On the home screen, touch then the All tab. 2. Under PERSONAL, touch Security. 3. Touch Screen lock > Password. 4. Follow the onscreen instructions to set a screen unlock password. 5. -
Page 30: Calls
Calls Smart dialing ............................In addition to standard call procedures, smart dialing lets you quickly find contacts by entering parts of their names or numbers. On the home screen, touch 2. Enter a phone number or the initials or first several letters of a contact name. Matching contacts in your phone and phone numbers in your call log are then displayed in a list. -
Page 31: Viewing The Call Log
Calls Viewing the call log ............................On the home screen, touch to display your recent calls above the dialer. 2. Touch > Missed calls to view your missed calls. What you can do during a call ............................Touch > to place the current call on hold, and touch again to resume the call. -
Page 32: Making A Conference Call
Calls Touch > to display a note. Touch > to display the contact list. To return to the call screen, flick down from the status bar to open the notification panel, and touch Current call. Making a conference call ............................Conference calling with your friends, family, and co-workers is easy. -
Page 33: Other Call Services
Calls 2. Enter your local emergency number and touch Emergency calls are subject to cellular network quality, use environment, service provider policies, and local laws and regulations. Never rely solely on your phone for critical communications when emergencies occur. Other call services ............................ - Page 34 Calls On the home screen, touch then the All tab. 2. Under APPS, touch Call. 3. Touch Voicemail > Voicemail settings > Voicemail number. 4. Enter your voicemail number, and touch OK. To listen to your voicemail messages, touch and hold the 1 key on the dialer and follow the voice instructions.
-
Page 35: People
People Forget about lugging around business card holders. With your phone, you can easily store and manage your contacts in your new phone. Creating a contact ............................On the home screen, touch then the Contacts tab. 2. Touch 3. Select an account you wish to use. 4. -
Page 36: Importing Or Exporting Contacts
People Importing or exporting contacts ............................Your phone supports contact files in .vcf format only. This is a standard format for files storing contacts. Contact names, addresses, phone numbers, and other information can be saved in .vcf files. Importing contacts from a storage device You can import contacts saved in a .vcf file from a storage device to your phone. -
Page 37: Adding A Contact To Your Favorites
People Adding a contact to your favorites ............................On the home screen, touch then the Favorites tab. 2. Touch 3. Touch the contact you wish to add to favorites or touch Select all to select all contacts. 4. Touch Add. Deleting a contact ............................ -
Page 38: Sharing Contacts
People 2. Select the contact you wish to split. 3. Touch Manage joined contacts to display the Joined contacts screen. 4. Touch to the right of the contact to split it. Sharing contacts ............................You can share contacts in .vcf format in many ways. On the home screen, touch then the Contacts tab. -
Page 39: Deleting A Contact Group
People Sending messages or emails to a contact group On the home screen, touch then the Groups tab. 2. Touch and hold the contact group you wish to send a message or email to. 3. From the displayed option menu, choose Send message or Send Mail. You can also open the contact group and touch to send a message or to send an email. -
Page 40: Messaging
Messaging Sending a text message ............................On the home screen, touch 2. In the list of message threads, touch 3. Touch the recipient text box and enter the contact name or phone number. Touch to select more contacts. 4. Write your message. 5. -
Page 41: Searching For A Message
Messaging 3. Touch the text field to write your reply. 4. When you are done, touch Searching for a message ............................On the home screen, touch 2. In the list of message threads, touch 3. Enter the message or contact, or parts of them. Your phone then displays matching results. -
Page 42: Modifying Message Settings
Messaging Locking a message You can lock important messages to avoid deleting them by mistake. Deleting a thread does not remove the locked messages in it. On the home screen, touch 2. In the list of message threads, touch a contact name or phone number to view the conversation thread. -
Page 43: Browser
Browser Your phone's browser lets you surf the web and stay on the ball with up-to-date news and information. Staying connected has never been easier. Browsing web pages ............................On the home screen, touch 2. Enter a website address in the address box. Your phone displays matching websites as you type. -
Page 44: Setting The Home Page
Browser 4. Touch and hold the bookmark you wish to edit. 5. From the displayed option menu, choose Edit bookmark. 6. Edit the bookmark, for example, rename it. 7. Touch OK. Setting the home page ............................Set your favorite web page as your browser's home page to make life a little easier. -
Page 45: Email
Email Don't want to miss important emails from your friends or clients during your business trip? Use your phone to read and reply to emails when you are on the Adding a POP3 or IMAP email account ............................Certain parameters must be set when you add a POP3 or IMAP email account. For details, contact your email service provider. -
Page 46: Switching Between Email Accounts
Email Switching between email accounts ............................On the home screen, touch 2. Touch the email address on the top to display your email account list. 3. Touch an email account you wish to use. Sending emails ............................On the home screen, touch 2. -
Page 47: Removing An Email Account
Email Removing an email account ............................After you delete an email account, your phone will no longer send or receive emails using that account. On the home screen, touch 2. On the Inbox screen, touch 3. Touch Settings. 4. Select the account you wish to delete. 5. -
Page 48: Multimedia
Multimedia Camera ............................As time flies by, there must be some memories you wish to keep forever. Camera is a great tool for this. It supports a variety of capture modes, such as group, panoramic, and smile. Photo taking screen •Drag the slider to to switch to photo mode. -
Page 49: Taking A Photo
Multimedia Drag to display an option menu, from which you can: •Touch to select a capture mode. •Touch to select a filter. •Touch to select a special effect. •Touch to set the capture scenario, white balance, ISO, and more. Touch to switch between the rear and front cameras. -
Page 50: Taking A Group Picture
Multimedia 2. Drag to open the settings menu. Then, touch > Panorama. 3. Frame the scene you wish to capture. 4. Tap 5. Move your phone slowly to capture the view along the direction indicated by the arrow and allow the phone to capture multiple photos. If the viewfinder screen turns red, the view will not be captured. -
Page 51: Gallery
Multimedia 2. Drag to open the settings menu. Then, touch > Beauty. 3. Frame the scene you wish to capture. The camera will identify a face and automatically focus on it. 4. Tap Using HDR High dynamic range (HDR) imaging technology improves the details in the lightest and darkest areas of photos to present more life-like qualities. -
Page 52: Editing A Photo
Multimedia Editing a photo You can remove red eye, crop a photo, or apply a number of effects to make your photos even more stunning. On the home screen, touch 2. Touch the photo you wish to edit. 3. Touch >... -
Page 53: Music
Multimedia 3. Touch 4. Touch OK. Sharing a photo or video Want to share your best shots or an amusing trick your dog just did? Simply share the photos and videos using email, Bluetooth, and more. On the home screen, touch 2. - Page 54 Multimedia 3. Touch the song you wish to play. Touch to enter the music library. Touch to enable or disable the Dolby sound. Touch to display the option menu from which you can perform additional operations. Touch to mark the current song as a favorite and add it to your favorites playlist.
-
Page 55: Creating A Playlist
Multimedia Creating a playlist Creating playlists lets you be creative with your songs, and organize them into groups. Play the list that fits your mood the most. On the home screen, touch 2. Touch Playlists > New playlist. 3. Touch the text box to name the playlist. 4. - Page 56 Multimedia Setting a song as the ringtone Want to hear your favorite song whenever you receive an incoming call? Just make it your ringtone. On the home screen, touch 2. Choose a category. 3. Touch and hold the song you wish to set as the ringtone. 4.
-
Page 57: Internet Connection
Internet connection Mobile data connection ............................After you insert a SIM card into your phone and power it on for the first time, your phone automatically registers with your service provider's data service. Checking the network connection On the home screen, touch then the All tab. -
Page 58: Wi-Fi Direct
Internet connection 4. Choose the Wi-Fi network you wish to connect to and touch Connect. For an encrypted Wi-Fi network, enter the password when prompted. If Wi-Fi and mobile data are both enabled, your phone connects to the Wi- Fi network preferentially. When Wi-Fi becomes unavailable, your phone automatically switches to the mobile data connection. -
Page 59: Sharing Your Phone's Mobile Data Connection
Internet connection 2. Under WIRELESS & NETWORKS, touch the Wi-Fi switch to turn on Wi-Fi. 3. On the Wi-Fi network list, touch 4. Touch Wi-Fi direct. You phone then scans for available devices and displays them. 5. Select a device. Sending a file using a Wi-Fi network Touch and hold the file you wish to send. -
Page 60: Bluetooth Tethering
Internet connection 2. On the home screen, touch then the All tab. 3. Under WIRELESS & NETWORKS, touch More..4. Touch Tethering & portable hotspot. 5. Select the USB tethering check box to share your phone's data connection. You cannot use your phone's USB tethering function when the phone is in USB storage mode. -
Page 61: Controlling Your Data Usage
Internet connection 8. On the device you want to use, search for and connect to your phone's Wi-Fi network. To manage the devices allowed to connect to your phone, touch Manage allowed devices and clear Allow all devices to connect. To add an allowed device, touch Add device. - Page 62 Internet connection Turn the mobile data connection on or off. To configure data control and query data usage, the mobile data connection must be turned Turn the mobile data usage limit on or off. Set the data usage cycle. Touch Data usage cycle then Change cycle... to set the data usage cycle.
-
Page 63: Sharing Data
Sharing data Bluetooth ............................Your phone is Bluetooth-capable, allowing you to connect to other Bluetooth-enabled devices for wireless data transmission. When using Bluetooth, stay within 10 meters (33 feet) of other Bluetooth devices. Turning on Bluetooth On the home screen, touch then the All tab. -
Page 64: Dlna
Sharing data On the home screen, touch 2. Touch and hold the file you wish to send. 3. From the displayed option menu, choose Share > Bluetooth. 4. From the detected Bluetooth device list, select a device. Receiving files using Bluetooth When your phone receives a file transfer request, open the notification panel. -
Page 65: Connecting Your Phone To A Computer
Sharing data Turning on Android Beam On the home screen, touch then the ALL tab. 2. Under WIRELESS & NETWORKS, touch More..3. Select the NFC check box to turn on NFC. 4. Touch Android Beam then the Android Beam switch. Sharing a web page or contact Before you use Android Beam to share a web page or contact, make sure that both phones are not locked and that NFC and Android Beam are enabled. -
Page 66: Connecting Your Phone To A Usb Storage Device
Sharing data PTP mode The Picture Transfer Protocol (PTP) is another method to transfer pictures and videos to your computer. Use a USB cable to connect your phone to the computer. 2. On the phone home screen, flick down from the status bar to open the notification panel. - Page 67 Sharing data To connect your phone to another phone, make sure that the phone you wish to connect to supports the USB mass storage function and has a microSD card installed. To establish the connection and read data stored on the microSD card: Use a USB OTG cable and USB cable to connect the two phones.
-
Page 68: Searching For A File
File Manager File Manager helps you manage files and applications in your phone. You'll be able to view, create, edit, delete, move, archive, compress, and decompress files. Creating a folder ............................You can create folders to better manage the files and applications stored in your phone. -
Page 69: Compressing Or Decompressing Files
File Manager Compressing or decompressing files ............................You can compress files into .zip files to save space or decompress .zip and .rar files. On the home screen, touch 2. Touch and hold the file or folder you wish to compress. 3. -
Page 70: Checking The Memory Status
File Manager Checking the memory status ............................Before you save large files to your phone, make sure there is enough space first. On the home screen, touch 2. Touch > Storage. 3. On the Storage settings screen, view the total and available spaces of your phone. -
Page 71: Managing Applications
Managing applications Downloading applications ............................A rich selection of applications are available to download through an application store, such as Google's Play Store. You can also connect your phone to a computer and transfer applications over that way. Installing an application ............................ -
Page 72: Clearing The Application Cache
Managing applications On the home screen, touch then the All tab. 2. Under APPS, touch Manage apps. 3. Flick to ALL. 4. Select the application you wish to uninstall. 5. Touch Uninstall > OK. Some pre-installed applications cannot be uninstalled. Clearing the application cache ............................ -
Page 73: Backup
Backup Backup lets you back up your important data and restore them after a system upgrade or reset. Backing up data to local storage ............................On the home screen, touch Mgmt. > then the Local tab. 2. Touch Back up to internal storage. 3. -
Page 74: Restoring Data From A Usb Storage Device
Backup 6. Touch OK. By default, backup files are saved to the HuaweiBackup folder in the USB storage device. Restoring data from a USB storage device ............................Connect a USB OTG cable to connect a USB storage device to your phone. 2. -
Page 75: Checking Your Emails
Google services To use Google services, sign in with a Google account. If you don't have one, open a Google application and follow the onscreen instructions to create your Google account. Google applications, services, and functions vary with country and service provider. -
Page 76: Talk
Google services Talk ............................Talk is an instant chat application provided by Google. With Talk, you can reach friends using messages, or voice and video chats. Adding a friend On the home screen, touch Google Apps > 2. Touch 3. Enter the email address of your friend. 4. -
Page 77: Youtube
Google services 4. Touch in the lower right corner of the keyboard. The search results are marked on the map by letters. 5. Touch a mark to see how to get there and view more details about the location. Checking how to get to a place When you browse a map, touch 2. -
Page 78: Play Store
Google services Play Store ............................Play Store is an application market provided by Google, where you can download applications and games. Installing an application On the home screen, touch 2. Find the desired application. 3. Follow the onscreen instructions to download and install it. Uninstalling an application On the home screen, touch 2. -
Page 79: Basic Utilities
Basic utilities Your phone comes with a variety of useful tools, such as Calendar, Clock, and Calculator, helping you keep yourself organized. Calendar ............................Calendar is your personal assistant that helps you manage, arrange, and keep track of all important events. Creating an event On the home screen, touch 2. -
Page 80: Clock
Basic utilities Synchronizing and viewing events Calendar events in your accounts (such as an email account) can be synchronized to and viewed on the Calendar application. On the home screen, touch 2. Touch > Calendars to display. 3. Select the account whose calendar you wish to display. 4. -
Page 81: Calculator
Basic utilities Configuring alarm settings On the home screen, touch 2. From the alarm list, touch > Settings. 3. On the alarm settings screen, set the ringing mode, snooze duration, and more. Calculator ............................Calculator lets you make make simple or complex calculations. On the home screen, touch Tools >... -
Page 82: Deleting A City
Basic utilities 2. Touch > Apart from your current city, you can add up to nine cities. 3. Enter a city name. Matching cities are then displayed. 4. Select the city you wish to add. Setting the default city On the home screen, touch Tools > 2. -
Page 83: Fm Radio
Basic utilities • Enter a phone number. • Touch to select a contact. 5. Touch to send the weather information to the recipient. FM radio ............................Want to listen to your favorite broadcast programs? Open FM Radio anytime anywhere you like. Connect a headset to the phone. - Page 84 Basic utilities Touch to enable or disable the speaker. Touch to display the station list.
-
Page 85: Accounts And Sync
Accounts and sync You can synchronize data on your phone, such as contacts, emails, and events, to and from the Internet. Adding an account ............................On the home screen, touch then the All tab. 2. Under ACCOUNTS, touch Add account. 3. -
Page 86: Modifying Account Synchronization Settings
Accounts and sync Modifying account synchronization settings ............................On the home screen, touch then the All tab. 2. Under ACCOUNTS, select an account type. 3. Select the account whose synchronization settings you wish to modify. 4. Under Sync settings, select the data you wish to synchronize. -
Page 87: Settings
Settings Turning on or off airplane mode ............................Your phone's signal reception or transmission may interfere with an airplane's flight system. Power off your phone or switch to airplane mode when you are on a flight. In airplane mode, your phone's wireless features are disabled, but you can still listen to music or play games. -
Page 88: Display Settings
Settings You can adjust the volume from the home screen or most applications, such as call, music, and video. Display settings ............................On the home screen, touch then the All tab. 2. Under DEVICE, touch Display. 3. On the settings screen, you can: •... -
Page 89: Setting The Date And Time
Settings • Touch Optimum performance to have your phone work in its best performance mode without any power saving operations. Setting the date and time ............................By default, your phone relies on the network-based date and time. You can also manually set the date and time. -
Page 90: Setting The Pin Of Your Sim Card
Settings On the home screen, touch then the All tab. 2. Under PERSONAL, touch Location access. 3. From the settings screen, you can: • Touch Access my location to enable your phone to use your location information. • Touch GPS satellites to have your phone obtain your location information from GPS satellites. -
Page 91: Online Update
Settings Back up important data on your phone before you restore factory settings. On the home screen, touch then the All tab. 2. Under PERSONAL, touch Backup & reset. 3. Tap Factory data reset > Reset phone > Reset phone. The phone will restore its factory settings and restart. -
Page 92: Faqs
FAQs http://www.huaweidevice.com/worldwide/ For more information, please visit faq.do?method=index&directoryId=50 How can I save battery power? • When you do not need Internet access, open the notification panel and touch to turn off your mobile data connection. • When you do not need wireless data services, such as GPS, Bluetooth, or Wi-Fi, open the notification panel, and touch , or to turn off these... - Page 93 FAQs How can I stop the song playing in the background? Open the notification panel, touch the playing song to display the music playback screen, and stop the playback. How can I return to the call screen? To return from another screen during a call, open the notification panel and touch the ongoing call.
-
Page 94: Legal Notice
The Bluetooth word mark and logos are registered trademarks owned by Bluetooth SIG, Inc. and any use of such marks by Huawei Technologies Co., Ltd. is under license. Other trademarks, product, service and company names mentioned may be the property of their respective owners. - Page 95 Huawei. To the greatest extent permitted by applicable law, it is explicitly stated that Huawei shall not compensate or be liable for services provided by third-party service providers, or the interruption or termination of third-party contents or services.
-
Page 96: Privacy Policy
Privacy Policy To better understand how we protect your personal information, please see the privacy policy at http://consumer.huawei.com/en/privacy-policy/index.htm. -
Page 97: Index
Index Accessibility Accessing a bookmark Accounts and sync Adding a bookmark Adding a city Adding a contact to your favorites Adding a home screen Adding a POP3 or IMAP email account Adding a profile Adding a widget to the home screen Adding a widget unit Adding an account Adding an alarm... - Page 98 Index Changing the system language Changing the theme Changing the wallpaper Charging the battery Checking the memory status Checking your emails Clearing the application cache Clearing your browsing history Compressing files Configuring alarm settings Configuring calendar settings Connecting to a Wi-Fi network Connecting to a Wi-Fi network using the WPS button Connecting to a Wi-Fi network using the WPS PIN Connecting two devices using Wi-Fi Direct...
- Page 99 FM radio Forwarding a message Gestures Getting to know your home screen HiSuite mode Huawei input method import regulations Important information about the battery Importing contacts from a Bluetooth device Importing contacts from a storage device Importing or exporting contacts...
- Page 100 Index Inserting a micro-SIM card Installing an application Joining contacts Listening to FM radio Listening to music Locking a message Locking the screen Making a conference call Making emergency calls Modifying browser settings Modifying email account settings Modifying location service settings Modifying message settings Moving a widget unit MTP mode...
- Page 101 Index Receiving a file using a Wi-Fi network Receiving files using Bluetooth Rejecting a call Rejecting a call using a text message Removing a widget unit Removing an email account Removing an item from a folder Renaming a file Replying to a message Restoring data from a USB storage device Restoring data from local storage Restoring to factory settings...
- Page 102 Index Sharing weather information Shooting a video Smart dialing Splitting contacts Starting applications and switching between them Status icons Switching between email accounts Switching between home screens Synchronizing and viewing calendar events Taking a beauty-mode photo Taking a group picture Taking a panoramic photo Taking a photo Taking a screenshot...
- Page 103 Index Viewing recently used applications Viewing the call log Weather What you can do during a call Wi-Fi hotspot...
- Page 104 All statements, information, and recommendations in this guide do not constitute a warranty of any kind, express or implied. Please visit www.huaweidevice.com/worldwide/support/hotline for recently updated hotline and email address in your country or region. Model:HUAWEI P2-6011 V100R001C00_01...