Advertisement
Table of Contents
- 1 Remote Controller
- 2 Table of Contents
- 3 Safety Precautions
- 4 Parts and Their Functions
- 5 Ventilation Operation
- 6 Setting the Current Day of the Week and Clock
- 7 Time
- 8 Correct Operating Procedures
- 9 Scheduled Operations
- 10 Error Displays
- 11 Timer Operations
- 12 Troubleshooting
- 13 Selecting the Remote Controller Functions
- Download this manual
Advertisement
Table of Contents

Related Manuals for Toshiba Carrier RBC-AMS41UL


Summary of Contents for Toshiba Carrier RBC-AMS41UL
-
Page 1: Remote Controller
REMOTE CONTROLLER FOR AIR CONDITIONER (SPLIT TYPE) Owner’s Manual Remote Controller Model name: Remote controller with weekly timer RBC-AMS41UL Owner’s Manual English Remote controller Manuel du proprietaire Français Télécommande... -
Page 2: Table Of Contents
Owner’s Manual Remote controller with weekly timer Contents 1 SAFETY PRECAUTIONS ....... . 3 2 PARTS AND THEIR FUNCTIONS . -
Page 3: Safety Precautions
Owner’s Manual Remote controller with weekly timer SAFETY PRECAUTIONS • Before use, read carefully through the “Safety Precautions” section to ensure correct operation. • The precautions described here are divided into two categories, WARNING and CAUTION. Both categories contain important safety-related information, and their directions must be followed without fail. - Page 4 Owner’s Manual Remote controller with weekly timer Operating precautions WARNING • Do not operate the buttons with wet hands. Failure to heed this warning may result in electric shocks and/or trouble. • Do not get the control unit wet. Take steps to avoid getting the control unit wet. Failure to heed this warning may result in electric shocks, a fire and/or trouble.
-
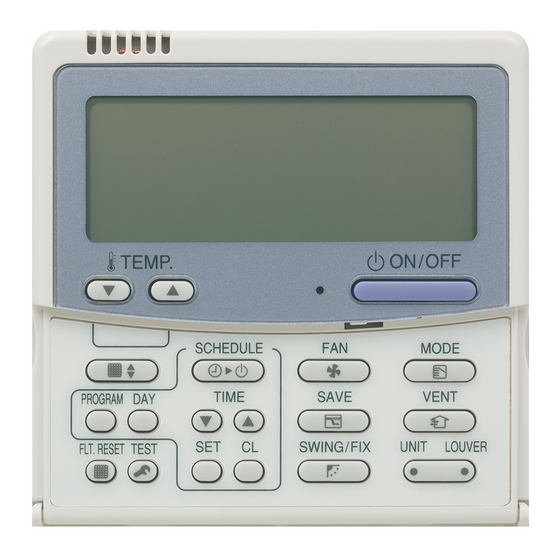
Page 5: Parts And Their Functions
Owner’s Manual Remote controller with weekly timer PARTS AND THEIR FUNCTIONS LCD area All displays are shown lighted only for the purposes of description. 2 3 4 5 7 8 9 10 21 20 19 18 17 16 Operation mode display No function The selected operation mode is displayed. -
Page 6: Ventilation Operation
Owner’s Manual Remote controller with weekly timer Save operation Days of the week display This appears while a save operation is being Special holiday set or executed. This appears for a day of the week which has Ventilation operation been set as a special holiday. This appears while the ventilation fan is Day arrow operating. - Page 7 Owner’s Manual Remote controller with weekly timer Button operation area SET button Use this when entering the settings of the program (for a scheduled operation or timer operation) which is being set. TEST button Use this for servicing. * This button is not normally used. FLT.RESET button Use this to reset (extinguish) the filter display.
-
Page 8: Setting The Current Day Of The Week And Clock
Owner’s Manual Remote controller with weekly timer SETTING THE CURRENT DAY OF THE WEEK AND CLOCK TIME • Set the current clock time and day of the Hold down the button week. (48) for at least 4 seconds. • The day of the week and clock settings can be performed whether the air •... -
Page 9: Correct Operating Procedures
Owner’s Manual Remote controller with weekly timer CORRECT OPERATING PROCEDURES Procedure for normal Starting operation operation Push the button (32) to start operation. The functions will differ depending on the • The ON lamp lights, and the operation model and system. details are displayed on the LCD screen. - Page 10 Owner’s Manual Remote controller with weekly timer Changing the air speed CAUTION Push the button (33), and select the desired air speed. • For cooling operations, set the • Each time the button is pushed, the air louvers to the horizontal blow-out speed display changes in the sequence position.
- Page 11 Owner’s Manual Remote controller with weekly timer Frost protection operation Stopping the louver swing motion (heating at 46°F (8°C)) While the louvers are swinging, push the button (39) when The functions will differ depending on the the louvers reach the desired model and system.
- Page 12 Owner’s Manual Remote controller with weekly timer Save operations Self-cleaning operations The functions will differ depending on the The functions will differ depending on the model and system. model and system. • During this operation, the maximum • When the air conditioner has stopped current is restricted.
- Page 13 Owner’s Manual Remote controller with weekly timer Grille operation procedure Push the button (32) to stop the up/down grille. The functions will differ depending on the • The up or down movement of the up/down model and system. grille now stops. * For further details, refer to the operating •...
-
Page 14: Scheduled Operations
Owner’s Manual Remote controller with weekly timer SCHEDULED OPERATIONS • Scheduled operations for a 1-week period in the example of the operation given above there is no need to input anything can be performed using this remote for the operation ON/OFF and controller. - Page 15 Owner’s Manual Remote controller with weekly timer Push the button (37). Operation mode Cooling • Each time the button is pushed, the (No display) number on the numeric display changes in the following sequence. • Stop pushing the button when the number Auto Heating to be programmed blinks on the display.
- Page 16 Owner’s Manual Remote controller with weekly timer Example of setting up an 5. Setting the save operation Each time the button (38) is pushed, the operation program numeric display and save operation display change in the following sequence. Stop Example of program input pushing the button when the desired save For program 01 for Wednesday, “7:00”, operation mode (mode 0 to 3) blinks on the...
- Page 17 Owner’s Manual Remote controller with weekly timer • Push the button (42), and enter the program number. • The numeric display stops blinking and lights up. • Finally, when the button (46) is pushed, goes off, and the SETTING original screen is restored. •...
-
Page 18: Error Displays
Owner’s Manual Remote controller with weekly timer Error displays • Display the number of the program to be checked, and check the program’s • Trouble may be to blame if the ERROR settings. * Unless the button (42) is pushed, the display remains lighted for 3 seconds key operations are canceled, in which while a scheduled operation is being... - Page 19 Owner’s Manual Remote controller with weekly timer Again push the button (45). Push the button (42). • Repeatedly push the button until the day • Enter the day of the week whose programs arrow moves to the copy destination day are to be cleared.
- Page 20 Owner’s Manual Remote controller with weekly timer Push the button (42). How to establish the special holiday setting • Enter the number of the program to be Push the button (46). cleared. • The display transfers to the program input •...
-
Page 21: Timer Operations
Owner’s Manual Remote controller with weekly timer TIMER OPERATIONS • Before this remote controller is shipped Push the TIME buttons from the factory, the schedule timer (40), and select the set time. operation function is set as an initial • Each time the button (40) is pushed, the set time is moved forward in half-hour setting (default), but the count-down timer... -
Page 22: Troubleshooting
Owner’s Manual Remote controller with weekly timer TROUBLESHOOTING Before requesting repair work Trouble diagnosis Check out the following points before Checks and inspections requesting repair work. • When trouble has occurred in the air The scheduled operation is not conditioner, an inspection code and the performed even though the set time is number of the indoor unit concerned blink reached. - Page 23 Owner’s Manual Remote controller with weekly timer Push the TEMP. button (49). • Each time one of these buttons is pushed, the trouble history events are displayed in numerical order. • The “01” code on the numeric display indicates the latest event, and “04” the earliest event.
-
Page 24: Selecting The Remote Controller Functions
Owner’s Manual Remote controller with weekly timer SELECTING THE REMOTE CONTROLLER FUNCTIONS • Change the settings of the remote Items to be set controller functions as required by taking • 24-hour/12-hour display setting <code the steps below. No.10> – The 24-hour display or 12-hour (AM/ How to change the remote controller PM) display can be selected for the functions... - Page 25 Owner’s Manual Remote controller with weekly timer • Display/non-display of clock <code Selecting the functions using the DIP switches of the remote controller no.13> • The following functions can be selected This item selects and sets whether the day using the DIP switches on the remote of the week and clock time are to be controller’s circuit board.
- Page 26 EH99677901...