Fujitsu ETERNUS LT20 S2 Installing, Starting Up And Maintaining
Lto library
Hide thumbs
Also See for ETERNUS LT20 S2:
- User manual (70 pages) ,
- Manual (11 pages) ,
- Installing, starting up and maintaining (95 pages)
Table of Contents
Advertisement
Quick Links
Download this manual
See also:
User Manual
Advertisement
Table of Contents
Troubleshooting

Related Manuals for Fujitsu ETERNUS LT20 S2


Summary of Contents for Fujitsu ETERNUS LT20 S2
- Page 1 Installing, Starting Up and Maintaining - English ETERNUS LT20 S2 LTO Library Installing, Starting Up and Maintaining Edition February 2013 (Version 2.3, ) P3AM-5382-02ENZ0...
-
Page 2: Copyright And Trademarks
Copyright and Trademarks Copyright © Fujitsu Limited 2011-2013 All rights reserved. Delivery subject to availability; right of technical modifications reserved. All hardware and software names used are trademarks of their respective manufacturers. This manual is printed on paper treated with... -
Page 3: Table Of Contents
Power and Signal Cable ..... 31 3.6.3 Verifying the Detection of the Library Under Windows ..33 ETERNUS LT20 S2... - Page 4 Viewing Dynamic Drive Information ....56 4.4.5.3 Viewing the Tape Cartridge Inventory ... . . 57 ETERNUS LT20 S2...
- Page 5 Example Error Code ..... . . 92 5.6.2 Error Code Table ......93 ETERNUS LT20 S2...
- Page 6 Index ........117 ETERNUS LT20 S2...
-
Page 7: Preface
Preface Target Groups This manual is written primarily for users with access to the entire range of the ETERNUS LT20 S2 LTO library functions, for system administrators and field engineering staff. Basic hardware knowledge is required. Notational Conventions The following notational conventions are used in this manual. -
Page 8: Warnings
Use the unit on a firm level surface free from vibration. ● Do not place anything on top of the unit. Product Warranty Caution The warranty for the tape library shall not apply to failures of any unit when: ETERNUS LT20 S2... -
Page 9: Rack Stability
Ensure that the full weight of the rack rests on the levelling jacks. ● Install stabilizing feet on the rack. ● In multiple-rack installations, secure racks together. ● Extend only one rack component at a time. Racks may become unstable if more than one component is extended. ETERNUS LT20 S2... -
Page 11: Product Description
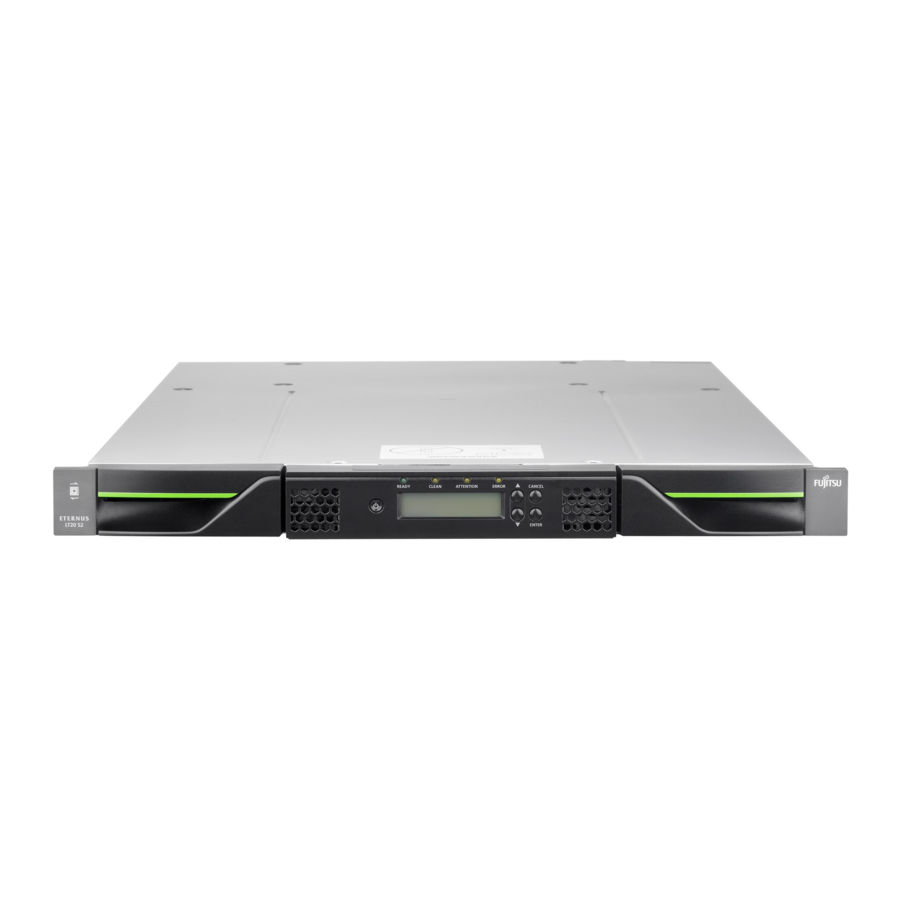
The ETERNUS LT20 S2 LTO library provides a compact, high-capacity, low-cost solution for simple, unattended data backup. The ETERNUS LT20 S2 houses up to 8 tape cartridges in a compact 1U form factor with easy access to tape cartridges via two removable magazines and a mailslot for importing and exporting cartridges. - Page 12 The ETERNUS LT20 has 1U rack format functionality. It provides cost-effective, easy to install, automated data protection for the small to medium sized business. Not all features will be available at initial product launch and will be added upon technology availability, anticipated market requirements, and/or customer needs. ETERNUS LT20 S2...
-
Page 13: Front Panel
Illuminated if the library has detected a condition that requires attention by the operator. LED "ERROR" (Amber). Illuminated if an unrecoverable tape drive or library error occurs. A corresponding error message displays on the LCD screen (see for more information). ETERNUS LT20 S2... -
Page 14: Rear Panel
Ethernet, serial and the USB port. Figure show the rear panel of a library with a half height LTO drive each. Figure 3: Rear panel with a SAS tape drive Figure 4: Rear panel with a Fibre Channel tape drive ETERNUS LT20 S2... - Page 15 Shipping lock (storage location) Fan vent Tape drive sled Product label foil (see chapter “Packaging before Transportation” on page 105) Tape Drive LED Ethernet port Serial port Controller LED USB port (Host) SAS connector Fibre Channel connector ETERNUS LT20 S2...
-
Page 16: Internal Components
Internal Components Product Description Internal Components Figure 5: Internal components Description Left magazine Robot with barcode reader Controller Drive sled Power supply Chassis Right magazine ETERNUS LT20 S2... -
Page 17: Installing The Tape Library
20-80 percent RH non-condensing Clearance Back: Minimum of 15.4 cm (6 inches) Front: Minimum of 30.8 cm (12 inches) – for mailslot Minimum of 60 cm to remove magazines (24 inches) Sides: Minimum of 5.08 cm (2 inches) ETERNUS LT20 S2... -
Page 18: Unpacking The Lto Library
Do not place the library on either end or sides as this may damage the library. After unpacking the library, save all the original packing materials in case you need to ship or move the library later. ETERNUS LT20 S2... - Page 19 Installing the Tape Library Unpacking the LTO Library Figure 6: Unpacking the library Description Accessories and top shell parts Sliding rails ETERNUS LT20 unit Bottom shell ETERNUS LT20 S2...
-
Page 20: Identifying Product Components
The shipping lock, which prevents the robot transport mechanism from moving during shipment, must be removed before the library is powered A yellow label with instructions regarding the shipping lock covers the power button, as shown in the following picture: Figure 7: Instructions for shipping lock ETERNUS LT20 S2... -
Page 21: Rack Mounting The Tape Library
WARNING Weight! Risk of personal injury or damage to the loader. ● Always remove all tapes to reduce the overall weight of the loader. ● Observe local health and safety requirements and guidelines for manual material handling. ETERNUS LT20 S2... -
Page 22: Preparing
CAUTION Before performing any installation or maintenance procedures, be sure that the library power switch is in the off position and that the power cord is disconnected from the library and the outlet. ETERNUS LT20 S2... -
Page 23: Installing The Library In A Rack
A Torx screwdriver is requested. A counternut is entered in the 2. hole in the rack of ETERNUS LT20 or in the 4. hole in the rack of ETERNUS LT40/60. 2. Standard rackmount rail for ETERNUS LT20 S2 The counternuts are already integrated, the screws are fixed with the help of a Phillips screwdriver. - Page 24 Rack Mounting the Tape Library Installing the Tape Library 1. If you use a Fujitsu Technology Solutions PRIMECENTER rack you first have to mount the support bracket in the appropriate height to the - seen from the front of the rack - left rear rack post as shown below.
- Page 25 The rail now is positioned between the two rack posts by its spring pressure. Support the rail with one hand. Figure 13: Setting in the right rail at the front ETERNUS LT20 S2...
- Page 26 Installing the Tape Library 5. Screw on the upper lug of the front rail end to the right front rack post using one screw with centering washer as shown below. Figure 14: Screwing on the right rail at the front ETERNUS LT20 S2...
- Page 27 – Screw on the upper lug of the front rail end to the left front rack post with one screw with centering washer. – Screw on the rear rail end to support bracket with two screws with centering washers as shown below. ETERNUS LT20 S2...
- Page 28 8. Put the ETERNUS LT20 from the front of the rack on the support angles of the sliding rails and push it into the rack to the back stop. 9. Remove the flange cover on the left hand side. Figure 17: Remove flange cover ETERNUS LT20 S2...
-
Page 29: Connecting
– Transmission type and speed of the data to be stored (e.g. Ethernet) – Number of devices at the host bus adapter (controller) – Sequential or parallel operation of the tape drives – Compressed or uncompressed operation of the tape drives ETERNUS LT20 S2... -
Page 30: Fibre Channel
LUNs). Consult your sales representative or a certified service engineer for compatibility of HBA, library and your server. Cable CAUTION Fujitsu recommends a maximum SAS cable length of 4 meters from HBA to one tape drive. Do not use any adapter or converter between HBA and tape drive(s). 3.6.1.3... -
Page 31: Power And Signal Cable
Remove the power cables from the server and all attached accessories. 2. Attach one end of the signal cable – to the SAS connector of a SAS tape drive. – to the FC connector of a FC tape drive. ETERNUS LT20 S2... - Page 32 Home screen will be displayed. 7. Plug in the host server or workstation and all attached devices. 8. Turn on any other devices you turned off earlier. 9. Turn on the server. ETERNUS LT20 S2...
-
Page 33: Verifying The Detection Of The Library Under Windows
Windows 2008® by going to: Settings → Control Panel → System → Hardware → Device Manager → Tape Drive and/or Media Changer. For more information on verifying the connection of devices, consult the operating system documentation. ETERNUS LT20 S2... -
Page 35: Operating The Lto Library
– Moving a cartridge from any source to a full slot – Unloading a cartridge from an empty slot – Moving a cartridge from any source to a full drive – Unloading a cartridge from an empty drive ETERNUS LT20 S2... -
Page 36: Power-Up Display
LEDs are functional. When initialization starts, all LEDs will be extinguished and the Ready/Activity LED will flash at a reasonable rate of approximately 1-second per cycle, 50% duty cycle. When the mechanical ETERNUS LT20 S2... -
Page 37: Input Modes
After pressing the ENTER button at the last digit the complete entry will be stored. Pressing the CANCEL button will cancel the whole edit process and the old value is valid again. ETERNUS LT20 S2... -
Page 38: Power On/Off
– The robot is moved to its home position. – The library controller switches off the power supply's secondary side. – To abort the shutdown process the user has to press Cancel within the first 3 seconds. ETERNUS LT20 S2... -
Page 39: Ocp Menu Tree
Save Library Config Inventory FW Rev..Restore Library Vendor ID ..Magazines Product ID ..Config Serial No ..SCSI ID ..(SCSI only) Drive WWNN ..Barcode (FC only) Reporting Figure 21: OCP menu tree ETERNUS LT20 S2... -
Page 40: Tape Cartridges
– Do not drop a cartridge. Excessive shock can damage the internal contents of the cartridge, or the cartridge case itself, making that cartridge unusable. – Do not expose your data cartridges to direct sunlight or sources of heat, including portable heaters and heating ducts. ETERNUS LT20 S2... -
Page 41: Labeling Tape Cartridges
Ultrium tape cartridges have a recessed area located on the front of the cartridge next to the write-protect switch. Use this area for attaching the adhesive-backed bar code label. Only apply labels as designated in figure 22. ETERNUS LT20 S2... -
Page 42: Write-Protecting Tape Cartridges
Figure 22: Ultrium tape cartridge and proper bar code label placement You may order tape cartridges, bar code labels, and other accessories via your Fujitsu sales representative. It is recommended to order acces- sories classified by Fujitsu as “Preferred Quality” exclusively. Only such tape cartridges have the full support by Fujitsu. -
Page 43: Backward Read Compatibility
You can find compatibility documentation at the following URL: http://www.fujitsu.com/global/services/computing/storage/eternus/products/tape/lt20-s2/ 4.2.6 Bar Code Reader The bar code reader provides inventory feedback to the host application and/or LCD screen by reading the cartridge bar code labels. The library stores the customized inventory data in memory. ETERNUS LT20 S2... -
Page 44: Activating The Autoclean Function
Remote Management Unit (RMU). In case the OCP or RMU initiated process has failed or the library no longer has power, a manual emergency release is available. See section “Magazine Does not Unlock via OCP or RMU” on page ETERNUS LT20 S2... -
Page 45: Inserting Tape Cartridges Into A Magazine
Ê Use the RMU, see section “Removing and Replacing a Magazine Using the RMU” on page 47 2. Insert cartridges in the magazines 3. Put the full magazines back to the tape library (see figure 24) Figure 24: Insert magazines ETERNUS LT20 S2... -
Page 46: Removing And Replacing A Magazine Using The Ocp
Magazine. The library cannot perform any other operation until the magazine is replaced. After exchanging tapes in a magazine, slide the magazine completely into the library. The magazine will lock into place once it is correctly installed and the library will inventory the magazine. ETERNUS LT20 S2... -
Page 47: Removing And Replacing A Magazine Using The Rmu
2. Go to Operations → Magazines. This page (see figure 26) allows the user to release the right or left magazine from the library. Figure 26: Operations, Magazine page 3. Press the Release button. 4. Remove the magazine from the unit. ETERNUS LT20 S2... -
Page 48: Slot Numbering
4.3.4 Slot Numbering The slot numbering scheme is shown in figure for the left magazine and figure for the right magazine. Figure 27: Slot numbering left magazine with mailslot Description Mailslot LTO Slot LTO Slot LTO Slot ETERNUS LT20 S2... -
Page 49: Mailslot
The command to open the mailslot may be denied if the robot is busy with some operation. In that case “Busy” is displayed and the command has to be repeated once the robots operation is finished (see figure 28). Figure 28: Handling mail slot ETERNUS LT20 S2... - Page 50 Magazines Operating the LTO Library Figure 29: Slot numbering right magazine Description LTO Slot LTO Slot LTO Slot LTO Slot ETERNUS LT20 S2...
-
Page 51: Remote Management Unit (Rmu)
The yellow exclamation point for Status Warning indicates that user intervention is necessary, but that the library is still capable of performing operations. The red X Status Error indicates that user intervention is required and that the library is not capable of performing operations. ETERNUS LT20 S2... -
Page 52: Login
● Service personnel user level. Access to this level is by Service personnel only. Each level affects which areas you have access to and what actions you can initiate from those areas. Figure 30: RMU Login page ETERNUS LT20 S2... -
Page 53: Identity
The following information can be found, although no changes can be made from this page: – Serial Number – Product ID – Currently Installed Library Firmware – Bootcode Firmware Revision – Barcode Reader – Library Mode – WWide Node Name Figure 31: Identity, Library page ETERNUS LT20 S2... -
Page 54: Viewing Static Drive Information
This page provides detailed information about the drive. No changes can be made from this page. You can reach this page by selecting Identity → Drive. Figure 32: Identity, Drive page (SAS) Figure 33: Identity, Drive page (FC) ETERNUS LT20 S2... -
Page 55: Viewing Static Network Information
Library. The following information can be found on this page: – Status – Cartridge in Transport – Number Of Moves – Total Power On Time – Robotic Status – Internal Temperature – Media Removal (allowed or prevented, from on library firmware version 1.90) – Magazines ETERNUS LT20 S2... -
Page 56: Viewing Dynamic Drive Information
Figure 35: Status, Library page 4.4.5.2 Viewing Dynamic Drive Information This page provides detailed information about the drive in the library. You can reach this page by selecting Status → Drive. Figure 36: Status, Drive page (FC) ETERNUS LT20 S2... -
Page 57: Viewing The Tape Cartridge Inventory
Figure 37: Status, Inventory page To get detailed information, click on the + button. This will expand the display for the specified magazine, specifying the bar codes and types of the cartridges: Figure 38: Status, Inventory page expanded ETERNUS LT20 S2... -
Page 58: Configuration
– Barcode Label Alignment Reported To Host – Select Language – Change ID String Figure 39: Configuration, System page Using the Select Language function changes both the language of the graphical user interface of the RMU and the embedded help manual. ETERNUS LT20 S2... -
Page 59: Changing The Drive Configuration
The user is also able to select Power on which activates the drive. You can reach this page by selecting Configuration → Drive. Figure 40: Configuration, Drive page (SAS) Figure 41: Configuration, Drive page (FC) ETERNUS LT20 S2... -
Page 60: Changing The Network Configuration
– IPv4 Subnet Mask – IPv4 Gateway Address – IPv4/IPv6 DNS Server 1/2 – IPv6 Stateless Auto Config – IPv6 DHCPv6 Addressing – IPv6 Static Addressing – IPv6 Static Address – Enable SSL for Web Figure 42: Configuration, Network page ETERNUS LT20 S2... - Page 61 Windows to generate a certificate when a connection is set up. Figure 43: Certificate generation Reply field Meaning The certificate is generated and installed You exit the procedure Display certificate The certificate obtained is displayed ETERNUS LT20 S2...
- Page 62 Remote Management Unit (RMU) Operating the LTO Library This screen is displayed for selection item 3: Figure 44: Certificate information ETERNUS LT20 S2...
- Page 63 Operating the LTO Library Remote Management Unit (RMU) The following screen appears when you install the certificate: Figure 45: Certificate import wizard: Welcome The screens below are displayed when you click on "Next >": Figure 46: Certificate import wizard: Storage ETERNUS LT20 S2...
- Page 64 Remote Management Unit (RMU) Operating the LTO Library Figure 47: Certificate import wizard: Finishing (1) Figure 48: Certificate import wizard: Finishing (2) ETERNUS LT20 S2...
- Page 65 Operating the LTO Library Remote Management Unit (RMU) Figure 49: Termination of certificate installation To terminate installation of the certificate, either click on "OK" or the X in the top right-hand corner of the screen. ETERNUS LT20 S2...
-
Page 66: Changing The Snmp Configuration
You can reach this page by selecting Configuration → SNMP. A list of changes that can be made are: – SNMP Enabled – IPv4 / IPv6 SNMP Target Addresses – IPv4 / IPv6 Target 1 ETERNUS LT20 S2... -
Page 67: Changing The Administrative Password
OCP Access PIN is enabled – Repeat OCP Access PIN Code – enter the OCP Access PIN Code again – Support Name – the name of the individual within your company to contact for RMU or library support ETERNUS LT20 S2... -
Page 68: Setting Date/Time
UTC Time Zone Offset – This shows current time zone selected. Select the zone for your location from the pull down list. Enable Daylight Savings Adjustment – Enabling Daylight Savings will ● advance the local time by one hour. Click Help for further information. ETERNUS LT20 S2... -
Page 69: Setting Error Log Mode
The trace level and trace filter selection options can be set by service personnel. 4.4.6.8 Setting Event Notification Parameters This page allows the user to set event notification to On. You can reach this page by selecting Configuration → Event Notification. Choices for event notification are: ETERNUS LT20 S2... -
Page 70: Restoring Factory Defaults
Figure 55: Configuration, Event Notification page 4.4.6.9 Restoring Factory Defaults This page allows the user to reset the configuration to the factory defaults. You can reach this page by selecting Configuration → Restore Defaults. Figure 56: Configuration, Restore Defaults page ETERNUS LT20 S2... -
Page 71: Operations
You can reach this page by selecting Operations → Move Media. Figure 57: Operations, Move Media page ETERNUS LT20 S2... -
Page 72: Determining Current Media Inventory
To manually release a magazine, see section “Magazine Does not Unlock via OCP or RMU” on page 96. However, this manual process should only be used if the magazine cannot be released using the Operator Control Panel or the Remote Management Unit. ETERNUS LT20 S2... -
Page 73: Service
You can reach this page by selecting Service → General Diagnostic. The user selects the number of test cycles before starting the test. To cancel the test before it completes the cycles, select the Stop button. Figure 60: Service, General Diagnostic page ETERNUS LT20 S2... -
Page 74: Performing Drive Diagnostics
You can reach this page by selecting Service → Drive Diagnostic. The user selects the drive test type. A Drive Support Ticket can be created and downloaded which can support service engineers solving drive and media problems. Figure 61: Service, Drive Diagnostic page ETERNUS LT20 S2... -
Page 75: Determining And Updating Firmware
Additionally the page allows to request if new firmware is available on the FTP server of Fujitsu Technology Solutions and to upgrade the firmware online. You can reach this page by selecting Service →... -
Page 76: Rebooting The Library
RMU display in your browser may be affected. In this case you will have to reload the RMU page in your browser manually. You can reach this page by selecting Service → Reboot. Figure 63: Service, Reboot page ETERNUS LT20 S2... -
Page 77: Viewing Library Logs
The following entries and buttons are available: – Log Type – Total Number Of Entries – Start Entry – Number of Entries Per Page – Update – Dump Log – Save Service Dump – Email Service Dump Figure 64: Service, Library Log page ETERNUS LT20 S2... -
Page 78: Cleaning Tape Drive
Cleaning Tape Drive This page allows the user to clean the tape drive. You can reach this page by selecting Service → Clean Drive. Figure 65: Service, Clean Drive Page See also section “Activating the Autoclean Function” on page ETERNUS LT20 S2... -
Page 79: Getting Cartridge Information
Selecting this page allows the user gets information on all cartridges in the library and all specific values the library handles for each cartridge. You can reach this page by selecting Service → Cartridge memory. Figure 66: Service, Cartridge Memory page ETERNUS LT20 S2... -
Page 81: Troubleshooting
Identity → Library → quick link Support (see section “Viewing Static Library Information” on page 53). Many backup applications use their own drivers for the library and drive. Before installing a driver, make sure it will not be in conflict with the software. ETERNUS LT20 S2... -
Page 82: Troubleshooting Table
Ê Contact your service representative. No display messages Ê Make sure the power cord is connected. appear Ê Make sure the power switch is on. Ê Power cycle the library. Ê Download library firmware. Ê Contact your service representative. Tape movement ETERNUS LT20 S2... - Page 83 Ê Contact your service representative. Tape stuck in storage slot See section “Removing Stuck Tapes from Slots” on page ETERNUS LT20 S2...
- Page 84 Ê Retry the operation with a different, known good tape. Ê Clean the tape drive. See section “Cleaning Tape Drive” on page ETERNUS LT20 S2...
- Page 85 “Library Status Icons” on page 51 inventory display more information. There is an error code on Look up the error code, try to resolve the failure, the LCD and power cycle (see section “Tape Library Error Codes” on page 92). ETERNUS LT20 S2...
- Page 86 Non-acclimated media A cartridge should be acclimated for at least 24 hours before being used, particularly if it has been stored at a substantially different temperature or level of humidity than the library. ETERNUS LT20 S2...
- Page 87 In some cases, a cartridge can be worn out, have a defective Cartridge Memory, or have been formatted as a Firmware Upgrade Cartridge. Ê Any cartridge that is suspected of being defective or contaminated should NOT be reused in any drive. ETERNUS LT20 S2...
-
Page 88: Removing Stuck Tapes From Slots
Repeat the process ten times. Figure 68: Removing stuck tapes from slot 3. During this process any burr on the cartridges will be removed. 4. Insert cartridge in the magazine. 5. Put the magazine back to the tape library. ETERNUS LT20 S2... -
Page 89: Magazine Does Not Unlock Via Ocp Or Rmu
3. To manually release the magazines, push the end of a straightened paper clip into the access hole for the magazine at the back of the library. While holding the paper clip, have a second person pull the magazine out of the front of the unit (see figure 70). ETERNUS LT20 S2... - Page 90 Process Insert pin into access hole Release and remove magazine If there are additional tapes still in the library, or if you were unable to manually remove the magazines and drive, please contact service for further instructions. ETERNUS LT20 S2...
-
Page 91: Media Removal Prevented
Library Status and the Drive Status pages then the Media Removal entries are set to Prevented. Figure 71: Media Removal information in the Library Status page (example: Allowed) Figure 72: Media Removal information in the Drive Status page (example: Allowed) ETERNUS LT20 S2... -
Page 92: Tape Library Error Codes
The event log with the library also includes a date stamp for each event. Press Enter to display the associated timestamp in the following format: ddd:hh:mm:ss:HH where: days hours minutes seconds 1/100 second A description of each error code and possible solution is provided in the following table. ETERNUS LT20 S2... -
Page 93: Error Code Table
Setting of rotation motor param- Reset the unit and retry eters failed operation. After several occurrences contact technical support Setting of sled motor parameters Reset the unit and retry failed operation. After several occurrences contact technical support ETERNUS LT20 S2... - Page 94 Gripper has reached a position after several occurrences beyond the expected range contact technical support Slider outside range, Run 'library Health Check', Slider has reached a position after several occurrences beyond the expected range contact technical support ETERNUS LT20 S2...
- Page 95 Rotation range out of specifi- Run 'library Health Check', cation after several occurrences contact technical support Sled range out of specification Run 'library Health Check', after several occurrences contact technical support ETERNUS LT20 S2...
- Page 96 Robot controller does not Reset the unit and retry respond on command operation. After several occurrences contact technical support Network initialization failed Check network cable and network configuration. If the error recurs, contact technical support ETERNUS LT20 S2...
- Page 97 Display Error Retry operation; after several Communication to display failed occurrences contact technical support Fatal system error Retry operation; after several occurrences contact technical support Data base error Retry operation; after several occurrences contact technical support ETERNUS LT20 S2...
- Page 98 Retry operation; if not Drive has run in a timeout while successful contact technical loading a tape support Drive Unload Timeout Retry operation; if not Drive has run in a timeout while successful contact technical unloading a tape support ETERNUS LT20 S2...
-
Page 99: Servicing
Ê Keep the work area free of no conducting materials, such as ordinary plastic assembly aids and foam packing. Ê Make sure you are always properly grounded when touching a static- sensitive component or assembly. Ê Avoid touching pins, leads, or circuitry. Ê Use conductive field service tools. ETERNUS LT20 S2... -
Page 100: Removing And Replacing A Tape Drive
2. Pull straight back on the tape drive handle to remove it from the library. Take care to slightly push down the product ID slide so it does not interfere with the drive sled (see figure 74). ETERNUS LT20 S2... - Page 101 6. Tighten the captive thumbscrews until the drive is secure. 7. Connecting the power cable and terminator. 8. Power on the library using the power button on the front panel. Run the library Verify test. ETERNUS LT20 S2...
-
Page 102: Removing And Replacing The Base Chassis
13. Tighten the mounting bracket screws to anchor the replacement library enclosure to the rack. 14. Plug in the power cord and host interface cable (and the terminator, if required) into the replacement library enclosure. 15. Power on the library. ETERNUS LT20 S2... - Page 103 16. Run the library Verify test (see section “Performing General Library Diagnostics” on page 73). 17. Securely package the library enclosure that was replaced, and return to repair center (see chapter “Packaging before Transportation” on page 105). ETERNUS LT20 S2...
-
Page 105: Packaging Before Transportation
The shipping lock prevents the robot mechanism from moving during shipment. Figure 76: Replacing Shipping lock before transportation 7. Before sending the defect library back, please contact the service department to give the information of the Part and Serial Numbers (see figure 77). ETERNUS LT20 S2... - Page 106 Packaging before Transportation Figure 77: Product Label 8. Package the tape library. Please use the original box or the box in which you received the spare library (see figure 78). 9. Send the library to the service center. ETERNUS LT20 S2...
- Page 107 Packaging before Transportation Figure 78: Re-packing the library Description Bottom shell ETERNUS LT20 unit Top shell parts ETERNUS LT20 S2...
-
Page 109: Technical Specifications
Technical Specifications You find the technical data of the library, the types of drives you can use and their performance characteristics in the “DATASHEET FUJITSU ETERNUS LT20” which is available at http://www.fujitsu.com/global/services/computing/storage/eternus/products/tape/lt20-s2/ ETERNUS LT20 S2... -
Page 111: Recycling And Disposal
For more infor- mation about where you can drop off your waste equipment for recycling, please contact your local city office, your household waste disposal service or the shop where you purchased the product. ETERNUS LT20 S2... -
Page 113: Regulatory Information
Although the equipment has been tested and found to comply with the allowed RF emission limits, as specified in the above cited Rules, there is no guarantee that interference will not occur in a particular installation. Interference can be ETERNUS LT20 S2... -
Page 114: Canadian Certification
– If necessary, consult an experienced radio/television technician for additional suggestions. 10.3 Canadian Certification This Class A digital apparatus meets all requirements of the Canadian Inter- ference-Causing Equipment Regulations (ICES-003, Class A). ETERNUS LT20 S2... - Page 115 Blank ETERNUS LT20 S2...
-
Page 116: 6 Eternus Lt20 S2
Related Publications an Links Blank ETERNUS LT20 S2... -
Page 117: Index
SSL data transfer inventory 57, chassis CLEAN cleaning LEDs controller left magazine 13, controller LED library configuration identity Data sheet status date library diagnostics device driver location device standards login disposal ETERNUS LT20 S2... - Page 118 ON/OFF top shell parts power supply transportation power-up troubleshooting product components troubleshooting table product label 15, unlock rack mounting unpacking READY rear panel USB port rebooting recycling regulatory information write-protect switch ETERNUS LT20 S2...