Table of Contents
Advertisement
Advertisement
Table of Contents

Related Manuals for Craftsman 536.886220


Summary of Contents for Craftsman 536.886220
- Page 1 ® 11 Horsepower 30 Inch Dual Stage 120V. Electric Start SNOWTHROWER MODEL NO. 536.886220 Caution: Read and follow all Safety Rules and Operating Instructions before first use of this product. SEARS, ROEBUCK AND CO., Hoffman Estates, IL 60179 U.S.A. 761118 11/03/97...
- Page 2 SNOW THROWER For two years from the date of purchase, when this Craftsman Snow Thrower is main- tained, lubricated, and tuned up according to the operating and maintenance instruc- tions in the owner's manual, Sears will repair, free of charge, any defect in material or workmanship.
- Page 3 Exercise extreme caution when operat- PREPARATION ing on or crossing gravel drives, walks, Thoroughly inspect the area where the or roads. Stay alert for hidden hazards snow thrower is to be .used and remove or traffic. all doormats, sleds, boards, wires and After striking a foreign object, stop the other foreign objects.
- Page 4 Maintain or replace safety and instruc- Disengage power to the auger/impeller when snow thrower is transportedor tion labels, as necessary. not in use. Run the snow thrower a few minutes 18. Use only attachments and accessories after throwing snow to prevent freeze- approved by the manufacturer of the...
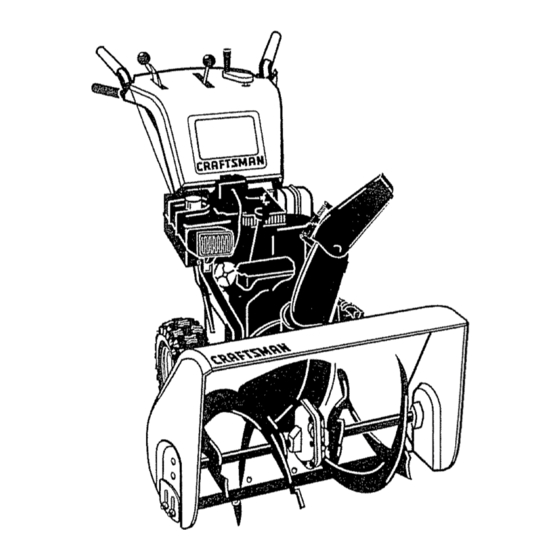
- Page 5 rts packed separately in carton (not shown full size) I - container 5W30 oil - Ignition Keys _ttached to engine in plastic bag) 1 - Speed Contro! Rod - Mid-Crank The figure below shows the snow thrower CAUTION: Always wear safety completely assembled.
- Page 6 INSTALL THE UPPER HANDLE HOW T ° SET UP YOUR SNOW THROWER • Cut ties securing the clutch control cables and remote chute control cable to the • Locate and remove container of 5W30 oil lower handle. Lay cable away from and parts bag found in parts box.
- Page 7 _onnect "Z" fitting into remote chute '.ontrol bracket as shown in figure below. :mote _ute Remote Chute Mid.Crank _ntrol Bracket acket JmoteChute Control Cable • Cut tie securing the lower crank rod to the chute rod bracket. See second figure below.
- Page 8 CONNECT CONTROL CABLES View from the left side of unit • Remove wrap from upper handle which gear position was used to protect clutch levers. NOTE: If control cables have become unattached from motor mount frame, Speed reconnect cables as shown below_ Select Bracket Traction drive...
- Page 9 J CHECKLIST While learning how to use your snow thrower, pay extra attention to the following Before you operate your new snow thrower, important items: to ensure that you receive the best perfor- /J" Engine oil is at proper level° mance and satisfaction from this quality Make sure gas tank is filled properly product, please review the following...
- Page 10 Speed Shifter Lever MranK Assembly Remote Chute Control Lever Lever Auger Drive Electric Starter Button Ignition Chute Deflector Chute Control Height Adjust _er Bar Shear Bolt Auger Drive Lever - Starts and stops the Ignition Key - Must be inserted to start the auger and impeller (snow gathering and engine°...
- Page 11 • Engage the traction drive lever as shown -IOW TO USE YOUR SNOW in first figure on this page, left hand. As tHROWER the snow thrower starts to move, maintain rO STOP YOUR SNOW THROWER a firm hold on the handles, and guide the , To stop throwing snow, release the auger snow thrower along the clearing path.
- Page 12 WARNING: Experience indicates that alco- BEFORE STARTING THE ENGINE hol blended fuels (called gasohol or those If the snow thrower must be moved with- using ethanol or methanol) can attract mois- out the aid of the engine, it is easier to pull ture which leads to separation and formation the snow thrower by the handles rather...
- Page 13 Four times if temperature is below 15°Fo 3 START ENGINE (Electric Starter) , Push down on the starter button until the ,_sure that the engine has sufficient oil engine starts. Do not crank for more than _e snow thrower engine is equipped with a t0 seconds at a time.
- Page 14 ., As engine starts warms up move choke CAUTION: Do no attempt to remove lever to "1/2 choke" position. When engine any item that may become lodged in runs smoothly, move choke lever to "No auger without taking the following precau- Choke"...
- Page 15 CUSTOMER RESPONSIBILITIES SERVICE SCHEDULE SERVICE DATES RECORDS ..........Fill in dates as After Befor_ Every Every Each Before first 2 Each Needed Season Storage you complete Hours Use Hours Hours Hours regular service ;Tighten AftScrews & Nuts Lubricate P ivotPoints - ....
- Page 16 SNOW THROWER Rubber_ Shaft Friction AFTER FIRST Disc Wheel o Check for any loose or damaged parts after each use, Gears Plate (Require • Tighten any loose fasteners..• Check and maintain the auger. Lubrication) AFTER EACH Friction • Remove all snow and slush off the snow Wheel Grease thrower to prevent freezing of auger or...
- Page 17 OIL RECOMMENDATION .UBRICATION Hex Shaft and Gears - Hex shaft and Only use high quality detergent oil rated with API service classification SG. Select gears require no lubrication. All bearings the oil's viscosity grade according to your and bushings are lifetime lubricated and expected operating temperature: require no maintenance°...
- Page 18 CAUTION: Always disconnect the TO ADJUST SCRAPER spark plug wire and tie back away from After considerable use, the metaI scraper the plug before making any adjustments bar will have a definite wear pattern. The or repairs, scraper bar in conjunction with the skids TO ADJUST SKID HEIGHT should always be adjusted to allow 1/8"...
- Page 19 :_ _':iii ' _i_i _'': ° i7!_:, :,!i _:¸_,:/__ ¸;¸,:8¸¸...
- Page 21 FO ADJUST'THE CLUTCH CONTROL TO ADJUST BELTS 3ABLES Belts stretch during normal use, If you need to adjust the belts due to wear or stretch, %riodic adjustment of the cables may be proceed as follows: "equired due to normal stretch and wear on AUGER DRIVE BELT :he belts.
- Page 22 Friction TO REPLACE FRICTION WHEEL tf the snow thrower will not move forward, and the friction wheel is worn or damaged, you need to replace it as follows: (First allow Bearing the engine to cool). Plate Bolts • Drain the gasoline from the fuel tank by removing the fuel line at the carburetor.
- Page 23 TO ADJUST: • Align the hole in the auger with the hole in the auger shaft° Install the new shear • Clean the spark plug by carefully scrap- pin and spacer found in toolbox located ing the electrodes (do not sand blast or on top of belt cover, use a wire brush), NOTE:...
- Page 24 (see warm. next figure). • tf you do not want to remove gasoline, a fuel stabilizer (such as Craftsman Fuel Stabilizer No, 33500) may be added to any gasoline left in the tank to minimize gum deposits and acids°...
- Page 25 TROUBLE CAUSE CORRECTION Difficult starting Defective spark pIug Replace defective plug Water or dirt in fuel system Use carburetor bowt drain to flush and refill with fresh fuel Engine runs Blocked fuel line or tow on fuel Clean fuel line; check fuei sup- ratically ply;...
- Page 26 CRAFTSMAN 30"- 11H.P. SNOW THROWER 536.886220 ---i ELECTRIC START ASSEMBLY PART NAME .,_-_"_::... PART NO. Starter Motor 6218 Screw, 1/4-20X .50 .i ::, "_] 6216 Screw, #6-32X2°50 !_ "" 6217 6219 Cord, Starter Motor 761118 Owner's Manual Eng/Sp 319051B ENGINE ASSEMBLY...
- Page 27 CRAFTSMAN 30" - 11H.P. SNOW THROWER 536.886220 FRAME ASSEMBLY 342574B REF. I REF.{ PART NAME _NO. I PART NAME PARTNOo i8oi 340386-848 Frame Assy 1710138 Stud, Brake Arm 780055 Screw, 5/16-t8X 30 120382 Washer, Regsptlk 583031-8481 Cover, Bottom Wheel 782585 Nut, 1/4-20 Reghexctrlk Screw, 1/4-20X .63...
- Page 28 CRAFTSMAN 30" - 11H+P. SNOW THROWER 536.886220 DRIVE ASSEMBLY 313995 J REF. PART NAME PART NO. PART NO. PART NAME ..18002o 579941 LeverAssy [229 Screw, 1/4-20X .75 313853 Bearing Flange 334163 Bearing and Retainer Assy Cotter Pin 137185 780055 Screw 5/16-18X .50...
- Page 29 CRAFTSMAN 30" - 11H.P. SNOW THROWER 536,886220 GEAR CASE ASSEMBLY 314014D JREF REF.I PART NAME PART NO. PART NAME NO_9 =ART NO. Gear Case RH 300 I 73905 Woodruff Key#91 Gear Case LH 301 I 313914 Ring, Quad 910828 Screw, 5/16-24Xl...
- Page 30 CRAFTSMAN 30" - 11H.P° SNOW THROWER 536.886220 DISCHARGE CHUTE ASSEMBLY REF, PART NAME PART NO. 761168-853 Upper Chute 578088 Screw, 5/16-18X ,75 71038 Nut, 5/16-18 Reghxctrtk Screw, 5/16-18X .75 578088 Plastic Washer, 6711 71038 Nut, 5/16-18 Reghxctrlk Lower Chute 761169-853 586280 Bolt, 5/t 6-18X1.00...
- Page 31 CRAFTSMAN 30" -11H.P. SNOW THROWER 536.886220 AUGER HOUSING ASSEMBLY 339974 M REF. REF. PART NAME PART NO. PART NO. PART NAME 583146 760596-853 Pulley, V4L 8.40 OD Auger Assy LH 71371 Square Key, 16SQX.88LG Screw, 114o20X 1.75 Flatwasher 71074 3943 Spacer Stebve .53 X1_00X,063...
- Page 32 CRAFTSMAN 30"-11H.P. SNOW THROWER 536.886220 HEADLIGHT PANEL ASSEMBLY REF. PART NAME PART NO. 583490 Housing, headlight Upper 581575 Headlight Assy °,,=!41!']J 583491 Housing, headlight Lower 180024 Screw, 114-20x 125 Wire Harness 760745 ' :, 760821 Bracket, Light Screw, 5/16-18 x 2.75...
- Page 33 CRAFTSMAN 30" '11H.P. SNOW THROWER 536.886220 HANDI.E ASSEMBLY °o 340090K_1 REF, REF, PAR1"NO, PART NAME 'NO. PART NO. PART NAME 581736 Handle, Upper LH Push-on Nut 3/8" 73664 581738 '742 Handle, Upper RH Cable, Clutch Control 579257 7268 Screw, 3/8-16X300...
- Page 34 RAFTSMAN 4-CYCLE ENGINE MODEL NUMBER: 143.981001 lrburetor No.640054 @"-37 _'-,37 "- PART ;tEF. PART No., PART NAME iNO. PART NAME 640054 Carburetdr '(incl 184 on engine) 63t 024 Float Shaft 631776A Throttle Shaft & Lever Ass'y. 632019 Float 631970 631028 Throttle Retum Spring Float Bowt "O"...
- Page 35 CRAFTSMAN 30'_- '11H.P. SNOW THROWER 536.886220 REMOTE CHUTE ASSEMBLY REF. PART NO. PART NAME 780207 Spring, Tension 120385 Washer, Flat 310088 Bolt, t/4-20 120393 Flatwasher, 344x.69x.065 46931 Nut, 1/4-20 180077 Screw, 5/16-18X °75 780066 Bracket, Cable Chute 1498 Nut, 5/16,.18 Reghxctrlk...
- Page 36 CRAFTSMAN 30" - 11H.P, SNOW THROWER 536.886220 CHUTE CONTROL ROD ASSEMBLY...
- Page 37 CRAFTSMAN 30" - 11H°Po SNOW THROWER 536.886220 CHUTE CONTROL ROD ASSEMBLY REF_ PART NAME PART NO. 578295 Rod, Assy Upper Chute Flatwasher 71072 406X .81X.066 Cotter Pin 121222 578051 Cover, Chute Crank Handle 578043 1795 Retainer Cap 3/8 Nut, Push-on 3/6"...
- Page 38 340893B PART NAME PART NO. 760970 Decal, t2" Impeller 313892 Decal, Danger Chute 70141 Decal, Danger Foot 302922 Decal, Danger 760968 Decal, Craftsman 760967 Decal, 11/30 ES 761078 Decal, Danger Chute Decal, Control Panel 8291 761095 Decal, Toolbox 760983 i833...
- Page 39 CRAFTSMAN 30" - 1 '1H,P. SNOW THROWER 536.886220 HANDLE ASSEMBLY 340090K-2 REF. PART NAME PART NO. Consote 339966 308313 Plug 300303 Screw, .25X75X.51 579440 Screw, 1/4-20X ,50 Gear Selector Bracket 578144-853 122168 Screw. 3/8-16X1.75 313842 Spring Flatwasher ,406X .81X_065 120394...
- Page 40 CRAFTSMAN 4-CYCLE ENGINE MODEL NUMBER: 143.981001 z_'T...
- Page 41 ;RAFTSMAN 4-CYCLE ENGINE MODEL NUMBER: 143.981001 :_ef.# I Part Noi Description Ref.# Part No. Desc iptton 35371 ! Cyiinder (incl 2 20 72) 27862 Valve Spring ( 27652 ! Dowel P{n 149A 35662 Valve Spdng ( 650820 ', Screw, 1/4-20xlt2" 27881 Valve Spring 31857...
- Page 42 CRAFTSMAN 4-CYCLE ENGINE MODEL NUMBER: 143.981001 Starter No. 590733 _,-._w _i _ PART iREF, _NO. PART NAME 590733 RewindStarter 590599A SpringPin (lncL4) 590600 Washer 590696 Retainer Washer 590601 590697 Brake Spring 590698 Starter [Jog 590699 Dog Spring 590709 Pulley & Rewind Sprg Assy...
- Page 43 ,RAFTSMAN 4-CYCLE ENGINE MODEL NUMBER: 143.981001 ;tarter Noo590749 REF, PART PART NAME ,,N(3, Rewind Starter 590749 590599A SpringPin (IncL 4) Washer 590600 Retainer 590679 Washer 590601 590678 Brake Spring 590680 Starter Dog 590412 Dog Spring Pulley & Rewind Spring Assy, 590682 590750 Starter Housing Ass y;...
- Page 44 For the repair or replacement parts you need delivered directly to your home Call 7 am-7 pm, 7 days a week 1-800-366-PART (1-800-366-7278) Para ordenar piezas con entrega a domicilio -1-800-659-7084 For in-house major brand repair service Call 24 hours a day, 7 days a week 1-800-4-REPAIR (1-800-473-7247) Para pedir servicio de reparaci6n a...