Advertisement
Table of Contents
- 1 Using Snow Thrower
- 2 To Use Wheel Lockout Pin
- 3 Fill Oil and Gas
- 4 Cold and Warm Starts
- 5 Frozen Recoil Starter
- 6 Snow Throwing Tips
- 7 Specifications
- 8 Lubrication
- 9 Auger Drive Belt
- 10 Traction Drive Belt
- 11 Adjusting Belt and Friction Wheel
- 12 Adjusting Carburetor
- 13 Adjusting or Replacing Spark Plug
- 14 Troubleshooting
- Download this manual
Advertisement
Table of Contents

Related Manuals for Craftsman 536.886150


Summary of Contents for Craftsman 536.886150
- Page 1 CRRFTSMRN ® 5.5 Horsepower OHV 26 Inch Dual Stage 120V. Electric Start SNOWTHROWER MODEL NO. 536.886150 Caution: Read and follow all Safety Rules and Operating Instructions before first use of this product. SEARS, ROEBUCK AND CO., Hoffman Estates 60179 U.S.A. 340804 06/28t96...
- Page 2 SNOW THROWER For two years from the date of purchase, when this Craftsman Snow Thrower is main- tained, lubricated, and tuned up according to the operating and maintenance instruc- tions in the owner's manual, Sears will repair, free of charge, any defect in material or workmanship.
- Page 3 garmentsoWear footwear t hatwill the spark plug, disconnect the cord on improve f ooting onslippery surfaces. electric motors, thoroughly inspect the snow thrower for any damage, and 4. Handle fuelwithcare;it is highly repair the damage before restarting flammable. and operating the snow thrower, (a)Useanapproved f uelcontainer.
- Page 4 electric start kits, etc.). WARNING: The engine exhaust 19. Never operate the snow thrower from this product contains chemicals known to the State of California to cause without good visibility or light,. Always be sure of your footing, and keep a firm cancer, birth defects or other reproductive harm_ hold on the handles°...
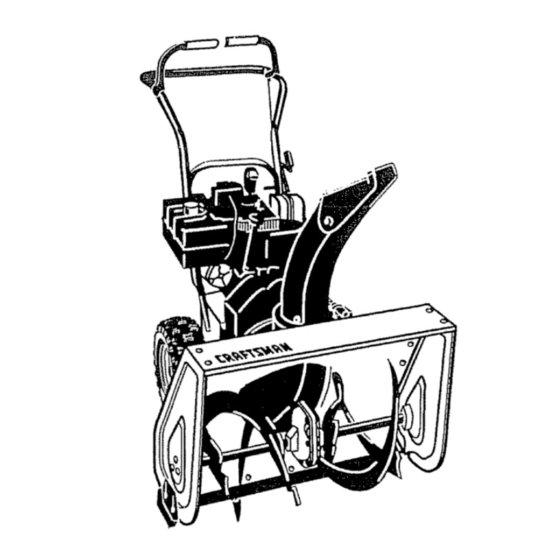
- Page 5 2- Screw, 5/16-t8 x 2 In. 2 -Washer, Hvsptlk 2- Nut, 5/1648 Reghex Parts packed separately in carton (not shown full size) 2 - Ignition Keys (Attached to engine in plastic bag) 1 - container 5W30 oil 1 - Snow Chute Assembly CAUTION: Always wear safety The figure below shows the snow thrower...
- Page 6 TO REMOVE SNOW THROWER Upper handle FROM CARTON • Locate and remove container of 5W30 oil. tf_efthand) "f • Locate all parts packed separately and remove from the carton+ 3t8" nylon • Remove and discard the packing materiat Iocknut from around the snow thrower •...
- Page 7 Install (3) ftatwashers and (3) nuts (found TO INSTALL SHIFTER LEVER KNOB in parts bag) on outside of flange ,, • Thread the hex nut found in the parts bag - Tighten carriage bolts securely, NOTE: onto shifter lever, Thread the shifter lever Check fourth carriage bolt for tightness., knob onto the threaded end of the shifter lever until it is snug against the hex nut...
- Page 8 4" CHECKLIST While learning how to use your snow thrower, pay extra attention to the following Before you operate your new snow important items: thrower, to ensure that you receive the ,/'.f Engine oil is at proper level. best performance and satisfaction from this ,/,/ Make sure gas tank is filled properly...
- Page 9 KNOW YOUR SNOW THROWER READ THIS OWNER'S MANUAL AND SAFETY RULES BEFORE OPERATING YOUR SNOW THROWER. Compare the illustrations with your SNOW THROWER to famiEiarize yourself with the location of various controls and adjustments Save this manual for future reference, Engine Engine Choke Off...
-
Page 10: Using Snow Thrower
The operation of any snow thrower can re- TO MOVE FORWARD sult in foreign objects being thrown into the BACKWARD eyes, which can result in severe eye dam- • To shift, release the traction drive Iever age. Always wear safety glasses or eye and move the speed shifter lever to the shields while operating the snow thrower. -
Page 11: To Use Wheel Lockout Pin
For extreme cold operating conditions of TO USE WHEEL LOCKOUT O°F and below, use a partial synthetic . The left hand wheel is secured to the axle 0W30 motor oil for easier starting. with a klick pin, see figure below.. This NOTE: S.A E. - Page 12 Always fill fueltankoutdoors andusea fun- on the engine first, then plug the other end nelor spout t o into the three-hole grounded receptacle_ prevent spilling When disconnecting power cord, always Make sure to wipe up any spilled fuel before unplug the end in the three-hole grounded starting the engine_ receptacle first.
-
Page 13: Cold And Warm Starts
COLD START If the starter still fails to turn engine, repeat the two previous steps until the starter en- • Be sure the auger drive and traction drive gages. Then continue with the directions for levers are in the disengaged (released) cold start. -
Page 14: Specifications
snow blowing is accomplished when the . After the snow throwing job has been snow is removed immediately after it completed, allow the engine to idle for a falls, few minutes, which will melt snow and accumulated ice off the engine. •... -
Page 15: Lubrication
GENERAL RECOMMENDATIONS SNOW THROWER The warranty on this snow thrower does not LUBRICATION - EVERY 25 HOURS cover items that have been subjected to op- erator abuse or negligence, To receive full • Lubricate Disc Drive Plate every twenty five value from the warranty, the operator must (25) hours and at the end of the season and/ maintain the snow thrower as instructed in... - Page 16 LUBRICATION - BEFORE STORAGE OIL RECOMMENDATION • Remove both wheels, grease (any auto- Only use high quality detergent oil rated motive type grease) both axles (see fig- with API service classification SG_ Select ure below) and replace wheels_ Do this at the oil's viscosity grade according to your least once a year and/or prior to storage°...
- Page 17 • Loosen the carriage bolts and nuts secur- CAUTION: Always disconnect the ing the scraper bar to the auger housing° spark plug wire and tie back away from • Adjust _he scraper bar to the proper posi- the plug before making any adjustments tion.
-
Page 18: Auger Drive Belt
AUGER DRIVE BELT If your snow thrower will not discharge snow, and the auger drive belt (see figure below) isdamaged, replace it as follows: Cable spring i Auger Drive Belt Ddve Pulley jSquare Pulley Tractio_ Drive Belt Guide Belt (Left Hand) (Right Hand) Traction Idler... -
Page 19: Traction Drive Belt
• Check clutchcontrol c ableadjustment. ,,..,,i._-_. j Drive Pulley seepage17. 3/32 Inch "_k,/" 4_..5_"" Belt Guide • Reconnect sparkplugwire Belt Guide.._,...,/\_"" (Left Hand) TRACTIONDRIVE BELT (Right Hand)_ ,,._\_,-" 3/32 Inch Ifyoursnowthrower w illnotmoveforward, checkthetraction drivebelt(seesecond figureonpage18)forwear(Check other Auger Idler'_ causes alsointhe Trouble Shooting Points section)°... - Page 20 If adjustment is necessary: • Remove right side bearing plate. Leave hex shaft in original position. • Loosen bolts in speed selector lever (see figure below), • Remove frictionwheel from hub, Slip fric- Speed Selector Lever tion wheel off hex shaft towards right side° See figure below.
-
Page 21: Adjusting Carburetor
IMPORTANT: Never tamper with the en- TO ADJUST CARBURETOR gine governor, which is factory set for The carburetor (see figure below) has been proper engine speed, Overspeeding pre-set at the factory and readjustment engine above the factory high speed setting should not be necessary. - Page 22 Z_ CAUTION: Neverstore yoursnow ff yOU do not want to remove gasoline, a • throwerindoors or in anenclosed, poorly fuel stabilizer (such as Craftsman Fuel ventilated areaif gasoline remains inthe Stabilizer No. 33500) may be added to tank.fumesmayreach anopenflame, any gasoline left in the tank to minimize...
-
Page 23: Troubleshooting
CORRECTION TROUBLE CAUSE Replace defective plug Difficult starting Defective spark plug Use carburetor bowl drain to Water or dirt in fuel system flush and refill with fresh fuel Clean fuel line; check fuel sup- Engine runs er- Blocked fuel line or low on fuel ply;... - Page 25 For the repair or replacement parts you need delivered directly to your home Call 7 am-7 pm, 7 days a week 1-800-366-PART (1-800-366-7278) Para ordenar piezas con entrega a domicilio -1-800-659-7084 For in-house major brand repair service Call 24 hours a day, 7 days a week 1-800-4-REPAIR (1-800-473-7247) Para pedir servicio de reparaci6n a...