Table of Contents

Related Manuals for Epson PhotoPC 550


Summary of Contents for Epson PhotoPC 550
- Page 1 User’s Guide...
- Page 2 Epson America, Inc. No patent liability is assumed with respect to the use of information contained herein. Nor is any liability assumed for damages resulting from the use of the information contained herein.
- Page 3 FCC COMPLIANCE STATEMENT FOR AMERICAN USERS This equipment has been tested and found to comply with the limits for a class B digital device, pursuant to Part 15 of the FCC Rules. These limits are designed to provide reasonable protection against harmful interference in a residential installation.
-
Page 4: Table Of Contents
Using Batteries Installing Batteries Handling Batteries Using the Optional AC Adapter Attaching the Hand Strap Installing Your PhotoPC 550 Software Installing for Windows 95 or Windows NT 4.0 Installing for Windows 3.1x or Windows NT 3.51 Making Software Installation Diskettes... - Page 5 Using Macro Mode to Take Close-ups Taking Pictures in Low Light Conditions Taking Pictures With the Self Timer Using a Tripod Erasing Pictures Getting Pictures Into Your Computer Connecting the Camera Getting Images and Sounds With the Camio Viewer Transferring Images Before Placing Them Dragging and Dropping a Picture Into a Document Getting Images and Sound With Image Expert...
- Page 6 Editing Images Viewing and Selecting Applying Quick Fix Correcting Cropping Resizing and Changing Resolution Rotating Flipping Applying Special Effects Changing the Number of Colors Managing the Camera From the Computer Taking Pictures From Your Computer Using the Self Timer Setting the Shutter Speed Adjusting Camera Settings From Your Computer Using SmartMedia Cards Installing a Storage Card...
- Page 7 3.3V SSFDC (solid state floppy disc card) or SmartMedia storage cards. Use PhotoPC 550 to add pictures to your documents, flyers, and presentations to increase their visual impact. Create personalized greeting cards. Share pictures with business colleagues or friends over the Internet.
-
Page 8: Introduction
PhotoPC 550 Features PhotoPC 550 comes with everything you need to capture digital images and includes the following: Resolutions up to 640 480 pixels 24-bit color images in more than 16 million colors 1MB internal flash memory that holds 24 standard... -
Page 9: System Requirements
EPSON Download You can call the EPSON Download Service at Service (800) 442-2007. Set your communications software to 8 data bits, 1 stop bit, no parity. -
Page 10: Software Support
Registration Please take a minute to fill out the registration card for the PhotoPC 550 digital camera and mail it back to us. This enables you to receive special information on accessories, new products, and software upgrades. You’ll get immediate attention if you have a problem with your PhotoPC 550. - Page 11 To reduce the risk of electric shock, do not remove the camera’s cover or open any of the compartments except as instructed in this User’s Guide. To prevent fire or electric shock, do not insert objects into any openings in the camera. To prevent fire or electric shock, do not expose the camera to rain or moisture and do not use the camera where inflammable or volatile gas is stored.
- Page 12 Adjust only those controls that are covered by the operating instructions. Do not attempt to service the camera yourself. Refer all servicing to qualified service personnel. If the liquid crystal solution contained in the display panel leaks out and gets on your hands, wash them thoroughly with soap and water.
-
Page 13: Getting Started
Unpacking your PhotoPC 550 Identifying camera parts Using batteries Using the optional AC adapter Attaching the hand strap Installing your PhotoPC 550 software Unpacking Your PhotoPC 550 Your PhotoPC 550 includes all the parts shown to the left. Getting Started 1-1... -
Page 14: Identifying Camera Parts
1-2 Getting Started viewfinder timer light microphone status light connector cover TITLE ONOFF-2.eps EPSON AMERICA, INC. Documentation Department DATE REV> 20 Septem 20770 Madrona Avenue, Torrance, CA 90503 (310) 782-0770 DRAWN BY Wendi Swanlund display panel storage card slot cover... -
Page 15: Using Batteries
display voice panel recording image quality shutter button button button S-Hi / Hi / S VOICE ERASE SELF TIMER erase timer button button top view Using Batteries The instructions in the following sections tell you how to install and handle batteries. Installing Batteries Before you install the batteries, make sure the camera is turned off (the lens cover is closed, see “Turning the Camera... -
Page 16: Handling Batteries
Close the battery cover and slide it to the right until it snaps into place. 1-4 Getting Started Handling Batteries When your PhotoPC 550 batteries wear out, you can replace them with any of the following: Single-use AA alkaline batteries (Energizer brand recommended) -
Page 17: Using The Optional Ac Adapter
This is especially useful when you are transferring pictures and operating the camera from your computer (see Chapter 3). The AC adapter allows you to connect your PhotoPC 550 to any standard 110/120V electrical outlet. The adapter powers the camera but does not charge the batteries. - Page 18 WARNING Use only the adapter designed for the PhotoPC 550. Using any other adapter may cause fire, electrical shock, or injury. Do not alter the plug on the power cable, and do not use the adapter for any other purpose than powering your PhotoPC 550.
-
Page 19: Attaching The Hand Strap
The included CD-ROM has this software for your Windows PC: Sierra Imaging Image Expert PhotoPC 550 TWAIN driver All programs will be installed in the PhotoPC 550 folder or directory. NOTE If you don’t have a CD-ROM drive, see page 1-9. -
Page 20: Installing For Windows 95 Or Windows Nt
Follow the instructions on the screen. NOTE for Windows 95 users To view the readme file, see C:\Program Files\Sierra Imaging\ PhotoPC 550\Image Expert\readme.wri. If you did a custom installation, the readme files may be located in a different directory. To uninstall Image Expert, use the Add/Remove Programs option in the Control Panel. -
Page 21: Making Software Installation Diskettes
Windows 95/Windows NT or Windows 3.1 . Then select your diskette drive and click OK . Follow the instructions on the screen to create the installation diskettes. Now you can install the PhotoPC 550 software on your computer. Getting Started 1-9... - Page 22 1-10 Getting Started...
-
Page 23: Taking Pictures
2 Taking Pictures Greetings from Utah aking pictures with PhotoPC 550 is similar to using a traditional “point and shoot” camera. This chapter tells you everything you need to know, including: Turning the camera on and off Checking the display panel... -
Page 24: Turning The Camera On And Off
Turning the Camera On and Off Before you can take pictures with PhotoPC 550, you need to turn on the camera and check the display panel. It’s important to be aware of the camera’s power-saving features and the status of your batteries. -
Page 25: Checking The Battery
Checking the Battery Before you take pictures, check the battery icon on the control panel. The icon shows how much battery power you have left, in the following stages. Full battery power (or AC adapter in use) Battery power is decreasing Battery power low (time to buy new batteries) Battery power is almost out Change batteries... -
Page 26: Setting Image Quality
Setting Image Quality PhotoPC 550 has three image quality (resolution) settings: Standard, High, and Super High. Press the image quality button on top of the camera to cycle from one setting to the other. The image quality icons (shown below) appear on the display panel. -
Page 27: Taking A Picture
Taking a Picture Follow these steps to take a picture: Make sure you are at least 23.6 inches (60 cm) away from your subject. Turn the camera on and wait until the status light turns green. status light viewfinder NOTE Remember that the camera shuts off automatically after 60 seconds. -
Page 28: Recording Messages With The Microphone
Press the shutter button the rest of the way down to take the picture. Hold the camera still until it beeps and the status light starts flashing red. The flashing red light indicates that the camera has captured the image and is processing it. Processing takes approximately eight seconds. -
Page 29: Using Macro Mode To Take Close-Ups
Hold the camera 4 to 6 inches (10.2 to 15.2 cm) away and speak into the microphone. You can record a message up to six seconds long. When the recording time is up, the camera beeps twice. After you record your message, the picture counter decreases by one. -
Page 30: Taking Pictures In Low Light Conditions
Taking Pictures in Low Light Conditions You can use PhotoPC 550 in most indoor or low light settings. There is no need for a flash because of the camera’s highly light sensitive CCD sensor. A good rule of thumb is if you can read a book in the available light, you can take a picture with PhotoPC 550. -
Page 31: Taking Pictures With The Self Timer
2 seconds before the shutter is released. The camera beeps when the image is captured. The status light continues to flash red as PhotoPC 550 processes the image. When the status light stops flashing and turns green, you can take another picture. -
Page 32: Erasing Pictures
Find the opening for the tripod screw on the bottom of your camera. Carefully place the camera on the tripod. Screw the camera on until it is firmly in place. tripod socket Adjust the tripod to view your subject as desired. Erasing Pictures You can erase the last picture taken (along with any accompanying audio message) or you can erase all the... -
Page 33: Getting Pictures Into Your Computer
3 Getting Pictures Into Your Computer hen you’re finished taking pictures, you can connect the camera to your computer and download the images. If you’re using Windows 95 or Windows NT 4.0, you can use the Camio ™ Viewer to drag a picture directly from the camera and drop it into your project. -
Page 34: Connecting The Camera
Connecting the Camera Note the following before you start: If you have the optional AC adapter, you can conserve battery life by using it when you connect the camera to your computer. See page 1-5 for instructions. The camera’s auto shut-off feature takes place after 5 minutes of inactivity when the camera is connected to your computer. -
Page 35: Getting Images And Sounds With The Camio Viewer
Getting Images and Sounds With the Camio Viewer PhotoPC 550 provides several different ways to transfer your pictures from the camera to your computer. The Camio Viewer, which runs only under Windows 95 and Windows NT 4.0, is a quick and easy way to get pictures from the... - Page 36 First you need to connect the camera to your computer as described in the previous section. Then follow these steps: Double-click the camera icon on the right end of your Windows 95 Taskbar. You see the Camio Viewer Startup Options dialog box: NOTE If you clicked the sound icon instead (available if your...
-
Page 37: Transferring Images Before Placing Them
NOTE Dragging and dropping an image with the Camio Viewer works only with OLE 2.0-compliant applications running under Windows 95 and Windows NT 4.0. You cannot drag and drop sound into your document. Continue with the steps in one of the following sections, depending on the option you chose in step 2. -
Page 38: Getting Images And Sound With Image Expert
Windows 3.1 or Windows NT system. Start Image Expert. Under Windows 95, click Start , and then point to Programs , PhotoPC 550 , Image Expert . If you’re using Windows 95 and Windows NT, you see a Quick Tour screen like the following: If you’re using Windows 3.1, skip to step 3. - Page 39 Click on any of the topics for an animated demonstration of what you can do with PhotoPC 550 and Image Expert. To skip the tour and download your pictures and sound, click Close . You see a window like the following:...
- Page 40 You see a Select Album window like the following: Image Expert will automatically create an album (folder) for your pictures with the current date as its name. You can type your own name for the album if you want, or choose an existing album.
-
Page 41: What To Do If You See An Error Message
If you want to make room for more pictures in your camera, click Yes . Your pictures are displayed in an album of thumbnails. You can double-click an image to open it in Image Expert. You can display your images one by one; edit, print, and copy them to diskettes;... -
Page 42: Getting Images Into Twain Applications
From the File menu, choose Import , then Select TWAIN_32 Source (or Acquire , then TWAIN_32 Select Source ). NOTE You may need to select TWAIN instead of TWAIN_32 in some applications, especially those in Windows 3.1. Choose PhotoPC 550 as the TWAIN source. -
Page 43: What To Do If The Camera Is Not Responding
From the File menu, choose Import , then TWAIN_32 (or Acquire , then TWAIN_32 Acquire ). The PhotoPC 550 Twain Driver window appears, with “thumbnail” images of your pictures, as shown below. (If you do not see the Twain Driver window, it may be in the background. - Page 44 Follow these steps to fix your camera connection: Make sure the camera is turned on and has not shut off automatically. If it has, turn it off and then back on again by closing and opening the lens cover. Check the cable and make sure the connections to the camera and computer are secure.
-
Page 45: Getting Pictures Into Your Documents
4 Getting Pictures Into Your Documents hotoPC 550 provides several methods for getting your pictures into presentations, letters, and other projects. You can drag and drop a picture from an Image Expert album into a document or presentation. You can also import an image into your application, or copy and paste it. -
Page 46: Using Drag And Drop From An Album
NOTE Although most of the instructions and illustrations in this chapter apply to Windows 95, you can follow the same steps on a different version of Windows. Using Drag and Drop From an Album Once you have transferred your pictures into albums, you can easily drag and drop them into documents or other projects if you are using Windows 95 or Windows NT 4.0. -
Page 47: Importing Images And Sound Into Documents
Your picture may display poor image quality after you import it if your computer doesn’t support more than 256 colors. However, in most cases it will print correctly. Follow these steps to import a PhotoPC 550 picture into your document: Start your application. - Page 48 Select the point where you want to place your picture. Select Picture from the Insert menu. (In some applications you may need to select a different command, such as Import Picture , which is usually in the File menu.) An Insert Picture dialog box appears: Locate and select the image you want to insert.
-
Page 49: Getting Images With Copy And Paste
A copy of the picture appears in your document. Converting File Formats PhotoPC 550 pictures are JPEG files. If your word processor or other application doesn’t support the JPEG format, you can use the Save As feature of Image Expert to convert your files. - Page 50 Select the file type from the pull-down menu. You can choose any of the following formats: JPEG Bitmap (BMP) TIFF Targa (TGA) PC Paintbrush (PCX) Click Save . 4-6 Getting Pictures Into Your Documents...
-
Page 51: Working With Pictures And Sounds In Albums
If your computer is configured for sound, you can listen to the messages you recorded with PhotoPC 550 or record new messages. You may even be able to e-mail a picture directly from Image Expert. -
Page 52: Using Albums
Using Albums Image Expert albums provide a convenient way to access and view your pictures. Click here to change a picture’s name. Here are some of the things you can do with albums: Use the Edit menu to rename or delete an album. Add or remove pictures by moving them to or from another album. -
Page 53: Viewing Picture Information
Click the picture to select it or open the image by double-clicking it. Click the Properties button or select Properties from the Image menu. You see information like the following: All PhotoPC 550 images are captured as 24-bit JPEG files. Working With Pictures and Sounds in Albums 5-3... -
Page 54: Printing An Image
Click the Camera Settings tab to display information like the following: NOTE If you are viewing an image from another application, the camera settings tab may not be available. Click another image to view its information, or close the Properties box. If you want to listen to the sound attached to your image, see “Playing Back Sounds”... -
Page 55: Printing An Album Or Selected Images
Set any of the following options and click OK : Click Actual Size to keep your picture the same size or click Fit to Page to stretch your picture to fill the page. NOTE If you click Fit to Page, your picture loses detail because it is being enlarged. -
Page 56: Playing Back Sounds
Set any of the following options and click OK : Choose Print Contact Sheet or Print Images . For a Contact Sheet, Image Expert prints your pictures at thumbnail size and fits as many as possible on the page. If you choose Print Images, you can set the number of images you want printed on each page. -
Page 57: Replaying A Section Of An Audio Clip
Follow these steps to see a sound wave of your audio clip: Select an image that has an audio clip. Click the Audio Edit button , or choose Edit from the Audio menu. The sound wave window opens. Click the Play button , or select Play from the Audio menu. -
Page 58: Adding And Modifying Sounds In A Downloaded Image
To change the playback or recording volume, right click the sound icon . The Audio Properties dialog box opens: Move the sliders left or right to change the volume. NOTE The Preferred device is set by your system. For more information, see your computer documentation. -
Page 59: Recording New Sounds
Click your mouse and drag the cursor over the section you want to cut or copy. The selected section is highlighted. Select Cut or Copy from the Edit menu. Select the image that you want to attach the audio to and paste in the selected audio clip. -
Page 60: Deleting Sounds
Select the option you want: To add sound to an image that doesn’t have sound or to replace the current sound, choose Record New . To add additional sound to an existing audio clip, choose Record Additional . To end your recording, choose Stop . To listen to your new recording, choose Play New . -
Page 61: Displaying Albums As Slide Shows
Displaying Albums as Slide Shows When you display an album as a slide show, you can have it play automatically with various transition effects between images. Follow these steps: Open your album. Click the Slide Show button or select Slide Show from the View menu. The first image appears on your screen with the slide show controls, as shown: view next... -
Page 62: Copying To Diskette
Set any of the following options and click OK: To stretch your pictures across the whole screen, click Fit to Screen . To change the display period for each picture, change the number in the Seconds Between Pictures box. To play the slide show only once, click Continuous Repeat to deselect it. -
Page 63: Viewing The Pictures On Diskette
Select Save to Floppy from the File menu. You see the following dialog box: Make sure your diskette drive appears in the Copy images to: box. If you want to include a slide show player to view the pictures, make sure Include Slide Show Player is checked. -
Page 64: Using An Album As A Screen Saver
Using an Album as a Screen Saver It’s easy to make your own screen saver with your favorite pictures. This option is available only if you are using Windows 95 or Windows NT. Follow these steps: Open the album you want to use. Choose Set Screen Saver from the File menu. -
Page 65: Sending Pictures And Sound By E-Mail
If you want the image to be stretched across the whole screen, click Resize to fit screen . Click Yes . (If you change your mind, click Remove Wallpaper .) You can minimize Image Expert to see your new wallpaper. Sending Pictures and Sound by E-mail If you are using Windows 95 or Windows NT 4.0, you can... - Page 66 Click OK . Your e-mail application opens, and the images you selected appear as attachments. Type the e-mail address where you’re sending the picture(s). You can also type in a subject heading and message if you want. When your e-mail is ready, click whatever button your application uses to send.
-
Page 67: Editing Images
6 Editing Images original image image with glass blocks effect applied image with ripple image with invert effect applied effect applied ou can edit your images to enhance their appearance; crop, rotate, and resize them; or create special effects. This chapter describes the following Image Expert features you can use to modify your images: Viewing and selecting Applying Quick Fix... -
Page 68: Viewing And Selecting
Viewing and Selecting When your image is displayed in an album, you can rotate it or do a quick fix. However, to use any other editing features, you need to open the image by double-clicking it or selecting Open Image from the File menu. Before you edit your image, you may want to use the Zoom and selection tools on the left side of your screen. -
Page 69: Correcting
Correcting To fine-tune an image, click the Corrections tool choose Corrections from the Image menu. You see a dialog box like the following: Click and drag to adjust the division between the original and edited preview. Click the tabs at the top of the screen to make these kinds of corrections: Brightness and Contrast For adjusting the amount of light in your image and the... -
Page 70: Cropping
The preview window shows your image with the original view on the left and the corrected image on the right. If you want to adjust the division between the original and edited image, click and drag the triangle below the image. You can also zoom in on your image to see more detail. -
Page 71: Resizing And Changing Resolution
NOTE High and Super High images from your PhotoPC 550 have a resolution of 144 pixels per inch. Click the tab if you want to change the image size in pixels. You see a dialog box like the following: Uncheck if you want to distort your image. -
Page 72: Rotating
Rotating You can click the Rotate tool to quickly rotate a picture to the right. (If you rotate an image displayed in an album, you can’t undo it.) For more options, select Rotate from the Image menu. You can choose one of the following: Left (90 degrees counterclockwise) Right (90 degrees clockwise) Exact (specify the degree of rotation) -
Page 73: Flipping
Flipping You can reverse your image by selecting Flip Horizontal from the Image menu. This is useful for printing iron-on transfers. Select Flip Vertical to turn your image upside down. Applying Special Effects To transform or distort your images in interesting ways, choose Effects from the Image menu. -
Page 74: Changing The Number Of Colors
The preview window shows your image with the original view on the left and the distorted image on the right. If you want to adjust the division between the original and filtered image, click and drag the triangle below the image. You can also zoom in on your image to see more detail. -
Page 75: Managing The Camera From The Computer
The AC adapter should be available where you bought your PhotoPC 550, or you can order it from EPSON. See page 1-5 for more information. Follow these steps to take pictures from your computer: Connect the camera to your computer as described in Chapter 3. - Page 76 Turn on both your camera and your computer system. Start Image Expert as described on page 3-6. Click the Camera Controls button Controls from the Camera menu. You see a dialog box like the following: Click to change the image quality setting.
-
Page 77: Using The Self Timer
NOTE When the camera is connected to your computer, you can’t use the shutter or control buttons on the camera. You must operate these features through your computer. The only feature you can control through the camera is macro mode. If you switch to or from macro mode, the mode automatically changes, but you must close and reopen the Camera Controls window to update the window. -
Page 78: Setting The Shutter Speed
Setting the Shutter Speed Most of the time, PhotoPC 550 adjusts the shutter speed automatically. However, when you take pictures from your computer, you can adjust the speed manually. This lets you use special lighting effects and even take “stop-action”... - Page 79 Click the Camera Setup button to display the Camera Setup dialog box: Enter a new Camera ID if you want to change the default. This might be useful if you have more than one camera and you want to be able to have its ID recorded in your picture data.
- Page 80 7-6 Managing the Camera From the Computer...
-
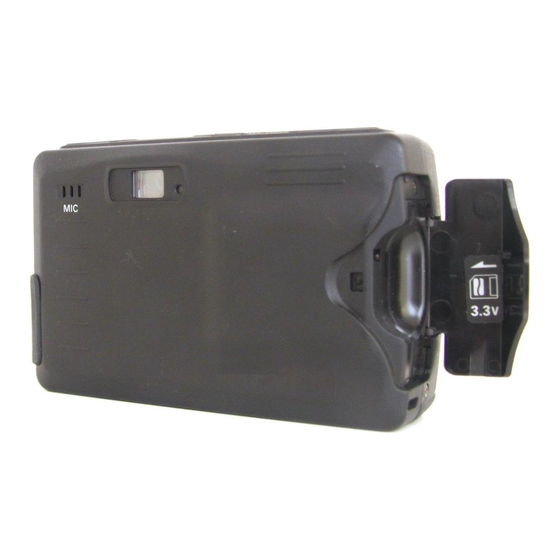
Page 81: Using Smartmedia Cards
3.3V SSFDC or SmartMedia removable storage cards (2MB and up) to increase the storage capacity of your PhotoPC 550 camera. They are easy to install and remove, and you can easily download the images to your computer. -
Page 82: Installing A Storage Card
Installing a Storage Card Before you start, make sure the camera is turned off. Then follow these steps: Open the storage card slot cover on the side of the camera. 8-2 Using SmartMedia Cards Insert the card all the way into the storage card slot. Close the storage card slot cover. -
Page 83: Removing A Storage Card
NOTE When a storage card is installed, you may notice a delay between the time you press the shutter button and when the camera beeps. To avoid blurring, hold the camera still until it beeps. Removing a Storage Card Make sure the camera is turned off. Then open the cover to the storage card slot and gently pull out the storage card. -
Page 84: Using A Pcmcia Adapter
Using a PCMCIA Adapter To use the PCMCIA adapter, your computer must have a PCMCIA slot. Refer to the instructions that came with your adapter or follow these steps to use an adapter: Insert the storage card all the way into the adapter, as shown below: 8-4 Using SmartMedia Cards Insert the adapter into your computer’s PCMCIA slot. -
Page 85: Transferring Pictures
Transferring Pictures Once the adapter and card are installed in your computer’s PCMCIA slot, you can transfer pictures by simply copying them to your hard drive. This is the fastest way to get pictures into your computer. In Windows 95, use My Computer or the Windows Explorer to drag and drop image files to your hard drive. - Page 86 8-6 Using SmartMedia Cards...
-
Page 87: Maintenance And Troubleshooting
9 Maintenance and Troubleshooting our PhotoPC 550 camera is easy to take care of, and any problems you may have are easy to solve. This chapter includes the following sections: Cleaning the camera Storing the camera Solving camera problems Solving picture problems... -
Page 88: Solving Camera Problems
Avoid sudden temperature changes, which can cause moisture to condense on the camera. Keep the camera in a case or bag if you need to move it from a cold environment to a warm one. Allow time for the camera and its optional accessories to adjust to temperature changes before using them. - Page 89 The camera may be connected to your computer. When it’s connected, you can’t use any of the controls on the camera itself. See Chapter 7 for instructions on taking pictures from your computer. The “pictures remaining” number on the display panel doesn’t decrease after you take a picture or record a message.
- Page 90 You are unable to format or use a SmartMedia storage card with your camera. Make sure you’re using a 3.3V SSFDC or SmartMedia card. Other cards will not work with PhotoPC 550. If you’re using a Simple Technology card, call the Technical Support Department at (800) 4-SIMPLE.
-
Page 91: Solving Picture Problems
Solving Picture Problems If you’re not satisfied with some of the pictures you get from the PhotoPC 550, you may need to adjust some of the camera settings. Read the suggestions below. Your pictures display poor image quality on the screen or when you print them out. - Page 92 Make sure you hold the camera steady and your subject isn’t moving. In low lighting conditions, try using a tripod to hold the camera steady. See page 2-9 for instructions. If you want to take a picture of a moving subject, you can increase the shutter speed while the camera is connected to your computer.
-
Page 93: Solving Sound Problems
Your pictures don’t look as good as they used to. Your camera’s lens may be dirty or dusty. Try cleaning it by following the instructions on page 9-1. The area captured in the picture is different from what you saw in the viewfinder. Make sure you look straight through the viewfinder. - Page 94 9-8 Maintenance and Troubleshooting...
-
Page 95: Camera
A Specifications Camera Physical Dimensions Width 4.2 in (106.5 mm) Height 2.6 in (66.8 mm) Depth 1.5 in (37.2 mm) Weight 5.4 oz (153 g), without batteries Safety Specifications Conforms to FCC specifications. FCC Declaration of Conformity on file. Power Sources 3 AA batteries (single-use alkaline, lithium or rechargeable NiCd or NiMH) -
Page 96: Environmental
144 pixels per inch Bit depth 16 million colors, 24-bit 1/3 inch progressive scan 640 Serial interface 2.5 mm mini terminal (to camera) RS-232C compatible (to computer) Serial communication Up to 115Kbps speed Internal memory 1MB flash memory Optional expansion 3.3V SSFDC or SmartMedia cards memory Environmental... -
Page 97: Microphone
Microphone Frequency response 200Hz to 2.3Hz at -30DB 400Hz to 1.3Hz at -20DB Optional AC Adapter Physical Dimensions Width 1.97 inches (50 mm) Height 1.18 inches (30 mm) 1.85 inches (47 mm) including pins Depth 3.74 inches (95 mm) Technical Output DC 7V/2.0A Input... - Page 98 A-4 Specifications...
-
Page 99: Index
Index AC adapter, 2, 1-5 to 1-6, 2-3, 3-2, A-3 Accessories, 2, 8-1 to 8-5 Acquiring photos, TWAIN programs, 3-10 to 3-11 Adjusting camera settings, 2-4, 7-4 to 7-5 Albums copying to diskette, 5-12 to 5-13 displaying as slide show, 5-11 to 5-12 dragging pictures from, 4-2 to 4-3 making screen saver, 5-14 organizing pictures, 5-2 to 5-3... - Page 100 Image Expert, 4-2 to 4-3 2 Index Edges, softening, 6-7 Editing images, 6-1 to 6-8 sounds, 5-8 to 5-10 Environmental specifications, A-2 EPSON Accessories, 2 Electronic support services, 3 to 4 help, 3 to 4 registration, 4 World Wide Web site, 3 Equalization, 6-3...
- Page 101 FTP, 3 Glass blocks effect, 6-7 Hand strap, attaching, 1-7 Handling batteries, 1-4 to 1-5 Help, EPSON, 3 to 4 Image Expert albums, 4-2 to 4-3, 5-2 to 5-13 camera settings, changing, 7-4 to 7-5 Camio Viewer, 3-3 to 3-6...
- Page 102 Negative images, 6-7 4 Index Parallax, 2-8 PCX files, 4-6 Photographic specifications, A-2 PhotoPC 550 camera AC adapter, using with, 1-5 to 1-6, 2-3 auto shut-off, 2-2, 7-2, 7-5 cleaning, 9-1 connecting to computer, 3-2 to 3-3 display panel, 2-2...
- Page 103 Pictures capturing from computer, 7-1 to 7-3 close-up, 2-7 color correcting, 6-3 to 6-4 color depth, changing, 6-8 copying to diskette, 5-12 to 5-13 correcting, 6-2 to 6-4 counter, 2-3 cropping, 6-4 downloading, 3-3 to 3-9 editing, 6-1 to 6-8 e-mailing, 5-15 to 5-16 erasing, 2-10, 3-4, 3-8, 3-11 flipping, 6-7...
- Page 104 SSFDC (solid state floppy disc card), see SmartMedia cards Storage cards, see SmartMedia cards Storing camera, 9-1 to 9-2 Strap, attaching, 1-7 Support EPSON, 3 to 4 Sierra Imaging, 4 System requirements, 3 Taking pictures close-up, 2-7 using computer, 7-1 to 7-3...
- Page 105 Targa (TGA) files, 4-6 Technical support, 3 to 4 TIFF files, 4-6 Timer, see Self Timer Tripod, 2-9 Troubleshooting, 9-2 to 9-7 Turning camera on and off, 2-2 Twain driver, 1-7 TWAIN programs, acquiring photos, 3-10 to 3-11 Unpacking the camera, 1-1 World Wide Web, 3 Zoom tool, 6-2 Index 7...
- Page 106 EPSON Connection at 800-922-8911 for warranty repair instructions and return authorization, if required. Epson will, at its option, repair or replace on an exchange basis the defective unit, without charge for parts or labor. If the product requires repair or replacement, package it in its original container or an equivalent, along with proof of the date of original purchase.
- Page 107 EPSON Connection at 800-922-8911 for warranty repair instructions and return authorization, if required. Epson will, at its option, repair or replace on an exchange basis the defective unit, without charge for parts or labor. If the product requires repair or replacement, package it in its original container or an equivalent, along with proof of the date of original purchase.