Craftsman 247.29934 Operator's Manual
208cc engine front tine tiller
Hide thumbs
Also See for 247.29934:
- Operator's manual (68 pages) ,
- Operator's manual (68 pages) ,
- Operator's manual (64 pages)
Table of Contents
Advertisement
Available languages
Available languages
Operator's
Manual
I:Rl FI'SlVl N
208cc Engine
Front Tine Tiller
Model No. 247.29934
CAUTION:
Before
using
this product,
read this
manual
and follow
all
safety
rules
and operating
instructions.
* SAFETY
* ASSEMBLY
* OPERATION
* MAINTENANCE
* PARTS LIST
* ESPANOL
Sears Brands
Management
Corporation,
Hoffman Estates,
iL 60179, U.S.A.
Visit our web site: www.craftsman.com
FORMNO. 769-05511C
2/1/2011
Advertisement
Table of Contents

Related Manuals for Craftsman 247.29934


Summary of Contents for Craftsman 247.29934
- Page 1 * OPERATION CAUTION: Before using * MAINTENANCE this product, read this * PARTS LIST manual and follow * ESPANOL safety rules and operating instructions. Sears Brands Management Corporation, Hoffman Estates, iL 60179, U.S.A. Visit our web site: www.craftsman.com FORMNO. 769-05511C 2/1/2011...
- Page 2 FORTWO YEARSfrom the dateof purchase,this productiswarrantedagainstanydefectsin materialor workmanship. D efectiveproductwill receivefree repairor free replacementif repairis unavailable. For warranty coverage details to obtain repair or replacement, visit the web site: www.craftsman.com This warranty covers ONLY defects in material and workmanship. Warranty...
- Page 3 This machinewas built to be operatedaccordingto the safe opera- This symbolpointsout importantsafetyinstructionswhich,if not tion practicesin this manual.As with any type of powerequipment, followed,couldendangerthe personalsafetyand/orpropertyof carelessnessor error on the part of the operatorcan resultin yourselfand others. Readand followall instructionsin this manual seriousinjury.This machineis capableof amputatingfingers,hands, beforeattemptingto operatethis machine.Failureto complywith toes and feet and throwingdebris.
- Page 4 Safe Handling of Gasoline: • Lookdownand behindand usecare whenin reverseor pulling machinetowardsyou. Toavoidpersonalinjuryor propertydamageuseextremecare in handlinggasoline.Gasolineis extremelyflammableand the vaporsare • Start the engineaccordingto the instructionsfoundinthis manual explosive.Seriouspersonalinjurycan occurwhengasolineis spilled and keepfeet well awayfromthe tines at all times. on yourselfor yourclotheswhichcan ignite.Washyour skin and •...
- Page 5 NOTICE REGARDING EMISSIONS • Do notchangethe enginegovernorsettingsor over-speed the engine.Thegovernorcontrolsthemaximumsafeoperatingspeed Engineswhich are certifiedtocomplywith Californiaand federal of engine. EPAemissionregulations for SORE(SmallOff RoadEquipment) are Maintainor replacesafetyand instructionlabels,as necessary. certifiedto operateon regularunleadedgasoline,and mayinclude Followthis manual f or safe loading,unloading,transporting, a nd the followingemissioncontrol systems:EngineModification (EM), storageof this machine.
- Page 6 SAFETY SYMBOLS This pagedepictsand describessafetysymbolsthat mayappear on this product. Read,understand,and followall instructionson the machine beforeattemptingto assembleand operate. READ THE OPERATOR'S MANUAL(S) Read, understand, and follow all instructions in the manual(s) before attempting to assemble operate WARNING-- ROTATING TINES Do not put hands or feet near rotating parts.
- Page 7 Fire Prevention Requirements,...
- Page 8 IMPORTANT: T his unit isshippedwithoutgasolineor oil inthe engine. Be certain to serviceenginewithgasolineand oil as instructed in the Operationsectionof this manualbeforeoperatingyourmachine. NOTE:Referenceto rightand left hand sideof the Tillerisobserved fromthe operatingposition. OPENING CARTON Cut eachcornerof the cartonverticallyfromtop to bottom. Removeall looseparts. Removeloosepackingmaterial. REMOVING UNIT FROM CARTON Use the handlebarto lift and pullthe tiller backwardsto a flat...
- Page 9 Tightenthe boltsecurelyafter securingthe handlebrace.See Figure4. Locatethecarriagebolt, bell washerand hand knobpackedwith yourtiller. Tail Bracket Insertthe carriagebolt throughthe weldedbracketon the handle, bell washer,handlebraceand intothe hand knob.See Figure4. Selectone of the threehandleheightpositions(threenotchesin the weldedhandlebracket)and tightenthe hand knobto secure the handlein the desiredposition.See Figure4. Returnto the lowerhandleand tightenthe hexbolt securely.
- Page 10 ADJUSTMENTS Prior to operatingyour tiller,carefullyreadand followall instructions below.Performall adjustmentsto verifyyourtiller isoperatingsafely _and propery. Checkthe adjustmentof the wheels: Thetiller isshippedwith the wheelsadjustedso thatthe machinesits level.Thewheels needto be adjustedto meetyourtillingneedsbefore operation.This adjustmentismadeby removingtheclevis pin fromthe wheelyokeand raisingthe wheelsto thedesiredheight.See Figure8. Checkthe adjustmentof the forwardclutchcableas follows: Disconnectand groundthe spark plugwire againsttheengine.
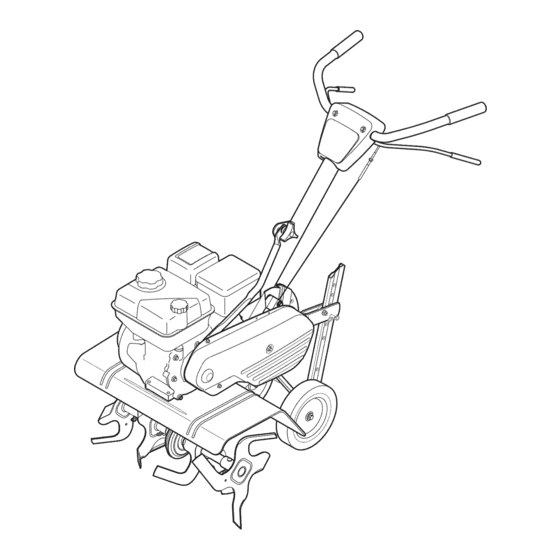
- Page 11 Muffler Forward Tine Engagement Lever Handle Height Fuel Ca Adjustment Oil Fill Cap _th Stake & Dipstick Tiller Tines Figure12 Nowthat youhaveset up yourtillerfor operation,get acquainted with its controlsand features.Theseare describedon the next two pages The operationof anytiller can resultin foreignobjectsbeingthrown and illustratedon this page.This knowledge will allowyou to useyour intothe eyes,which can damageyoureyesseverely.Alwayswear newequipmentto its fullestpotential.
- Page 12 AiR FILTER DEPTH STAKE Theair filter is a deviceon the engineair intake that preventsdust and The depthstakecontrolsthe tillingdepth.See Figure12. dirt enteringthe engine.See Figure12. HANDLEBAR HEIGHT ADJUSTMENT MUFFLER The handleheightmay be adjusted.Loosenthe knobto changethe Engineexhaustexitsthe enginevia the muffler.See Figure12. position.Tightenhardwarewhencomplete.See Figure12. OIL FILL CAP &...
- Page 13 AND OIL FILL-UP Oil (one bottle shipped with unit) Alcoholblendedfuels (calledgasoholor usingethanolor methanol) FirstTime Use canattract moisturewhich leadsto separation and formationof acids Removeoil fill dipstick. duringstorage.Acidicgas can damagethe fuel systemof an engine With the tilleron levelground,usea funnelto emptyentire whilein storage. contentsofoil bottle providedintothe engine.
- Page 14 Pullthe rope with a rapid,continuous,full arm stroke.Keepa firm grip on the starterhandle.Letthe rope rewindslowly. Repeat,if necessary,untilenginestarts.Whenengine starts, movechokecontrol graduallytowardthe RUNI _' I position.. If enginefalters,movechokecontrol backtowardthe CHOKE I'_1 positionand repeatsteps5 though8. 10. ALWAYS keepthe throttlecontrol in the START/RUN (Rabbit) positionwhenoperatingthe tiller. TO STOP ENGINE Tostop the wheelsand tines,releasethe ForwardClutchBail.
- Page 15 ADJUSTING THE HANDLE HEIGHT The handleshouldbe adjustedso that whenthe tilleris digging3-4" intothe soil, the handlefalls to aboutwaste-high. T o adjusthandle, simplyloosenthe handleknob, movethe handleto the desiredheight and retightenthe handleknob. See Figure17. Beforeclearingthe tines by hand,stop theengine,allowall moving partsto stopand disconnectthe sparkplug wire. Failureto followthis warningcouldresultin personalinjury.
- Page 16 Choosing the Correct Tine Speed With experience, y ou will findthe tillingdepthand tilling speed combinationthat isbest for yourgarden.Set theengine throttlelever at a speedtogive the engineadequatepowerand yet allowit tooperate at the slowestpossiblespeeduntilyou haveachievedthe maximum tillingdepthyoudesire. Fasterenginespeedsmay be desirable whenmakingfinalpassesthroughthe seedbedor when cultivating. Selectionof the correctenginespeed,in relationto the tillingdepth, will ensurea sufficientpowerlevelto do thejob withoutcausingthe engineto labor.
- Page 17 Terrace Gardening Tocreatea terrace,startat thetop of the slopeand work down Go back and forth acrossthefirst row. See Figure22. Eachsucceedinglowerterraceis startedby walkingbelowthe terraceyouare preparing.Foradded stabilityof the tiller,always keepthe uphillwheelin the soft, newlytilledsoil. Donot till the last 12"or moreof thedownhilloutside edgeof each terrace.This untilledstrip helpspreventthe terracesfrombreakingapart and washingdownhill.It also providesa walkingpath betweenthe rows,...
- Page 18 MAINTENANCE SCHEDULE Followthe maintenanceschedulegivenbelow.This chart describes Beforeperforming anytypeof maintenance/service, disengage all serviceguidelinesonly. Usethe ServiceLog columnto keeptrackof controls and stoptheengine.Waituntilall moving partshavecometo completedmaintenance tasks.To locate the nearest Sears Service a complete stop.Disconnect sparkplugwireandgrounditagainstthe Centeror to scheduleservice,simplycontactSears at enginetoprevent u nintended starting. A lways wearsafety glassesduring 1-800-4-MY-HOME®.
- Page 19 Removethespark plug bootand use a sparkplug wrenchto removethe plug.See Figure23. Visuallyinspectthe spark plug.Discardthe spark plug if thereis apparentwear,or if the insulatoris crackedor chipped.Cleanthe sparkplug with a wirebrush if it is to be reused. Measurethe plug gap with a feelergauge.Correctas necessary by bendingsideelectrode.See Figure24.The gap shouldbe set to 0.030in.
- Page 20 Check Engine Checkoil beforeeachuse. Stopengineand wait severalminutes beforecheckingoil level.With the tilleron levelground,the oil mustbe to FULLmarkon dipstick. Removeoil fill dipstickand wipe cleanwith cloth. Replacedipstick intothe oil filler neck,but do not screwitin. Removeand checkoil level. Levelshouldbe at FULLmark. If needed,add oil slowly- recheck.Do not overfill. Wipedipstickclean, replacebut do not tighten.Removeand checkoil level.Oil levelshouldbe at FULLline on dipstick.
- Page 21 LUBRiCATiON After every 10operatinghours,oil or greasethe lubricationpoints.Use cleanlubricatingoil (#30 weightmotoroil is suitable)and cleangeneral purposegrease(greasecontaininga metallubricantis preferred,if available). Removethetines and cleanthe fine shaft. Usea file or sandpa- per to gently removeany rust,burrsor roughspots(especially Hex Stop aroundthe holesin the shaft). Applygreaseto the endsof the shaftbeforeinstalling t he tines.
- Page 22 TINES Thetines will wearwith useand shouldbe inspected a t the beginning of eachtillingseasonand after every30 operatinghours.Thetines Clevis Pin can be replaced.Referto the PartsList sectionof this manualfor part numbers. Tine inspection With use,the tines will becomeshorter,narrowerand pointed.Badly worntines will resultina lossof tillingdepth,and reducedeffective- nesswhen choppingup and turningunderorganicmatter.
- Page 23 Neverstoretiller withfuel in tank indoorsor in poorlyventilatedareasI wherefuel fumesmay reachan open flame,spark,or pilotlightas on a furnace,water heater,c othesdryer, or gas app ance. PREPARING THE TILLER Whenthe tillerwon't be usedfor an extendedperiod,prepareit for Neverleaveengineunattendedwhileit is running. storageas follows: Cleanthe tillerand engine. PREPARING THE ENGINE Followthe lubricationrecommendations a nd checkfor looseparts...
- Page 24 Before performing anytype d maintenance/service, disengage all controls and stoptheengine.Waituntilall movingpartshavecometo a completestop.Disconnect sparkplugwireandgroundit against t heengineto prevent unintended starting. A lways wearsafetyglasses duringoperation or whileperforming anyadjustments or repairs. Reconnect w ire. Enginefails to start Sparkplugwire disconnected. EngineThrottleControlLeverincorrectlyset. Putleverin STARTposition. Fueltank emptyor stale fuel.
- Page 26 Craftsman Tiller B IViodel No. 247.29934...
- Page 27 Craftsman Tiller B IViodel No. 247.29934 686-0081A-0637 WheelBracketAssembly 720-0274 Grip,Handle 731-06253A HandleCover 911-0415 ClevisPin, .375x 1.75 714-04043 BowTie Cotter Pin 931-1645B ClutchBail Holder 936-0140 Fiat Washer,.385x .62 x .063 734-04547 CompleteWheelAssy.8 x 1.75 736-0242 Bell Washer,.340x .872x .060 738-0929 ShoulderScrew,.496x 1.4453/8-16 710-0805 HexHeadScrew,5/16-18x 1.50...
- Page 28 Craftsman Tiller B Model No. 247.29934...
- Page 29 Craftsman Tiller B IViodel No. 247.29934 710-3005 Hex HeadScrew,3/8-16x 1.25 986-0091 ChainCaseAssembly 711-1036A Hex Nut,5/16-18 642-0002-0637 inner TineAssembly,RH 642-0003-0637 inner TineAssembly,LH ,7120266A . Jamlock Nut,3/8-16 Nut,1/2-20,Jam 642-0004-0637 OuterTineAssembly,RH 712-3029 Washer,.531x 1.62x .045 642-0005-0637 OuterTineAssembly,LH 736-0112 LockWasher,5/16 911-0415 ClevisPin,.375x 1.75 936-0119...
- Page 30 Craftsman Engine IViodel 170=VOB For Tiller IViodel 247.29934 951-11285 ExhaustPipe Gasket 712-04214 Nut,M8 751-12294 MufflerAssembly 710-05002 Bolt 951-10806 Air CleanerHousing 712-04213 710-05102 Self-Tapping Bolt M4.2x16 951-12135 SilencerPlate 951-10794 Air CleanerAssembly 951-10794 Air CleanerAssembly 951-12136 Air CleanerCover...
- Page 31 Craftsman Engine IViodel 170-VOB For Tiller IViodel 247.29934 951-10797 Carburetor Assembly FloatPin 951-11571 Carburetor GasketPlate Emulsion Tube 951-11177 ControlLever, Choke NeedleValve ChokeShaft MainJet ChokePlate NeedleValveSpring ThrottleShaft Float ThrottlePlate 951-11589 FuelBowlGasket ScrewM3x5 FuelBowl LockWasher 951-11348 FuelBowlGasket IdleJet Assembly 710-04945 FuelBowlMountingBolt Gasket,ThrottlePlate...
- Page 32 Craftsman Engine IViodel 170=VOB For Tiller IViodel 247.29934...
- Page 33 Craftsman Engine IViodel 170=VOB For Tiller IViodel 247.29934 951-11253 PistonRingSet 951-11632 PistonPin Snap Ring 951-12007 Piston 951-11633 PistonPin 710-04915 Bolt M6x12 951-11113 Air Shield 951-11573 ConnectingRodAssembly 951-11356 GovernorArm Shaft 736-04461 Washer5.2xl.9 951-11574 GovernorSeal 714-04074 CotterPin 951-11575 CamshaftAssy. 951-11369 RadialBall Bearing,6205...
- Page 34 Craftsman Engine Model 170=VOB For Tiller Model 247.29934...
- Page 35 Craftsman Engine IViodel 170=VOB For Tiller IViodel 247.29934 710-05276 MufflerStud M8x36 710-04968 BoltM6x16 951-10657 951-11054 ValveCover MufflerStudAssembly 710-05101 StudM6x110 731-07059 BreatherHose 951-11567 Carburetor InsulatorGasket 726-04101 HoseClamp 951-11568 Carburetor Insulator 951-11565 ValveCoverGasket 951-11569 Carburetor Gasket 951-11892 RockerArmAssembly 951-11572 751-11124 Gasket,CylinderHead Nut,Pivot Locking...
- Page 36 Craftsman Engine IViodel 170=VOB For Tiller IViodel 247.29934 951-12126 Oil Seal25x41.25x6 951-10792 IgnitionCoil Assembly 710-04919 BoltM6x25 951-10805 Flywheel 951-10909 Fan,Cooling 951-10911 Pulley,Starter 712-04209 Nut,Special,M14x1.5 710-04915 BoltM6x12 951-11583 BlowerHousing 736-04455 FlatWasher 710-04974 BoltM6xlO 951-12127 RecoilStarter 712-04212 Nut,M6 710-04918 BoltM6x20 951-11109 BlowerHousingShield...
- Page 37 Craftsman Engine IViodel 170=VOB For Tiller IViodel 247.29934 710-04968 BoltM6x16 951-11914 DipstickDecorationCover 951-11067 ThrottleControlKnob 710-04905 Bolt 951-12131 PrimerBracket 710-04915 Bolt M6x12 710-04928 BoltM6x12 951-11903 Oil FillTubeO-Ring 951-11585 951-10656 Oil FillTube GovernorSpring 951-10664 101a 951-11913 ThrottleLinkageSpring Oil FillTubeAssembly 951-10665 951-11904 ThrottleLinkage...
- Page 38 Craftsman Tiller IViodel No. 247.29934 777D15526 777123259 777i23174 777S33498 777D15527 777D15447 777D15452 777S33612 777120358 777122502...
- Page 39 (Thispage applicablein the U.S.A.and Canadaonly.) Sears Brands Management Corporation (Sears), the California Air Resources Board (CARD) and the United States Environmental Protection Agency (U.S. EPA) Emission Control System Warranty Statement (Owner's Defect Warranty Rights and Obligations) EMISSIONCONTROL WARRANTY COVERAGEISAPPLICABLE TO CERTI- YEAR 1997AND LATERENGINES WHICHARE PURCHASED AND USED FIEDENGINESPURCHASEDIN CALIFORNIAIN 1995ANDTHEREAF- ELSEWHERE IN THE UNITEDSTATES (ANDAFTERJANUARY1,2001 IN...
- Page 40 Look For Relevant Emissions Durability Period and Air index information On Your Engine Emissions Label Engines that are certified to meet the California Air Resources Board (CARB) Tier 2 Emission Standards must display information regarding the Emissions Durability Period and the Air Index. Sears Brands Management Corporation makes this information available to the consumer on our emission...
- Page 41 Congratulations on makinga smartpurchase.YournewCraftsman@ Onceyou purchasethe Agreement,a simplephonecall is all that it productis designedand manufactured for yearsof dependableopera- takesfor youto scheduleservice.Youcan call anytimedayor night,or tion. But likeall products,it may requirerepairfrom time to time.That's schedulea serviceappointmentonline. whenhavinga RepairProtectionAgreementcansave youmoneyand The RepairProtectionAgreementis a risk-freepurchase.If youcancel aggravation.
- Page 42 NOmero de servicio .... Cubierta posterior Servicio y Mantenimiento ..Paginas 57-61 CRAFTSMAN DE DOS AI_IOS DE GARANTiA PORDOSANOSa partir de la fechade cornpra,este productoest_garantizadocontracualquierdefectode materialo rnanode obra.El productodefectuosorecibir_la reparaci6no la sustituci6ngratuitasi la reparaci6nno est_ disponible. Para detalles sobre la garantia de cobertura...
- Page 43 Esta m &quina est& d iseSada para ser u tilizada respetando las normas Lapresencia deeste s imbolo indica que s e trata d einstrucciones de seguridad contenidas en este m anual. AI i gual que con cualquier tipo seguridad importantes que s e deben respetar para e vitar poner enpeligro de equipo motorizado,...
- Page 44 • Si golpea algOnun objeto extraSoo si la m&quinacomienzaa emitir Manejo seguro de la gasolina: un sonidopococomOno a vibrar,apagueel motorde inmediato. Para evitarlesionespersonalesy da_os materialestenga muchocuidado al Desconecteel cable de la buj[a,p6ngalohaciendomasacontrael motor manipularla gasolina.La gasolinaes sumamenteinflamabley sus vapores y siga los pasossiguientes: puedencausarexplosiones.Si se derramagasolinaencimao sobre la ropa se puedelesionargravementeya quese puedeincendiar.
- Page 45 ,, Observe lareglamentaci6n ylas normas respecto alaeliminaci6n AVISO REFERIDO A EMISIONES correcta degasolina, aceite, etc. para proteger elmedic ambiente. Losmotoresque est_ncertificadosy cumplencon las regulacionesde • SegOn laComisi6n de Seguridad deProductos para elConsumidor emisionesfederalesEPAy de Californiapara SORE (EquiposSmall Off Road los Estados Unidos (CPSC) ylaAgencia deProtecci6n...
- Page 46 SiIVIBOLOS DE SEGURIDAD En esta p_ginase presentany describenlos simbolosde seguridadque puedenapareceren este producto. Lea,entienday cumplatodas las instruccionesincluidasen la m_quinaantes de intentararmarlay utilizarla. LEA LOS MANUALES DEL OPERADOR Lea, entienda y cumpla todas las instrucciones incluidas en los manuales antes de intentar armar la unidad y utilizarla.
- Page 47 IMPORTANTE:Estaunidadse envfasin gasoNna ni aceiteen el motor.Antesde operarla rn&quina cargueel motorcon gasoNna y aceitecornose indicaen la secci6nFundonarniento de este manual. NOTA:Lasreferenciasa los ladosderechoe izquierdode la cultivadorase hacenobservandola rn&quina desdela posici6nde operaci6n. APERTURA DE LA CAJA DE CARTON Cortecada una de lasesquinasde la cajaverticalrnente, d e la partesuperiora la base.
- Page 48 Asegureel pernodespu6sde ajustarla trabade la manila.Yea la Figura4, Ubiqueel pernode carro,la arandelade campanay la perilla de manoempaquetados consu cultivadora, Inserteel perno de carroa travesdel soportesoldadode la manila,la arandelacampana,la traba de la manila,y dentrode la perillade mano,Veala Figura4, Seleccioneuna de las tres posicionespara la alturade la manila (tres muescasen la m6nsulasoldadade la manila),y ajustela perillade manoparafijar la manilaen la posici6ndeseada.Veala figura4, Regresea la manilainferiory ajusteel perno hexagonal...
- Page 49 AJUSTES Antes de operar sucultivadora,lea atentamente y cumplatodas las instruccionesque aparecena continuaci6n.Realicetodos los ajustespara verificarque la unidadest&operandocon seguridady correctamente, Tuerca he×agonal Verifiqueel ajustede las ruedas: La cultivadorase entregacon las ruedasajustadasde modoque la m_.quina est_ nivelada,Es necesarioajustarlas ruedaspara adaptarsea sus necesidadesde labranzaantes de hacerfuncionarla m&quina.
- Page 50 Silenciador enganche de rnarcha Filtro de hacia adelante de los dientes aire uste de la altura de la rnanija Tap6nde combustible Tap6n de de profundidad Ilenado y varilla del nivel de aceite Dientes de la cultivadora Figura12 Ahoraque tiene lacultivadorapreparada para funcionar,farniliaricese con loscontrolesy funciones.Encontrar_.
- Page 51 FILTRO DE AIRE LLENADO DE GASOLINA Y ACEITE El filtro de aire es un dispositivode la tornade aire del motorque Aceite (se envfa una botella con la unidad) impidela entradade polvoy suciedaden el motor.Vea la Figura12. Primeruso Saquela varilladel nivelde aceite. SILENCIADOR Conla cultivadorasobreterrenonivelado,utiliceun ernbudopara vaciardentrodel motortodoel contenidode la boteNa de aceite...
- Page 52 Gasolina PARA ENCENDER EL MOTOR 1. Saque latapa del c ombustible del d ep6sito del r nisrno. Conecteel cablede la bujiay la rnangade gornaa la rnisrna. 2. Verifique que elrecipiente del q ue vaaverter lagasolina est_ Lleneel dep6sitocon no rn_.s de 1/2 pulgadapor debajode la lirnpio ylibre de6xido o deobjetos extraSos.
- Page 53 PARA DETENER EL MOTOR Paradetenerlas ruedasy losdientes,suelteel ganchodel embraguede marchadirecta. Muevala palancade controldel reguladorhasta._la p osici6n SLOW(lento,representado por una tortuga)_ll_,. Siempreque sea posible,reduzcagradualmente la velocidaddel motorantes de detenerlo. Muevala palancade controldel reguladora la posici6nSTOP (detenci6n) u OFF (apagado). Desconecte el cablede la bujfay hagamasaconel motorpara evitarque seenciendaaccidentalmente el equipoal dejarlosin vigilancia.
- Page 54 Estaca de profundidad La estacade profundidadfuncionacornoun frenode lacultivadoray controlala profundidad y la velocidada la cual funcionala rn_.quina. Retireel pasadorde horquillapara subiro bajarla estacade profundidad. V ea la Figura16. AJUSTE DE LA ALTURA DE LA MANIJA La rnanijadebe ajustarseparaque cuandola cultivadoraest_ labrandoa una profundidadde 3-4"...
- Page 55 Elecci6n de la velocidad correcta para los dientes Conexperiencia,podr_,encontrarla cornbinaci6n de profundidady velocidadde labranzarn_.s adecuadaa las necesidades de su jardin. Ajustela palancadel reguladordel motora una velocidadque d_ al motoradecuadapotenciay que al rnisrnotiernpole perrnitafuncionar a la rnenorvelocidadposiNe hastaque hayaalcanzadola rn_.xirna profundidadde labranzadeseada.AJrealizarlaspasadasfinales a travesdel lechode siernbrao al realizarla labranzatal vez sea deseaNeutilizarvelocidadesrn_.s r_.pidas del motor.La selecci6n de la velocidadcorrectadel motor,en relaci6ncon la profundidadde...
- Page 56 Labranza cuesta arriba y cuesta abajo Pararnantenerla erosi6ndel sueloal rninirno,aseg_rese de agregarsuficienternateriaorg_.nica al suelopara que rnantenga un nivelde hurnedad adecuado,y tratede evitardejar pisadaso rnarcasde ruedas. AI realizarla labranzaverticalrnente, t rate de hacerla prirnera pasadahaciaarriba yaque la cultivadoracavacon mayor profundidadcuandosube quecuandobaja. En sueloblandoo dondehay rnalezas,puedeser necesarioque levantelas barras de control levernente al ir cuestaarriba.AI realizarla labranza cuestaabajo,traslapela prirnerapasadaen aproxirnadarnente l a...
- Page 57 PROGRAMA DE MANTENIMIENTO Siga el cronograrna de rnantenirniento que se presentaa continuaci6n. Antesde realizar c ualquier t ipode rnantenirniento o servicio, Estatabla s61o describepautasde servicio.Utilicela colurnnaRegistro desenganche todosloscontroles y detenga el motor. E sperea quese de Serviciopara hacerel seguirniento de lastareas de rnantenirniento detengan cornpletarnente todaslaspiezasrn6viles.
- Page 58 Retirela fundade bujia y utiliceuna Ilavepara bujiaspara extraer la bujfa.Veala Figura23. Inspeccione visualrnentela bujfa.Elirninela bujfasi presenta rnuchodesgaste,o si el aislanteest,. agrietadoo astillado.Lirnpie la bujfacon un cepillode alarnbresi seva a reutilizar. Bujia de Midala separaci6nde bujfacon un calibrador.Corrijade ser encendido necesariotorciendoel electrodolateral.Veala figura24.La separaci6ndebeestablecerseen 0,030pulg.
- Page 59 Inspeccione el aceite del motor Controleel aceiteantes de cada uso. Detengael motor y espere variosrninutosantes de verificarel nivelde aceite.Con la cultivadorasobreuna superficiepareja,el aceite debealcanzarla rnarcaFULL (lleno)de la varilladel nivelde aceite. Extraigala varillade rnedici6nde aceitey sequelacon un trapo. Vuelvaa colocarlaen el cuellode Ilenadode aceite pero no la atornille.Saquela varillay verifiqueel nivelde aceite.El nivel deberiaestar en la rnarcaFULL (lleno) Si es necesario,agregueaceite lentarnente y vuelvaa controlar.
- Page 60 LUBRICACION Despu_sde cada 10 horasde funcionarniento, aceite o engraselos puntosde lubricaci6n-Useaceite lubricantelirnpio(esadecuado el aceitepara rnotores de peso#30) y grasade usogenerallirnpia (es preferiblegrasaque contengaun lubricantede metal,si hay disponible). Tuer¢a • Retirelos dientesy lirnpieel eje de losdientes.Useuna limao he×agonal papelde lija para quitarsuavernente cualquier6xido,rebabas detenci6n o asperezas(especialrnente alrededorde los orificiosdel eje).
- Page 61 DIENTES Losdientesse desgastanconel uso y se los debe inspeccionar a l Pasadorde comienzode cadatemporadade labranzay a intervalosde 30 horas horquilla de funcionamiento. L osdientesse pueden reemplazar. C onsulteel nQmero de piezaen la secci6nLista de piezasde este manual. Inspecci6n de los dientes Conel uso, losdientes seacortan,se angostany vuelven puntiagudos.El usode dientesmuy desgastados resultaraen p_rdida de profundidad de la labranzayen menoreficaciaparacortar y girar...
- Page 62 Nuncaalrnacenela cultivadoraconcombustibleen el tanqueen un espaciocerradoo en _.reas pocoventiladasdonde los gasesdel combustiblepuedanNegar a una Narna expuesta,una chispao un pilotocornoel que tienenalgunoshornos,calentadores de agua, secadoresde ropao algQnartefactoa gas. PREPARACI6N DE LA CULTIVADORA Si la cultivadorano se va a usarduranteun perfodoprolongado, Nuncadeje el motorsin vigilanciarnientras est,. en funcionarniento. prep_.rela parael alrnacenarniento de la siguienteforrna: Lirnpiela cultivadoray el motor.
- Page 63 Antesde realizar c ualquiertipode rnantenirniento o servicio, d esenganche t odosloscontroles y detenga el motor.Esperea que sedetengan cornpletarnente todaslaspiezasrn6viles. D esconecte e l cablede la bujfay p6ngalohaciendo rnasacontrael motorparaevitarqueseenciendaaccidentalrnente. Utilicesiernpre anteojos de seguridad durantelaoperaci6n o rnientras realizaajustes o reparaciones. El motor no arranca Reconecteel cable.
- Page 64 (Esta p_.ginase aplica s61oen EE.UU. y Canada.). Sears Brands Management Corporation, el Consejo de Recursos Ambientales de California (CARB) y la Agencia de Protecci6n Ambiental de los Estados Unidos (EPA) Declaraci6n de garantia del sistema de control de emisiones (derechos y obligaciones de la garanfia de defectos del propi= etario)
- Page 65 Busque el periodo de duraci6n de emisiones importantes yla informaci6n de clasificaci6n de aire en la etiqueta de emisiones de su motor Los motores cuyo cumpiimiento con los estAndares de emisi6n Tier 2 de la Comisi6n de Recursos Ambientales de California (CARB) est6 certificado deben exhibir la informaci6n relacionada con el periodo de duraci6n de ias emisiones y la clasificaci6n de aire.
- Page 66 Felicitaciones por haberrealizadouna adquisici6ninteligente.El Unavezadquiridoel Acuerdo,puedeprograrnar el serviciocon productoCraftsman@ que ha adquiridoest_ dise_adoy fabricado tan s61orealizaruna Ilarnadatelef6nica.PuedeIlarnaren cualquier para brindarrnuchosa_osde funcionarniento confiable.Perocorno mornento del dia o de la nocheo prograrnar un servicioen linea. todoslos productosa vecespuederequerirde reparaciones.Esen El Acuerdode Protecci6nde Reparaci6n es una cornprasin riesgo. esernornentocuandoel disponerde un Acuerdode protecci6npara Si ustedanula por alguna raz6nduranteel periodode garantiade reparaciones le puedeahorrardineroy problernas.
- Page 68 Your Home For troubleshooting, product manuals and expert advice: managernylife www.managemylife.com For repair - in your home - of all major brand appliances, lawn and garden equipment, or heating and cooling systems, no matter who made it, no matter who sold it! For the replacement parts, accessories owner's manuals that you need to do-it-yourself.