Table of Contents
Advertisement
Quick Links
Advertisement
Table of Contents

Related Manuals for Asus PIKE 1078


Summary of Contents for Asus PIKE 1078
- Page 1 PIKE 1078 LSISAS1078 SAS RAID card...
- Page 2 Product warranty or service will not be extended if: (1) the product is repaired, modified or altered, unless such repair, modification of alteration is authorized in writing by ASUS; or (2) the serial number of the product is defaced or missing.
-
Page 3: Table Of Contents
Contents Contents ...................... iii About this guide ..................iv PIKE 1078 specifications summary ............vi Chapter 1: Product introduction Welcome! ..................1-2 Package contents ................. 1-2 Card layout ................... 1-3 System requirements ..............1-3 Card installation ................1-4 Chapter 2: RAID configuration Setting up RAID ................ -
Page 4: About This Guide
How this guide is organized This guide contains the following parts: • Chapter 1: Product introduction This chapter offers the PIKE 1078 SAS RAID card features and the new technologies it supports. • Chapter 2: RAID configuration This chapter provides instructions on setting up, creating, and configuring RAID sets using the available utilities. -
Page 5: Conventions Used In This Guide
Conventions used in this guide To make sure that you perform certain tasks properly, take note of the following symbols used throughout this manual. DANGER/WARNING: Information to prevent injury to yourself when trying to complete a task. CAUTION: Information to prevent damage to the components when trying to complete a task. -
Page 6: Pike 1078 Specifications Summary
Form factor 6.44 in x 1.57 in (1U compatible) * Install the i-Button for PIKE 1078 to work properly. ** The exact OS support would base on the OS support list of the motherboard. *** Specifications are subject to change without notice. -
Page 7: Chapter 1: Product Introduction
This chapter offers the PIKE 1078 SAS RAID card features and the new technologies it supports. Chapter 1: Product introduction... -
Page 8: Welcome
PIKE 1078 SAS RAID card! ® The ASUS PIKE 1078 allows you to create RAID 0, RAID 1, RAID 10, RAID 5, RAID 50, RAID 6, and RAID 60 set(s) from SAS hard disk drives connected to the SAS connectors on the motherboard. -
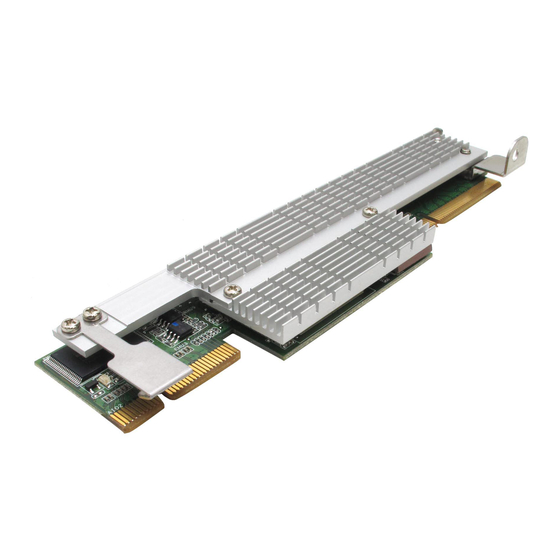
Page 9: Card Layout
Refer to the motherboard manual for detailed information about using the SGPIO connectors on the motherboard. System requirements Before you install the PIKE 1078 SAS RAID card, check if the system meets the following requirements: • Workstation or server motherboard with a PIKE RAID card slot •... -
Page 10: Card Installation
(usually named ITBN_SEL1) to [PIKE RAID5] after installing PIKE card. Refer to the motherboard’s manual for details. For 2U, 5U, or pedestal server To install ASUS PIKE 1078 SAS RAID card on a 2U, 5U, or pedestal server Locate the PIKE RAID card slot on the motherboard. - Page 11 Connect the SAS hard disk drives to the SAS connectors on the motherboard. To uninstall ASUS PIKE 1078 SAS RAID card from a 2U, 5U, or pedestal server Disconnect all SAS hard disk drives from the motherboard. Remove the screw that secures the RAID card to the motherboard.
- Page 12 For 1U server You have to remove the outer heatsink of ASUS PIKE 1078 SAS RAID card to install the card in a 1U server. To install ASUS PIKE 1078 SAS RAID card on a 1U server Remove the two screws that secure the heatsink bracket on the back of the SAS RAID card.
- Page 13 RAID card with the PIKE RAID card slot. Insert the RAID card into the PIKE RAID card slot. Make sure the card is completely inserted into the card slot. Connect the SAS hard disk drives to the SAS connectors on the motherboard. ASUS PIKE 1078...
- Page 14 Chapter 1: Product introduction...
-
Page 15: Chapter 2: Raid Configuration
This chapter provides instructions on setting up, creating, and configuring RAID sets using the available utilities. Chapter 2: RAID configuration... -
Page 16: Setting Up Raid
Setting up RAID The RAID card supports RAID 0, RAID 1, RAID 10, RAID 5, RAID 50, RAID 6, and RAID 60 set(s). 2.1.1 RAID definitions RAID 0 (Data striping) optimizes two identical hard disk drives to read and write data in parallel, interleaved stacks. -
Page 17: Installing Hard Disk Drives
To install SAS hard disks for RAID configuration: Install the SAS hard disks into the drive bays following the instructions in the system user guide. Connect the SAS port connectors to the SAS drives. ASUS PIKE 1078... -
Page 18: Lsi Webbios Configuration Utility
• Check configurations for data consistency • PIKE 1078 does not support the Battery Backup Unit (BBU) function. • You may use disks of different sizes; however, the size of the smallest disk determines the “logical” size of each member disk. -
Page 19: Webbios Cu Main Screen Options
Click this icon to turn off the sound on the onboard controller alarm. Click this icon to display information about the WebBIOS CU version, browser version, and HTML interface engine. ASUS PIKE 1078... - Page 20 Here is a description of the options listed on the left of the main WebBIOS CU screen: • Adapter Properties: Select this to view the properties of the currently selected SAS adapter. • Scan Devices: Select this to have the WebBIOS CU re-scan the physical and virtual disks for any changes in the drive status or the physical configuration.
-
Page 21: Creating A Storage Configuration
Auto Configuration with Redundancy: Automatically creates an • optimal RAID 1 or RAID 5 configuration, providing data redundancy. We recommends that you select this option. • Auto Configuration without Redundancy: Automatically creates a non-redundant RAID 0 configuration. Click Next to continue. ASUS PIKE 1078... -
Page 22: Using Auto Configuration
Using Auto Configuration Follow these instructions to create a configuration with auto configuration, either with or without redundancy: When WebBIOS displays the proposed new configuration, review the information on the screen, and click Accept to accept it. (Or click Back to go back and change the configuration.) RAID 0: If you selected Auto Configuration without Redundancy, •... - Page 23 ◊ Adaptive: When Adaptive read ahead is selected, the controller begins using read ahead if the two most recent disk accesses occurred in sequential sectors. If the read requests are random, the controller reverts to Normal (no read ahead). ASUS PIKE 1078...
- Page 24 Write Policy: Specify the write policy for this virtual drive: • ◊ WBack: In Writeback mode the controller sends a data transfer completion signal to the host when the controller cache has received all the data in a transaction. This setting is recommended in Standard mode.
- Page 25 Click Accept DG to move the drives to a proposed disk group configuration in the Disk Groups window on the right, as shown in the right figure. If you need to undo the changes, click the Back button. ASUS PIKE 1078 2-11...
- Page 26 When you have finished selecting physical disks for the disk groups, click Next. The span definition screen appears Select one of the available disk groups, and then click Add to Span. When finish, click Next. The Virtual Disk Definition screen appears, as shown in the right figure.
- Page 27 You may specify a smaller size if you want to create other virtual disks on the same disk group. Click Accept to accept the changes to the virtual disk definition, or click Back to return to the previous settings. ASUS PIKE 1078 2-13...
- Page 28 Click Next when you are finished defining virtual disks. The configuration preview screen appears, as shown in the right figure. Check the information in the configuration preview. If the virtual disk configuration is acceptable, click Accept to save the configuration. Otherwise, click Cancel to end the operation and return to the WebBIOS main menu, or click Back to return to the previous screens and change the configuration.
- Page 29 If the read requests are random, the controller reverts to Normal (no read ahead). • Write Policy: Specify the write policy for this virtual drive: ASUS PIKE 1078 2-15...
- Page 30 ◊ WBack: In Writeback mode the controller sends a data transfer completion signal to the host when the controller cache has received all the data in a transaction. This setting is recommended in Standard mode. ◊ WThru: In Writethrough mode the controller sends a data transfer completion signal to the host when the disk subsystem has received all the data in a transaction.
- Page 31 When you select Custom Configuration and click Next, the Disk Group Definition screen appears. You use this screen to select physical drives to create disk groups (arrays). Hold <Ctrl> while selecting at least three ready physical drives in the Physical Drives window on the left. ASUS PIKE 1078 2-17...
- Page 32 Click Accept DG to move the drives to a proposed disk group configuration in the Disk Groups window on the right, as shown in the right figure. If you need to undo the changes, click the Back button. When you have finished selecting physical disks for disk groups, click Next.
- Page 33 WebBIOS to do other configuration tasks. This is the default. ◊ Yes: Select Yes if you do not want to allow background initializations for configurations on this controller. ASUS PIKE 1078 2-19...
- Page 34 Select Size: Specify the size of the virtual disk in megabytes. Normally, • this would be the full size for RAID 6 shown in the Configuration Panel on the right. You may specify a smaller size if you want to create other virtual disks on the same disk group.
- Page 35 In version 1.1, the maximum size is the size of the smaller disk group multiplied by two. Change the virtual disk options from the defaults listed on the screen as needed. Here are brief explanations of the virtual disk options: ASUS PIKE 1078 2-21...
- Page 36 RAID Level: The drop-down menu lists the possible RAID levels for the • virtual disk. Select RAID 10. • Strip Size: The strip size specifies the size of the segment written to each disk in a RAID configuration. You can set the strip size to 8, 16, 32, 64, 128, 256, 512 or 1024 Kbytes.
- Page 37 Cancel to end the operation and return to the WebBIOS main menu, or click Back to return to the previous screens and change the configuration. 13. If you accept the configuration, click Yes at the prompt to save the configuration. The WebBIOS main menu appears. ASUS PIKE 1078 2-23...
- Page 38 Using Custom Configuration: RAID 50 RAID 50 provides the features of both RAID 0 and RAID 5. RAID 50 uses both distributed parity and disk striping across multiple arrays. It provides high data throughput, data redundancy, and very good performance. It is best implemented on two RAID 5 disk arrays with data striped across both disk arrays.
- Page 39 This setting is recommended in Standard mode. ◊ WThru: In Writethrough mode the controller sends a data transfer completion signal to the host when the disk subsystem has received all the data in a transaction. This is the default. ASUS PIKE 1078 2-25...
- Page 40 ◊ Wrthru for BAD BBU: Select WBack for Write Policy and unselect this item if you want the controller to use Writeback mode but the controller has no BBU or the BBU is bad. If you choose this option, the controller firmware automatically switches to Writethrough mode if it detects a bad or missing BBU.
- Page 41 Click Accept DG to move the drives to a proposed disk group configuration in the Disk Groups window on the right, as shown in the right figure. If you need to undo the changes, click the Back button. ASUS PIKE 1078 2-27...
- Page 42 When you have finished selecting physical disks for the disk groups, click Next. The span definition screen appears. You should add both disk groups you’ve created in the previous step to Span section. Select the disk group in Array With Free Space section and then click Add to Span.
- Page 43 RAID 60 shown in the Configuration Panel on the right. You may specify a smaller size if you want to create other virtual disks on the same disk group. ASUS PIKE 1078 2-29...
- Page 44 Click Accept to accept the changes to the virtual disk definition, or click Back to return to the previous settings. 10. Click Next when you are finished defining virtual disks. The configuration preview screen appears, as shown in the right figure.
-
Page 45: Viewing And Changing Device Properties
The following table describes the entries/options listed on the second Adapter Properties screen. We recommend that you leave these options at their default settings to achieve the best performance, unless you have a specific reason for changing them. ASUS PIKE 1078 2-31... - Page 46 Adapter Properties Menu Options Option Description Battery Backup This entry indicates whether the selected controller has a BBU. If present, you can click Present to view information about the BBU. Set Factory Use this option to load the default MegaRAID WebBIOS CU settings.
- Page 47 Use this option to control if controller will maintain physical disk fail Fail History history. If you make changes to the options on this screen, click Submit to register them. If you change your mind, click Reset to return the options to their default values. ASUS PIKE 1078 2-33...
-
Page 48: Viewing And Changing Virtual Disk Properties
Viewing and Changing Virtual Disk Properties Access the Virtual Disk screen by selecting a virtual disk (virtual disk) from the virtual disk list on the WebBIOS CU main screen and clicking Virtual Disk. The following figure shows the Virtual Disk screen. The Properties panel of this screen displays the virtual disk’s RAID level, state, size, and strip size. - Page 49 Global hot spare or a Dedicated hot spare. WebBIOS displays the global hot spare as Global and the dedicated hot spare as Ded. A Prepare for removal option may also appear. • ASUS PIKE 1078 2-35...
-
Page 50: Viewing System Event Information
2.2.5 Viewing System Event Information The SAS controller firmware monitors the activity and performance of all storage configurations and devices in the system. When an event occurs (such as the creation of a new virtual disk or the removal of a physical drive) an event message is generated and is stored in the controller NVRAM. -
Page 51: Managing Configurations
In addition, if one or more physical disks are removed from a configuration, by a cable pull or physical disk removal, for example, the configuration on those disks is considered a foreign configuration by the RAID controller. ASUS PIKE 1078 2-37... - Page 52 The WebBIOS CU allows you to import the foreign configuration to the RAID controller, or to clear the configuration so you can create a new configuration using these physical disks. If WebBIOS CU detects a foreign configuration, the screen appears, as shown in the following figure.
- Page 53 If the physical disks in a non-redundant virtual disk are removed, the controller considers the drives to have foreign configurations. Import or clear the foreign configuration. No rebuilds will occur after the import operation because there is no redundant data to rebuild the drives with. ASUS PIKE 1078 2-39...
- Page 54 Migrating the RAID Level of a Virtual Disk As the amount of data and the number of disk drives in your system increase, you can use RAID-level migration to change a virtual disk from one RAID level to another. You do not have to power down or reboot the system. When you migrate a virtual disk, you can keep the same number of drives, or you can add drives.
- Page 55 When the message appears, confirm that you want to migrate the RAID level of the virtual disk. A reconstruction operation begins on the virtual disk. You must wait until the reconstruction is completed before performing any other tasks in the WebBIOS ASUS PIKE 1078 2-41...
-
Page 56: Megaraid Storage Manager
MegaRAID Storage Manager MegaRAID Storage Manager software enables you to configure, monitor, and maintain storage configurations on LSI SAS controllers. The MegaRAID Storage Manager graphical user interface (GUI) makes it easy for you to create and manage storage configurations. 2.3.1 Hardware and Software Requirements The hardware requirements for MegaRAID Storage Manager software are as follows:... - Page 57 Click Next to continue. On the next screen, accept the default Destination Folder, or click Change to select a different destination folder. Click Next to continue. The Setup Type screen appears, as shown in the following figure. ASUS PIKE 1078 2-43...
- Page 58 Select one of the Setup options. The options are fully explained in the screen text. – Normally, you would select Complete if you are installing MegaRAID Storage Manager software on a server. – Select Custom Installation if you want to select individual program components.
- Page 59 (that is, servers with a complete installation of MegaRAID Storage Manager software), the server screen will appear, as shown in the following figure. The server screen will not list any servers. You can use this screen to manage systems remotely. ASUS PIKE 1078 2-45...
-
Page 60: Installing Megaraid Storage Manager Sofware For Linux
2.3.3 Installing MegaRAID Storage Manager Sofware for Linux Follow these steps if you need to install MegaRAID Storage Manager software on a system running Red Hat Linux or SUSE Linux: Copy the MSM_linux_installer...tar.gz file to a temporary folder. Untar the MSM_linux_installer...tar.gz file using the following command: tar -zxvf MSM_linux_installer...tar.gz A new disk directory is created. -
Page 61: Linux Error Messages
Exiting installation. This is the message that appears when the installation is complete. • RPM installation failed. This message indicates that the installation failed for some reason. Additional message text explains the cause of the failure. ASUS PIKE 1078 2-47... -
Page 62: Starting Megaraid Storage Manager Software
2.3.5 Starting MegaRAID Storage Manager Software Follow these steps to start MegaRAID Storage Manager software and view the main window: Start the program using the method required for your operating system environment: – To start MegaRAID Storage Manager software on a Microsoft Windows system, select Start >... - Page 63 You must enter the root/administrator user name and password to use Full Access mode. If your user name and password are correct for the Login mode you have chosen, the main MegaRAID Storage Manager window appears. ASUS PIKE 1078 2-49...
-
Page 64: Megaraid Storage Manager Window
At the top of the hierarchy is the system itself. One or more controllers are installed in the system. The controller label identifies the MegaRAID controller, such as the ASUS PIKE 1078 controller, so that you can easily differentiate between multiple controllers. Each controller has one or more ports. Disk drives and other devices are attached to the ports. - Page 65 These include enabling or silencing the alarm and running a Patrol Read. Some types of devices, such as arrays and ports, do not have operations associated with them. ASUS PIKE 1078 2-51...
-
Page 66: Event Log Panel
• The Graphical View tab can be selected in the right panel if a physical drive, virtual disk, or disk enclosure is selected in the left panel. In graphical view, the device’s storage capacity is color coded according to the legend shown on the screen. - Page 67 If this warning appears, click on the active content warning bar and enable the active content. • If you are using the Linux operating system, you must install Firefox ® Mozilla for the MegaRAID Storage Manager online help to display. ® ASUS PIKE 1078 2-53...
- Page 68 2-54 Chapter 2: RAID configuration...
-
Page 69: Chapter 3: Driver Installation
This chapter provides instructions for installing the RAID drivers on different operating systems. Chapter 3: Driver installation... -
Page 70: Raid Driver Installation
Loading FreeDOS FAT KERNEL GO! Press any key to boot from CDROM... The Makedisk menu appears. Select LSI 1078 SAS Driver, and press <Enter> to enter the sub-menu. Create Driver Diskette Menu PIKE 1078 SAS Driver FreeDOS command prompt Chapter 3: Driver installation... - Page 71 SLES 9 SP2 32/64 bit SLES 9 SP3 32/64 bit SLES 10 32/64 bit Back Exit Place a blank, high-density floppy disk to the floppy disk drive. Press <Enter>. 10. Follow screen instructions to create the driver disk. ASUS PIKE 1078...
-
Page 72: Windows ® Os
3.1.2 Windows ® During Windows OS installation ® To install the RAID card driver when installing Windows ® OS installation CD. The Window Boot the computer using the Windows ® ® Setup starts. Press <F6> when the message “Press F6 if you need to install a third party SCSI or RAID driver...”... - Page 73 ENTER=Select F3=Exit The Windows Setup loads the RAID card drivers from the RAID driver disk. ® When next screen appears, press <Enter> to continue installation. Setup then proceeds with the OS installation. Follow screen instructions to continue. ASUS PIKE 1078...
- Page 74 After Windows OS installation ® To update the RAID card driver after installing Windows ® Right-click the My Computer icon on the desktop and select Properties from the menu. Click the Hardware tab on the top, then click the Device Manager button. Double-click the LSI Logic MegaRAID SAS PCI Express ROMB item.
- Page 75 Toggle Don’t search. I will choose the driver to install, then click Next to continue. Insert the RAID driver disk you created earlier to the floppy disk drive. Highlight LSI Logic MegaRAID SAS PCI Express ROMB, then click Have Disk. ASUS PIKE 1078...
- Page 76 Select from the drop-down menu and locate the driver. 10. Click Next to start updating the driver. 11. After completing driver update, click Finish to close the wizard. Chapter 3: Driver installation...
-
Page 77: Red Hat ® Enterprise Linux Os
Select fd0 using the <Tab> key when asked to select the driver disk source. Press <Tab> to move the cursor to OK, then press <Enter>. Driver Disk Source You have multiple devices which could serve as sources for a driver disk. Which would you like to use? scd0 Cancel ASUS PIKE 1078... - Page 78 Insert the Red Hat Enterprise RAID driver disk to the floppy disk drive, select ® OK, then press <Enter>. Insert Driver Disk Insert your driver disk into /dev/fd0 and press “OK” to continue. Back The drivers for the RAID card are installed to the system. When asked if you will load additional RAID controller drivers, select No, then press <Enter>.
-
Page 79: Suse Linux Enterprise Server Os
Press <F5>, then select Yes from the menu. Press <Enter>. Boot from Hard Disk Installation Installation--ACPI Disabled Installation--Local APIC Disabled Installation--Safe Settings Rescue System Memory Test Boot Options | File Help Language 1280 x 1024 Driver ASUS PIKE 1078 3-11... - Page 80 Insert the RAID driver disk to the floppy disk drive. Make sure that Installation from the Boot Options menu is selected, then press <Enter>. Boot from Hard Disk Installation Installation--ACPI Disabled Installation--Local APIC Disabled Installation--Safe Settings Rescue System Memory Test Boot Options | Help Language...