
Related Manuals for Haier QBJ1-130A58E


Summary of Contents for Haier QBJ1-130A58E
- Page 1 Solar Water Heater QBJ1-130A58E QBJ1-150A58E QBJ1-175A58E QBJ1-200A58E QBJ1-230A58E QBJ1-270A58E Please read this manual before usage Retain it for future reference Instruction for use...
-
Page 3: Table Of Contents
Content Technical data Features Appearance and parts Technical parameter Precautions Before use Notice Assembly Instruction The location Exterior and installation dimension Tank assembly Frame assembly Frame fastness Glass tube assembly Extraventricular plumbing instructions Indoor plumbing instructions Installation notice Pipelines thermal insulation notice The product with controller installation and using notice Using Instruction... -
Page 4: Technical Data
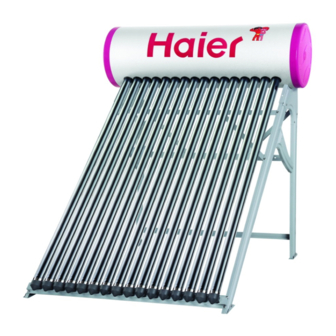
4. Frame: Steady structure, shapely and durable . Appearance and parts Outer shell Evacuated tubes Base support Technical parameter Models QBJ1-130A58E QBJ1-150A58E QBJ1-175A58E QBJ1-200A58E Specification of tubes 58mm 1800mm all glass evacuated tubular collector Collector frame angle standard fixed Number of tubes Aperture area 1.79m... -
Page 5: Precautions
Precautions Precautions When using the water heater with electric heating, ensure that electric heating and electric tracing belt are closed. 2. Avoiding irradiation without water after installation, it can't be used immediately, it should be sheltered. 3. When supplying water at the first time, it should be operated in the morning or evening or the condition of short of light;... -
Page 6: Before Use
Please take time to read this manual and familiarize yourself with the function of this production. 1. Please check out the packing list. 2.If you fix electric auxiliary heating and controller, please select Haier equipped products. 3. To avoid the scald, please mix the hot and the cold water before use it. -
Page 7: Assembly Instruction
L, L=H/tg(66.5 H:height of the hindrance; Notice: The solar water heater shall be installed by professional. Exterior and installation dimension: Exterior dimension(mm) Installation dimension(mm) Models QBJ1-130A58E QBJ1-150A58E QBJ1-175A58E QBJ1-200A58E QBJ1-230A58E QBJ1-270A58E Remarks: The permitted error limit of above parameters is : latitude of the area 10%. -
Page 8: Tank Assembly
Assembly Instruction ank assembly 1. Unpacking the tank, rip off the protection film. Uninstall the nut and cushion. 2. Place tank onto tank bracket cradle, inserting protruding bolts into holes. fasten with nuts. Notice: 1. Rip off the protection film after the installation to avoid the destroy of the tank, and please don't use the sharp tool. -
Page 9: Glass Tube Assembly
Assembly Instruction Glass tube assembly 1. Keep tubes out of the irradiation while assembling the unit or a scald may be caused. 2. Place the rounded side of rubber seal downwards on the open end of tubes.(A) 3. Insert the tube into base support of locating hole with gentle pressure and twisting motion. -
Page 10: Extraventricular Plumbing Instructions
Air supply pipe Electric heating pipe Air supply hole(1/2 ) Electric heating flange forbidden to stem Sensor hole 3/4 QBJ1-130A58E QBJ1-150A58E Remarks: The permitted error limit of above parameters is Indoor plumbing instructions Solar water heater Water level sensor Electric heating... -
Page 11: Installation Notice
6. The installation project should be confirmed by our professional service personnel when install several sets of these series. Other water heaters Tap water Illustration of connect the solar tank with other tanks Contact to the water tank... -
Page 12: Pipelines Thermal Insulation Notice
1.If you fix controller, please select Haier products, otherwise our company won't be responsible for personal injure and damage of water heater. 2.Haier has the controller used in domestic water heater, which has cord and plug, and they are connected well. Please select the electrical outlet of good quality, its rated current is not less than 16 A, and must ground reliably. -
Page 13: Using Instruction
Assembly Instruction 7.If the controller you choose has automatic water supply function, electromagnetic valve must be fixed in room horizontally; the direction of arrowhead labled on valve is the direction of water running out. Suggest fixing manual water supply side line, ensure that users can use water heater normally when the electromagnetic valve is damaged. -
Page 14: Troubles Treatment
Using Instruction Troubles treatment Possible reason Phenomenon The tank is empty No water supply The pipeline or the connection is impeded The controller The evacuated tubes have can't reach the damaged programmed The water supply is paused or low level or there is water pressure no water The pipeline or the connection is... - Page 16 Made in China Rev. 01 Specific Number 0040500680F...
- Page 17 Solar water heater controller HR-QBJ1-KSD Please read this manual before usage Retain it for future reference Instruction for use...
- Page 18 Content Safety Notice Product Instruction System components Working principle Main technical specification Function Instruction Control panel Main function Using Instruction Switch on/off the controller and parameters setting Main function operation Error display and handling Installation Instructions Installation notice Electric water heater, water temperature and level sensor installation Indoor pipe and electromagnetic valve installation notice...
-
Page 19: Safety Notice
Safety Notice Product Instruc Safety Notice 1.The product can't be watered directly 2.Containing 220V voltage, forbid user to open back cap 3.Live operation is forbidden when installing and maintaining 4.Forbid children under 10 years old to use alone 5.Stop electric heating before using hot water 6.If supply cord is damaged, in order to avoid risk, it must be replaced by factory or maintenance department or full-time staff. -
Page 20: Main Technical Specification
Function Instruction Main technical specification 1.Power supply: AC220V 10%. 50Hz 2.Power loss: Power loss < 5W 3.Temperature accuracy : 4.Temperature range: 0~99 5.Water supply grade: 5 grids 6.Electric heater power: 1500W 7.Controllable the length of self-limiting electricity heating belt:10 meters(power is 20W/mh) 8.Controllable the power of pump: 200W 9.Leaking current action: 10~15mA/0.1s... -
Page 21: Main Function
Function Instruction 5.Water supply: the sign shows that water is supplying. 6.Pressure sign: the sign shows that pump is working. 7.Water level : display water level with four grids. 8.Water temperature display: generally it shows the actual water temperature, when the number is flickering, it displays the set temperature of electric heating, and getting the set value, electric heating will automatically stop. -
Page 22: Using Instruction
Using Instruction 10.Anti-dry heating: when the water level in water tank doesn't reach the second level and user press key by mistake, the electric heating will not activate to protect the electric heater from damage. At this time, water supply will automatically activate to supply water until the water reaches the second level, then electric heater will be activated automatically. -
Page 23: Main Function Operation
Using Instruction and exit from the set mode. Continue to press adjustment. (2)Take turn press key to adjust pre-set temperature (adjusting range: 30~80 );water level (adjusting range:2~4 level); hour of clock, minutes of clock; hours and minutes of water supply time; choosing between antifreeze and pressure mode. - Page 24 Using Instruction (4)When water temperature is higher than 90 and there is no water in tank, in order to protect the tube from bombing due to the sudden cold, the system will forbid supplying water automatically ,even if user presses the key , it won't be activated.
- Page 25 Installation Instruction the pre-set value, electric heating will activate automatically until reaching the pre-set temperature. (2)If the water temperature lower than the set value and water level is lower than two level, electric heating will be activated automatically. (3)When displays, press key until the display dies out and time electric heating is cancelled.
-
Page 26: Error Display And Handling
Installation Instruction (2)When the system opens electromagnetic valve to supply water, pump will be activated automatically to pump water; when stopping supplying water, pump will be closed at the same time. 8.Timer (1)Key for choosing time mode , there are four modes: none in time mode, water supply in time mode, electric heating in time mode, both water supply and electric heating in time mode. -
Page 27: Installation Notice
Installation Instruction DisplayE4 Water level sensor is in short circuit Water level display 1.The surface of sensor is doesn't accord with dirty. the actual value 2.The sensor disabled. 1.The local hydraulic pressure is low. Water can't be 2.The electromagnetic supplied valve filter is blocked up. - Page 28 Installation Instruction follows the diagrammatic chart of electric heater. Connect electric heater's brown wire to the terminal of firing line, connect the blue wire to the nil line terminal. Connect yellow-green wire to the ground wire bolt using a special pincer of holding-down line.
-
Page 29: Indoor Pipe And Electromagnetic Valve Installation Notice
Installation Instruction Indoor pipe and electromagnetic valve installation notice 1.Refer to the corresponding installation chart, connect indoor pipeline. 2.Flush pipe before installing electromagnetic valve, clean the impurities. 3.There are back valves in the electromagnetic valve, the direction of the arrow labeled on the electromagnetic valve is the direction of inlet, wrong connection is not allowed. - Page 30 Installation Instruction electromagnetic valve arbitrarily; the sensor has four wires, blue one and red one are water level wires, they are joined to the two terminal of water level; the green one and yellow one are water temperature wires, they are joined to the two terminals of water temperature.
-
Page 31: Packing List
Packing list Packing list Name Size, specification Main engine HR-QBJ1-KSD Solenoid valve with 3 meters line Hanging board Holding-down clip Plastic expander tube Self-tapping screw ST 4 25 cross slot and round head Self-tapping screw ST2.9 6.5 cross slot and round head Self-tapping screw ST2.9 9.5 cross slot and flat head Self-tapping screw... - Page 32 Rev. 01 Specific Number 0040500680G...