Silvercrest SDRB 1000 A1 Operating Instructions Manual
Hide thumbs
Also See for SDRB 1000 A1:
- Operating instructions manual (65 pages) ,
- Operating instructions manual (62 pages) ,
- Operating instructions manual (26 pages)
Table of Contents
Advertisement
Available languages
Available languages
Quick Links
KOMPERNASS GMBH
Burgstraße 21
D-44867 Bochum
www.kompernass.com
Estado das informações · Last Information Update
Stand der Informationen:
07 / 2012 · Ident.-No.: SDRB1000A1052012-1
IAN 77154
ESCOVA A VAPOR SDRB 1000 A1
ESCOVA A VAPOR
Manual de instruções
DAMPFBÜRSTE
Bedienungsanleitung
IAN 77154
5
Antes de começar a ler abra na página com as imagens e, de seguida, familiarize-se com todas as
funções do aparelho.
Before reading, unfold the page containing the illustrations and familiarise yourself with all functions of
the device.
Klappen Sie vor dem Lesen die Seite mit den Abbildungen aus und machen Sie sich anschließend mit allen
Funktionen des Gerätes vertraut.
PT
STEAM BRUSH
GB
Operating instructions
DE / AT / CH
Manual de instruções
Operating instructions
Bedienungsanleitung
Página
1
Page
13
Seite
23
Advertisement
Chapters
Table of Contents

Related Manuals for Silvercrest SDRB 1000 A1


Summary of Contents for Silvercrest SDRB 1000 A1
- Page 1 Before reading, unfold the page containing the illustrations and familiarise yourself with all functions of the device. Klappen Sie vor dem Lesen die Seite mit den Abbildungen aus und machen Sie sich anschließend mit allen Funktionen des Gerätes vertraut. ESCOVA A VAPOR SDRB 1000 A1 Manual de instruções Página ESCOVA A VAPOR...
-
Page 3: Table Of Contents
Índice Página Introdução Utilização correcta Material fornecido Descrição do aparelho Dados técnicos Indicações de segurança Antes da primeira utilização Funcionamento Abastecimento de água ........................6 Colocação/remoção do aplique para escova................7 Função de escova a vapor......................7 Tratamento de vestuário ........................8 Tratamento de cortinas e estofos ....................8 Escova para borboto ........................8 Função de ferro ..........................9 Após a utilização da escova a vapor....................9... -
Page 4: Introdução
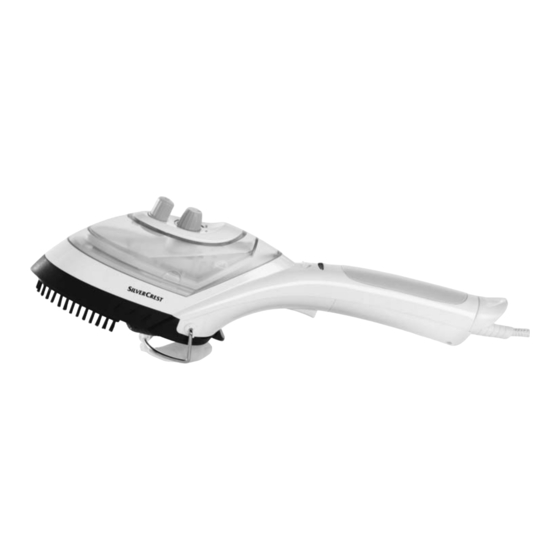
ESCOVA A VAPOR Descrição do aparelho Figura A: Introdução 1 Depósito de água 2 Entrada de abastecimento Parabéns pela compra do seu aparelho novo. 3 Regulador da temperatura Decidiu-se, assim, por um produto de elevada quali- 4 Botão de desbloqueio do depósito de água 5 Luz de controlo de aquecimento dade. -
Page 5: Indicações De Segurança
Indicações de segurança Perigo de queimaduras! •Segure o aparelho apenas pela pega, caso este esteja quente. •As crianças devem ser supervisionadas, de modo a garan- tir que não brincam com o aparelho. •Nunca coloque as suas mãos no jacto de vapor ou nas peças metálicas quentes. - Page 6 Perigo de incêndio! Perigo de ferimentos! •Nunca deixe a escova a vapor sem vigilância, enquanto esta estiver quente, em funcionamento ou ligada à corrente. •Armazene o aparelho apenas quando este estiver total- mente frio. •Coloque o aparelho apenas com o suporte aberto sobre uma superfície plana e resistente ao calor.
- Page 7 •Nunca entre em contacto com o cabo ou a ficha de rede com as mãos húmidas. •Nunca mergulhe o aparelho em líquidos e evite a entrada de líquidos na estrutura do aparelho. Não deve expor o aparelho a qualquer humidade nem utilizá-lo ao ar livre. No entanto, caso algum líquido se infiltre alguma vez na estrutura do aparelho, deve retirar imediatamente da to- mada a ficha de alimentação do aparelho e este deve ser...
-
Page 8: Antes Da Primeira Utilização
Atenção! • Engome um pedaço de tecido do qual já não • Caso nas indicações de tratamento não se reco- necessite para eliminar eventuais impurezas do mende que engome o vestuário (símbolo fundo do ferro 0. não deve utilizar a escova a vapor na peça de Nota: vestuário. -
Page 9: Colocação/Remoção Do Aplique Para Escova
• Coloque o depósito de água 1 novamente no Para prolongar a função de vaporização, misture aparelho. O depósito de água 1 tem de encaixar a água canalizada com água destilada, de acordo no botão de desbloqueio do depósito de água com a tabela. -
Page 10: Tratamento De Vestuário
Nota: Nota: Prima o botão de vaporização 8 consecutiva- Para a função de vapor ajuste o regulador da tem- peratura 3, no mínimo, para •••. mente até que a luz de controlo de aquecimento 5 Em níveis mais baixos, a temperatura não é suficien- acenda ou saiam gotas de água pela base do ferro 0. -
Page 11: Função De Ferro
• Pode limpar a escova para borboto e, escovando • Caso a luz de controlo de aquecimento 5 se no sentido contrário (da direita para a esquerda), acenda durante o funcionamento, solte o botão por exemplo sobre restos de tecido. de vaporização 8 e aguarde uns momentos, até... -
Page 12: Limpeza E Conservação
Limpeza e conservação Resolução de avarias Perigo de ferimentos! Jacto de vapor reduzido ou inexistente: Antes da limpeza, retire a ficha de rede 7. A reserva de água da escova a vapor foi esgota- Existe perigo de choque eléctrico! Deixe o aparelho da. -
Page 13: Garantia & Assistência Técnica
Garantia & Assistência Técnica Importador Este aparelho tem 3 anos de garantia a partir da KOMPERNASS GMBH data de compra. Este aparelho foi fabricado com o BURGSTRASSE 21 máximo cuidado e escrupulosamente testado antes 44867 BOCHUM, GERMANY da sua distribuição. Guarde o talão de compra como comprovativo da compra. - Page 14 - 12 -...
- Page 15 CONTENT PAGE Introduction Intended Use Items supplied Description of the appliance Technical data Safety instructions Before the First Usage Operation Filling with water ..........................18 Attaching/detaching the brush attachment .................19 Steam brush function ........................19 Clothing care..........................20 Curtain and soft furnishing care ....................20 Fluff brush ............................20 Ironing function..........................20 After using the steam brush......................21...
-
Page 16: Introduction
STEAM BRUSH Description of the appliance Figure A: Introduction 1 Water tank 2 Water fill opening Congratulations on the purchase of your new appli- 3 Temperature regulator ance. 4 Unlocking device for the water tank 5 Heating-up control lamp You have clearly decided in favour of a quality product. -
Page 17: Safety Instructions
Safety instructions Risk of Burns! •When the appliance is hot, grasp it only by the handle. •Children should be supervised to ensure that they do not play with the appliance. •Never hold your hand over the steam spray or on hot me- tal parts. - Page 18 Risk of fire! Risk of Injury! •Never leave unattended a steam brush that is hot, switched on or connected to the mains power supply. •Put the appliance into storage only when it has cooled down. •Place the appliance on level and heat resistant surfaces only with the stand folded out.
- Page 19 •After every usage, before cleaning the appliance and when refilling with water, remove the plug from the mains power socket. •Never touch the power cable or the power plug with wet hands. •Under no circumstances may the appliance be submersed in fluids or fluids be allowed to permeate the housing.
-
Page 20: Before The First Usage
Attention! • Then iron a redundant piece of material, this will • Should the care instructions in the clothing item remove any impurites that may possibly be on forbid ironing (Symbol ), you may not use the the sole of the iron 0. steam brush on it. -
Page 21: Attaching/Detaching The Brush Attachment
Attaching/detaching the brush To extend the optimal steam blast function, mix mains attachment water with distilled water according to the table. Attention! Ratios - distilled Water hardness water to mains NEVER attempt to attach or detach the brush attach- water ment w when the appliance is heated up. -
Page 22: Clothing Care
Note: Curtain and soft furnishing care To release the first steam blast after heating the appli- • Creases and wrinkles can be removed from ance up, it can happen that you may need to press draperies by hanging them over a pole. the steam blast button 8 several times in succession. -
Page 23: After Using The Steam Brush
Note: • Pour away any water remaining in the water tank 1 to do this, open, the water fill opening If doubt exists, start with a low temperature and gradually increase it to a higher one. With sensitive 2 of the water tank 1, turn the appliance upsi- materials we recommend carrying out an ironing de down and lightly swivel it. -
Page 24: Troubleshooting
Troubleshooting The warranty covers only claims for material and manufacturing defects, but not for transport dama- ge, for wearing parts or for damage to fragile com- The steam brush ejects no or very little steam: ponents, e.g. buttons or batteries. This product is for The supply of water in the steam brush is exhausted. - Page 25 INHALTSVERZEICHNIS SEITE Einleitung Bestimmungsgemäßer Gebrauch Lieferumfang Gerätebeschreibung Technische Daten Sicherheitshinweise Vor dem ersten Gebrauch Bedienen Wasser einfüllen..........................28 Bürstenaufsatz aufsetzen/abnehmen...................29 Dampfbürstenfunktion ........................29 Kleiderpflege ..........................30 Gardinen- und Polsterpflege ......................30 Fusselbürste.............................30 Bügelfunktion ..........................30 Nach dem Gebrauch der Dampfbürste ..................31 Reinigen und Pflegen Entkalken ............................32 Aufbewahren Fehlfunktionen beseitigen Entsorgen...
-
Page 26: Einleitung
DAMPFBÜRSTE Gerätebeschreibung Abbildung A: Einleitung 1 Wassertank 2 Einfüllöffnung Herzlichen Glückwunsch zum Kauf Ihres neuen 3 Temperaturregler Gerätes. 4 Entriegelung für den Wassertank 5 Aufheizkontrollleuchte Sie haben sich damit für ein hochwertiges Produkt entschieden. Die Bedienungsanleitung ist Bestand- 6 Aufhängeöse teil dieses Produkts. -
Page 27: Sicherheitshinweise
Sicherheitshinweise Verbrennungsgefahr! •Fassen Sie das Gerät nur am Griff an, wenn es heiß ist. •Kinder sollten beaufsichtigt werden, um sicherzustellen, dass sie nicht mit dem Gerät spielen. •Halten Sie niemals Ihre Hände in den Dampfstoß oder an heiße Metallteile. •Sie dürfen die Einfüllöffnung für den Wassertank während des Gebrauchs nicht öffnen. - Page 28 Brandgefahr! Verletzungsgefahr! •Lassen Sie die heiße, am Stromnetz angeschlossene oder eingeschaltete Dampfbürste niemals unbeaufsichtigt. •Verstauen Sie das Gerät nur in abgekühltem Zustand. •Legen Sie das Gerät nur mit ausgeklapptem Ständer auf ei- nen ebenen und hitzeunempfindlichen Untergrund. Das Gerät muss stabil stehen, wenn es abgestellt wird. •Bügeln Sie nur mit den auf den Pflegehinweisen angegebe- nen und für das Material geeigneten Temperatureinstellun- gen.
- Page 29 •Fassen Sie das Kabel oder den Netzstecker niemals mit feuchten Händen an. •Sie dürfen das Gerät keinesfalls in eine Flüssigkeit tauchen und keine Flüssigkeiten in das Gerätegehäuse gelangen lassen. Sie dürfen das Gerät keiner Feuchtigkeit aussetzen und nicht im Freien benutzen. Falls doch einmal Flüssigkeit in das Gerätegehäuse gelangt, ziehen Sie sofort den Netz- stecker des Geräts aus der Netzsteckdose und lassen Sie es von qualifiziertem Fachpersonal reparieren.
-
Page 30: Vor Dem Ersten Gebrauch
Achtung! • Bügeln Sie dann ein nicht mehr benötigtes Stück • Falls die Pflegehinweise in der Kleidung das Stoff, um eventuelle Unreinheiten von der Bügeln untersagen (Symbol ), dürfen Sie das Bügelsohle 0 zu beseitigen. Kleidungsstück nicht mit der Dampfbürste behan- Hinweis: deln. -
Page 31: Bürstenaufsatz Aufsetzen/Abnehmen
Zur Verlängerung der optimalen Dampfstoß- • Setzen Sie den Wassertank 1 wieder auf das Gerät. Der Wassertank 1 muss hörbar an der Funktion mischen Sie das Leitungswasser mit destil- liertem Wasser entsprechend der Tabelle. Entriegelung für den Wassertank 4 einrasten. Anteil destillier- Bürstenaufsatz aufsetzen/abnehmen Wasserhärte... -
Page 32: Kleiderpflege
• Durch Drücken der Dampfstoßtaste 8, können • Leuchtet die Aufheizkontrollleuchte 5 während Sie nun einen Dampfstoß erzeugen. des Betriebes auf, drücken Sie nicht nocheinmal die Dampfstoßtaste 8. Warten Sie einige Au- Hinweis: genblicke, bis die Aufheizkontrollleuchte 5 wie- der erlischt, bevor Sie die Dampfstoßtaste 8 er- Um den ersten Dampfstoß... -
Page 33: Nach Dem Gebrauch Der Dampfbürste
Hinweis: • Stellen Sie den Temperaturregler 3 nach den Wenn Sie die Dampfstoßtaste 8 drücken, während internationalen Punktsymbolen (Wäscheetikett) oder nach Gewebeart ein. Die Aufheizkontroll- die Aufheizkontrollleuchte 5 leuchtet, entsteht Kon- leuchte 5 leuchtet. Sobald die eingestellte Tem- denswasser anstatt Dampf und Wasser tropft aus der Bügelsohle 0. -
Page 34: Entkalken
Entsorgen • Reinigen Sie die Metallteile mit einem leicht mit Wasser befeuchtetem Tuch und einem milden, nicht scheuerndem Reinigungsmittel. Werfen Sie das Gerät keinesfalls in den normalen Hausmüll. Dieses Produkt Entkalken unterliegt der europäischen Richtlinie Sollte die Dampfleistung nach einiger Zeit nachlas- 2002/96/EC. -
Page 35: Importeur
Die Garantiezeit wird durch die Gewährleistung nicht verlängert. Dies gilt auch für ersetzte und repa- rierte Teile. Eventuell schon beim Kauf vorhandene Schäden und Mängel müssen sofort nach dem Auspacken gemeldet werden, spätestens aber zwei Tage nach Kaufdatum. Nach Ablauf der Garantie- zeit anfallende Reparaturen sind kostenpflichtig.